本教程是一个教程系列中的第三部分。 了解如何在 Azure Service Fabric 中运行的 ASP.NET Core 服务中添加 HTTPS 终结点。 完成后,你将获得一个投票应用程序,该应用程序具有已启用 HTTPS 的 ASP.NET Core Web 前端,可侦听端口 443。 如果不想在教程系列的第一部分中手动创建投票应用程序,可以下载源代码以获取已完成的应用程序。
本教程介绍如何执行下列操作:
- 在服务中定义一个 HTTPS 终结点
- 设置 Kestrel 以使用 HTTPS
- 在远程群集节点上安装 TLS/SSL 证书
- 授予 NetworkService 访问证书私钥的权限
- 在 Azure 负载均衡器中打开端口 443
- 将应用程序部署到远程群集
本教程系列介绍如何:
- 构建 .NET Service Fabric 应用程序
- 将应用程序部署到远程群集
- 向 ASP.NET Core 前端服务添加 HTTPS 终结点(本教程)
- 使用 Azure Pipelines 配置 CI/CD
- 设置监视和诊断应用程序
注意
建议使用 Azure Az PowerShell 模块与 Azure 交互。 若要开始,请参阅安装 Azure PowerShell。 若要了解如何迁移到 Az PowerShell 模块,请参阅 将 Azure PowerShell 从 AzureRM 迁移到 Az。
先决条件
在开始学习本教程之前:
- 如果没有 Azure 订阅,请创建一个试用版版订阅。
- 安装 Visual Studio 2019 版本 16.5 或更高版本,包括 Azure 开发工作负载以及 ASP.NET 和 Web 开发工作负载。
- 安装 Service Fabric SDK。
获取证书或创建自签名开发证书
对于生产应用程序,请使用来自证书颁发机构 (CA) 的证书
。 出于开发和测试目的,可以创建并使用自签名证书。 Service Fabric SDK 包含 CertSetup.ps1 脚本。 该脚本创建一个自签名证书并将其导入到 Cert:\LocalMachine\My 证书存储中。 以管理员身份打开命令提示符窗口并运行以下命令来创建使用者为“CN=mytestcert”的证书:
PS C:\program files\microsoft sdks\service fabric\clustersetup\secure> .\CertSetup.ps1 -Install -CertSubjectName CN=mytestcert
如果你已证书个人信息交换 (PFX) 文件,请运行以下命令以将证书导入 Cert:\LocalMachine\My 证书存储中:
PS C:\mycertificates> Import-PfxCertificate -FilePath .\mysslcertificate.pfx -CertStoreLocation Cert:\LocalMachine\My -Password (ConvertTo-SecureString "!Passw0rd321" -AsPlainText -Force)

   PSParentPath: Microsoft.PowerShell.Security\Certificate::LocalMachine\My

Thumbprint                                Subject
----------                                -------
3B138D84C077C292579BA35E4410634E164075CD  CN=zwin7fh14scd.chinanorth3.cloudapp.chinacloudapi.cn
在服务清单中定义一个 HTTPS 终结点
使用“以管理员身份运行”选项打开 Visual Studio,然后打开投票解决方案。 在解决方案资源管理器中,打开 VotingWeb/PackageRoot/ServiceManifest.xml。 服务清单定义服务终结点。 找到 Endpoints 部分并编辑 ServiceEndpoint 终结点的值。 将名称更改为 EndpointHttps,将协议设置为 https,将类型设置为 Input,将端口设置为 443。 保存所做更改。
<?xml version="1.0" encoding="utf-8"?>
<ServiceManifest Name="VotingWebPkg"
                 Version="1.0.0"
                 xmlns="http://schemas.microsoft.com/2011/01/fabric"
                 xmlns:xsd="https://www.w3.org/2001/XMLSchema"
                 xmlns:xsi="https://www.w3.org/2001/XMLSchema-instance">
  <ServiceTypes>
    <StatelessServiceType ServiceTypeName="VotingWebType" />
  </ServiceTypes>

  <CodePackage Name="Code" Version="1.0.0">
    <EntryPoint>
      <ExeHost>
        <Program>VotingWeb.exe</Program>
        <WorkingFolder>CodePackage</WorkingFolder>
      </ExeHost>
    </EntryPoint>
  </CodePackage>

  <ConfigPackage Name="Config" Version="1.0.0" />

  <Resources>
    <Endpoints>
      <Endpoint Protocol="https" Name="EndpointHttps" Type="Input" Port="443" />
    </Endpoints>
  </Resources>
</ServiceManifest>
将 Kestrel 配置为使用 HTTPS
在“解决方案资源管理器”中,打开 VotingWeb/VotingWeb.cs 文件。 配置 Kestrel,以使用 HTTPS 并在 Cert:\LocalMachine\My 存储中查找证书。 添加以下 using 语句:
using System.Net;
using Microsoft.Extensions.Configuration;
using System.Security.Cryptography.X509Certificates;
更新 ServiceInstanceListener 的值以使用新的 EndpointHttps 终结点并侦听端口 443。 将 Web 主机设置为使用 Kestrel 服务器时,必须配置 Kestrel 以在所有网络接口上侦听 IPv6 地址:opt.Listen(IPAddress.IPv6Any, port, listenOptions => {...}。
new ServiceInstanceListener(
serviceContext =>
    new KestrelCommunicationListener(
        serviceContext,
        "EndpointHttps",
        (url, listener) =>
        {
            ServiceEventSource.Current.ServiceMessage(serviceContext, $"Starting Kestrel on {url}");

            return new WebHostBuilder()
                .UseKestrel(opt =>
                {
                    int port = serviceContext.CodePackageActivationContext.GetEndpoint("EndpointHttps").Port;
                    opt.Listen(IPAddress.IPv6Any, port, listenOptions =>
                    {
                        listenOptions.UseHttps(FindMatchingCertificateBySubject());
                        listenOptions.NoDelay = true;
                    });
                })
                .ConfigureAppConfiguration((builderContext, config) =>
                {
                    config.AddJsonFile("appsettings.json", optional: false, reloadOnChange: true);
                })

                .ConfigureServices(
                    services => services
                        .AddSingleton<HttpClient>(new HttpClient())
                        .AddSingleton<FabricClient>(new FabricClient())
                        .AddSingleton<StatelessServiceContext>(serviceContext))
                .UseContentRoot(Directory.GetCurrentDirectory())
                .UseStartup<Startup>()
                .UseServiceFabricIntegration(listener, ServiceFabricIntegrationOptions.None)
                .UseUrls(url)
                .Build();
        }))
接下来添加以下方法,以便 Kestrel 可以使用使用者在 Cert:\LocalMachine\My 存储中查找证书。
如果使用前面的 PowerShell 命令创建了自签名证书,请将 <your_CN_value> 替换为 mytestcert,或者使用证书的 CN。
如果使用 localhost 的本地部署,我们建议使用 CN=localhost 以避免身份验证异常。
private X509Certificate2 FindMatchingCertificateBySubject(string subjectCommonName)
{
    using (var store = new X509Store(StoreName.My, StoreLocation.LocalMachine))
    {
        store.Open(OpenFlags.OpenExistingOnly | OpenFlags.ReadOnly);
        var certCollection = store.Certificates;
        var matchingCerts = new X509Certificate2Collection();

    foreach (var enumeratedCert in certCollection)
    {
      if (StringComparer.OrdinalIgnoreCase.Equals(subjectCommonName, enumeratedCert.GetNameInfo(X509NameType.SimpleName, forIssuer: false))
        && DateTime.Now < enumeratedCert.NotAfter
        && DateTime.Now >= enumeratedCert.NotBefore)
        {
          matchingCerts.Add(enumeratedCert);
        }
    }

        if (matchingCerts.Count == 0)
    {
        throw new Exception($"Could not find a match for a certificate with subject 'CN={subjectCommonName}'.");
    }

        return matchingCerts[0];
    }
}
授予网络服务访问证书私钥的权限
在之前的步骤中,你已将证书导入到开发计算机上的 Cert:\LocalMachine\My 存储中。
现在,显式允许运行服务(默认为 NETWORK SERVICE)的帐户访问证书的私钥。 可以手动执行此步骤(使用 certlm.msc 工具),但最好是在服务清单的 中SetupEntryPoint以运行 PowerShell 脚本。
注意
Service Fabric 支持按指纹或使用者公用名声明终结点证书。 在这种情况下,运行时会设置绑定,并根据作为服务运行身份的标识设置证书私钥的分配。 运行时还会监视证书的更改、续订以及相应私钥的分配更新。
配置服务安装程序入口点
在解决方案资源管理器中,打开 VotingWeb/PackageRoot/ServiceManifest.xml。 在 CodePackage 部分,依次添加 SetupEntryPoint 节点和 ExeHost 节点。 在 ExeHost 中,将 Program 设置为 Setup.bat,将 WorkingFolder 设置为 CodePackage。 当 VotingWeb 服务启动时,先是 Setup.bat 脚本在 CodePackage 文件夹中执行,然后 VotingWeb.exe 才会启动。
<?xml version="1.0" encoding="utf-8"?>
<ServiceManifest Name="VotingWebPkg"
                 Version="1.0.0"
                 xmlns="http://schemas.microsoft.com/2011/01/fabric"
                 xmlns:xsd="https://www.w3.org/2001/XMLSchema"
                 xmlns:xsi="https://www.w3.org/2001/XMLSchema-instance">
  <ServiceTypes>
    <StatelessServiceType ServiceTypeName="VotingWebType" />
  </ServiceTypes>

  <CodePackage Name="Code" Version="1.0.0">
    <SetupEntryPoint>
      <ExeHost>
        <Program>Setup.bat</Program>
        <WorkingFolder>CodePackage</WorkingFolder>
      </ExeHost>
    </SetupEntryPoint>

    <EntryPoint>
      <ExeHost>
        <Program>VotingWeb.exe</Program>
        <WorkingFolder>CodePackage</WorkingFolder>
      </ExeHost>
    </EntryPoint>
  </CodePackage>

  <ConfigPackage Name="Config" Version="1.0.0" />

  <Resources>
    <Endpoints>
      <Endpoint Protocol="https" Name="EndpointHttps" Type="Input" Port="443" />
    </Endpoints>
  </Resources>
</ServiceManifest>
添加批处理和 PowerShell 设置脚本
若要从 SetupEntryPoint 的值运行 PowerShell,可以在指向 PowerShell 文件的批处理文件中运行 PowerShell.exe。
首先,添加服务项目的批处理文件。 在“解决方案资源管理器”中,右键单击“VotingWeb”,然后选择“添加”>“新建项”。 添加名为 Setup.bat 的新文件。 编辑 Setup.bat 文件,添加以下命令:
powershell.exe -ExecutionPolicy Bypass -Command ".\SetCertAccess.ps1"
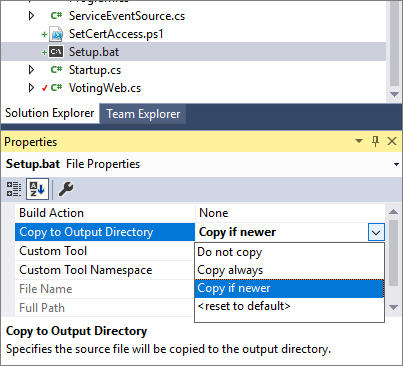
修改 Setup.bat 文件的属性,将“复制到输出目录”设置为“如果较新则复制”。
在解决方案资源管理器中,右键单击“VotingWeb”。 然后选择“添加”“新建项”,并添加名为 SetCertAccess.ps1 的新文件>。 编辑 SetCertAccess.ps1 文件以添加以下脚本:
$subject="mytestcert"
$userGroup="Network Service"

Write-Host "Checking permissions to certificate $subject.." -ForegroundColor DarkCyan

$cert = (gci Cert:\LocalMachine\My\ | where { $_.Subject.Contains($subject) })[-1]

if ($cert -eq $null)
{
    $message="Certificate with subject:"+$subject+" does not exist at Cert:\LocalMachine\My\"
    Write-Host $message -ForegroundColor Red
    exit 1;
}elseif($cert.HasPrivateKey -eq $false){
    $message="Certificate with subject:"+$subject+" does not have a private key"
    Write-Host $message -ForegroundColor Red
    exit 1;
}else
{
    $keyName=$cert.PrivateKey.CspKeyContainerInfo.UniqueKeyContainerName

    $keyPath = "C:\ProgramData\Microsoft\Crypto\RSA\MachineKeys\"

    if ($keyName -eq $null){
      $privateKey = [System.Security.Cryptography.X509Certificates.RSACertificateExtensions]::GetRSAPrivateKey($cert)
      $keyName = $privateKey.Key.UniqueName
      $keyPath = "C:\ProgramData\Microsoft\Crypto\Keys"
    }

    $fullPath=$keyPath+$keyName
    $acl=(Get-Item $fullPath).GetAccessControl('Access')

    $hasPermissionsAlready = ($acl.Access | where {$_.IdentityReference.Value.Contains($userGroup.ToUpperInvariant()) -and $_.FileSystemRights -eq [System.Security.AccessControl.FileSystemRights]::FullControl}).Count -eq 1

    if ($hasPermissionsAlready){
        Write-Host "Account $userGroup already has permissions to certificate '$subject'." -ForegroundColor Green
        return $false;
    } else {
        Write-Host "Need add permissions to '$subject' certificate..." -ForegroundColor DarkYellow

        $permission=$userGroup,"Full","Allow"
        $accessRule=new-object System.Security.AccessControl.FileSystemAccessRule $permission
        $acl.AddAccessRule($accessRule)
        Set-Acl $fullPath $acl

        Write-Output "Permissions were added"

        return $true;
    }
}
修改 SetCertAccess.ps1 文件的属性,将“复制到输出目录”设置为“如果较新则复制”。
以管理员身份运行设置脚本
默认情况下,服务设置入口点可执行文件运行时使用的凭据与 Service Fabric (通常为 NetworkService 帐户)使用的相同。 SetCertAccess.ps1 需要管理员权限。 在应用程序清单中,可以将安全权限更改为在本地管理员帐户下运行启动脚本。
在“解决方案资源管理器”中,打开 Voting/ApplicationPackageRoot/ApplicationManifest.xml。 首先,创建 Principals 部分并添加一个新用户(例如 SetupAdminUser)。 向 Administrators 系统组添加 SetupAdminUser 用户帐户。
接下来,在 VotingWebPkg 的 ServiceManifestImport 部分,配置 RunAsPolicy 以将 SetupAdminUser 主体应用于设置入口点。 此策略告知 Service Fabric,Setup.bat 文件以 SetupAdminUser 身份(具有管理员权限)运行。
<?xml version="1.0" encoding="utf-8"?>
<ApplicationManifest xmlns:xsd="https://www.w3.org/2001/XMLSchema" xmlns:xsi="https://www.w3.org/2001/XMLSchema-instance" ApplicationTypeName="VotingType" ApplicationTypeVersion="1.0.0" xmlns="http://schemas.microsoft.com/2011/01/fabric">
  <Parameters>
    <Parameter Name="VotingData_MinReplicaSetSize" DefaultValue="3" />
    <Parameter Name="VotingData_PartitionCount" DefaultValue="1" />
    <Parameter Name="VotingData_TargetReplicaSetSize" DefaultValue="3" />
    <Parameter Name="VotingWeb_InstanceCount" DefaultValue="-1" />
  </Parameters>
  <ServiceManifestImport>
    <ServiceManifestRef ServiceManifestName="VotingDataPkg" ServiceManifestVersion="1.0.0" />
    <ConfigOverrides />
  </ServiceManifestImport>
  <ServiceManifestImport>
    <ServiceManifestRef ServiceManifestName="VotingWebPkg" ServiceManifestVersion="1.0.0" />
    <ConfigOverrides />
    <Policies>
      <RunAsPolicy CodePackageRef="Code" UserRef="SetupAdminUser" EntryPointType="Setup" />
    </Policies>
  </ServiceManifestImport>
  <DefaultServices>
    <Service Name="VotingData">
      <StatefulService ServiceTypeName="VotingDataType" TargetReplicaSetSize="[VotingData_TargetReplicaSetSize]" MinReplicaSetSize="[VotingData_MinReplicaSetSize]">
        <UniformInt64Partition PartitionCount="[VotingData_PartitionCount]" LowKey="0" HighKey="25" />
      </StatefulService>
    </Service>
    <Service Name="VotingWeb" ServicePackageActivationMode="ExclusiveProcess">
      <StatelessService ServiceTypeName="VotingWebType" InstanceCount="[VotingWeb_InstanceCount]">
        <SingletonPartition />
      </StatelessService>
    </Service>
  </DefaultServices>
  <Principals>
    <Users>
      <User Name="SetupAdminUser">
        <MemberOf>
          <SystemGroup Name="Administrators" />
        </MemberOf>
      </User>
    </Users>
  </Principals>
</ApplicationManifest>
在本地运行应用程序
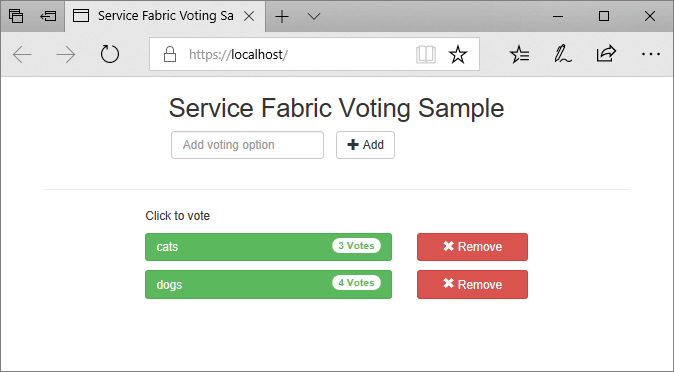
在“解决方案资源管理器”中,选择“Voting”应用程序并将“应用程序 URL”属性设置为 https://localhost:443。
保存所有文件并按 F5,以便在本地运行应用程序。 在应用程序部署完以后,浏览器会打开到 https://localhost:443。 如果使用自签名证书,则会看到一个警告,指出电脑不信任此网站的安全性。 继续访问网页。
在群集节点上安装证书
在将应用程序部署到 Azure 之前,请在所有远程群集节点的 Cert:\LocalMachine\My 存储中安装证书。 服务可以移到群集的不同节点。 当前端 Web 服务在群集节点上启动时,启动脚本会查找证书并配置访问权限。
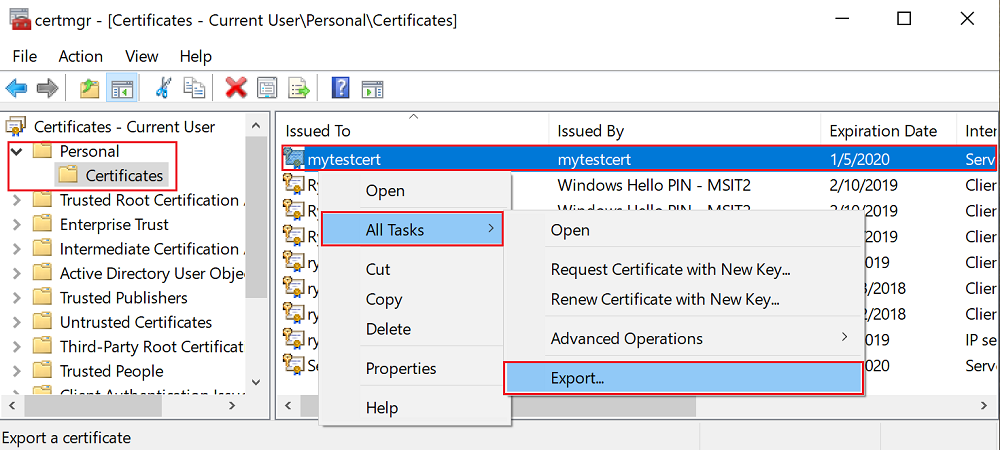
若要在群集节点上安装证书,首先请将证书导出为 PFX 文件。 打开“certlm.msc”应用程序文件并转到“个人”“证书”>。 右键单击“mytestcert”证书,然后选择“所有任务”>“导出”。
在导出向导中,选择“是,导出私钥”,然后选择 PFX 格式。 将文件导出到 C:\Users\sfuser\votingappcert.pfx。
接下来,使用 PowerShell 脚本在远程群集上安装证书。
警告
对于开发和测试应用程序,自签名证书已足够。 对于生产应用程序,请使用来自证书颁发机构 (CA) 的证书
而不是使用自签名证书。
在 Azure 负载均衡器和虚拟网络中打开端口 443
在负载均衡器中打开端口 443(如果尚未打开):
$probename = "AppPortProbe6"
$rulename="AppPortLBRule6"
$RGname="voting_RG"
$port=443

# Get the load balancer resource
$resource = Get-AzResource | Where {$_.ResourceGroupName -eq $RGname -and $_.ResourceType -eq "Microsoft.Network/loadBalancers"}
$slb = Get-AzLoadBalancer -Name $resource.Name -ResourceGroupName $RGname

# Add a new probe configuration to the load balancer
$slb | Add-AzLoadBalancerProbeConfig -Name $probename -Protocol Tcp -Port $port -IntervalInSeconds 15 -ProbeCount 2

# Add rule configuration to the load balancer
$probe = Get-AzLoadBalancerProbeConfig -Name $probename -LoadBalancer $slb
$slb | Add-AzLoadBalancerRuleConfig -Name $rulename -BackendAddressPool $slb.BackendAddressPools[0] -FrontendIpConfiguration $slb.FrontendIpConfigurations[0] -Probe $probe -Protocol Tcp -FrontendPort $port -BackendPort $port

# Set the goal state for the load balancer
$slb | Set-AzLoadBalancer
对关联的虚拟网络执行相同的操作:
$rulename="allowAppPort$port"
$nsgname="voting-vnet-security"
$RGname="voting_RG"
$port=443

# Get the network security group resource
$nsg = Get-AzNetworkSecurityGroup -Name $nsgname -ResourceGroupName $RGname

# Add the inbound security rule.
$nsg | Add-AzNetworkSecurityRuleConfig -Name $rulename -Description "Allow app port" -Access Allow `
    -Protocol * -Direction Inbound -Priority 3891 -SourceAddressPrefix "*" -SourcePortRange * `
    -DestinationAddressPrefix * -DestinationPortRange $port

# Update the network security group
$nsg | Set-AzNetworkSecurityGroup
将应用程序部署到 Azure
保存所有文件,从“调试”切换到“发布”,然后按 F6 进行重新生成。 在“解决方案资源管理器”中,右键单击“Voting”并选择“发布”。 选择在将应用程序部署到群集中创建的群集的连接终结点,或者选择另一群集。 选择“发布”,将应用程序发布到远程群集。
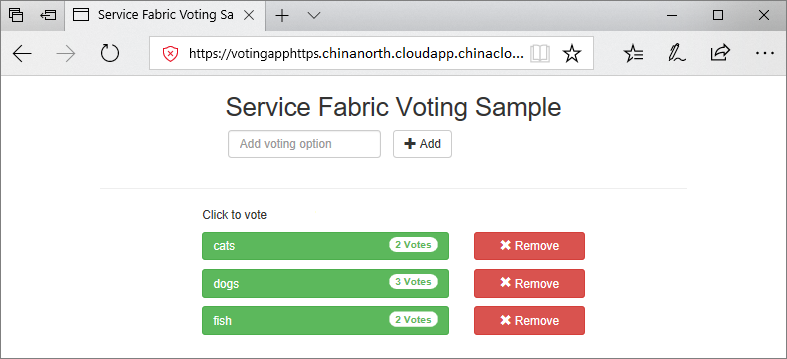
在应用程序部署后,打开 Web 浏览器并转到 https://mycluster.region.cloudapp.chinacloudapi.cn:443(使用群集的连接终结点更新 URL)。 如果使用自签名证书,则会看到一个警告,指出电脑不信任此网站的安全性。 继续访问网页。
下一步
转到下一教程: