在 Service Fabric 群集上运行 Linux 容器中的现有应用程序不需要对应用程序进行任何更改。 本文逐步讲解如何创建包含 Python Flask Web 应用程序的 Docker 映像并将其部署到 Service Fabric 群集。 此外,将通过 Azure 容器注册表共享容器化的应用程序。 本文假定读者对 Docker 有一个基本的了解。 阅读 Docker Overview(Docker 概述)即可了解 Docker。
注意
本文适用于 Linux 开发环境。 Service Fabric 群集运行时和 Docker 运行时必须在同一 OS 上运行。 不能在 Windows 群集上运行 Linux 容器。
必备条件
一台运行以下软件的开发计算机:
包含三个或多个节点的 Linux 群集。
一个位于 Azure 容器注册表中的注册表 - 在 Azure 订阅中创建容器注册表。
定义 Docker 容器
基于 Docker 中心内的 Python 映像生成一个映像。
在 Dockerfile 中指定 Docker 容器。 Dockerfile 包含有关在容器中设置环境、加载要运行的应用程序以及映射端口的说明。 Dockerfile 是 docker build 命令的输入,该命令用于创建映像。
创建一个空目录并创建文件 Dockerfile(不带文件扩展名)。 将以下内容添加到 Dockerfile 并保存所做的更改:
# Use an official Python runtime as a base image
FROM python:2.7-slim

# Set the working directory to /app
WORKDIR /app

# Copy the current directory contents into the container at /app
ADD . /app

# Install any needed packages specified in requirements.txt
RUN pip install -r requirements.txt

# Make port 80 available outside this container
EXPOSE 80

# Define environment variable
ENV NAME World

# Run app.py when the container launches
CMD ["python", "app.py"]
请阅读 Dockerfile reference 以获取更多信息。
创建基本 Web 应用程序
创建一个侦听端口 80 并返回“Hello World!”的 Flask Web 应用程序。 在同一个目录中,创建文件 requirements.txt。 添加以下内容并保存所做的更改:
Flask
此外,创建 app.py 文件并添加以下代码片段:
from flask import Flask

app = Flask(__name__)

@app.route("/")
def hello():

    return 'Hello World!'

if __name__ == "__main__":
    app.run(host='0.0.0.0', port=80)
登录到 Docker 并生成映像
接下来,我们将创建运行你的 Web 应用程序的映像。 从 Docker(如 Dockerfile 中的 python:2.7-slim)拉取公共映像时,最佳做法是使用 Docker Hub 帐户进行身份验证,而不是发出匿名拉取请求。
注意
频繁发出匿名拉取请求时,你可能会看到 Docker 错误,类似于 ERROR: toomanyrequests: Too Many Requests. 或 You have reached your pull rate limit.。请对 Docker Hub 进行身份验证以避免这些错误。 有关详细信息,请参阅通过 Azure 容器注册表管理公共内容。
打开 PowerShell 窗口并导航到包含 Dockerfile 的目录。 然后运行以下命令:
docker login
docker build -t helloworldapp .
该命令按 Dockerfile 中的说明生成新映像,并将映像命名为(-t 表示标记)helloworldapp。 若要生成容器映像,首先从 Docker Hub 下载基础映像并在其上添加应用程序。
生成命令执行完以后,请运行 docker images 命令,查看有关新映像的信息:
$ docker images

REPOSITORY                    TAG                 IMAGE ID            CREATED             SIZE
helloworldapp                 latest              86838648aab6        2 minutes ago       194 MB
在本地运行应用程序
先验证容器化应用程序是否在本地运行,然后将它推送到容器注册表。
运行应用程序,并将计算机的端口 4000 映射到容器的公开端口 80:
docker run -d -p 4000:80 --name my-web-site helloworldapp
name 用于为运行的容器(而不是容器 ID)命名。
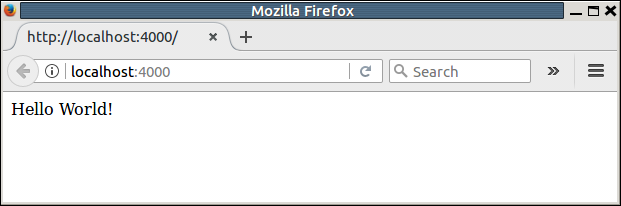
连接到正在运行的容器。 打开 Web 浏览器,指向端口 4000 上返回的 IP 地址,例如“http://localhost:4000"。 应该会看到标题“Hello World!”显示在浏览器中。
若要停止容器,请运行:
docker stop my-web-site
从开发计算机中删除该容器:
docker rm my-web-site
将映像推送到容器注册表
确认应用程序在 Docker 中运行后,请将映像推送到 Azure 容器注册表中的注册表。
运行 docker login,以使用注册表凭据登录到容器注册表。
以下示例传递了 Microsoft Entra 服务主体的 ID 和密码。 例如,你可能在自动化方案中向注册表分配了服务主体。 或者,可以使用注册表用户名和密码登录。
docker login azure --cloud-name AzureChinaCloud myregistry.azurecr.cn -u xxxxxxxx-xxxx-xxxx-xxxx-xxxxxxxxxxxx -p myPassword
以下命令使用注册表的完全限定路径创建映像的标记或别名。 此示例将映像置于 samples 命名空间,以免注册表根目录中出现混乱。
docker tag helloworldapp myregistry.azurecr.cn/samples/helloworldapp
将映像推送到容器注册表:
docker push myregistry.azurecr.cn/samples/helloworldapp
使用 Yeoman 打包 Docker 映像
用于 Linux 的 Service Fabric SDK 包括 Yeoman 生成器,利用它可以轻松地创建第一个服务应用程序和添加容器映像。 让我们使用 Yeoman 创建具有单个 Docker 容器(名为 SimpleContainerApp)的应用程序。
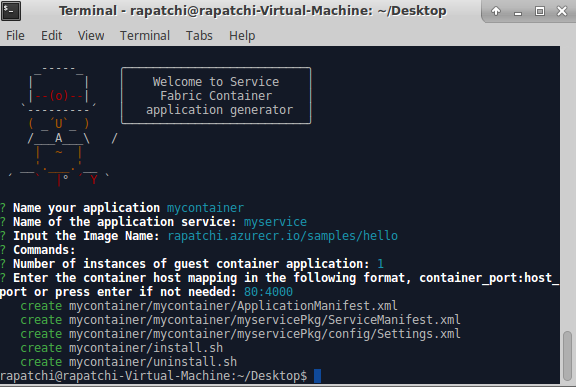
若要创建 Service Fabric 容器应用程序,请打开终端窗口并运行 yo azuresfcontainer。
为应用程序命名(例如 mycontainer),以及为应用程序服务命名(例如 myservice)。
对于映像名称,请提供容器映像在容器注册表中的 URL(例如“myregistry.azurecr.cn/samples/helloworldapp”)。
此映像中定义了一个工作负荷入口点,因此不需显式指定输入命令(命令在容器中运行,这可以在启动后使容器保持运行)。
指定实例数为“1”。
以适当的格式指定端口映射。 对于本文,需要提供 80:4000 作为端口映射。 通过这样做,已将主机上到达端口 4000 的所有传入请求都重定向到容器上的端口 80。
配置容器存储库身份验证
请参阅容器存储库身份验证,了解如何为容器映像的下载配置不同类型的身份验证。
配置隔离模式
使用 6.3 运行时版本时,Linux 容器支持 VM 隔离,从而支持两种容器隔离模式:process 和 Hyper-V。 使用 Hyper-V 隔离模式时,内核将在每个容器与容器主机之间隔离。 使用 Clear Containers 实现 Hyper-V 隔离。 在应用程序清单文件中的 ServicePackageContainerPolicy 元素内,为 Linux 群集指定了隔离模式。 可以指定的隔离模式为 process、hyperv 和 default。 默认为进程隔离模式。 以下代码片段演示如何在应用程序清单文件中指定隔离模式。
<ServiceManifestImport>
    <ServiceManifestRef ServiceManifestName="MyServicePkg" ServiceManifestVersion="1.0.0"/>
      <Policies>
        <ServicePackageContainerPolicy Hostname="votefront" Isolation="hyperv">
          <PortBinding ContainerPort="80" EndpointRef="myServiceTypeEndpoint"/>
        </ServicePackageContainerPolicy>
    </Policies>
  </ServiceManifestImport>
配置资源治理
资源调控限制容器能够在主机上使用的资源。 在应用程序清单中指定的 ResourceGovernancePolicy 元素用于声明服务代码包的资源限制。 可为以下资源设置资源限制:内存、MemorySwap、CpuShares(CPU 相对权重)、MemoryReservationInMB、BlkioWeight(BlockIO 相对权重)。 在此示例中,服务包 Guest1Pkg 在所在的群集节点上分配一个核心。 内存限制是绝对的,所以此代码包限制为 1024 MB 内存(和相同的软保证预留)。 代码包(容器或进程)无法分配超过此限制的内存,并且尝试这样做会导致内存不足异常。 若要强制执行资源限制,服务包中的所有代码包均应指定内存限制。
<ServiceManifestImport>
  <ServiceManifestRef ServiceManifestName="MyServicePKg" ServiceManifestVersion="1.0.0" />
  <Policies>
    <ServicePackageResourceGovernancePolicy CpuCores="1"/>
    <ResourceGovernancePolicy CodePackageRef="Code" MemoryInMB="1024"  />
  </Policies>
</ServiceManifestImport>
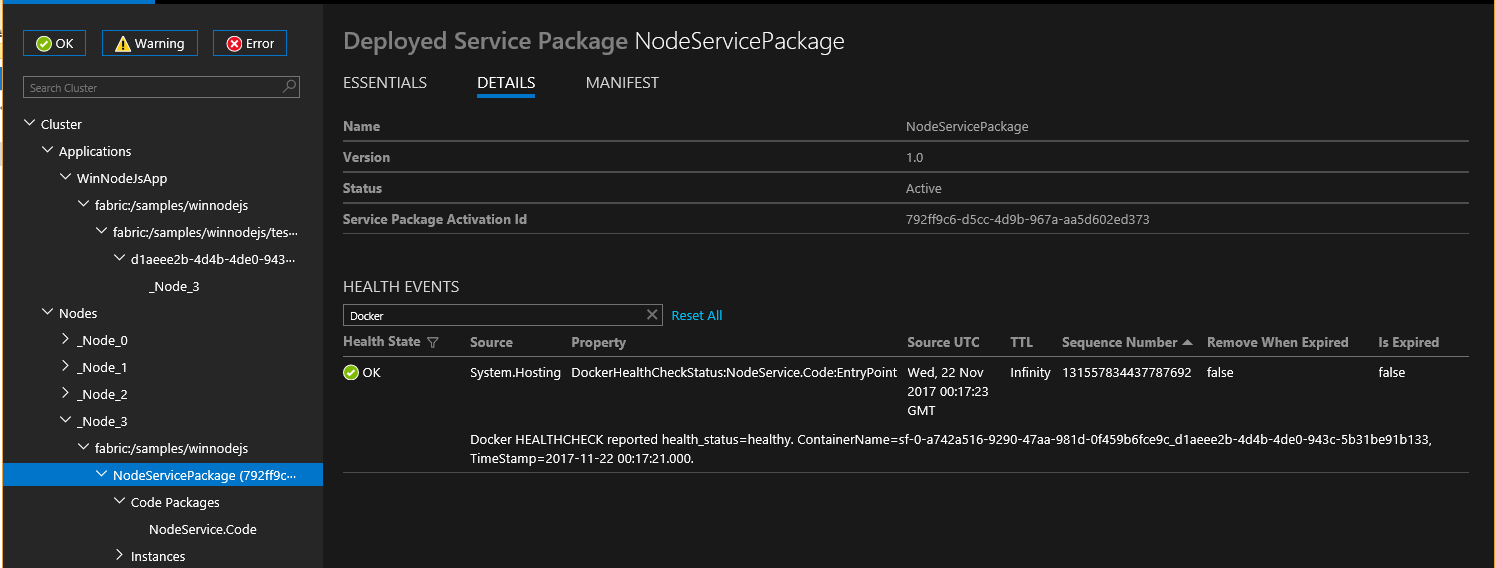
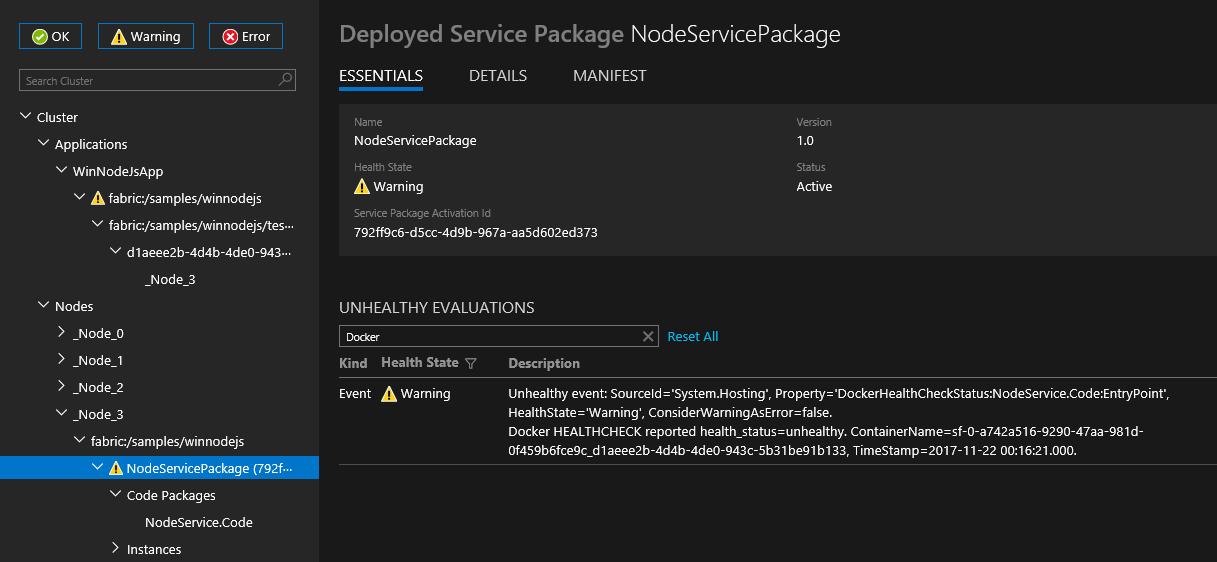
配置 docker HEALTHCHECK
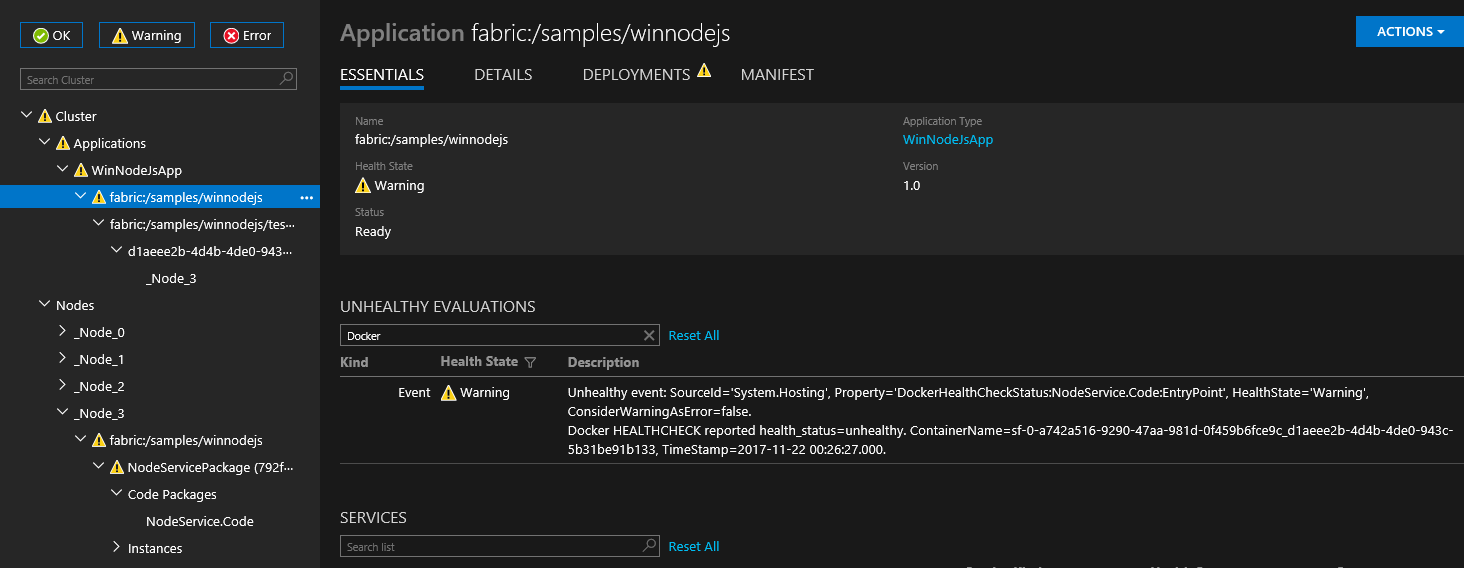
从 v6.1 开始,Service Fabric 自动将 docker HEALTHCHECK 事件集成到其系统运行状况报告。 这意味着,如果容器已启用 HEALTHCHECK,当 Docker 报告容器的运行状况状态发生更改时,Service Fabric 将报告运行状况。 当health_status为正常时,Service Fabric Explorer 中会显示"OK"运行状况报告;而当health_status为运行不正常时,将显示WARNING。
从 v6.4 的最新更新版开始,可以选择指定应将 Docker HEALTHCHECK 评估报告为错误。 如果此选项已启用,当 health_status 为“正常”时,将显示“正常”运行状况报告;当 health_status 为“不正常”时,将显示“错误”运行状况报告。
生成容器映像时使用的 Dockerfile 中必须存在 HEALTHCHECK 指令,该指令指向监视容器运行状况时执行的实际检查。
通过在 ApplicationManifest 中将 HealthConfig 选项指定为 ContainerHostPolicies 的一部分,可以为每个容器配置 HEALTHCHECK 行为。
<ServiceManifestImport>
    <ServiceManifestRef ServiceManifestName="ContainerServicePkg" ServiceManifestVersion="2.0.0" />
    <Policies>
      <ContainerHostPolicies CodePackageRef="Code">
        <HealthConfig IncludeDockerHealthStatusInSystemHealthReport="true"
		      RestartContainerOnUnhealthyDockerHealthStatus="false"
		      TreatContainerUnhealthyStatusAsError="false" />
      </ContainerHostPolicies>
    </Policies>
</ServiceManifestImport>
默认情况下,IncludeDockerHealthStatusInSystemHealthReport 设置为 true,RestartContainerOnUnhealthyDockerHealthStatus 设置为 false,而 TreatContainerUnhealthyStatusAsError 设置为 false。
如果 RestartContainerOnUnhealthyDockerHealthStatus 设置为 true,则会重启(可能在其他节点上进行)反复报告“不正常”的容器。
如果 TreatContainerUnhealthyStatusAsError 设置为 true,当容器的 health_status 为 unhealthy 时,将显示 ERROR 运行状况报告。
若要禁用整个 Service Fabric 群集的 HEALTHCHECK 集成,则需将 EnableDockerHealthCheckIntegration 设置为 false。
部署应用程序
生成应用程序后,可以使用 Service Fabric CLI 将其部署到本地群集。
连接到本地 Service Fabric 群集。
sfctl cluster select --endpoint http://localhost:19080
使用 https://github.com/Azure-Samples/service-fabric-containers/ 模板中提供的安装脚本可将应用程序包复制到群集的映像存储、注册应用程序类型和创建应用程序的实例。
./install.sh
打开浏览器并导航到位于 http://localhost:19080/Explorer 的 Service Fabric Explorer(如果在 Mac OS X 上使用 Vagrant,则使用 VM 的专用 IP 替换 localhost)。 展开“应用程序”节点,注意现在多了一个用于您的应用程序类型的条目,以及一个用于此类型的第一个实例的条目。
连接到正在运行的容器。 打开 Web 浏览器,指向端口 4000 上返回的 IP 地址,例如“http://localhost:4000"。 应该会看到标题“Hello World!”显示在浏览器中。
清理
使用模板中提供的卸载脚本从本地开发群集中删除应用程序实例并取消注册应用程序类型。
./uninstall.sh
将映像推送到容器注册表后,可以从开发计算机中删除本地映像:
docker rmi helloworldapp
docker rmi myregistry.azurecr.cn/samples/helloworldapp
Service Fabric 应用程序和服务清单的完整示例
下面本文中使用的服务和应用程序完整清单。
ServiceManifest.xml
<?xml version="1.0" encoding="utf-8"?>
<ServiceManifest Name="myservicePkg"
                 Version="1.0.0"
                 xmlns="http://schemas.microsoft.com/2011/01/fabric"
                 xmlns:xsd="https://www.w3.org/2001/XMLSchema"
                 xmlns:xsi="https://www.w3.org/2001/XMLSchema-instance">
  <ServiceTypes>
    <!-- This is the name of your ServiceType.
         The UseImplicitHost attribute indicates this is a guest service. -->

    <StatelessServiceType ServiceTypeName="myserviceType" UseImplicitHost="true" />
  </ServiceTypes>

  <!-- Code package is your service executable. -->

  <CodePackage Name="Code" Version="1.0.0">
    <EntryPoint>
      <!-- Follow this link for more information about deploying containers
      to Service Fabric: https://aka.ms/sfguestcontainers -->

      <ContainerHost>
        <ImageName>myregistry.azurecr.cn/samples/helloworldapp</ImageName>
        <!-- Pass comma delimited commands to your container: dotnet, myproc.dll, 5" -->

        <!--Commands> dotnet, myproc.dll, 5 </Commands-->

        <Commands></Commands>
      </ContainerHost>
    </EntryPoint>
    <!-- Pass environment variables to your container: -->

    <EnvironmentVariables>
      <!--
      <EnvironmentVariable Name="VariableName" Value="VariableValue"/>
      -->

    </EnvironmentVariables>

  </CodePackage>

  <Resources>
    <Endpoints>
      <!-- This endpoint is used by the communication listener to obtain the port on which to
           listen. Please note that if your service is partitioned, this port is shared with
           replicas of different partitions that are placed in your code. -->

      <Endpoint Name="myServiceTypeEndpoint" UriScheme="http" Port="4000" Protocol="http"/>
    </Endpoints>
  </Resources>
</ServiceManifest>
ApplicationManifest.xml
<?xml version="1.0" encoding="utf-8"?>
<ApplicationManifest ApplicationTypeName="mycontainerType"
                     ApplicationTypeVersion="1.0.0"
                     xmlns="http://schemas.microsoft.com/2011/01/fabric"
                     xmlns:xsd="https://www.w3.org/2001/XMLSchema"
                     xmlns:xsi="https://www.w3.org/2001/XMLSchema-instance">
  <!-- Import the ServiceManifest from the ServicePackage. The ServiceManifestName and ServiceManifestVersion
       should match the Name and Version attributes of the ServiceManifest element defined in the
       ServiceManifest.xml file. -->

  <ServiceManifestImport>
    <ServiceManifestRef ServiceManifestName="myservicePkg" ServiceManifestVersion="1.0.0" />
    <ConfigOverrides />
    <Policies>
      <ContainerHostPolicies CodePackageRef="Code">
        <RepositoryCredentials AccountName="myregistry" Password="=P==/==/=8=/=+u4lyOB=+=nWzEeRfF=" PasswordEncrypted="false"/>
        <PortBinding ContainerPort="80" EndpointRef="myServiceTypeEndpoint"/>
      </ContainerHostPolicies>
    </Policies>
  </ServiceManifestImport>
  <DefaultServices>
    <!-- The section below creates instances of service types, when an instance of this
         application type is created. You can also create one or more instances of service type using the
         ServiceFabric PowerShell module.

         The attribute ServiceTypeName below must match the name defined in the imported ServiceManifest.xml file. -->

    <Service Name="myservice">
      <!-- On a local development cluster, set InstanceCount to 1. On a multi-node production
      cluster, set InstanceCount to -1 for the container service to run on every node in
      the cluster.
      -->

      <StatelessService ServiceTypeName="myserviceType" InstanceCount="1">
        <SingletonPartition />
      </StatelessService>
    </Service>
  </DefaultServices>
</ApplicationManifest>
将更多服务添加到现有应用程序
若要将其他容器服务添加到使用 yeoman 创建的应用程序,请执行以下步骤:
- 将目录更改为现有应用程序的根目录。 例如
cd ~/YeomanSamples/MyApplication(如果MyApplication是 Yeoman 创建的应用程序)。 - 运行
yo azuresfcontainer:AddService
配置在强制终止容器之前需经历的时间间隔
可以配置一个时间间隔,以便在服务删除(或迁移到另一个节点)操作开始后,运行时在删除容器之前等待。 配置时间间隔时,会向容器发送 docker stop <time in seconds> 命令。 有关更多详细信息,请参阅 docker stop。 等待时间间隔在 Hosting 节指定。 以下群集清单代码片段显示了如何设置等待时间间隔:
{
        "name": "Hosting",
        "parameters": [
          {
                "name": "ContainerDeactivationTimeout",
                "value" : "10"
          },
	      ...
        ]
}
默认时间间隔设置为 10 秒。 由于此配置是动态的,因此对群集进行仅配置升级即可更新超时。
将运行时配置为删除未使用的容器映像
可以将 Service Fabric 群集配置为从节点删除未使用的容器映像。 如果节点上存在过多容器映像,则可通过此配置回收磁盘空间。 若要启用此功能,请更新群集清单中的 Hosting 节,如以下代码片段所示:
{
        "name": "Hosting",
        "parameters": [
          {
                "name": "PruneContainerImages",
                "value": "True"
          },
          {
                "name": "ContainerImagesToSkip",
                "value": "mcr.microsoft.com/windows/servercore|mcr.microsoft.com/windows/nanoserver|mcr.microsoft.com/dotnet/framework/aspnet|..."
          }
          ...
          }
        ]
}
对于不应删除的映像,可以在 ContainerImagesToSkip 参数下进行指定。
配置容器映像下载时间
Service Fabric 运行时分配 20 分钟来下载和提取容器映像,这适用于大多数容器映像。 如果是大型映像,或者网络连接速度较慢,则可能必须延长中止映像下载和解压缩之前的等待时间。 此超时可以使用群集清单的 Hosting 节的 ContainerImageDownloadTimeout 属性来设置,如以下代码片段所示:
{
        "name": "Hosting",
        "parameters": [
          {
              "name": "ContainerImageDownloadTimeout",
              "value": "1200"
          }
        ]
}
设置容器保留策略
为了帮助诊断容器启动故障,Service Fabric(6.1 或更高版本)支持保留终止的或无法启动的容器。 此策略可以在 ApplicationManifest.xml 文件中设置,如以下代码片段所示:
<ContainerHostPolicies CodePackageRef="NodeService.Code" Isolation="process" ContainersRetentionCount="2" RunInteractive="true">
ContainersRetentionCount 设置指定在容器故障时需保留的容器数。 如果指定负值,则会保留所有失败的容器。 如果未指定 ContainersRetentionCount 属性,则不会保留任何容器。 ContainersRetentionCount 属性还支持应用程序参数,因此用户可以为测试性群集和生产群集指定不同的值。 使用此功能时可使用放置约束,将容器服务的目标设置为特定的节点,防止将容器服务移至其他节点。 使用此功能保留的容器必须手动删除。
使用自定义参数启动 Docker 守护程序
有了 6.2 版和更高版本的 Service Fabric 运行时,可以使用自定义参数启动 Docker 守护程序。 指定自定义参数时,Service Fabric 不会将 --pidfile 参数以外的任何其他参数传递给 docker 引擎。 因此,--pidfile 不应作为参数传递。 此外,参数应继续让 docker 守护程序侦听 Windows 上的默认名称管道(或 Linux 上的 unix 域套接字),以便 Service Fabric 与该守护程序通信。 自定义参数在 ContainerServiceArguments 的 Hosting 节下的群集清单中指定。 以下代码片段显示了一个示例:
{
        "name": "Hosting",
        "parameters": [
          {
            "name": "ContainerServiceArguments",
            "value": "-H localhost:1234 -H unix:///var/run/docker.sock"
          }
        ]
}
后续步骤
- 详细了解如何运行 Service Fabric 上的容器。
- 阅读在容器中部署 .NET 应用程序教程。
- 了解 Service Fabric 应用程序生命周期。
- 查看 GitHub 上的 Service Fabric 容器代码示例。