注意
本文引用了 CentOS,这是一个处于生命周期结束 (EOL) 状态的 Linux 发行版。 请根据实际情况考虑你的使用方式并进行规划。 有关详细信息,请参阅 CentOS 生命周期结束指南。
本文介绍如何将邻近放置组中运行的 Azure 虚拟机 (VM) 复制到次要区域,并执行故障转移和故障恢复操作。
邻近放置组是 Azure 虚拟机中的逻辑分组功能。 可以使用它们来减少与您的应用程序相关的 VM 间网络延迟。
当在相同的邻近放置组中部署虚拟机时,它们彼此的物理位置会尽可能接近。 邻近放置组有助于满足延迟敏感型工作负载的要求。
使用邻近放置组进行灾难恢复
在典型场景中,你可能会在邻近放置组中运行虚拟机,以避免在应用程序的各个层之间出现网络延迟。 虽然这种方法可以最大程度减少应用程序的网络延迟,但你可能希望通过使用 Azure Site Recovery 来保护这些应用程序,以应对任何区域级别的故障。
Site Recovery 将数据从一个 Azure 区域复制到另一个区域。 在故障转移事件中,系统会自动激活灾难恢复区域的计算机。
注意事项
- 最佳做法是将虚拟机在邻近放置组中执行故障转移和故障恢复。 如果存在 OverconstrainedAllocationRequest 错误,导致我们无法在邻近放置组内启动虚拟机,则故障转移和故障恢复仍将执行,但将在邻近放置组外创建虚拟机。
- 如果将某个可用性集固定到邻近放置组,且可用性集中的虚拟机在故障恢复或故障转移时具有分配约束,则系统将在可用性集和邻近放置组之外创建虚拟机。
- 非托管磁盘不支持适用于邻近放置组的 Site Recovery。
注意
对于从 Hyper-V 迁移到 Azure 的方案,Azure Site Recovery 不支持从托管磁盘故障恢复。 不支持从 Azure 中的邻近放置组恢复到 Hyper-V。
通过 Azure 门户为邻近放置组中的虚拟机设置灾难恢复
Azure 到 Azure
可以通过“虚拟机灾难恢复”页面选择为虚拟机启用复制。 或者,可以转到预先创建的保管库,进入 Site Recovery 部分,然后启用复制。 让我们看看如何通过这两种方法在邻近放置组内设置 Site Recovery 虚拟机。
注意
确保目标 PPG 和目标虚拟机位于同一资源组中。
如果 VM 也是 可用性集的一部分,请确保可用性集、VM 和 PPG 都驻留在同一资源组中。
若要在 DR 区域选择邻近放置组,并通过基础设施即服务 (IaaS) 虚拟机 DR 页面启用复制功能,请执行下列操作:
转到虚拟机。 在左侧窗格中的“操作”下,选择“灾难恢复”。
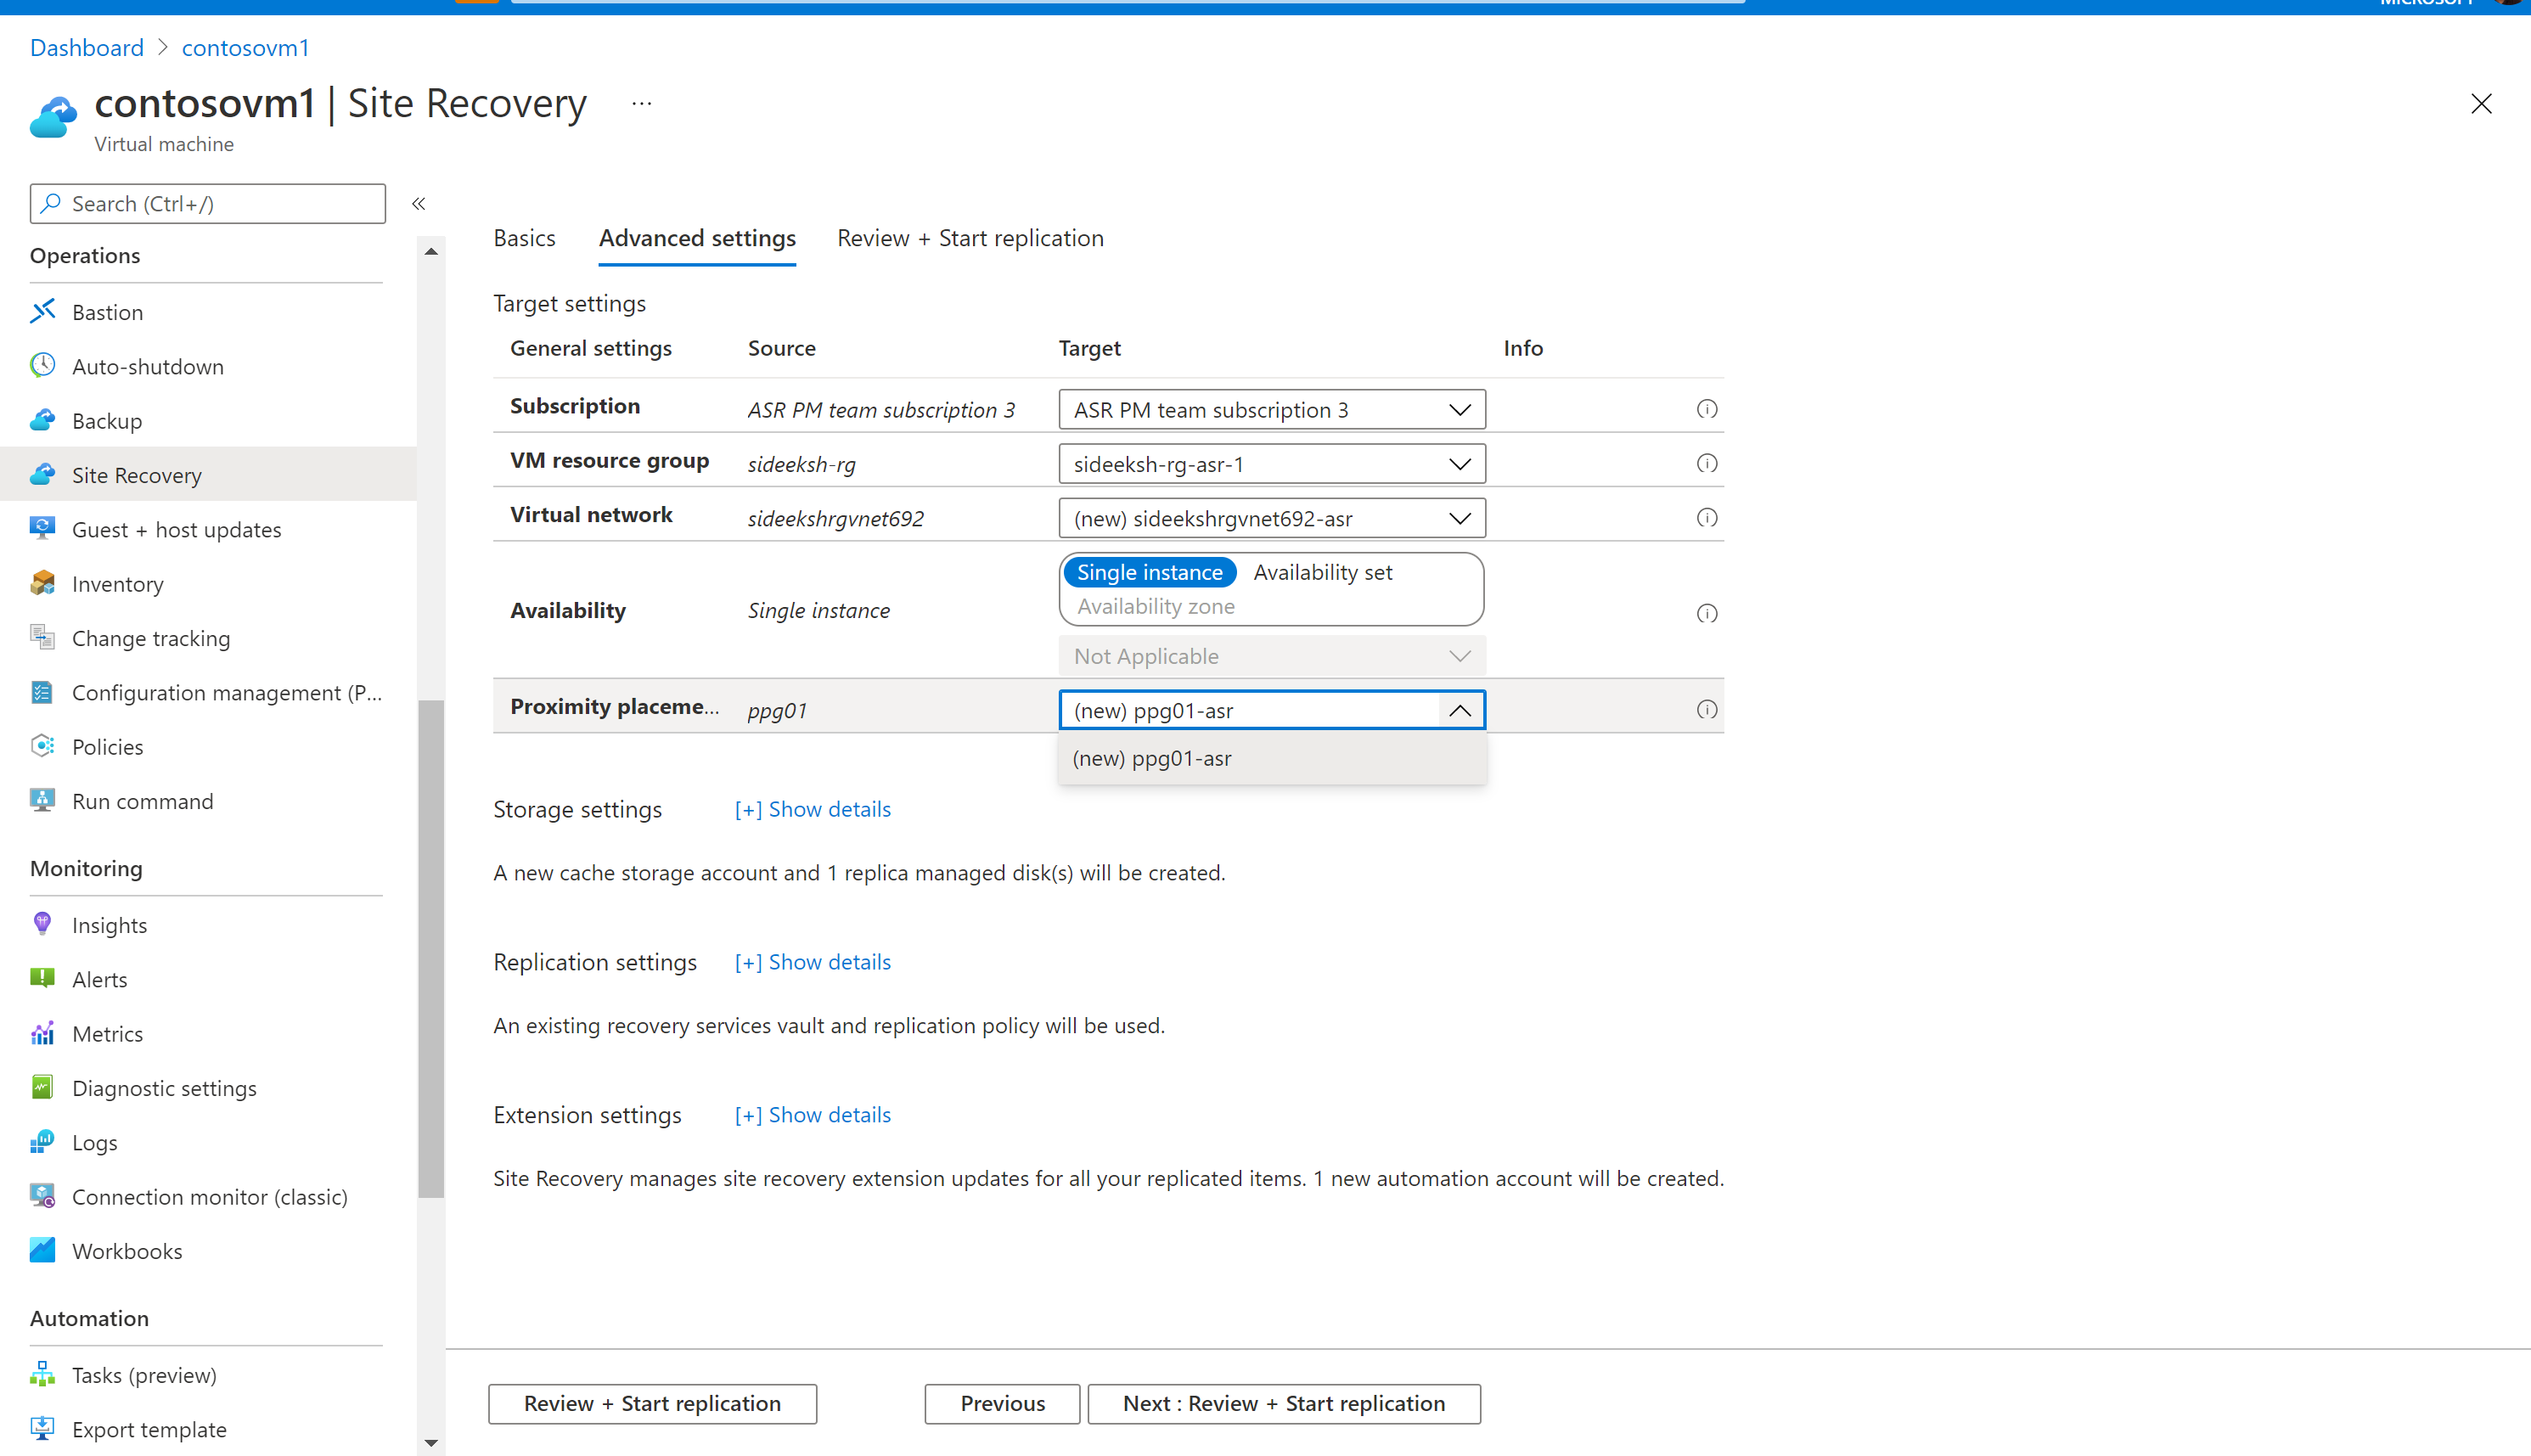
在“基本信息”选项卡中,选择要将虚拟机复制到的 DR 区域。 转到“高级设置”。
可以看到虚拟机的邻近放置组,以及用于在灾难恢复区域选择邻近放置组的选项。 如果选择使用此默认选项,则 Site Recovery 还会提供一个选项,供你使用其为你创建的新邻近放置组。
选择您想要的邻近放置组。 然后选择“查看 + 开始复制”。
若要在 DR 区域中选择邻近放置组,同时通过保管库页面启用复制,请执行下列操作:
转到您的恢复服务保管库,然后转到“Site Recovery”选项卡。
选择“+ 启用 Site Recovery”。 然后,选择“1:在 Azure 虚拟机下启用复制”(在希望复制 Azure 虚拟机的情况下)。
在“源”选项卡中填写必填字段,然后选择“下一步”。
在“虚拟机”选项卡中选择要为其启用复制的虚拟机列表,然后选择“下一步”。
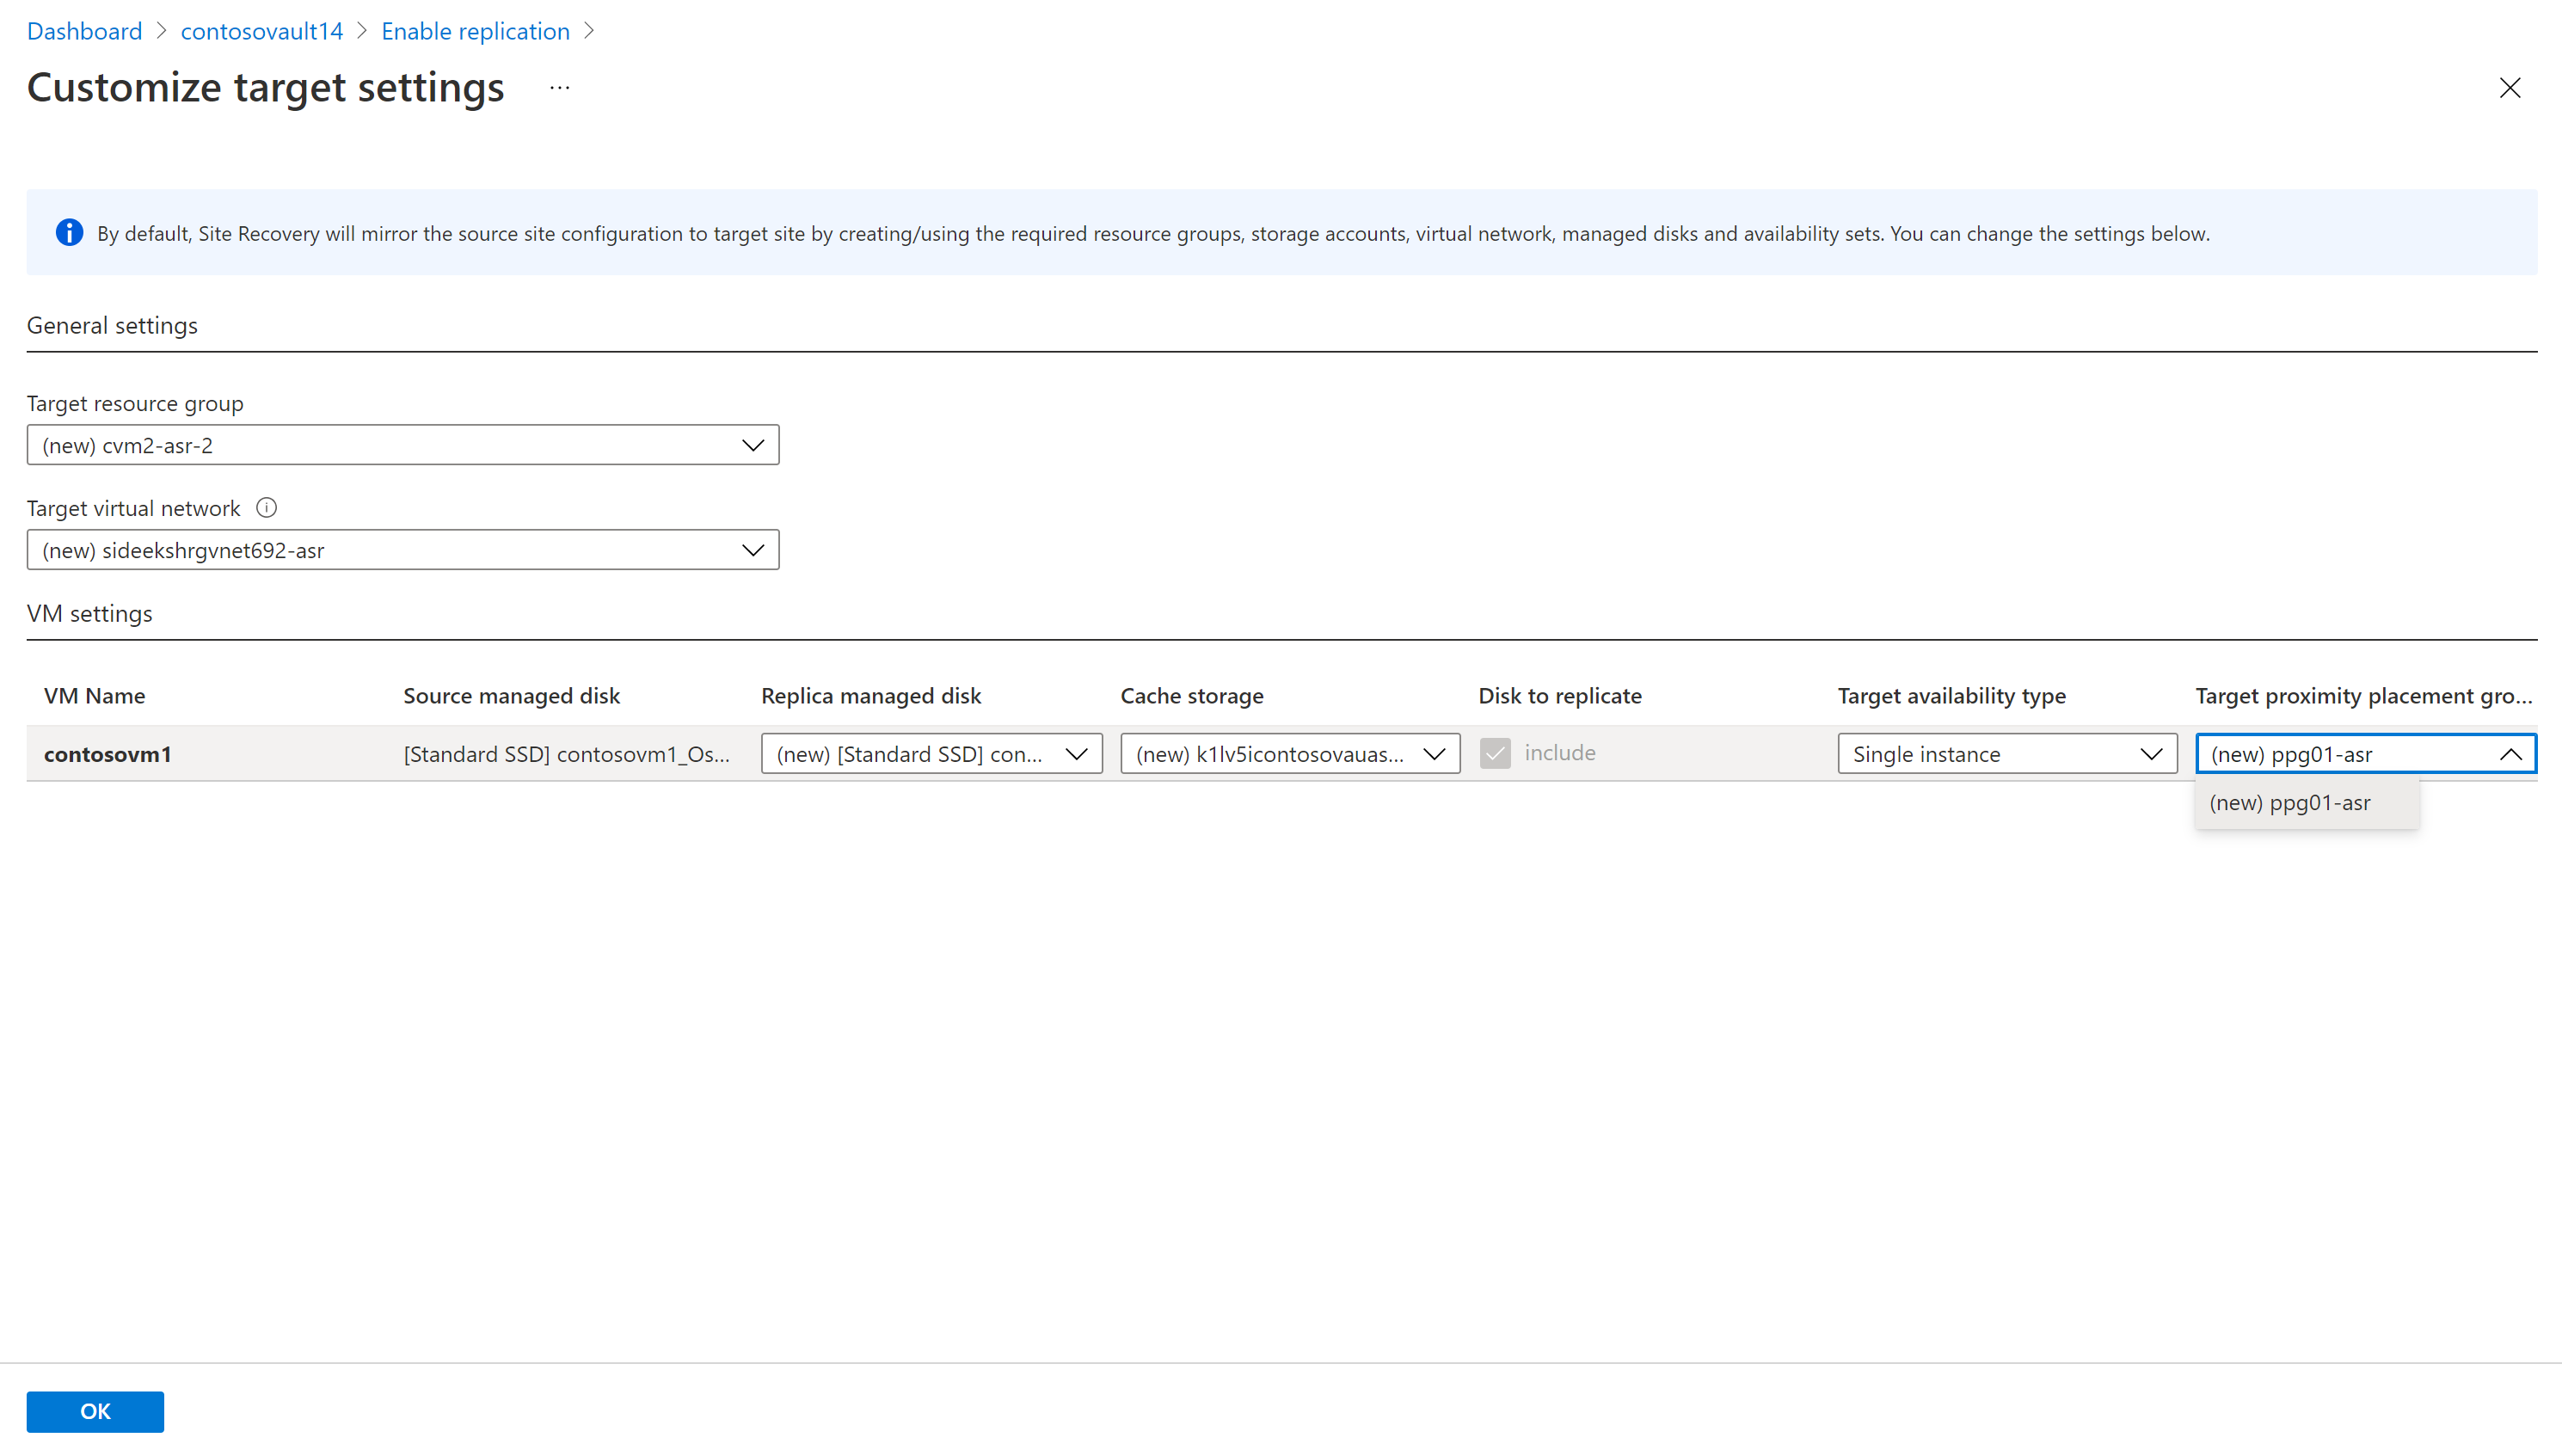
可以看到在 DR 区域中选择邻近放置组的选项。 如果选择使用此默认选项,则 Site Recovery 还会提供一个选项,供你使用其为你创建的新邻近放置组。
请选择您需要的邻近放置组,然后继续启用复制功能。
在为虚拟机启用复制后,您可以轻松更新 DR 区域中选择的邻近放置组:
- 转到虚拟机。 在左侧窗格中的“操作”下,选择“灾难恢复”。
- 转到“计算”窗格,选择“编辑”。
- 可以看到用于编辑多个目标设置(包括目标邻近放置组)的选项。 选择要将虚拟机故障转移到的邻近放置组,然后选择“保存”。
注意
对于正在复制的 VM,不支持从其复制设置中删除邻近放置组。 必须先禁用再重新启用复制。
VMware 到 Azure
在启用虚拟机的复制功能后,就可以为目标虚拟机设置邻近放置组。 请确保根据您的要求在目标区域中单独创建邻近放置组。
为虚拟机启用复制后,您可以轻松更新 DR 区域中邻近放置组的选择。
从保管库中选择虚拟机。 在左侧窗格中的“操作”下,选择“灾难恢复”。
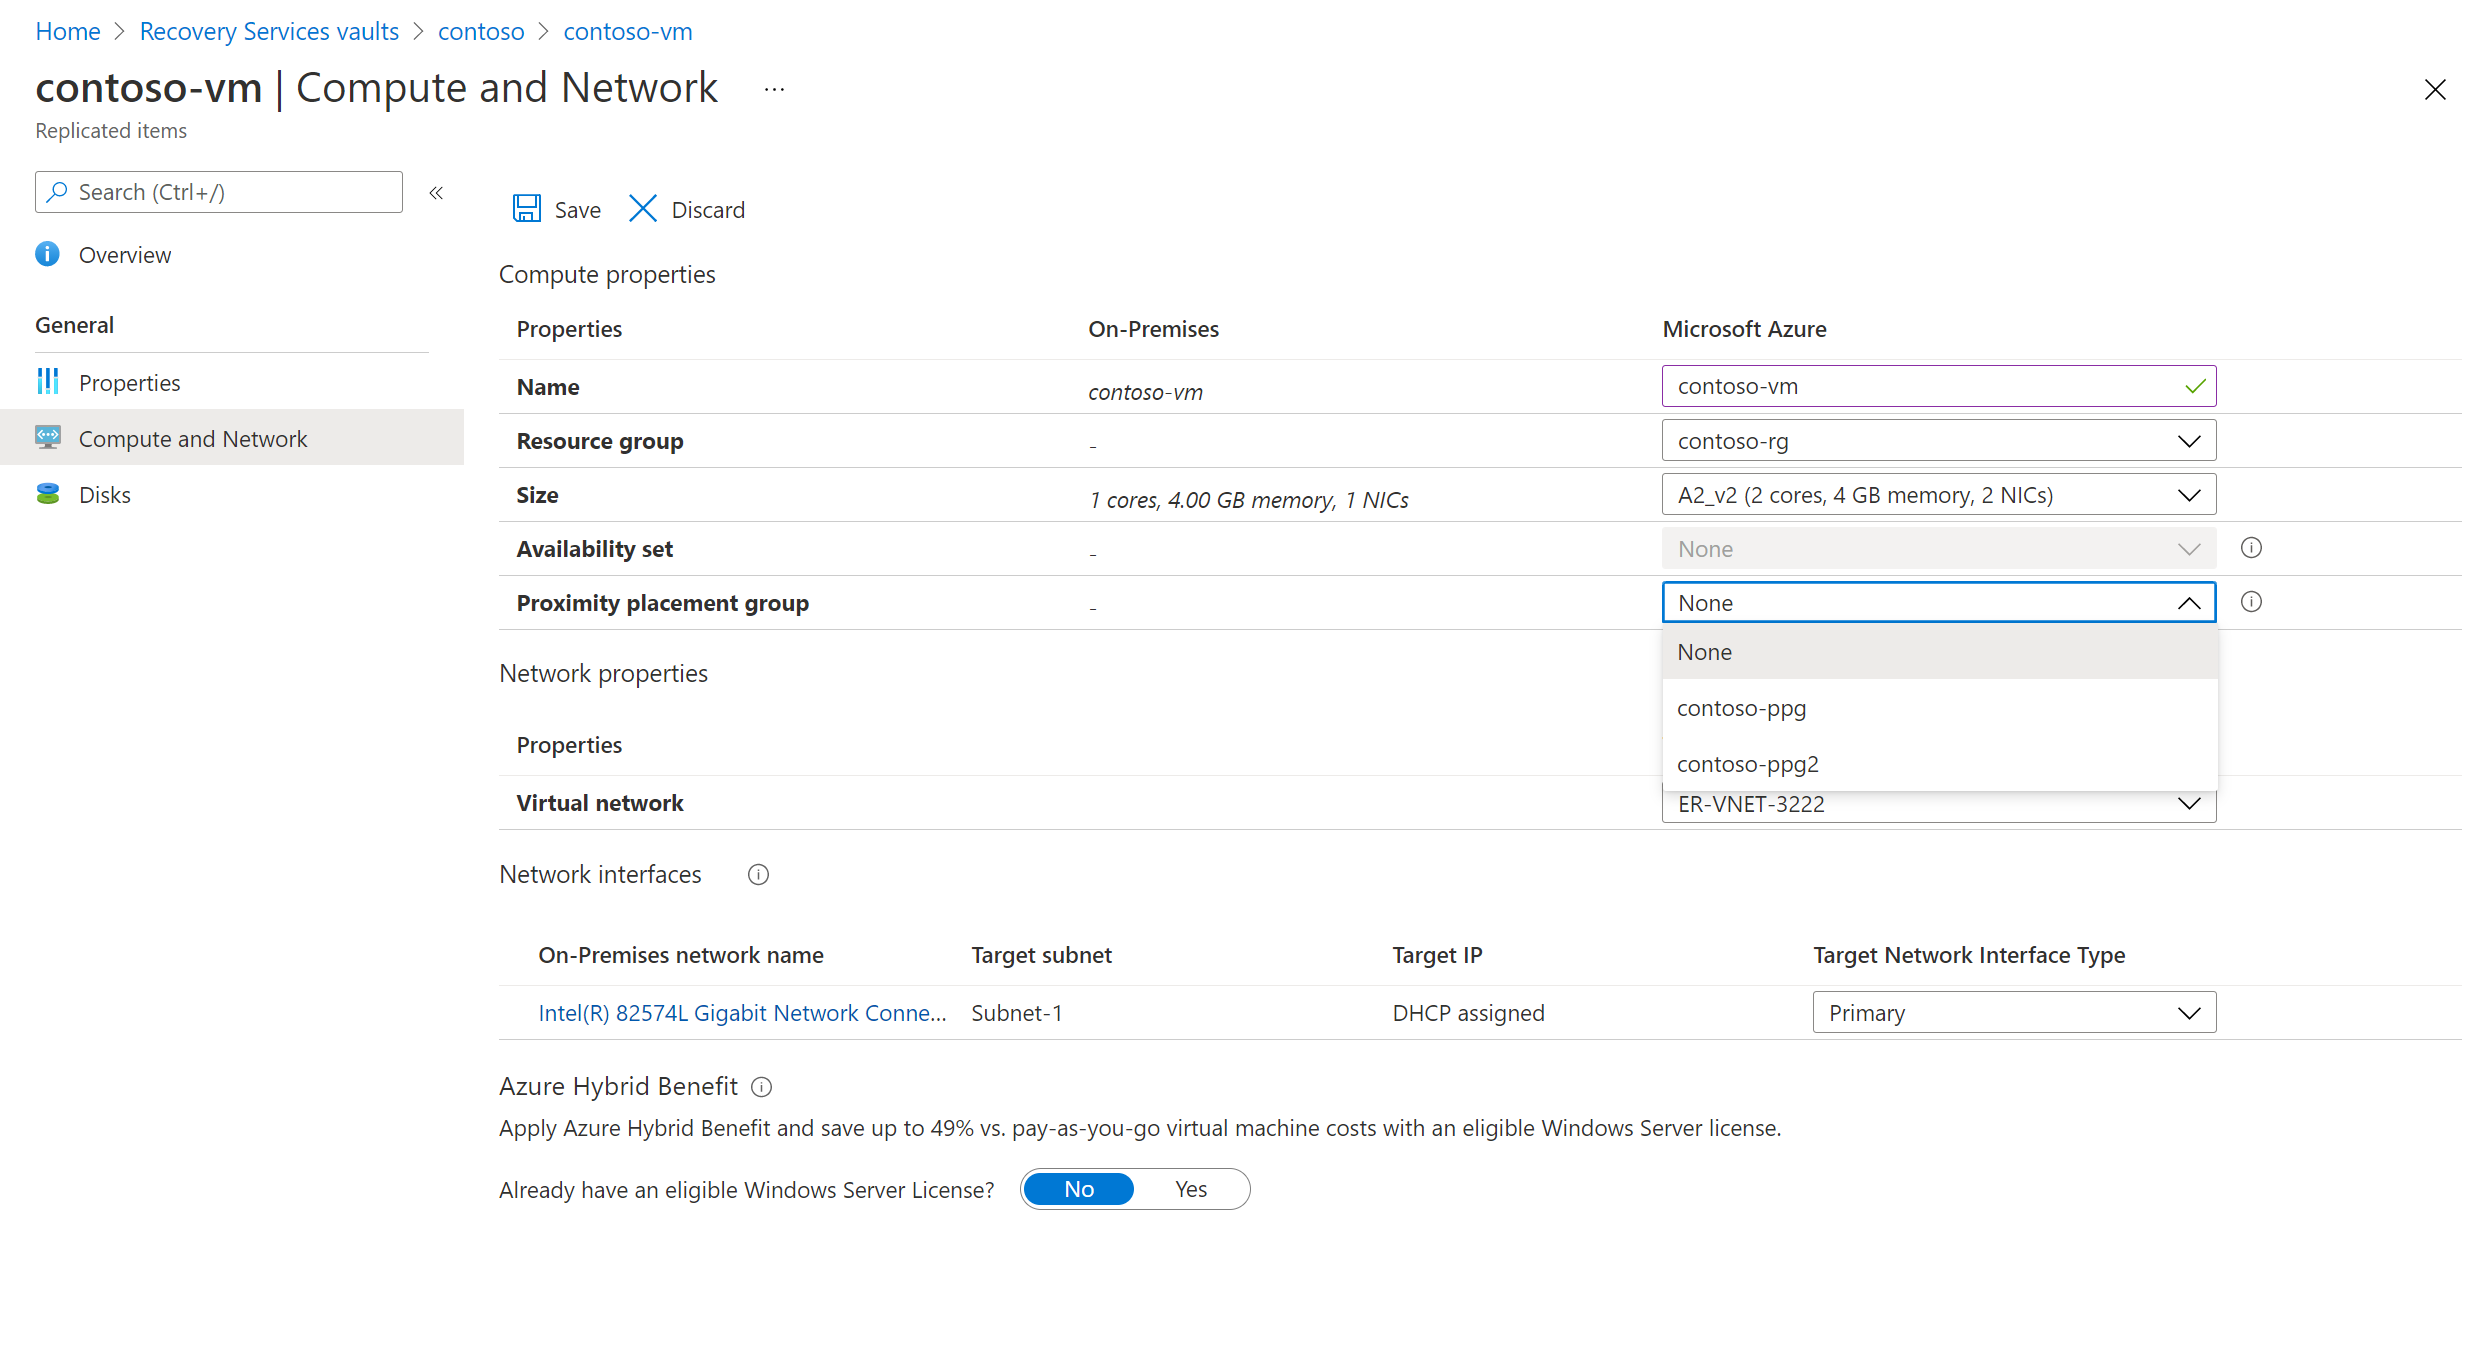
转到“计算和网络”窗格,选择“编辑”。
可以看到用于编辑多个目标设置(包括目标邻近放置组)的选项。 选择要将虚拟机故障转移到的邻近放置组,然后选择“保存”。
Hyper-V 到 Azure
为虚拟机启用复制后,可以为目标虚拟机设置邻近放置组。 请确保根据您的需求在目标区域单独创建邻近放置组。
为虚拟机启用复制后,可以轻松更新灾难恢复(DR)区域中选择的邻近放置组:
从保管库中选择虚拟机。 在左侧窗格中的“操作”下,选择“灾难恢复”。
转到“计算和网络”窗格,选择“编辑”。
可以看到用于编辑多个目标设置(包括目标邻近放置组)的选项。 选择要将虚拟机故障转移到的邻近放置组,然后选择“保存”。

通过 PowerShell 为邻近放置组中的虚拟机设置灾难恢复
先决条件
确保已有 Azure PowerShell Az 模块。 如需安装或升级 Azure PowerShell,请遵循此 Azure PowerShell 安装和配置指南。
最小的 Azure PowerShell Az 版本应为 4.1.0。 若要检查当前版本,请使用以下命令:
Get-InstalledModule -Name Az
Azure 到 Azure
** 准备保管库以启动复制虚拟机。 此步骤涉及为主区域和恢复区域创建 Azure Service Fabric 对象。
为主结构和恢复结构创建 Site Recovery 保护容器。
使用以下 PowerShell cmdlet 复制具有托管磁盘的 Azure 虚拟机:
#Get the resource group that the virtual machine must be created in when it's failed over.
$RecoveryRG = Get-AzResourceGroup -Name "a2ademorecoveryrg" -Location "China North 2"

#Specify replication properties for each disk of the virtual machine that will be replicated (create disk replication configuration).
#Make sure to replace the variable $OSdiskName with the OS disk name.

#OS Disk
$OSdisk = Get-AzDisk -DiskName $OSdiskName -ResourceGroupName "A2AdemoRG"
$OSdiskId = $OSdisk.Id
$RecoveryOSDiskAccountType = $OSdisk.Sku.Name
$RecoveryReplicaDiskAccountType = $OSdisk.Sku.Name

$OSDiskReplicationConfig = New-AzRecoveryServicesAsrAzureToAzureDiskReplicationConfig -ManagedDisk -LogStorageAccountId $ChinaNorthCacheStorageAccount.Id -DiskId $OSdiskId -RecoveryResourceGroupId $RecoveryRG.ResourceId -RecoveryReplicaDiskAccountType $RecoveryReplicaDiskAccountType -RecoveryTargetDiskAccountType $RecoveryOSDiskAccountType

#Make sure to replace the variable $datadiskName with the data disk name.

#Data disk
$datadisk = Get-AzDisk -DiskName $datadiskName -ResourceGroupName "A2AdemoRG"
$datadiskId1 = $datadisk[0].Id
$RecoveryReplicaDiskAccountType = $datadisk[0].Sku.Name
$RecoveryTargetDiskAccountType = $datadisk[0].Sku.Name

$DataDisk1ReplicationConfig  = New-AzRecoveryServicesAsrAzureToAzureDiskReplicationConfig -ManagedDisk -LogStorageAccountId $ChinaNorthCacheStorageAccount.Id -DiskId $datadiskId1 -RecoveryResourceGroupId $RecoveryRG.ResourceId -RecoveryReplicaDiskAccountType $RecoveryReplicaDiskAccountType -RecoveryTargetDiskAccountType $RecoveryTargetDiskAccountType

#Create a list of disk replication configuration objects for the disks of the virtual machine that will be replicated.

$diskconfigs = @()
$diskconfigs += $OSDiskReplicationConfig, $DataDisk1ReplicationConfig

#Start replication by creating a replication protected item. Use a GUID for the name of the replication protected item to ensure uniqueness of the name.

$TempASRJob = New-AzRecoveryServicesAsrReplicationProtectedItem -AzureToAzure -AzureVmId $VM.Id -Name (New-Guid).Guid -ProtectionContainerMapping $EusToWusPCMapping -AzureToAzureDiskReplicationConfiguration $diskconfigs -RecoveryResourceGroupId $RecoveryRG.ResourceId -RecoveryProximityPlacementGroupId $targetPpg.Id
为多个数据磁盘启用复制时,请使用以下 PowerShell cmdlet:
#Get the resource group that the virtual machine must be created in when it's failed over.
$RecoveryRG = Get-AzResourceGroup -Name "a2ademorecoveryrg" -Location "China North 2"

#Specify replication properties for each disk of the virtual machine that will be replicated (create disk replication configuration).
#Make sure to replace the variable $OSdiskName with the OS disk name.

#OS Disk
$OSdisk = Get-AzDisk -DiskName $OSdiskName -ResourceGroupName "A2AdemoRG"
$OSdiskId = $OSdisk.Id
$RecoveryOSDiskAccountType = $OSdisk.Sku.Name
$RecoveryReplicaDiskAccountType = $OSdisk.Sku.Name

$OSDiskReplicationConfig = New-AzRecoveryServicesAsrAzureToAzureDiskReplicationConfig -ManagedDisk -LogStorageAccountId $ChinaNorthCacheStorageAccount.Id -DiskId $OSdiskId -RecoveryResourceGroupId $RecoveryRG.ResourceId -RecoveryReplicaDiskAccountType $RecoveryReplicaDiskAccountType -RecoveryTargetDiskAccountType $RecoveryOSDiskAccountType

$diskconfigs = @()
$diskconfigs += $OSDiskReplicationConfig

#Data disk

# Add data disks
Foreach( $disk in $VM.StorageProfile.DataDisks)
{
    $datadisk = Get-AzDisk -DiskName $datadiskName -ResourceGroupName "A2AdemoRG"
    $dataDiskId1 = $datadisk[0].Id
    $RecoveryReplicaDiskAccountType = $datadisk[0].Sku.Name
    $RecoveryTargetDiskAccountType = $datadisk[0].Sku.Name
    $DataDisk1ReplicationConfig  = New-AzRecoveryServicesAsrAzureToAzureDiskReplicationConfig -ManagedDisk -LogStorageAccountId $ChinaNorthCacheStorageAccount.Id `
         -DiskId $dataDiskId1 -RecoveryResourceGroupId $RecoveryRG.ResourceId -RecoveryReplicaDiskAccountType $RecoveryReplicaDiskAccountType `
         -RecoveryTargetDiskAccountType $RecoveryTargetDiskAccountType
    $diskconfigs += $DataDisk1ReplicationConfig
}

#Start replication by creating a replication protected item. Use a GUID for the name of the replication protected item to ensure uniqueness of the name.

$TempASRJob = New-AzRecoveryServicesAsrReplicationProtectedItem -AzureToAzure -AzureVmId $VM.Id -Name (New-Guid).Guid -ProtectionContainerMapping $EusToWusPCMapping -AzureToAzureDiskReplicationConfiguration $diskconfigs -RecoveryResourceGroupId $RecoveryRG.ResourceId -RecoveryProximityPlacementGroupId $targetPpg.Id
使用邻近放置组启用区域到区域复制时,用于启动复制的命令将与 PowerShell cmdlet 交换:
$TempASRJob = New-AzRecoveryServicesAsrReplicationProtectedItem -AzureToAzure -AzureVmId $VM.Id -Name (New-Guid).Guid -ProtectionContainerMapping $EusToWusPCMapping -AzureToAzureDiskReplicationConfiguration $diskconfigs -RecoveryResourceGroupId $RecoveryRG.ResourceId -RecoveryProximityPlacementGroupId $targetPpg.Id -RecoveryAvailabilityZone "2"启动复制操作成功后,虚拟机数据将复制到恢复区域。
复制过程首先在恢复区域中初始植入虚拟机复制磁盘的副本。 这个阶段称为初始复制阶段。
初始复制完成后,复制过程将转移到差异同步阶段。 此时,虚拟机受到保护,可对其执行测试故障转移操作。 初始复制完成后,表示虚拟机的复制项的复制状态将进入受保护状态。
获取虚拟机对应的复制保护项的详细信息,监视该虚拟机的复制状态和复制运行状况:
Get-AzRecoveryServicesAsrReplicationProtectedItem -ProtectionContainer $PrimaryProtContainer | Select FriendlyName, ProtectionState, ReplicationHealth使用以下 PowerShell 命令重新设置保护并故障恢复到源区域:
#Create a cache storage account for replication logs in the primary region. $ChinaNorthCacheStorageAccount = New-AzStorageAccount -Name "a2acachestoragechinanorth" -ResourceGroupName "A2AdemoRG" -Location 'China North' -SkuName Standard_LRS -Kind Storage #Use the recovery protection container, the new cache storage account in China North, and the source region VM resource group. Update-AzRecoveryServicesAsrProtectionDirection -ReplicationProtectedItem $ReplicationProtectedItem -AzureToAzure -ProtectionContainerMapping $WusToEusPCMapping -LogStorageAccountId $ChinaNorthCacheStorageAccount.Id -RecoveryResourceGroupID $sourceVMResourcegroup.ResourceId -RecoveryProximityPlacementGroupId $vm.ProximityPlacementGroup.Id禁用复制。
VMware 到 Azure
为到 Azure 的灾难恢复准备本地 VMware 服务器。
复制 VMware 虚拟机,并使用以下 PowerShell cmdlet 查看详细信息:
#Get the target resource group to be used.
$ResourceGroup = Get-AzResourceGroup -Name "VMwareToAzureDrPs"

#Get the target virtual network to be used.
$RecoveryVnet = Get-AzVirtualNetwork -Name "ASR-vnet" -ResourceGroupName "asrrg"

#Get the protection container mapping for the replication policy named ReplicationPolicy.
$PolicyMap = Get-AzRecoveryServicesAsrProtectionContainerMapping -ProtectionContainer $ProtectionContainer | where PolicyFriendlyName -eq "ReplicationPolicy"

#Get the protectable item that corresponds to the virtual machine CentOSVM1.
$VM1 = Get-AzRecoveryServicesAsrProtectableItem -ProtectionContainer $ProtectionContainer -FriendlyName "CentOSVM1"

# Enable replication for virtual machine CentOSVM1 by using the Az.RecoveryServices module 2.0.0 onward to replicate to managed disks.
# The name specified for the replicated item needs to be unique within the protection container. Use a random GUID to ensure uniqueness.
$Job_EnableReplication1 = New-AzRecoveryServicesAsrReplicationProtectedItem -VMwareToAzure -ProtectableItem $VM1 -Name (New-Guid).Guid -ProtectionContainerMapping $PolicyMap -ProcessServer $ProcessServers[1] -Account $AccountHandles[2] -RecoveryResourceGroupId $ResourceGroup.ResourceId -logStorageAccountId $LogStorageAccount.Id -RecoveryAzureNetworkId $RecoveryVnet.Id -RecoveryAzureSubnetName "Subnet-1" -RecoveryProximityPlacementGroupId $targetPpg.Id
使用
Get-ASRReplicationProtectedItemcmdlet 检查虚拟机的复制状态和复制运行状况:Get-AzRecoveryServicesAsrReplicationProtectedItem -ProtectionContainer $ProtectionContainer | Select FriendlyName, ProtectionState, ReplicationHealth
Hyper-V 到 Azure
为灾难恢复到 Azure 准备本地 Hyper-V 服务器。
使用以下步骤启用复制:
检索与要保护的 VM 相对应的可保护项:
$VMFriendlyName = "Fabrikam-app"          #Name of the VM
$ProtectableItem = Get-AzRecoveryServicesAsrProtectableItem -ProtectionContainer $protectionContainer -FriendlyName $VMFriendlyName
保护 VM。 如果要保护的 VM 有多个附加磁盘,则需使用
OSDiskName参数指定操作系统磁盘:$OSType = "Windows" # "Windows" or "Linux" $DRjob = New-AzRecoveryServicesAsrReplicationProtectedItem -ProtectableItem $VM -Name $VM.Name -ProtectionContainerMapping $ProtectionContainerMapping -RecoveryAzureStorageAccountId $StorageAccountID -OSDiskName $OSDiskNameList[$i] -OS $OSType -RecoveryResourceGroupId $ResourceGroupID -RecoveryProximityPlacementGroupId $targetPpg.Id等待 VM 在完成初始复制后进入受保护状态。 此过程可能需要一段时间,具体取决于诸如要复制的数据量和 Azure 的可用上游带宽等因素。
进入受保护状态后,作业的
State和StateDescription更新如下:$DRjob = Get-AzRecoveryServicesAsrJob -Job $DRjob $DRjob | Select-Object -ExpandProperty State $DRjob | Select-Object -ExpandProperty StateDescription更新各种恢复属性(例如 VM 角色大小),并更新故障转移后要将 VM NIC 连接到的 Azure 网络:
$nw1 = Get-AzVirtualNetwork -Name "FailoverNw" -ResourceGroupName "MyRG"

$VMFriendlyName = "Fabrikam-App"

$rpi = Get-AzRecoveryServicesAsrReplicationProtectedItem -ProtectionContainer $protectionContainer -FriendlyName $VMFriendlyName

$UpdateJob = Set-AzRecoveryServicesAsrReplicationProtectedItem -InputObject $rpi -PrimaryNic $VM.NicDetailsList[0].NicId -RecoveryNetworkId $nw1.Id -RecoveryNicSubnetName $nw1.Subnets[0].Name

$UpdateJob = Get-AzRecoveryServicesAsrJob -Job $UpdateJob

$UpdateJob | Select-Object -ExpandProperty state

Get-AzRecoveryServicesAsrJob -Job $job | Select-Object -ExpandProperty state
后续步骤
若要执行 VMware 到 Azure 的重新保护和故障恢复,请参阅准备重新保护和故障恢复 VMware VM。
若要执行从 Hyper-V 到 Azure 的故障转移,请参阅运行从本地到 Azure 的故障转移。 若要进行故障恢复,请参阅为 Hyper-V VM 运行故障恢复。
有关详细信息,请参阅 Site Recovery 中的故障转移。