了解如何使用 Azure 门户、Azure CLI、Azure PowerShell、Azure 资源管理器 (ARM) 模板、Bicep 模板和 Terraform 创建 Azure 虚拟网络(VNet)。 部署两个虚拟机和一个 Azure Bastion 主机,以测试同一虚拟网络中的虚拟机之间的连接。 Azure Bastion 主机通过 SSL 直接在 Azure 门户中促进与虚拟机的安全无缝 RDP 和 SSH 连接。
登录到 Azure
使用 Azure 帐户登录到 Azure 门户。
创建虚拟网络和 Azure Bastion 主机
以下过程创建包含资源子网、Azure Bastion 子网和 Bastion 主机的虚拟网络:
在门户中,搜索并选择“虚拟网络”。
在“虚拟网络”页面上,选择“+ 创建”。
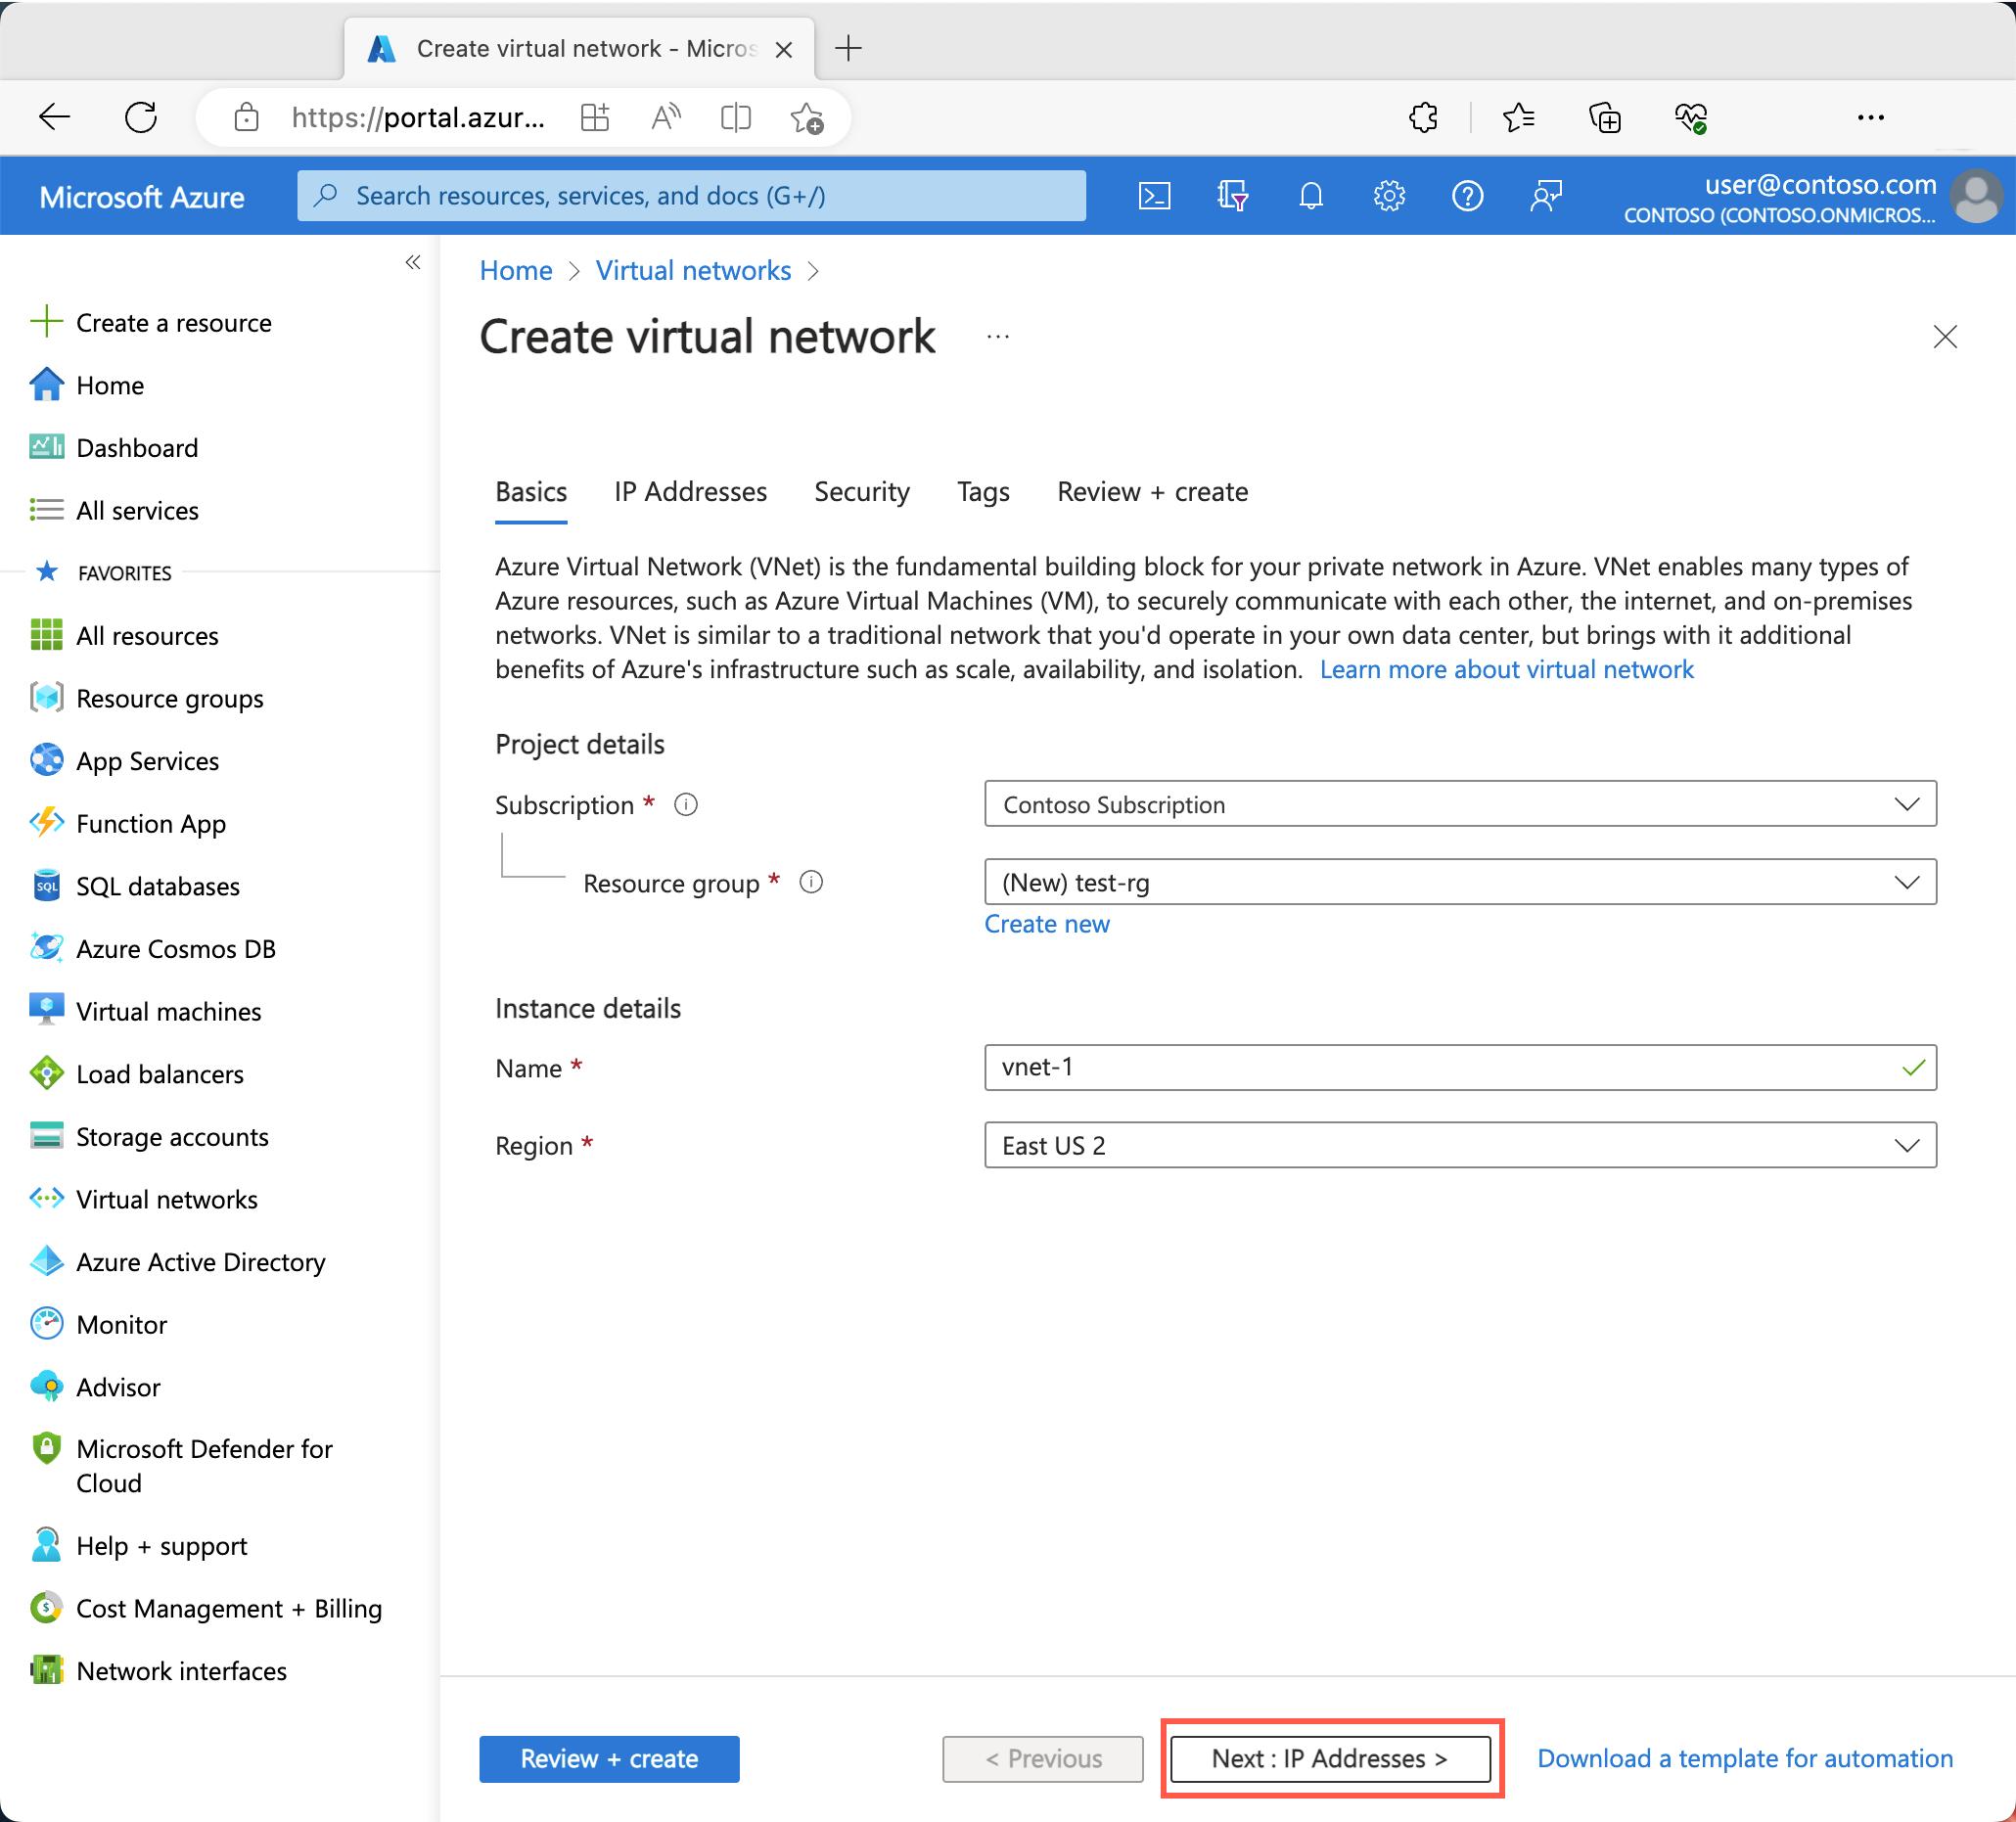
在创建虚拟网络的基本信息选项卡上输入或选择以下信息:
| 设置 |
价值 |
|
项目详细信息 |
|
| 订阅 |
选择订阅。 |
| 资源组 |
选择“新建”。
输入“test-rg”作为名称。
选择“确定”。 |
|
实例详细信息 |
|
| 名称 |
输入“vnet-1”。 |
| 区域 |
选择“(亚太)中国东部 2”。 |

选择“下一步”,转到“安全性”选项卡。
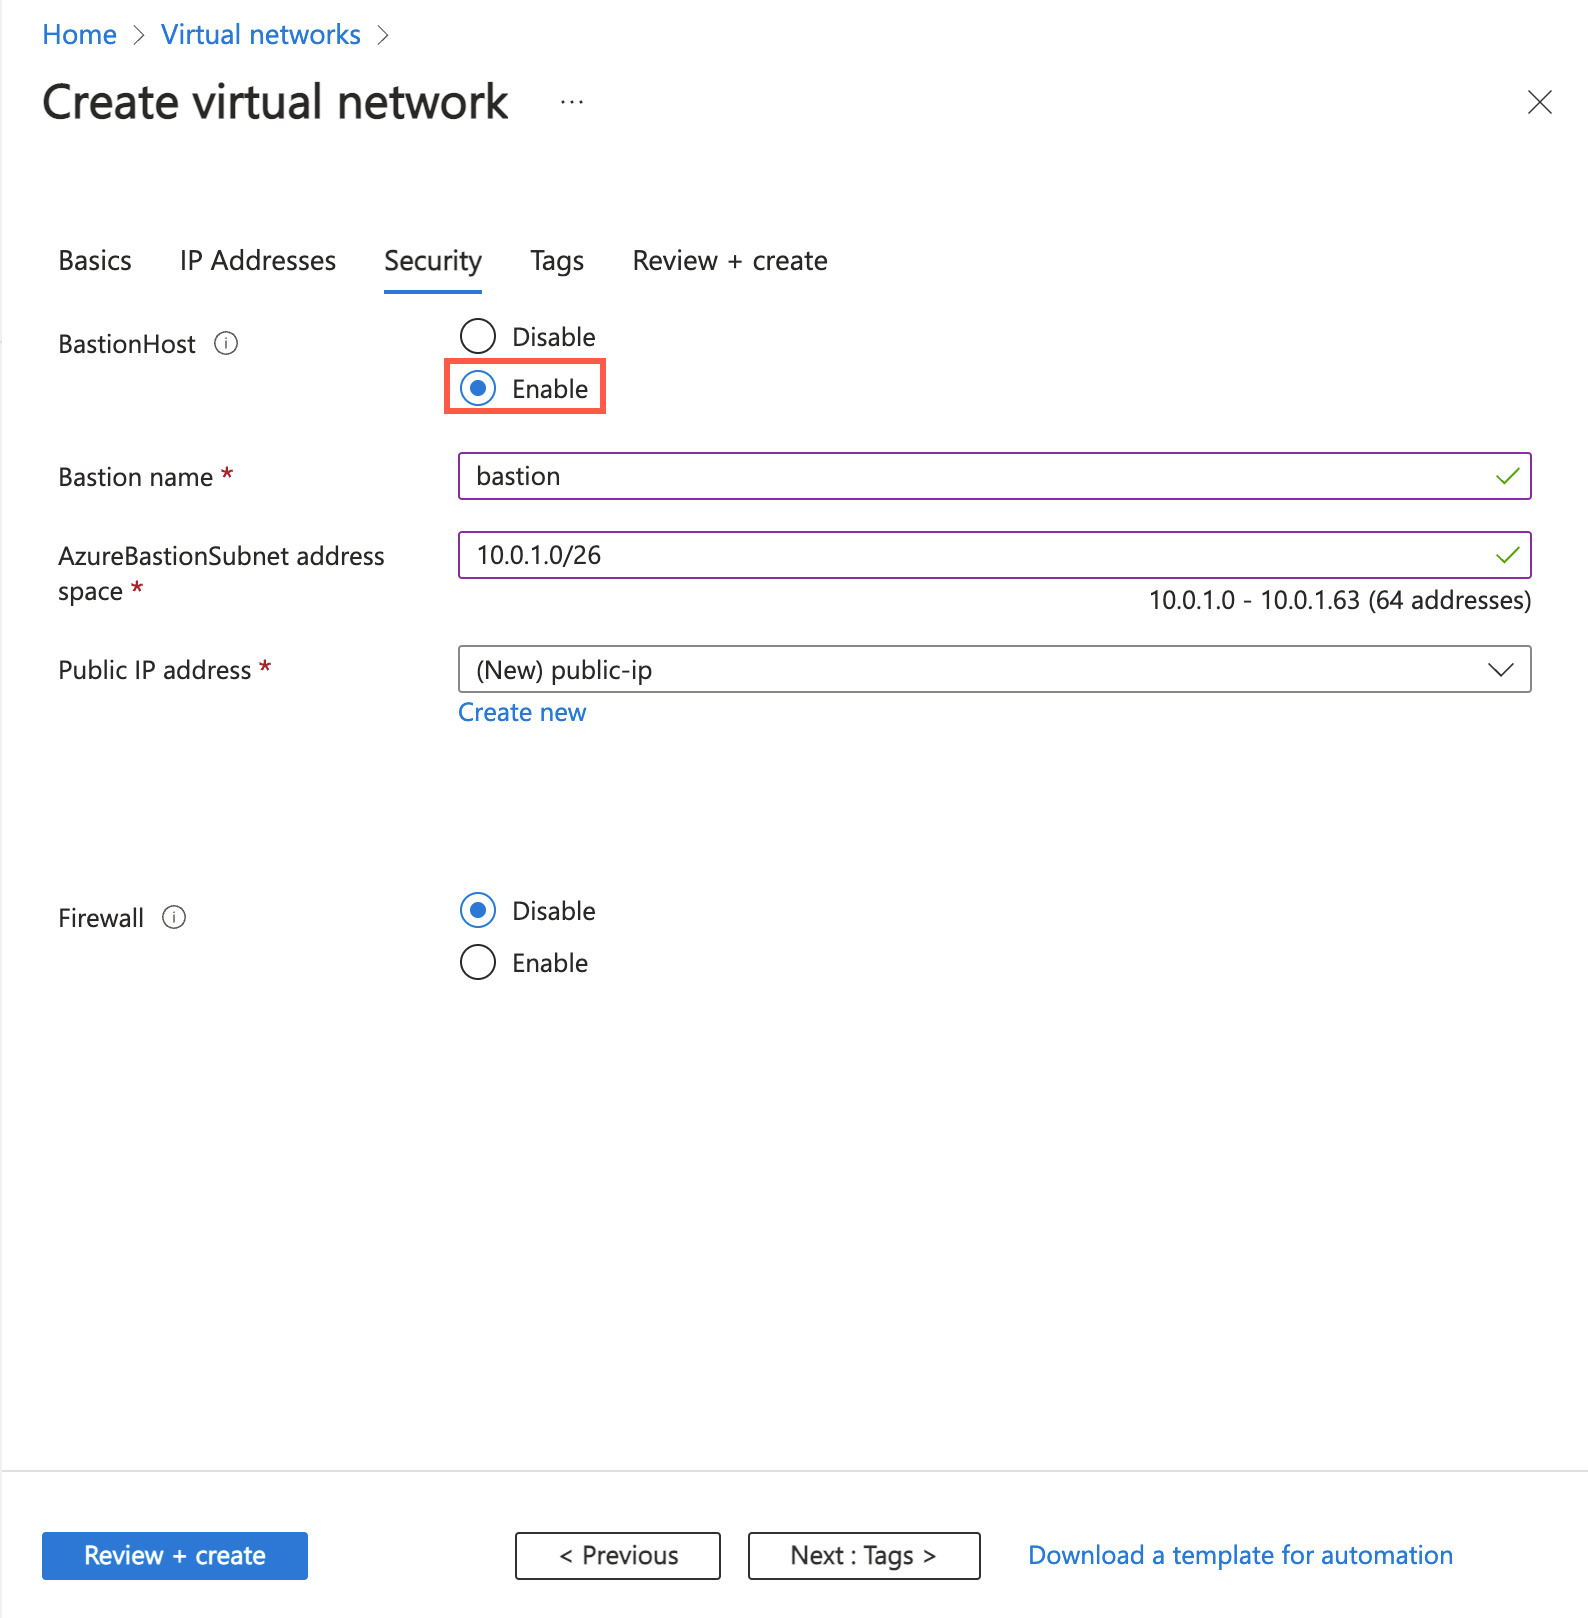
在Azure Bastion部分,选择启用 Bastion。
Bastion 使用浏览器通过安全外壳 (SSH) 或远程桌面协议 (RDP),通过使用其专用 IP 地址连接虚拟网络中的虚拟机。 虚拟机不需要公共 IP 地址、客户端软件或特殊配置。 有关详细信息,请参阅什么是 Azure Bastion?。
注释
无论出站数据使用情况如何,按小时定价都从部署 Bastion 的时间开始算起。 有关详细信息,请参阅定价和 SKU。 如果要将 Bastion 部署为教程或测试的一部分,建议在使用完此资源后将其删除。
在“Azure Bastion”中,输入或选择以下信息:
| 设置 |
价值 |
| Azure Bastion 主机名 |
输入 堡垒。 |
| Azure Bastion 公共 IP 地址 |
选择“创建公共 IP 地址”。
在名称中输入 public-ip-bastion。
选择“确定”。 |

选择下一步,转到IP 地址选项卡。
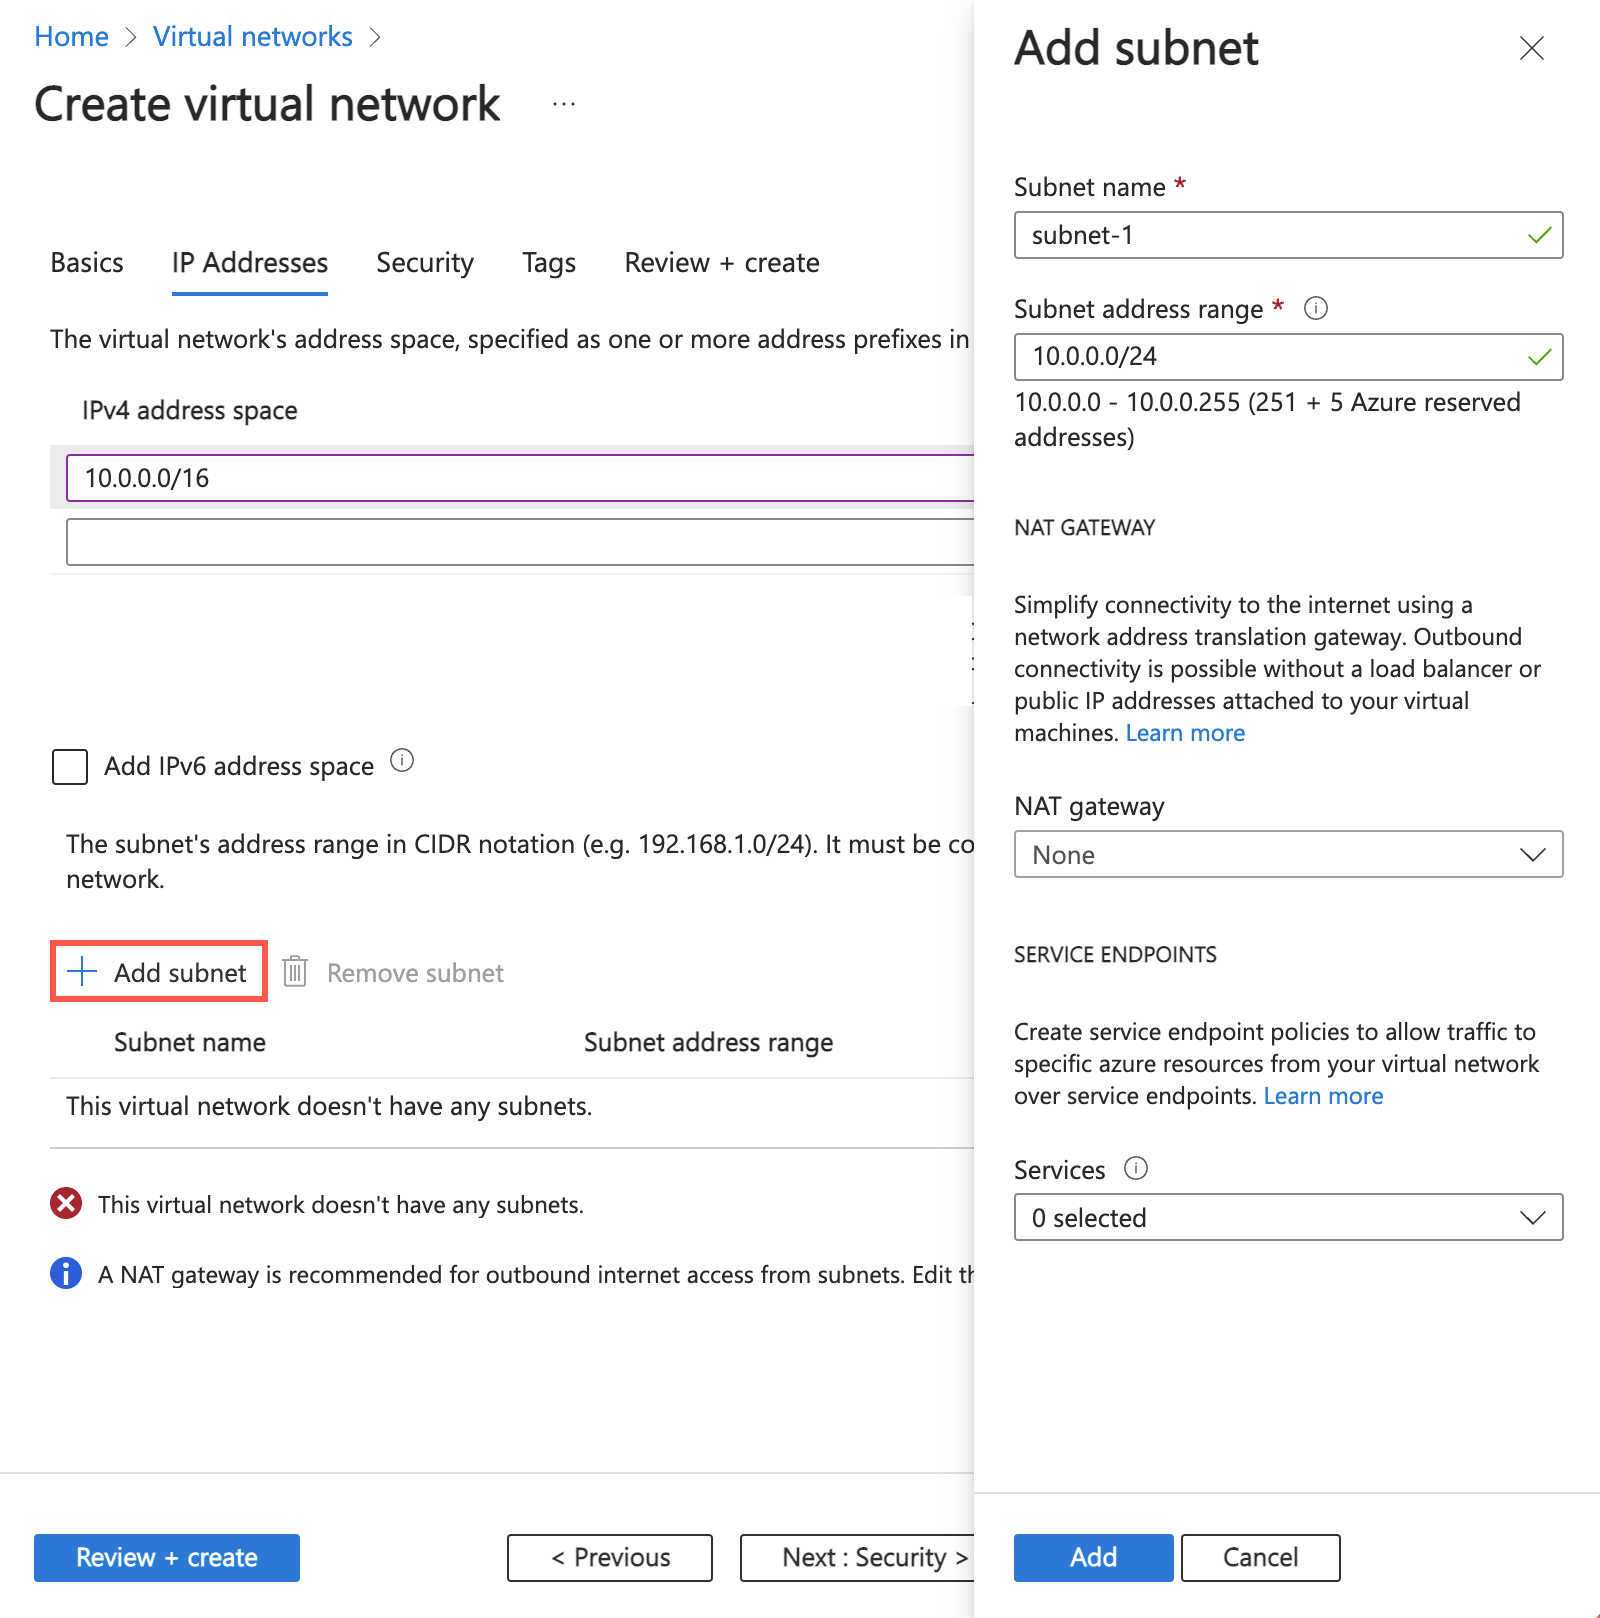
在“子网”的地址空间框中,选择“默认”子网。
在编辑子网中,输入或选择以下信息:
| 设置 |
价值 |
|
子网详细信息 |
|
| 子网模板 |
保留默认值“默认”。 |
| 名称 |
输入subnet-1。 |
| 起始地址 |
保留默认值“10.0.0.0”。 |
| 子网大小 |
保留默认值“/24 (256 个地址)”。 |

选择“保存”。
在窗口底部选择查看 + 创建。 验证通过后,选择“创建”。
创建虚拟机
以下过程在虚拟网络中创建两个 VM,名称分别为“vm-1”和“vm-2”:
在门户中,搜索并选择“虚拟机”。
在“虚拟机”中,选择“+ 创建”,然后选择“Azure 虚拟机”。
在“创建虚拟机”的“基本信息”选项卡上,输入或选择以下信息:
| 设置 |
价值 |
|
项目详细信息 |
|
| 订阅 |
选择订阅。 |
| 资源组 |
选择 test-rg。 |
|
实例详细信息 |
|
| 虚拟机名称 |
输入“vm-1”。 |
| 区域 |
选择“中国北部 3”。 |
| 可用性选项 |
选择“无需基础结构冗余”。 |
| 安全类型 |
保留默认值标准。 |
| 图像 |
选择“Ubuntu Server 22.04 LTS - Gen2”。 |
| 尺寸 |
请选择尺寸。 |
|
管理员帐户 |
|
| 身份验证类型 |
选择密码。 |
| 用户名 |
输入“azureuser”。 |
| 密码 |
输入密码。 |
| 确认密码 |
重新输入密码。 |
|
入站端口规则 |
|
| 公共入站端口 |
选择无。 |
选择“网络”选项卡。输入或选择以下信息:
| 设置 |
价值 |
|
网络接口 |
|
| 虚拟网络 |
选择“vnet-1”。 |
| 子网 |
选择“subnet-1 (10.0.0.0/24)”。 |
| 公网 IP |
选择无。 |
| NIC 网络安全组 |
选择“高级”。 |
| 配置网络安全组 |
选择“新建”。
在“名称”中输入“nsg-1”。
将其余字段保留默认设置,然后选择“确定”。 |
将其余设置保留为默认值,然后选择“查看 + 创建”。
检查设置,然后选择“创建”。
等待第一台虚拟机部署,然后重复前面的步骤,以使用以下设置创建第二台虚拟机:
| 设置 |
价值 |
| 虚拟机名称 |
输入“vm-2”。 |
| 虚拟网络 |
选择“vnet-1”。 |
| 子网 |
选择“subnet-1 (10.0.0.0/24)”。 |
| 公网 IP |
选择无。 |
| NIC 网络安全组 |
选择“高级”。 |
| 配置网络安全组 |
选择 nsg-1。 |
注释
虚拟网络中具有 Azure Bastion 主机的虚拟机不需要公共 IP 地址。 Bastion 提供公共 IP,虚拟机使用专用 IP 在网络中进行通信。 可以从 Bastion 托管的虚拟网络的任何虚拟机中删除公共 IP。 有关详细信息,请参阅 将公共 IP 地址与 Azure VM 取消关联。
注释
Azure 会为未分配公共 IP 地址的 VM 或位于内部基本 Azure 负载均衡器的后端池中的 VM 提供默认出站访问 IP。 默认出站访问 IP 机制会提供不可配置的出站 IP 地址。
发生以下事件之一时,将禁用默认出站访问 IP:
在灵活业务流程模式下通过使用虚拟机规模集创建的 VM 没有默认的出站访问权限。
有关 Azure 中的出站连接的详细信息,请参阅 Azure 中的默认出站访问,使用源网络地址转换(SNAT)进行出站连接。
创建资源组
使用 New-AzResourceGroup 创建用于托管虚拟网络的资源组。 运行以下代码,在 chinanorth3 Azure 区域中创建名为 test-rg 的资源组:
$rg = @{
    Name = 'test-rg'
    Location = 'chinanorth3'
}
New-AzResourceGroup @rg
创建虚拟网络
使用 New-AzVirtualNetwork 在 test-rg 资源组和 chinanorth3 位置创建名为 vnet-1 的虚拟网络,其 IP 地址前缀为 10.0.0.0/16:
$vnet = @{
    Name = 'vnet-1'
    ResourceGroupName = 'test-rg'
    Location = 'chinanorth3'
    AddressPrefix = '10.0.0.0/16'
}
$virtualNetwork = New-AzVirtualNetwork @vnet
Azure 将资源部署到虚拟网络中的子网。 使用 Add-AzVirtualNetworkSubnetConfig 创建名为 subnet-1 的子网 配置,地址前缀 为 10.0.0.0/24:
$subnet = @{
    Name = 'subnet-1'
    VirtualNetwork = $virtualNetwork
    AddressPrefix = '10.0.0.0/24'
}
$subnetConfig = Add-AzVirtualNetworkSubnetConfig @subnet
使用 Set-AzVirtualNetwork 将子网配置关联到虚拟网络:
$virtualNetwork | Set-AzVirtualNetwork
部署 Azure Bastion
Azure Bastion 使用浏览器通过其专用 IP 地址通过安全外壳(SSH)或远程桌面协议(RDP)连接到虚拟网络中的虚拟机。 虚拟机不需要公共 IP 地址、客户端软件或特殊配置。 有关 Azure Bastion 的详细信息,请参阅什么是 Azure Bastion。
无论出站数据使用情况如何,按小时定价都从部署 Bastion 的时间开始算起。 有关详细信息,请参阅定价和 SKU。 如果要将 Bastion 部署为教程或测试的一部分,建议在使用完此资源后将其删除。
为虚拟网络配置 Bastion 子网。 此子网专用于 Bastion 资源,必须命名为 AzureBastionSubnet。
$subnet = @{
    Name = 'AzureBastionSubnet'
    VirtualNetwork = $virtualNetwork
    AddressPrefix = '10.0.1.0/26'
}
$subnetConfig = Add-AzVirtualNetworkSubnetConfig @subnet
设置配置:
$virtualNetwork | Set-AzVirtualNetwork
为 Bastion 创建一个公共 IP 地址。 Bastion 主机使用公共 IP 通过端口 443 访问 SSH 和 RDP。
$ip = @{
        ResourceGroupName = 'test-rg'
        Name = 'public-ip'
        Location = 'chinanorth3'
        AllocationMethod = 'Static'
        Sku = 'Standard'
        Zone = 1,2,3
}
New-AzPublicIpAddress @ip
使用 New-AzBastion 命令在 AzureBastionSubnet 中创建新的标准 SKU Bastion 主机:
$bastion = @{
    Name = 'bastion'
    ResourceGroupName = 'test-rg'
    PublicIpAddressRgName = 'test-rg'
    PublicIpAddressName = 'public-ip'
    VirtualNetworkRgName = 'test-rg'
    VirtualNetworkName = 'vnet-1'
    Sku = 'Basic'
}
New-AzBastion @bastion
部署 Bastion 资源大约需要 10 分钟。 在 Bastion 部署到虚拟网络时,可以在下一部分中创建虚拟机。
创建虚拟机
使用 New-AzVM 在虚拟网络的 subnet-1 子网中创建名为 vm-1 和 vm-2 的两个虚拟机。 系统提示输入凭据时,输入虚拟机的用户名和密码。
若要创建第一个虚拟机,请使用以下代码:
# Set the administrator and password for the virtual machine. ##
$cred = Get-Credential

## Place the virtual network into a variable. ##
$vnet = Get-AzVirtualNetwork -Name 'vnet-1' -ResourceGroupName 'test-rg'

## Create a network interface for the virtual machine. ##
$nic = @{
    Name = "nic-1"
    ResourceGroupName = 'test-rg'
    Location = 'chinanorth3'
    Subnet = $vnet.Subnets[0]
}
$nicVM = New-AzNetworkInterface @nic

## Create a virtual machine configuration. ##
$vmsz = @{
    VMName = "vm-1"
    VMSize = 'Standard_DS1_v2'
}
$vmos = @{
    ComputerName = "vm-1"
    Credential = $cred
}
$vmimage = @{
    PublisherName = 'Canonical'
    Offer = '0001-com-ubuntu-server-jammy'
    Skus = '22_04-lts-gen2'
    Version = 'latest'
}
$vmConfig = New-AzVMConfig @vmsz `
    | Set-AzVMOperatingSystem @vmos -Linux `
    | Set-AzVMSourceImage @vmimage `
    | Add-AzVMNetworkInterface -Id $nicVM.Id

## Create the virtual machine. ##
$vm = @{
    ResourceGroupName = 'test-rg'
    Location = 'chinanorth3'
    VM = $vmConfig
}
New-AzVM @vm
若要创建第二个虚拟机,请使用以下代码:
# Set the administrator and password for the virtual machine. ##
$cred = Get-Credential

## Place the virtual network into a variable. ##
$vnet = Get-AzVirtualNetwork -Name 'vnet-1' -ResourceGroupName 'test-rg'

## Create a network interface for the virtual machine. ##
$nic = @{
    Name = "nic-2"
    ResourceGroupName = 'test-rg'
    Location = 'chinanorth3'
    Subnet = $vnet.Subnets[0]
}
$nicVM = New-AzNetworkInterface @nic

## Create a virtual machine configuration. ##
$vmsz = @{
    VMName = "vm-2"
    VMSize = 'Standard_DS1_v2'
}
$vmos = @{
    ComputerName = "vm-2"
    Credential = $cred
}
$vmimage = @{
    PublisherName = 'Canonical'
    Offer = '0001-com-ubuntu-server-jammy'
    Skus = '22_04-lts-gen2'
    Version = 'latest'
}
$vmConfig = New-AzVMConfig @vmsz `
    | Set-AzVMOperatingSystem @vmos -Linux `
    | Set-AzVMSourceImage @vmimage `
    | Add-AzVMNetworkInterface -Id $nicVM.Id

## Create the virtual machine. ##
$vm = @{
    ResourceGroupName = 'test-rg'
    Location = 'chinanorth3'
    VM = $vmConfig
}
New-AzVM @vm
小窍门
可以在继续执行其他任务时使用此选项 -AsJob 在后台创建虚拟机。 例如,运行 New-AzVM @vm1 -AsJob。 当 Azure 在后台开始创建虚拟机时,将得到类似于以下输出的内容:
Id     Name            PSJobTypeName   State         HasMoreData     Location             Command
--     ----            -------------   -----         -----------     --------             -------
1      Long Running... AzureLongRun... Running       True            localhost            New-AzVM
创建虚拟机需要几分钟时间。 Azure 完成创建虚拟机后,会将输出返回到 PowerShell。
注释
具有 Bastion 主机的虚拟网络中的虚拟机不需要公共 IP 地址。 Bastion 提供公共 IP,虚拟机使用专用 IP 在网络中通信。 可以从 Bastion 托管的虚拟网络中的任何虚拟机中删除公共 IP。 有关详细信息,请参阅 将公共 IP 地址与 Azure VM 取消关联。
注释
Azure 会为未分配公共 IP 地址的 VM 或位于内部基本 Azure 负载均衡器的后端池中的 VM 提供默认出站访问 IP。 默认出站访问 IP 机制会提供不可配置的出站 IP 地址。
发生以下事件之一时,将禁用默认出站访问 IP:
在灵活业务流程模式下通过使用虚拟机规模集创建的 VM 没有默认的出站访问权限。
有关 Azure 中的出站连接的详细信息,请参阅 Azure 中的默认出站访问,使用源网络地址转换(SNAT)进行出站连接。
创建资源组
使用 az group create 创建用于托管虚拟网络的资源组。 使用以下代码在 chinanorth3 Azure 区域中创建名为 test-rg 的资源组:
az group create \
    --name test-rg \
    --location chinanorth3
创建虚拟网络和子网
使用 az network vnet create 创建名为 vnet-1 的虚拟网络,并在 test-rg 资源组中创建名为 subnet-1 的子网:
az network vnet create \
    --name vnet-1 \
    --resource-group test-rg \
    --address-prefix 10.0.0.0/16 \
    --subnet-name subnet-1 \
    --subnet-prefixes 10.0.0.0/24
部署 Azure Bastion
Azure Bastion 使用浏览器通过其专用 IP 地址通过安全外壳(SSH)或远程桌面协议(RDP)连接到虚拟网络中的虚拟机。 虚拟机不需要公共 IP 地址、客户端软件或特殊配置。
无论出站数据使用情况如何,按小时定价都从部署 Bastion 的时间开始算起。 有关详细信息,请参阅定价和 SKU。 如果要将 Bastion 部署为教程或测试的一部分,建议在使用完此资源后将其删除。
有关 Bastion 的详细信息,请参阅什么是 Azure Bastion?。
使用 az network vnet subnet create 为虚拟网络创建 Bastion 子网。 此子网专用于 Bastion 资源,必须命名为 AzureBastionSubnet。
az network vnet subnet create \
    --name AzureBastionSubnet \
    --resource-group test-rg \
    --vnet-name vnet-1 \
    --address-prefix 10.0.1.0/26
为 Bastion 创建一个公共 IP 地址。 此 IP 地址用于从 Internet 连接到 Bastion 主机。 使用 az network public-ip create 在 test-rg 资源组中创建名为 public-ip 的公共 IP 地址:
az network public-ip create \
    --resource-group test-rg \
    --name public-ip \
    --sku Standard \
    --location chinanorth3 \
    --zone 1 2 3
使用 az network bastion create 在 AzureBastionSubnet 中为虚拟网络创建 Bastion 主机:
az network bastion create \
    --name bastion \
    --public-ip-address public-ip \
    --resource-group test-rg \
    --vnet-name vnet-1 \
    --location chinanorth3
部署 Bastion 资源大约需要 10 分钟。 在 Bastion 部署到虚拟网络时,可以在下一部分中创建虚拟机。
创建虚拟机
使用 az vm create 在虚拟网络的 subnet-1 子网中创建两个名为 vm-1 和 vm-2 的虚拟机。 系统提示输入凭据时,输入虚拟机的用户名和密码。
若要创建第一个虚拟机,请使用以下命令:
az vm create \
    --resource-group test-rg \
    --admin-username azureuser \
    --authentication-type password \
    --name vm-1 \
    --image Ubuntu2204 \
    --public-ip-address ""
若要创建第二个虚拟机,请使用以下命令:
az vm create \
    --resource-group test-rg \
    --admin-username azureuser \
    --authentication-type password \
    --name vm-2 \
    --image Ubuntu2204 \
    --public-ip-address ""
小窍门
还可以使用此选项 --no-wait 在后台创建虚拟机,同时继续执行其他任务。
创建虚拟机需要几分钟时间。 Azure 创建每个虚拟机后,Azure CLI 将返回类似于以下消息的输出:
    {
      "fqdns": "",
      "id": "/subscriptions/00000000-0000-0000-0000-000000000000/resourceGroups/test-rg/providers/Microsoft.Compute/virtualMachines/vm-2",
      "location": "chinanorth3",
      "macAddress": "00-0D-3A-23-9A-49",
      "powerState": "VM running",
      "privateIpAddress": "10.0.0.5",
      "publicIpAddress": "",
      "resourceGroup": "test-rg"
      "zones": ""
    }
注释
具有 Bastion 主机的虚拟网络中的虚拟机不需要公共 IP 地址。 Bastion 提供公共 IP,虚拟机使用专用 IP 在网络中通信。 可以从 Bastion 托管的虚拟网络中的任何虚拟机中删除公共 IP。 有关详细信息,请参阅 将公共 IP 地址与 Azure VM 取消关联。
注释
Azure 会为未分配公共 IP 地址的 VM 或位于内部基本 Azure 负载均衡器的后端池中的 VM 提供默认出站访问 IP。 默认出站访问 IP 机制会提供不可配置的出站 IP 地址。
发生以下事件之一时,将禁用默认出站访问 IP:
在灵活业务流程模式下通过使用虚拟机规模集创建的 VM 没有默认的出站访问权限。
有关 Azure 中的出站连接的详细信息,请参阅 Azure 中的默认出站访问,使用源网络地址转换(SNAT)进行出站连接。
查看模板
本快速入门中使用的模板来自 Azure 快速入门模板。
{
  "$schema": "https://schema.management.azure.com/schemas/2019-04-01/deploymentTemplate.json#",
  "contentVersion": "1.0.0.0",
  "metadata": {
    "_generator": {
      "name": "bicep",
      "version": "0.6.18.56646",
      "templateHash": "10806234693722113459"
    }
  },
  "parameters": {
    "vnetName": {
      "type": "string",
      "defaultValue": "VNet1",
      "metadata": {
        "description": "VNet name"
      }
    },
    "vnetAddressPrefix": {
      "type": "string",
      "defaultValue": "10.0.0.0/16",
      "metadata": {
        "description": "Address prefix"
      }
    },
    "subnet1Prefix": {
      "type": "string",
      "defaultValue": "10.0.0.0/24",
      "metadata": {
        "description": "Subnet 1 Prefix"
      }
    },
    "subnet1Name": {
      "type": "string",
      "defaultValue": "Subnet1",
      "metadata": {
        "description": "Subnet 1 Name"
      }
    },
    "subnet2Prefix": {
      "type": "string",
      "defaultValue": "10.0.1.0/24",
      "metadata": {
        "description": "Subnet 2 Prefix"
      }
    },
    "subnet2Name": {
      "type": "string",
      "defaultValue": "Subnet2",
      "metadata": {
        "description": "Subnet 2 Name"
      }
    },
    "location": {
      "type": "string",
      "defaultValue": "[resourceGroup().location]",
      "metadata": {
        "description": "Location for all resources."
      }
    }
  },
  "resources": [
    {
      "type": "Microsoft.Network/virtualNetworks",
      "apiVersion": "2021-08-01",
      "name": "[parameters('vnetName')]",
      "location": "[parameters('location')]",
      "properties": {
        "addressSpace": {
          "addressPrefixes": [
            "[parameters('vnetAddressPrefix')]"
          ]
        },
        "subnets": [
          {
            "name": "[parameters('subnet1Name')]",
            "properties": {
              "addressPrefix": "[parameters('subnet1Prefix')]"
            }
          },
          {
            "name": "[parameters('subnet2Name')]",
            "properties": {
              "addressPrefix": "[parameters('subnet2Prefix')]"
            }
          }
        ]
      }
    }
  ]
}
该模板定义以下 Azure 资源:
部署模板
将资源管理器模板部署到 Azure:
选择“部署到 Azure”,登录到 Azure 并打开模板。 该模板创建包含两个子网的虚拟网络。
在门户中的“创建具有两个子网的虚拟网络”页上,输入或选择以下值:
- 资源组:选择“新建”,输入资源组名称“CreateVNetQS-rg”,然后选择“确定”。
- 虚拟网络名称:输入新虚拟网络的名称。
选择“查看 + 创建”,然后选择“创建”。
部署完成后,选择“转到资源”按钮,查看已部署的资源。
查看已部署的资源
浏览“VNet1”的设置面板,探索您使用虚拟网络创建的资源。
若要了解模板中虚拟网络的 JSON 语法和属性,请参阅 Microsoft.Network/virtualNetworks。
创建虚拟网络和虚拟机
本快速入门使用 Azure 资源管理器快速入门模板中的 VNET Bicep 模板创建虚拟网络、资源子网和虚拟机。 Bicep 模板定义以下 Azure 资源:
查阅 Bicep 文件:
@description('Admin username')
param adminUsername string

@description('Admin password')
@secure()
param adminPassword string

@description('Prefix to use for VM names')
param vmNamePrefix string = 'BackendVM'

@description('Location for all resources.')
param location string = resourceGroup().location

@description('Size of the virtual machines')
param vmSize string = 'Standard_D2s_v3'

var availabilitySetName = 'AvSet'
var storageAccountType = 'Standard_LRS'
var storageAccountName = uniqueString(resourceGroup().id)
var virtualNetworkName = 'vNet'
var subnetName = 'backendSubnet'
var loadBalancerName = 'ilb'
var networkInterfaceName = 'nic'
var subnetRef = resourceId('Microsoft.Network/virtualNetworks/subnets', virtualNetworkName, subnetName)
var numberOfInstances = 2

resource storageAccount 'Microsoft.Storage/storageAccounts@2023-01-01' = {
  name: storageAccountName
  location: location
  sku: {
    name: storageAccountType
  }
  kind: 'StorageV2'
}

resource availabilitySet 'Microsoft.Compute/availabilitySets@2023-09-01' = {
  name: availabilitySetName
  location: location
  sku: {
    name: 'Aligned'
  }
  properties: {
    platformUpdateDomainCount: 2
    platformFaultDomainCount: 2
  }
}

resource virtualNetwork 'Microsoft.Network/virtualNetworks@2023-09-01' = {
  name: virtualNetworkName
  location: location
  properties: {
    addressSpace: {
      addressPrefixes: [
        '10.0.0.0/16'
      ]
    }
    subnets: [
      {
        name: subnetName
        properties: {
          addressPrefix: '10.0.2.0/24'
        }
      }
    ]
  }
}

resource networkInterface 'Microsoft.Network/networkInterfaces@2023-09-01' = [for i in range(0, numberOfInstances): {
  name: '${networkInterfaceName}${i}'
  location: location
  properties: {
    ipConfigurations: [
      {
        name: 'ipconfig1'
        properties: {
          privateIPAllocationMethod: 'Dynamic'
          subnet: {
            id: subnetRef
          }
          loadBalancerBackendAddressPools: [
            {
              id: resourceId('Microsoft.Network/loadBalancers/backendAddressPools', loadBalancerName, 'BackendPool1')
            }
          ]
        }
      }
    ]
  }
  dependsOn: [
    virtualNetwork
    loadBalancer
  ]
}]

resource loadBalancer 'Microsoft.Network/loadBalancers@2023-09-01' = {
  name: loadBalancerName
  location: location
  sku: {
    name: 'Standard'
  }
  properties: {
    frontendIPConfigurations: [
      {
        properties: {
          subnet: {
            id: subnetRef
          }
          privateIPAddress: '10.0.2.6'
          privateIPAllocationMethod: 'Static'
        }
        name: 'LoadBalancerFrontend'
      }
    ]
    backendAddressPools: [
      {
        name: 'BackendPool1'
      }
    ]
    loadBalancingRules: [
      {
        properties: {
          frontendIPConfiguration: {
            id: resourceId('Microsoft.Network/loadBalancers/frontendIpConfigurations', loadBalancerName, 'LoadBalancerFrontend')
          }
          backendAddressPool: {
            id: resourceId('Microsoft.Network/loadBalancers/backendAddressPools', loadBalancerName, 'BackendPool1')
          }
          probe: {
            id: resourceId('Microsoft.Network/loadBalancers/probes', loadBalancerName, 'lbprobe')
          }
          protocol: 'Tcp'
          frontendPort: 80
          backendPort: 80
          idleTimeoutInMinutes: 15
        }
        name: 'lbrule'
      }
    ]
    probes: [
      {
        properties: {
          protocol: 'Tcp'
          port: 80
          intervalInSeconds: 15
          numberOfProbes: 2
        }
        name: 'lbprobe'
      }
    ]
  }
  dependsOn: [
    virtualNetwork
  ]
}

resource vm 'Microsoft.Compute/virtualMachines@2023-09-01' = [for i in range(0, numberOfInstances): {
  name: '${vmNamePrefix}${i}'
  location: location
  properties: {
    availabilitySet: {
      id: availabilitySet.id
    }
    hardwareProfile: {
      vmSize: vmSize
    }
    osProfile: {
      computerName: '${vmNamePrefix}${i}'
      adminUsername: adminUsername
      adminPassword: adminPassword
    }
    storageProfile: {
      imageReference: {
        publisher: 'MicrosoftWindowsServer'
        offer: 'WindowsServer'
        sku: '2019-Datacenter'
        version: 'latest'
      }
      osDisk: {
        createOption: 'FromImage'
      }
    }
    networkProfile: {
      networkInterfaces: [
        {
          id: networkInterface[i].id
        }
      ]
    }
    diagnosticsProfile: {
      bootDiagnostics: {
        enabled: true
        storageUri: storageAccount.properties.primaryEndpoints.blob
      }
    }
  }
}]

output location string = location
output name string = loadBalancer.name
output resourceGroupName string = resourceGroup().name
output resourceId string = loadBalancer.id
部署 Bicep 模板
将 Bicep 文件保存到本地计算机作为 main.bicep。
使用 Azure CLI 或 Azure PowerShell 来部署 Bicep 文件:
CLI
az group create \
    --name TestRG \
    --location chinanorth3

az deployment group create \
    --resource-group TestRG \
    --template-file main.bicep
PowerShell
 $rgParams = @{
     Name     = 'TestRG'
     Location = 'chinanorth3'
 }
 New-AzResourceGroup @rgParams

 $deploymentParams = @{
     ResourceGroupName = 'TestRG'
     TemplateFile      = 'main.bicep'
 }
 New-AzResourceGroupDeployment @deploymentParams
部署完成后,一条消息指示部署成功。
部署 Azure Bastion
Bastion 使用浏览器通过其专用 IP 地址通过安全外壳(SSH)或远程桌面协议(RDP)连接到虚拟网络中的虚拟机。 虚拟机不需要公共 IP 地址、客户端软件或特殊配置。 有关 Azure Bastion 的详细信息,请参阅什么是 Azure Bastion。
注释
无论出站数据使用情况如何,按小时定价都从部署 Bastion 的时间开始算起。 有关详细信息,请参阅定价和 SKU。 如果要将 Bastion 部署为教程或测试的一部分,建议在使用完此资源后将其删除。
使用 Azure 资源管理器快速入门模板中的 Azure Bastion 即服务 Bicep 模板在虚拟网络中部署和配置 Bastion。 该 Bicep 模板定义以下 Azure 资源:
查阅 Bicep 文件:
@description('Name of new or existing vnet to which Azure Bastion should be deployed')
param vnetName string = 'vnet01'

@description('IP prefix for available addresses in vnet address space')
param vnetIpPrefix string = '10.1.0.0/16'

@description('Specify whether to provision new vnet or deploy to existing vnet')
@allowed([
  'new'
  'existing'
])
param vnetNewOrExisting string = 'new'

@description('Bastion subnet IP prefix MUST be within vnet IP prefix address space')
param bastionSubnetIpPrefix string = '10.1.1.0/26'

@description('Name of Azure Bastion resource')
param bastionHostName string

@description('Azure region for Bastion and virtual network')
param location string = resourceGroup().location

var publicIpAddressName = '${bastionHostName}-pip'
var bastionSubnetName = 'AzureBastionSubnet'

resource publicIp 'Microsoft.Network/publicIPAddresses@2022-01-01' = {
  name: publicIpAddressName
  location: location
  sku: {
    name: 'Standard'
  }
  properties: {
    publicIPAllocationMethod: 'Static'
  }
}

// if vnetNewOrExisting == 'new', create a new vnet and subnet
resource newVirtualNetwork 'Microsoft.Network/virtualNetworks@2022-01-01' = if (vnetNewOrExisting == 'new') {
  name: vnetName
  location: location
  properties: {
    addressSpace: {
      addressPrefixes: [
        vnetIpPrefix
      ]
    }
    subnets: [
      {
        name: bastionSubnetName
        properties: {
          addressPrefix: bastionSubnetIpPrefix
        }
      }
    ]
  }
}

// if vnetNewOrExisting == 'existing', reference an existing vnet and create a new subnet under it
resource existingVirtualNetwork 'Microsoft.Network/virtualNetworks@2022-01-01' existing = if (vnetNewOrExisting == 'existing') {
  name: vnetName
}
resource subnet 'Microsoft.Network/virtualNetworks/subnets@2022-01-01' = if (vnetNewOrExisting == 'existing') {
  parent: existingVirtualNetwork
  name: bastionSubnetName
  properties: {
    addressPrefix: bastionSubnetIpPrefix
  }
}

resource bastionHost 'Microsoft.Network/bastionHosts@2022-01-01' = {
  name: bastionHostName
  location: location
  dependsOn: [
    newVirtualNetwork
    existingVirtualNetwork
  ]
  properties: {
    ipConfigurations: [
      {
        name: 'IpConf'
        properties: {
          subnet: {
            id: subnet.id
          }
          publicIPAddress: {
            id: publicIp.id
          }
        }
      }
    ]
  }
}
部署 Bicep 模板
将 Bicep 文件保存到本地计算机作为 bastion.bicep。
使用文本或代码编辑器在文件中进行以下更改:
- 第 2 行:将
param vnetName string 从 'vnet01' 更改为 'VNet'。
- 第 5 行:将
param vnetIpPrefix string 从 '10.1.0.0/16' 更改为 '10.0.0.0/16'。
- 第 12 行:将
param vnetNewOrExisting string 从 'new' 更改为 'existing'。
- 第 15 行:将
param bastionSubnetIpPrefix string 从 '10.1.1.0/26' 更改为 '10.0.1.0/26'。
- 第 18 行:将
param bastionHostName string 更改为 param bastionHostName = 'VNet-bastion'。
更改后,Bicep 文件的前 18 行应如下示例所示:
@description('Name of new or existing vnet to which Azure Bastion should be deployed')
param vnetName string = 'VNet'

@description('IP prefix for available addresses in vnet address space')
param vnetIpPrefix string = '10.0.0.0/16'

@description('Specify whether to provision new vnet or deploy to existing vnet')
@allowed([
  'new'
  'existing'
])
param vnetNewOrExisting string = 'existing'

@description('Bastion subnet IP prefix MUST be within vnet IP prefix address space')
param bastionSubnetIpPrefix string = '10.0.1.0/26'

@description('Name of Azure Bastion resource')
param bastionHostName = 'VNet-bastion'
保存 bastion.bicep 文件。
使用 Azure CLI 或 Azure PowerShell 来部署 Bicep 文件:
CLI
az deployment group create \
     --resource-group TestRG \
     --template-file bastion.bicep
PowerShell
$deploymentParams = @{
    ResourceGroupName = 'TestRG'
    TemplateFile      = 'bastion.bicep'
}
New-AzResourceGroupDeployment @deploymentParams
部署完成后,一条消息指示部署成功。
注释
具有 Bastion 主机的虚拟网络中的虚拟机不需要公共 IP 地址。 Bastion 提供公共 IP,虚拟机使用专用 IP 在网络中通信。 可以从 Bastion 托管的虚拟网络中的任何虚拟机中删除公共 IP。 有关详细信息,请参阅 将公共 IP 地址与 Azure VM 取消关联。
查看已部署的资源
使用 Azure CLI、Azure PowerShell 或 Azure 门户来查看部署的资源。
CLI
az resource list --resource-group TestRG
PowerShell
Get-AzResource -ResourceGroupName TestRG
Portal
在 Azure 门户中,搜索并选择 资源组。 在“资源组”页面上,从资源组列表中选择“TestRG”。
在 TestRG的“概述”页上,查看创建的所有资源,包括虚拟网络、两个虚拟机和 Bastion 主机。
选择“VNet”虚拟网络。 在 VNet 的“概述”页上,留意所定义的地址空间“10.0.0.0/16”。
在左侧菜单中选择“子网”。 在“子网”页上,留意所部署的子网“backendSubnet”和“AzureBastionSubnet”,以及 Bicep 文件中分配的值。


