Note
Access to this page requires authorization. You can try signing in or changing directories.
Access to this page requires authorization. You can try changing directories.
Azure Backup supports backing up all the disks (OS and data) in a virtual machine (VM) together by using the VM backup solution. Now, by using the selective disk backup and restore functionality, you can back up a subset of the data disks in a VM.
Selective disk backup and restore is supported for the Enhanced and Standard policies. This functionality provides an efficient and cost-effective solution for your backup and restore needs. Each recovery point contains only the disks that are included in the backup operation. In this way, you have a subset of disks restored from the specific recovery point during the restore operation. This functionality applies to restore from snapshots and the vault.
Note
Selective disk backup and restore is supported for both backup policies: Enhanced and Standard.
Selective disk backup and restore with the Enhanced policy is available in all Azure regions, including public, government, and air-gapped regions.
If you use selective disk backup with the Enhanced policy on a Linux VM, ensure that lsblk and lsscsi are available in your distribution so that the disks are excluded. If you use selective disk backup with the Standard policy, snapshot cost is always calculated for all the disks in the VM (both the included and excluded disks).
Scenarios
This solution is particularly useful in the following scenarios:
- If you have critical data to be backed up on only one disk or a subset of the disks. You don't want to back up the rest of the disks attached to a VM to minimize the backup storage costs.
- If you have other backup solutions for part of your VM or data. For example, you want to back up your databases or data by using a different workload backup solution. You want to use Azure VM-level backup for the rest of the data or disks to build an efficient and robust system by using the best capabilities that are available.
- If you use the Enhanced policy, you can use this solution to exclude unsupported disk types and configure a VM for backup. For shared disks in a VM, you can exclude the disk from VM backup and use Azure disk backup to take a crash-consistent backup of the shared disk.
When you use the Azure CLI, PowerShell, or the Azure portal, you can configure selective disk backup of the Azure VM. With a script, you can include or exclude data disks by using their logical unit numbers (LUNs). The ability to configure selective disk backup via the Azure portal is limited to the backup OS disk only for the Standard policy. You can configure it for all the data disks for the Enhanced policy.
The OS disk is added to the VM backup by default and can't be excluded.
Use the CLI
Ensure that you're using the Azure CLI version 2.0.80 or later. You can get the CLI version with the following command. The following CLI steps apply to selective disk backup for VMs that use either the Enhanced policy or the Standard policy.
az --version
Sign in to the subscription ID, where the Recovery Services vault and the VM exist:
az account set -s {subscriptionID}
Only the resourcegroup name (not the object) corresponding to the vault is needed in the following commands.
Configure backup with the CLI
During the configure-protection operation, you need to specify the disk list setting with an inclusion or exclusion parameter. Give the LUNs of the disks to be included or excluded in the backup.
The configure-protection operation overrides the previous settings, so they're not cumulative.
az backup protection enable-for-vm --resource-group {resourcegroup} --vault-name {vaultname} --vm {vmname} --policy-name {policyname} --disk-list-setting include --diskslist {LUNs separated by space}
az backup protection enable-for-vm --resource-group {resourcegroup} --vault-name {vaultname} --vm {vmname} --policy-name {policyname} --disk-list-setting exclude --diskslist 0 1
If the VM isn't in the same resource group as the vault, ResourceGroup refers to the resource group where the vault was created. Instead of the VM name, provide the VM ID as indicated:
az backup protection enable-for-vm --resource-group {ResourceGroup} --vault-name {vaultname} --vm $(az vm show -g VMResourceGroup -n MyVm --query id --output tsv) --policy-name {policyname} --disk-list-setting include --diskslist {LUNs separated by space}
Modify protection for already backed up VMs with the CLI
az backup protection update-for-vm --resource-group {resourcegroup} --vault-name {vaultname} -c {vmname} -i {vmname} --disk-list-setting exclude --diskslist {LUNs separated by space}
Back up only the OS disk during the configure-backup operation with the CLI
az backup protection enable-for-vm --resource-group {resourcegroup} --vault-name {vaultname} --vm {vmname} --policy-name {policyname} --exclude-all-data-disks
Back up only the OS disk during the modify-protection operation with the CLI
az backup protection update-for-vm --vault-name MyVault --resource-group MyResourceGroup --container-name MyContainer --item-name MyItem --disk-list-setting exclude --diskslist 1.
Restore disks with the CLI
az backup restore restore-disks --resource-group {resourcegroup} --vault-name {vaultname} -c {vmname} -i {vmname} -r {restorepoint} --target-resource-group {targetresourcegroup} --storage-account {storageaccountname} --diskslist {LUN of the disk(s) to be restored}
Restore only the OS disk with the CLI
az backup restore restore-disks --resource-group {resourcegroup} --vault-name {vaultname} -c {vmname} -i {vmname} -r {restorepoint} } --target-resource-group {targetresourcegroup} --storage-account {storageaccountname} --restore-only-osdisk
Get a protected item to get disk exclusion details with the CLI
az backup item show -c {vmname} -n {vmname} --vault-name {vaultname} --resource-group {resourcegroup} --backup-management-type AzureIaasVM
Another diskExclusionProperties parameter is added to the protected item:
"extendedProperties": {
      "diskExclusionProperties": {
        "diskLunList": [
          0,
          1
        ],
        "isInclusionList": true
      }
Get a backup job with the CLI
az backup job show --vault-name {vaultname} --resource-group {resourcegroup} -n {BackupJobID}
The following command helps get the details of the backed-up disks and excluded disks:
   "Backed-up disk(s)": "diskextest_OsDisk_1_170808a95d214428bad92efeecae626b; diskextest_DataDisk_0; diskextest_DataDisk_1",  "Backup Size": "0 MB",
   "Excluded disk(s)": "diskextest_DataDisk_2",
The backup job name is BackupJobID. To fetch the job name, run the following command:
az backup job list --resource-group {resourcegroup} --vault-name {vaultname}
List recovery points with the CLI
az backup recoverypoint list --vault-name {vaultname} --resource-group {resourcegroup} -c {vmname} -i {vmname} --backup-management-type AzureIaasVM
The following command gives the information on the number of disks attached and backed up in the VM:
      "recoveryPointDiskConfiguration": {
        "excludedDiskList": null,
        "includedDiskList": null,
        "numberOfDisksAttachedToVm": 4,
        "numberOfDisksIncludedInBackup": 3
};
Get a recovery point with the CLI
az backup recoverypoint show --vault-name {vaultname} --resource-group {resourcegroup} -c {vmname} -i {vmname} --backup-management-type AzureIaasVM -n {recoverypointID}
Each recovery point has the information of the included and excluded disks:
  "recoveryPointDiskConfiguration": {
      "excludedDiskList": [
        {
          "lun": 2,
          "name": "diskextest_DataDisk_2"
        }
      ],
      "includedDiskList": [
        {
          "lun": -1,
          "name": "diskextest_OsDisk_1_170808a95d214428bad92efeecae626b"
        },
        {
          "lun": 0,
          "name": "diskextest_DataDisk_0"
        },
        {
          "lun": 1,
          "name": "diskextest_DataDisk_1"
        }
      ],
      "numberOfDisksAttachedToVm": 4,
      "numberOfDisksIncludedInBackup": 3
Remove disk exclusion settings and get the protected item with the CLI
az backup protection update-for-vm --vault-name {vaultname} --resource-group {resourcegroup} -c {vmname} -i {vmname} --disk-list-setting resetexclusionsettings

az backup item show -c {vmname} -n {vmname} --vault-name {vaultname} --resource-group {resourcegroup}
When you run these commands, you see "diskExclusionProperties": null.
Use PowerShell
Ensure that you're using Azure PowerShell version 3.7.0 or later.
During the configure-protection operation, you need to specify the disk list setting with an inclusion or exclusion parameter. Give the LUNs of the disks to be included or excluded in the backup.
The configure-protection operation overrides the previous settings, so they're not cumulative.
Enable backup with PowerShell
For example:
$disks = ("0","1")
$targetVault = Get-AzRecoveryServicesVault -ResourceGroupName "rg-p-recovery_vaults" -Name "rsv-p-servers"
Set-AzRecoveryServicesVaultContext -Vault $targetVault
Get-AzRecoveryServicesBackupProtectionPolicy
$pol = Get-AzRecoveryServicesBackupProtectionPolicy -Name "P-Servers"
Enable-AzRecoveryServicesBackupProtection -Policy $pol -Name "V2VM" -ResourceGroupName "RGName1" -InclusionDisksList $disks -VaultId $targetVault.ID
Enable-AzRecoveryServicesBackupProtection -Policy $pol -Name "V2VM" -ResourceGroupName "RGName1" -ExclusionDisksList $disks -VaultId $targetVault.ID
Back up only the OS disk during the configure-backup operation with PowerShell
Enable-AzRecoveryServicesBackupProtection -Policy $pol -Name "V2VM" -ResourceGroupName "RGName1" -ExcludeAllDataDisks -VaultId $targetVault.ID
Get the backup item object to be passed in the modify-protection operation with PowerShell
$item= Get-AzRecoveryServicesBackupItem -BackupManagementType "AzureVM" -WorkloadType "AzureVM" -VaultId $targetVault.ID -FriendlyName "V2VM"
You need to pass the preceding obtained $item object to the -Item parameter in the following cmdlets.
Modify protection for already backed up VMs with PowerShell
Enable-AzRecoveryServicesBackupProtection -Item $item -InclusionDisksList[Strings] -VaultId $targetVault.ID -Policy $pol
Back up only the OS disk during the modify-protection operation with PowerShell
Enable-AzRecoveryServicesBackupProtection -Item $item -ExcludeAllDataDisks -VaultId $targetVault.ID -Policy $pol
Reset the disk exclusion setting with PowerShell
Enable-AzRecoveryServicesBackupProtection -Item $item -ResetExclusionSettings -VaultId $targetVault.ID -Policy $pol
If the command fails with the error that a policy parameter is required, check the protection status of the backup item. It's likely that the protection stopped. A policy is required to resume the protection and reset all previous disk exclusion settings.
Restore selective disks with PowerShell
$startDate = (Get-Date).AddDays(-7)
$endDate = Get-Date
$rp = Get-AzRecoveryServicesBackupRecoveryPoint -Item $item -StartDate $startdate.ToUniversalTime() -EndDate $enddate.ToUniversalTime() -VaultId $targetVault.ID
Restore-AzRecoveryServicesBackupItem -RecoveryPoint $rp[0] -StorageAccountName "DestAccount" -StorageAccountResourceGroupName "DestRG" -TargetResourceGroupName "DestRGforManagedDisks" -VaultId $targetVault.ID -RestoreDiskList [$disks]
Restore only the OS disk with PowerShell
Restore-AzRecoveryServicesBackupItem -RecoveryPoint $rp[0] -StorageAccountName "DestAccount" -StorageAccountResourceGroupName "DestRG" -TargetResourceGroupName "DestRGforManagedDisks" -VaultId $targetVault.ID -RestoreOnlyOSDisk
Use the Azure portal
Note
The functionality that the following sections describe can also be accessed via Backup center. Backup center is a single unified management experience in Azure. It enables enterprises to govern, monitor, operate, and analyze backups at scale. With this solution, you can perform most of the key operations for backup management without being limited to the scope of an individual vault.
When you use the Azure portal, you can view the included and excluded disks from the VM backup details pane and the backup Job Details pane. During restore, when you select the recovery point from which to restore, you can view the backed-up disks in that recovery point.
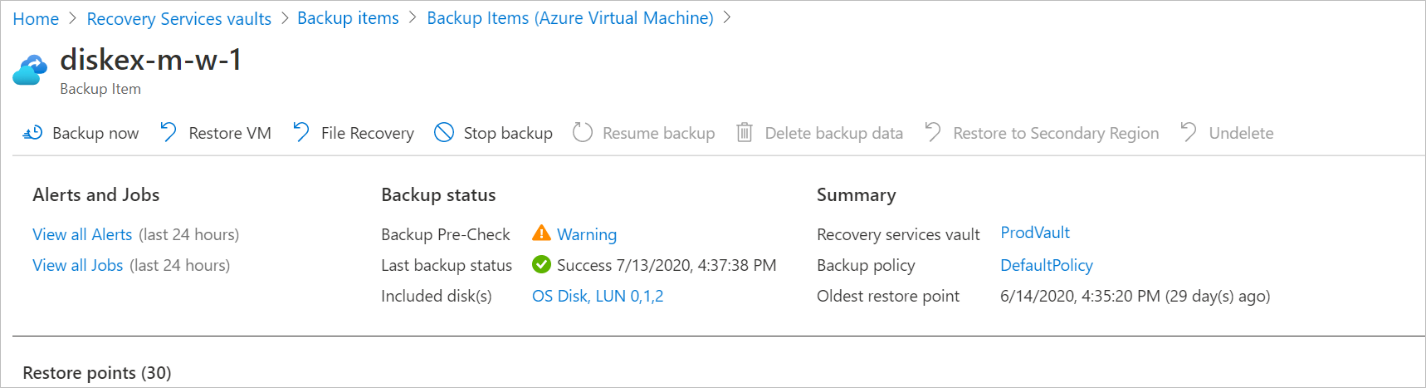
You can view the included and excluded disks for a VM in the portal from the VM backup details pane.
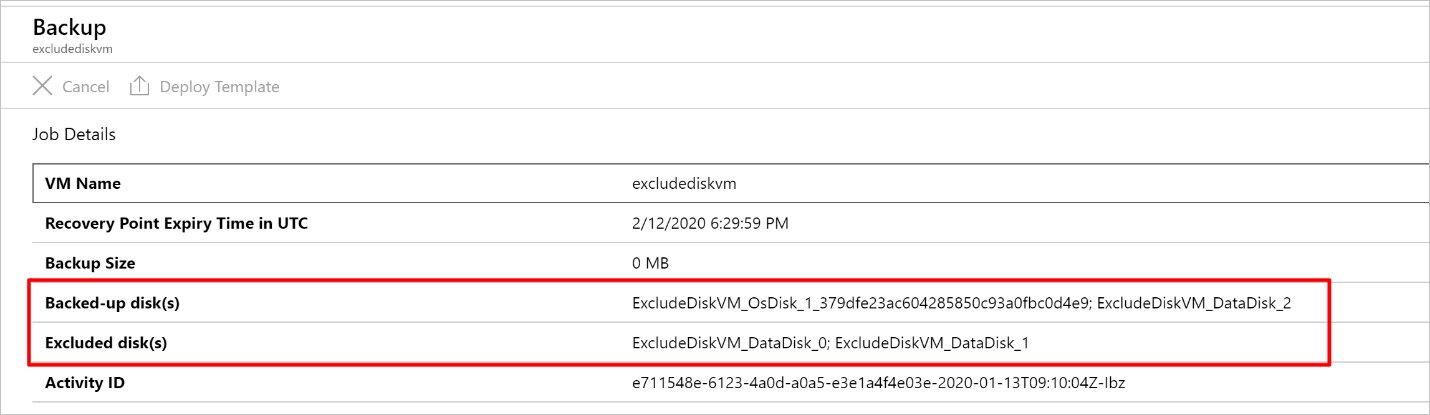
You can view the included and excluded disks in a backup on the Job Details pane.
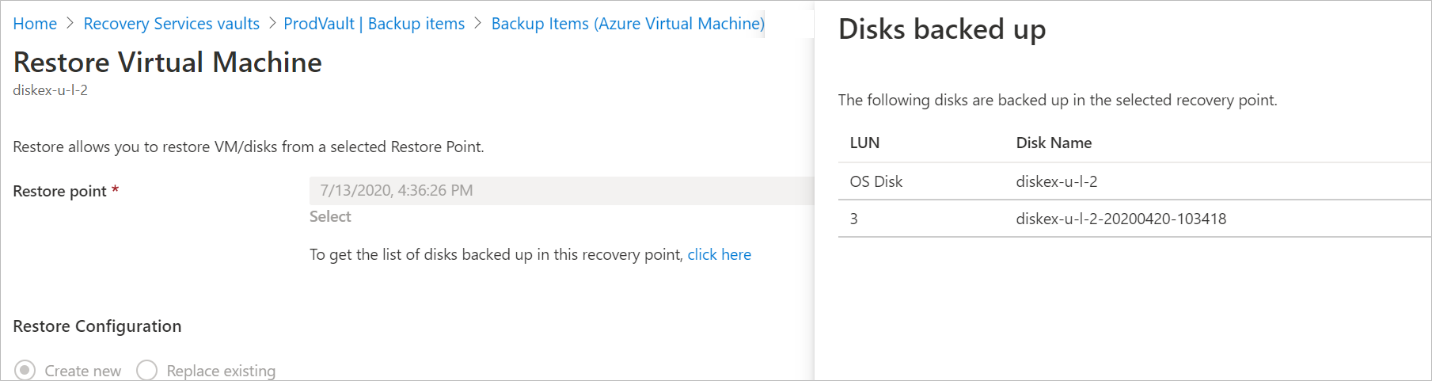
You can view the backed-up disks during restore when you select the recovery point from which to restore them.
- If you use the Standard policy to back up the VM, configuring the selective disk backup experience for a VM through the Azure portal is limited to the OS Disk Only option. To use selective disk backup on an already backed-up VM or for advanced inclusion or exclusion of specific data disks of a VM, use PowerShell or the CLI.
- If you use the Enhanced policy to back up the VM, select the data disks that you want to back up. Optionally, choose to include disks added to the VM in the future for backup.
Note
If data spans across disks, make sure that all the dependent disks are included in the backup. If you don't back up all the dependent disks in a volume, during restore the volume that comprises some of the nonbacked-up disks isn't created.
Back up the OS disk only in the Azure portal (Standard policy)
When you enable backup by using the Azure portal, select the OS Disk Only option. Then you can configure backup of your Azure VM with the OS disk and exclude all data disks attached to it.

Configure selective disk backup in the Azure portal (Enhanced policy)
When you enable the backup operation by using the Azure portal, choose the data disks that you want to include in the backup. (The OS disk is always included.) You can also choose to include disks that are added in the future for automatic backup by enabling the Include future disks option.
Note
Currently, you can configure a set of disks in a portal only when the VM is protected for the first time. You need to use the CLI or PowerShell commands to edit the set of disks that are backed up after protection or during a resume protection operation.
Use the Azure REST API
You can configure Azure VM backup with a few select disks. You can also modify an existing VM's protection to include or exclude a few disks. For more information, see Excluding disks in Azure VM backup.
Selective disk restore
Selective disk restore is an added functionality that you get when you enable selective disk backup. With this functionality, you can restore selective disks from all the disks that are backed up in a recovery point. It's more efficient and helps save time in scenarios where you know which of the disks need to be restored:
- The OS disk is included by default in the VM backup and restore and can't be excluded.
- Selective disk restore is supported only for recovery points that are created after the disk exclusion capability is enabled.
- Backups with the disk exclude setting turned on support only the Disk restore option. The VM restore or Replace existing restore options aren't supported in this case, and the options during restore become unavailable. If you choose a restore point that contains all disks before you configure disk exclusion during restore, the VM restore and Replace existing options become available.

Limitations
Selective disk backup functionality for the Standard policy isn't supported for classic VMs and encrypted VMs. Azure VMs that are encrypted with Azure Disk Encryption (ADE) by using Azure BitLocker for encryption of Windows VMs and the dm-crypt feature for Linux VMs are unsupported. VMs with ADE enabled can use selective disk backup with the Enhanced policy.
The Create new VM and Replace existing restore options aren't supported for the VM for which the selective disk backup functionality is enabled.
Currently, Azure VM backup doesn't support VMs with shared disks attached to them. Selective disk backup for the Standard policy can't be used in such cases, which exclude the disk and back up the VM. You can use selective disk backup with the Enhanced policy to exclude these disks and configure backup.
If you use disk exclusion or selective disks while backing up an Azure VM, stop protection and retain backup data. When you resume backup for this resource, you need to set up disk exclusion settings again.
Billing
Azure VM backup follows the existing pricing model. For more information, see Azure Backup pricing.
Standard policy
If you use the Standard policy, protected instance (PI) cost is calculated for the OS disk only if you choose to back up by using the OS Disk only option. If you configure backup and select at least one data disk, the PI cost is calculated for all the disks that are attached to the VM. Backup storage cost is calculated based on only the included disks, so you get to save on the storage cost. Snapshot cost is always calculated for all the disks in the VM (both the included and excluded disks).
If you select Cross Region Restore (CRR), the CRR pricing applies on the backup storage cost after excluding the disk.
Enhanced policy
If you use the Enhanced policy, PI costs, snapshot costs, and vault tier storage costs are all calculated based on the disks that you include for backup.
Known limitations
| OS type | Limitation |
|---|---|
| Windows | Spanned volumes: For spanned volumes (volumes spread across more than one physical disk), ensure that all disks are included in the backup. If not, Azure Backup might not be able to reliably restore the data and exclude it in billing. Storage pool: If you use disks carved out of a storage pool and if a LUN included for backup is common across virtual disks and data disks, the size of the virtual disk is also included in the backup size in addition to the data disks. |
| Linux | Logical volumes: For logical volumes spread across more than one disk, ensure that all disks are included in the backup. If not, Azure Backup might not be able to reliably restore the data and exclude it in billing. Distro support: Azure Backup uses lsscsi and lsblk to determine the disks being excluded for backup and to estimate the size of the data backed up for the PI fee calculation. If your distro (Debian 8.11, 10.13, and so on) doesn't support lsscsi, install it by using sudo apt install lsscsi to ensure that selective disk backup works. If not, the PI fee is calculated based on the backup data transferred instead of using lsscsi and lsblk. |
If you select the CRR feature, the CRR pricing applies on the backup storage cost after excluding the disk.
Frequently asked questions
How is PI cost calculated for only OS disk backup in Windows and Linux?
PI cost is calculated based on the actual (used) size of the VM:
- Windows: Used space calculation is based on the drive that stores the OS (which is usually drive C).
- Linux: Used space calculation is based on the device where the root filesystem ( / ) is mounted.
I configured only OS disk backup. Why is the snapshot happening for all the disks?
If you use the Standard policy, selective disk backup lets you save on backup vault storage cost by hardening the included disks that are part of the backup. However, the snapshot is taken for all the disks that are attached to the VM. So the snapshot cost is always calculated for all the disks in the VM (both the included and excluded disks). For more information, see Billing.
If you use the Enhanced policy, the snapshot is taken only for the OS disk and the data disks that you included.
Why can't I configure backup for the Azure VM by excluding shared disks attached to the VM?
If you use the Standard policy, Azure VM backup doesn't support VMs with shared disks attached to them. You can't exclude them with selective disk backup and then configure backup.
If you use the Enhanced policy, you can exclude the unsupported disks from the backup via selective disk backup (in the Azure portal, the CLI, PowerShell, and so on), and configure backup for the VM.