Note
Access to this page requires authorization. You can try signing in or changing directories.
Access to this page requires authorization. You can try changing directories.
APPLIES TO:  Azure Data Factory
  Azure Synapse Analytics
This article outlines how to use Copy Activity in Azure Data Factory or Azure Synapse pipelines to copy data from and to Azure SQL Database, and use Data Flow to transform data in Azure SQL Database. To learn more, read the introductory article for Azure Data Factory or Azure Synapse Analytics.
Supported capabilities
This Azure SQL Database connector is supported for the following capabilities:
| Supported capabilities | IR | Managed private endpoint |
|---|---|---|
| Copy activity (source/sink) | ① ② | ✓ |
| Mapping data flow (source/sink) | ① | ✓ |
| Lookup activity | ① ② | ✓ |
| GetMetadata activity | ① ② | ✓ |
| Script activity | ① ② | ✓ |
| Stored procedure activity | ① ② | ✓ |
① Azure integration runtime ② Self-hosted integration runtime
For Copy activity, this Azure SQL Database connector supports these functions:
- Copying data by using SQL authentication and Microsoft Entra Application token authentication with a service principal or managed identities for Azure resources.
- As a source, retrieving data by using a SQL query or a stored procedure. You can also choose to parallel copy from an Azure SQL Database source, see the Parallel copy from SQL database section for details.
- As a sink, automatically creating destination table if not exists based on the source schema; appending data to a table or invoking a stored procedure with custom logic during the copy.
If you use Azure SQL Database serverless tier, note when the server is paused, activity run fails instead of waiting for the auto resume to be ready. You can add activity retry or chain additional activities to make sure the server is live upon the actual execution.
Important
If you copy data by using the Azure integration runtime, configure a server-level firewall rule so that Azure services can access the server. If you copy data by using a self-hosted integration runtime, configure the firewall to allow the appropriate IP range. This range includes the machine's IP that's used to connect to Azure SQL Database.
Get started
To perform the copy activity with a pipeline, you can use one of the following tools or SDKs:
- Copy Data tool
- Azure portal
- .NET SDK
- Python SDK
- Azure PowerShell
- REST API
- Azure Resource Manager template
Create an Azure SQL Database linked service using UI
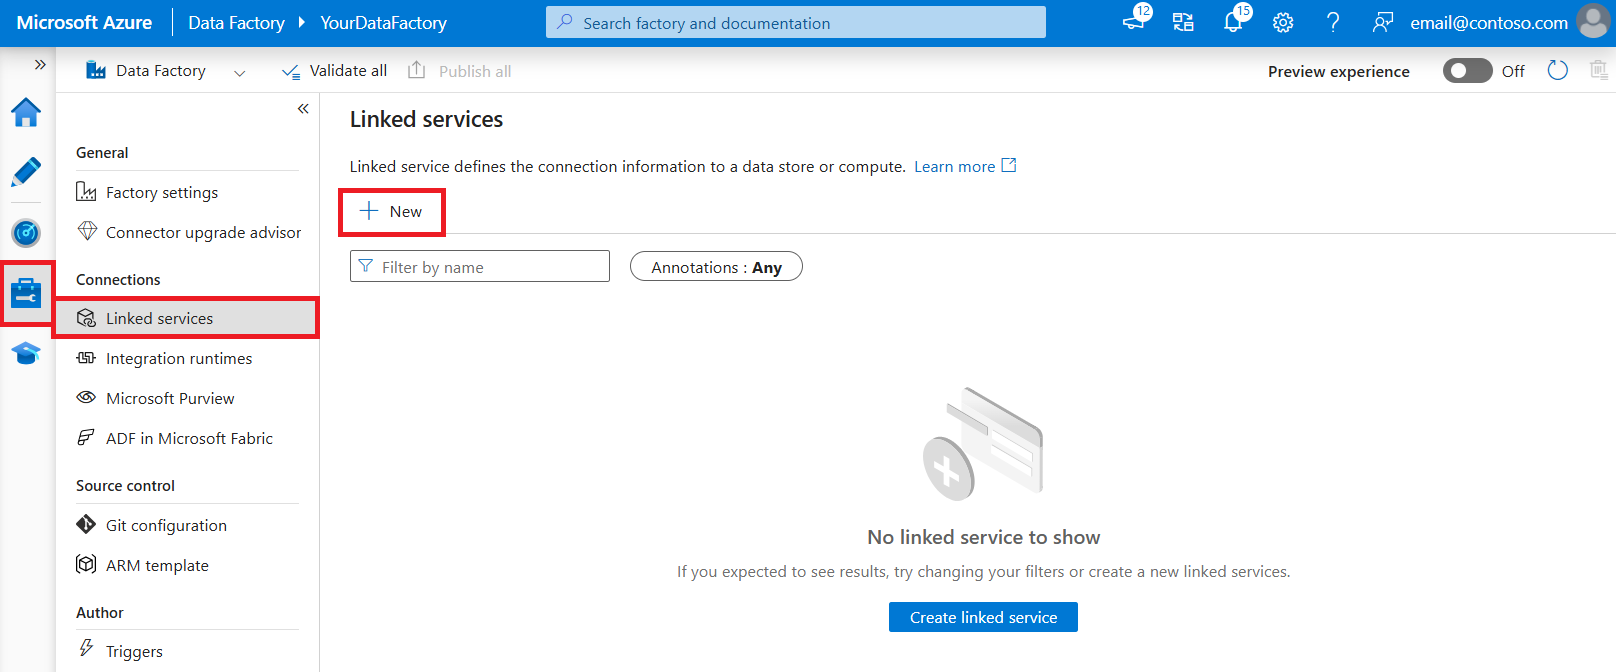
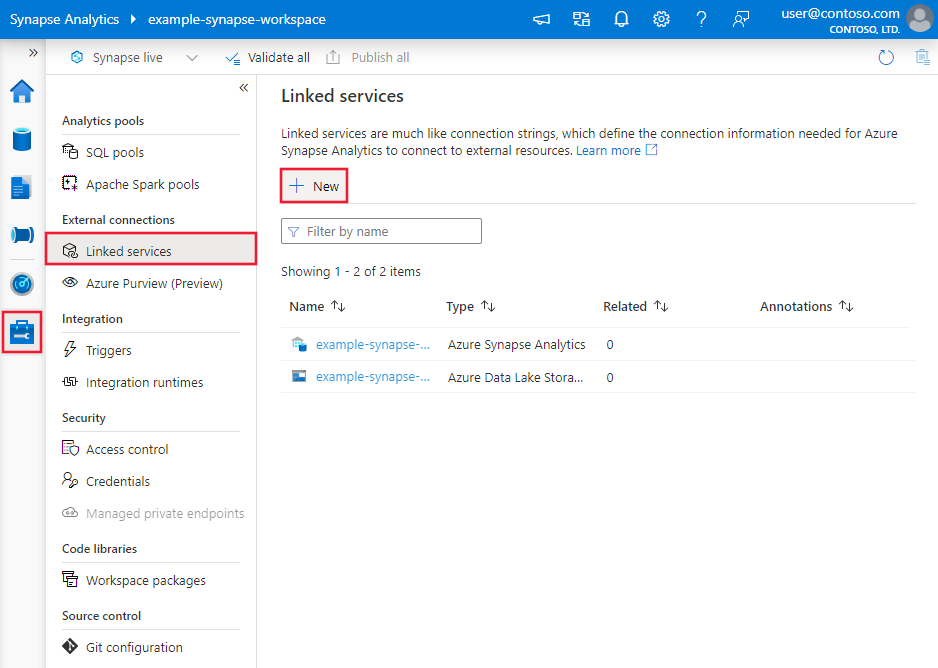
Use the following steps to create an Azure SQL Database linked service in the Azure portal UI.
Browse to the Manage tab in your Azure Data Factory or Synapse workspace and select Linked Services, then click New:
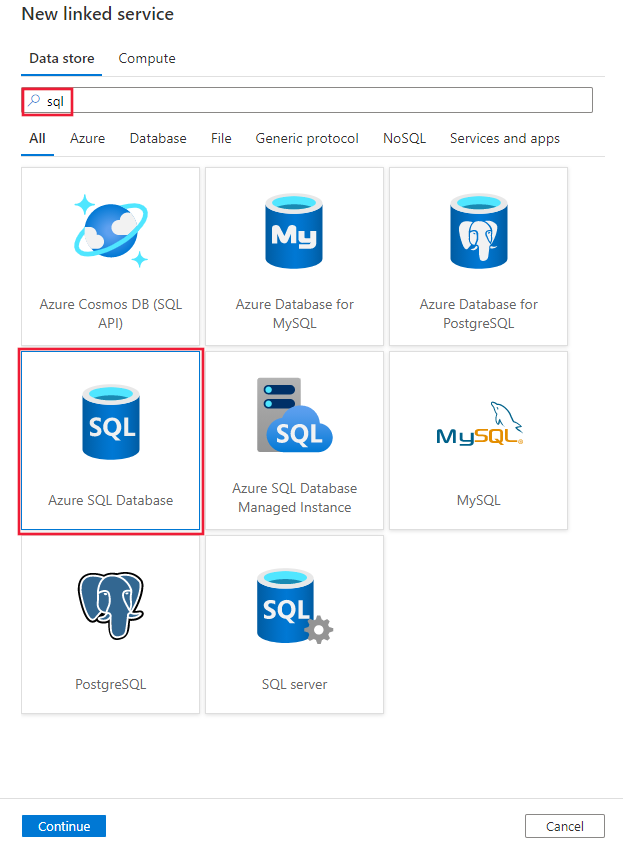
Search for SQL and select the Azure SQL Database connector.
Configure the service details, test the connection, and create the new linked service.
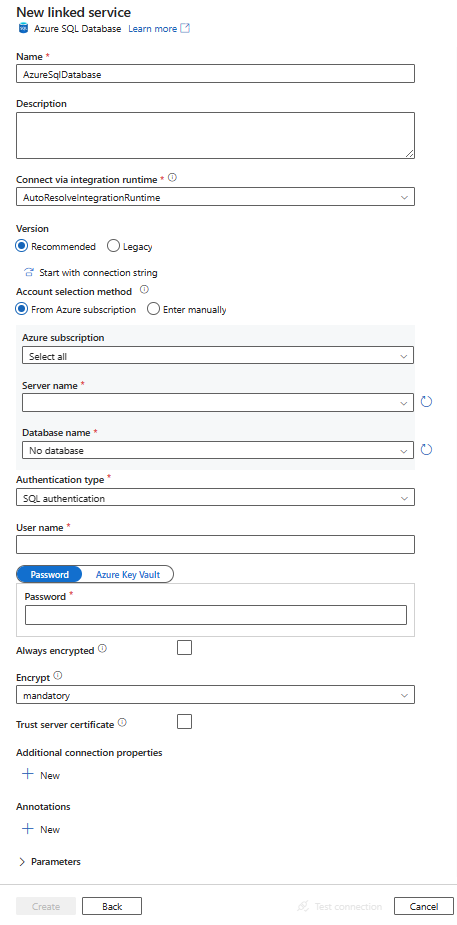
Connector configuration details
The following sections provide details about properties that are used to define Azure Data Factory or Synapse pipeline entities specific to an Azure SQL Database connector.
Linked service properties
The Azure SQL Database connector Recommended version supports TLS 1.3. Refer to this section to upgrade your Azure SQL Database connector version from Legacy one. For the property details, see the corresponding sections.
Tip
If you hit an error with the error code "UserErrorFailedToConnectToSqlServer" and a message like "The session limit for the database is XXX and has been reached," add Pooling=false to your connection string and try again. Pooling=false is also recommended for SHIR(Self Hosted Integration Runtime) type linked service setup. Pooling and other connection parameters can be added as new parameter names and values in Additional connection properties section of linked service creation form.
Recommended version
These generic properties are supported for an Azure SQL Database linked service when you apply Recommended version:
| Property | Description | Required |
|---|---|---|
| type | The type property must be set to AzureSqlDatabase. | Yes |
| server | The name or network address of the SQL server instance you want to connect to. | Yes |
| database | The name of the database. | Yes |
| authenticationType | The type used for authentication. Allowed values are SQL (default), ServicePrincipal, SystemAssignedManagedIdentity, UserAssignedManagedIdentity. Go to the relevant authentication section on specific properties and prerequisites. | Yes |
| alwaysEncryptedSettings | Specify alwaysencryptedsettings information that's needed to enable Always Encrypted to protect sensitive data stored in SQL server by using either managed identity or service principal. For more information, see the JSON example following the table and Using Always Encrypted section. If not specified, the default always encrypted setting is disabled. | No |
| encrypt | Indicate whether TLS encryption is required for all data sent between the client and server. Options: mandatory (for true, default)/optional (for false)/strict. | No |
| trustServerCertificate | Indicate whether the channel will be encrypted while bypassing the certificate chain to validate trust. | No |
| hostNameInCertificate | The host name to use when validating the server certificate for the connection. When not specified, the server name is used for certificate validation. | No |
| connectVia | This integration runtime is used to connect to the data store. You can use the Azure integration runtime or a self-hosted integration runtime if your data store is located in a private network. If not specified, the default Azure integration runtime is used. | No |
For additional connection properties, see the table below:
| Property | Description | Required |
|---|---|---|
| applicationIntent | The application workload type when connecting to a server. Allowed values are ReadOnly and ReadWrite. |
No |
| connectTimeout | The length of time (in seconds) to wait for a connection to the server before terminating the attempt and generating an error. | No |
| connectRetryCount | The number of reconnections attempted after identifying an idle connection failure. The value should be an integer between 0 and 255. | No |
| connectRetryInterval | The amount of time (in seconds) between each reconnection attempt after identifying an idle connection failure. The value should be an integer between 1 and 60. | No |
| loadBalanceTimeout | The minimum time (in seconds) for the connection to live in the connection pool before the connection being destroyed. | No |
| commandTimeout | The default wait time (in seconds) before terminating the attempt to execute a command and generating an error. | No |
| integratedSecurity | The allowed values are true or false. When specifying false, indicate whether userName and password are specified in the connection. When specifying true, indicates whether the current Windows account credentials are used for authentication. |
No |
| failoverPartner | The name or address of the partner server to connect to if the primary server is down. | No |
| maxPoolSize | The maximum number of connections allowed in the connection pool for the specific connection. | No |
| minPoolSize | The minimum number of connections allowed in the connection pool for the specific connection. | No |
| multipleActiveResultSets | The allowed values are true or false. When you specify true, an application can maintain multiple active result sets (MARS). When you specify false, an application must process or cancel all result sets from one batch before it can execute any other batches on that connection. |
No |
| multiSubnetFailover | The allowed values are true or false. If your application is connecting to an AlwaysOn availability group (AG) on different subnets, setting this property to true provides faster detection of and connection to the currently active server. |
No |
| packetSize | The size in bytes of the network packets used to communicate with an instance of server. | No |
| pooling | The allowed values are true or false. When you specify true, the connection will be pooled. When you specify false, the connection will be explicitly opened every time the connection is requested. |
No |
SQL authentication
To use SQL authentication, in addition to the generic properties that are described in the preceding section, specify the following properties:
| Property | Description | Required |
|---|---|---|
| userName | The user name used to connect to the server. | Yes |
| password | The password for the user name. Mark this field as SecureString to store it securely. Or, you can reference a secret stored in Azure Key Vault. | Yes |
Example: using SQL authentication
{
    "name": "AzureSqlDbLinkedService",
    "properties": {
        "type": "AzureSqlDatabase",
        "typeProperties": {
            "server": "<name or network address of the SQL server instance>",
            "database": "<database name>",
            "encrypt": "<encrypt>",
            "trustServerCertificate": false,
            "authenticationType": "SQL",
            "userName": "<user name>",
            "password": {
                "type": "SecureString",
                "value": "<password>"
            }
        },
        "connectVia": {
            "referenceName": "<name of Integration Runtime>",
            "type": "IntegrationRuntimeReference"
        }
    }
}
Example: password in Azure Key Vault
{
    "name": "AzureSqlDbLinkedService",
    "properties": {
        "type": "AzureSqlDatabase",
        "typeProperties": {
            "server": "<name or network address of the SQL server instance>",
            "database": "<database name>",
            "encrypt": "<encrypt>",
            "trustServerCertificate": false,
            "authenticationType": "SQL",
            "userName": "<user name>",
            "password": {
                "type": "AzureKeyVaultSecret",
                "store": {
                    "referenceName": "<Azure Key Vault linked service name>",
                    "type": "LinkedServiceReference"
                },
                "secretName": "<secretName>"
            }
        },
        "connectVia": {
            "referenceName": "<name of Integration Runtime>",
            "type": "IntegrationRuntimeReference"
        }
    }
}
Example: Use Always Encrypted
{
    "name": "AzureSqlDbLinkedService",
    "properties": {
        "type": "AzureSqlDatabase",
        "typeProperties": {
            "server": "<name or network address of the SQL server instance>",
            "database": "<database name>",
            "encrypt": "<encrypt>",
            "trustServerCertificate": false,
            "authenticationType": "SQL",
            "userName": "<user name>",
            "password": {
                "type": "SecureString",
                "value": "<password>"
            },
            "alwaysEncryptedSettings": {
                "alwaysEncryptedAkvAuthType": "ServicePrincipal",
                "servicePrincipalId": "<service principal id>",
                "servicePrincipalKey": {
                    "type": "SecureString",
                    "value": "<service principal key>"
                }
            }
        },
        "connectVia": {
            "referenceName": "<name of Integration Runtime>",
            "type": "IntegrationRuntimeReference"
        }
    }
}
Service principal authentication
To use service principal authentication, in addition to the generic properties that are described in the preceding section, specify the following properties:
| Property | Description | Required |
|---|---|---|
| servicePrincipalId | Specify the application's client ID. | Yes |
| servicePrincipalCredential | The service principal credential. Specify the application's key. Mark this field as SecureString to store it securely, or reference a secret stored in Azure Key Vault. | Yes |
| tenant | Specify the tenant information, like the domain name or tenant ID, under which your application resides. Retrieve it by hovering the mouse in the upper-right corner of the Azure portal. | Yes |
| azureCloudType | For service principal authentication, specify the type of Azure cloud environment to which your Microsoft Entra application is registered. By default, the data factory or Synapse pipeline's cloud environment is used. |
No |
You also need to follow the steps below:
Create a Microsoft Entra application from the Azure portal. Make note of the application name and the following values that define the linked service:
- Application ID
- Application key
- Tenant ID
Provision a Microsoft Entra administrator for your server on the Azure portal if you haven't already done so. The Microsoft Entra administrator must be a Microsoft Entra user or Microsoft Entra group, but it can't be a service principal. This step is done so that, in the next step, you can use a Microsoft Entra identity to create a contained database user for the service principal.
Create contained database users for the service principal. Connect to the database from or to which you want to copy data by using tools like SQL Server Management Studio, with a Microsoft Entra identity that has at least ALTER ANY USER permission. Run the following T-SQL:
CREATE USER [your application name] FROM EXTERNAL PROVIDER;Grant the service principal needed permissions as you normally do for SQL users or others. Run the following code. For more options, see this document.
ALTER ROLE [role name] ADD MEMBER [your application name];Configure an Azure SQL Database linked service in an Azure Data Factory or Synapse workspace.
Linked service example that uses service principal authentication
{
    "name": "AzureSqlDbLinkedService",
    "properties": {
        "type": "AzureSqlDatabase",
        "typeProperties": {
            "server": "<name or network address of the SQL server instance>",
            "database": "<database name>",
            "encrypt": "<encrypt>",
            "trustServerCertificate": false,
            "hostNameInCertificate": "<host name>",
            "authenticationType": "ServicePrincipal",
            "servicePrincipalId": "<service principal id>",
            "servicePrincipalCredential": {
                "type": "SecureString",
                "value": "<application key>"
            },
            "tenant": "<tenant info, e.g. microsoft.partner.onmschina.cn>"
        },
        "connectVia": {
            "referenceName": "<name of Integration Runtime>",
            "type": "IntegrationRuntimeReference"
        }
    }
}
System-assigned managed identity authentication
A data factory or Synapse workspace can be associated with a system-assigned managed identity for Azure resources that represents the service when authenticating to other resources in Azure. You can use this managed identity for Azure SQL Database authentication. The designated factory or Synapse workspace can access and copy data from or to your database by using this identity.
To use system-assigned managed identity authentication, specify the generic properties that are described in the preceding section, and follow these steps.
Provision a Microsoft Entra administrator for your server on the Azure portal if you haven't already done so. The Microsoft Entra administrator can be a Microsoft Entra user or a Microsoft Entra group. If you grant the group with managed identity an admin role, skip steps 3 and 4. The administrator has full access to the database.
Create contained database users for the managed identity. Connect to the database from or to which you want to copy data by using tools like SQL Server Management Studio, with a Microsoft Entra identity that has at least ALTER ANY USER permission. Run the following T-SQL:
CREATE USER [your_resource_name] FROM EXTERNAL PROVIDER;Grant the managed identity needed permissions as you normally do for SQL users and others. Run the following code. For more options, see this document.
ALTER ROLE [role name] ADD MEMBER [your_resource_name];Configure an Azure SQL Database linked service.
Example
{
    "name": "AzureSqlDbLinkedService",
    "properties": {
        "type": "AzureSqlDatabase",
        "typeProperties": {
            "server": "<name or network address of the SQL server instance>",
            "database": "<database name>",
            "encrypt": "<encrypt>",
            "trustServerCertificate": false,
            "authenticationType": "SystemAssignedManagedIdentity"
        },
        "connectVia": {
            "referenceName": "<name of Integration Runtime>",
            "type": "IntegrationRuntimeReference"
        }
    }
}
User-assigned managed identity authentication
A data factory or Synapse workspace can be associated with a user-assigned managed identities that represents the service when authenticating to other resources in Azure. You can use this managed identity for Azure SQL Database authentication. The designated factory or Synapse workspace can access and copy data from or to your database by using this identity.
To use user-assigned managed identity authentication, in addition to the generic properties that are described in the preceding section, specify the following properties:
| Property | Description | Required |
|---|---|---|
| credentials | Specify the user-assigned managed identity as the credential object. | Yes |
You also need to follow the steps below:
Provision a Microsoft Entra administrator for your server on the Azure portal if you haven't already done so. The Microsoft Entra administrator can be a Microsoft Entra user or a Microsoft Entra group. If you grant the group with user-assigned managed identity an admin role, skip steps 3. The administrator has full access to the database.
Create contained database users for the user-assigned managed identity. Connect to the database from or to which you want to copy data by using tools like SQL Server Management Studio, with a Microsoft Entra identity that has at least ALTER ANY USER permission. Run the following T-SQL:
CREATE USER [your_resource_name] FROM EXTERNAL PROVIDER;Create one or multiple user-assigned managed identities and grant the user-assigned managed identity needed permissions as you normally do for SQL users and others. Run the following code. For more options, see this document.
ALTER ROLE [role name] ADD MEMBER [your_resource_name];Assign one or multiple user-assigned managed identities to your data factory and create credentials for each user-assigned managed identity.
Configure an Azure SQL Database linked service.
Example
{
    "name": "AzureSqlDbLinkedService",
    "properties": {
        "type": "AzureSqlDatabase",
        "typeProperties": {
            "server": "<name or network address of the SQL server instance>",
            "database": "<database name>",
            "encrypt": "<encrypt>",
            "trustServerCertificate": false,
            "authenticationType": "UserAssignedManagedIdentity",
            "credential": {
                "referenceName": "credential1",
                "type": "CredentialReference"
            }
        },
        "connectVia": {
            "referenceName": "<name of Integration Runtime>",
            "type": "IntegrationRuntimeReference"
        }
    }
}
Legacy version
These generic properties are supported for an Azure SQL Database linked service when you apply Legacy version:
| Property | Description | Required |
|---|---|---|
| type | The type property must be set to AzureSqlDatabase. | Yes |
| connectionString | Specify information needed to connect to the Azure SQL Database instance for the connectionString property. You also can put a password or service principal key in Azure Key Vault. If it's SQL authentication, pull the password configuration out of the connection string. For more information, see Store credentials in Azure Key Vault. |
Yes |
| alwaysEncryptedSettings | Specify alwaysencryptedsettings information that's needed to enable Always Encrypted to protect sensitive data stored in SQL server by using either managed identity or service principal. For more information, see Using Always Encrypted section. If not specified, the default always encrypted setting is disabled. | No |
| connectVia | This integration runtime is used to connect to the data store. You can use the Azure integration runtime or a self-hosted integration runtime if your data store is located in a private network. If not specified, the default Azure integration runtime is used. | No |
For different authentication types, refer to the following sections on specific properties and prerequisites respectively:
- SQL authentication for the legacy version
- Service principal authentication for the legacy version
- System-assigned managed identity authentication for the legacy version
- User-assigned managed identity authentication for the legacy version
SQL authentication for the legacy version
To use SQL authentication, specify the generic properties that are described in the preceding section.
Service principal authentication for the legacy version
To use service principal authentication, in addition to the generic properties that are described in the preceding section, specify the following properties:
| Property | Description | Required |
|---|---|---|
| servicePrincipalId | Specify the application's client ID. | Yes |
| servicePrincipalKey | Specify the application's key. Mark this field as SecureString to store it securely or reference a secret stored in Azure Key Vault. | Yes |
| tenant | Specify the tenant information, like the domain name or tenant ID, under which your application resides. Retrieve it by hovering the mouse in the upper-right corner of the Azure portal. | Yes |
| azureCloudType | For service principal authentication, specify the type of Azure cloud environment to which your Microsoft Entra application is registered. By default, the data factory or Synapse pipeline's cloud environment is used. |
No |
You also need to follow the steps in Service principal authentication to grant the corresponding permission.
System-assigned managed identity authentication for the legacy version
To use system-assigned managed identity authentication, follow the same step for the recommended version in System-assigned managed identity authentication.
User-assigned managed identity authentication for legacy version
To use user-assigned managed identity authentication, follow the same step for the recommended version in User-assigned managed identity authentication.
Dataset properties
For a full list of sections and properties available to define datasets, see Datasets.
The following properties are supported for Azure SQL Database dataset:
| Property | Description | Required |
|---|---|---|
| type | The type property of the dataset must be set to AzureSqlTable. | Yes |
| schema | Name of the schema. | No for source, Yes for sink |
| table | Name of the table/view. | No for source, Yes for sink |
| tableName | Name of the table/view with schema. This property is supported for backward compatibility. For new workload, use schema and table. |
No for source, Yes for sink |
Dataset properties example
{
    "name": "AzureSQLDbDataset",
    "properties":
    {
        "type": "AzureSqlTable",
        "linkedServiceName": {
            "referenceName": "<Azure SQL Database linked service name>",
            "type": "LinkedServiceReference"
        },
        "schema": [ < physical schema, optional, retrievable during authoring > ],
        "typeProperties": {
            "schema": "<schema_name>",
            "table": "<table_name>"
        }
    }
}
Copy activity properties
For a full list of sections and properties available for defining activities, see Pipelines. This section provides a list of properties supported by the Azure SQL Database source and sink.
Azure SQL Database as the source
Tip
To load data from Azure SQL Database efficiently by using data partitioning, learn more from Parallel copy from SQL database.
To copy data from Azure SQL Database, the following properties are supported in the copy activity source section:
| Property | Description | Required |
|---|---|---|
| type | The type property of the copy activity source must be set to AzureSqlSource. "SqlSource" type is still supported for backward compatibility. | Yes |
| sqlReaderQuery | This property uses the custom SQL query to read data. An example is select * from MyTable. |
No |
| sqlReaderStoredProcedureName | The name of the stored procedure that reads data from the source table. The last SQL statement must be a SELECT statement in the stored procedure. | No |
| storedProcedureParameters | Parameters for the stored procedure. Allowed values are name or value pairs. The names and casing of parameters must match the names and casing of the stored procedure parameters. |
No |
| isolationLevel | Specifies the transaction locking behavior for the SQL source. The allowed values are: ReadCommitted, ReadUncommitted, RepeatableRead, Serializable, Snapshot. If not specified, the database's default isolation level is used. Refer to this doc for more details. | No |
| partitionOptions | Specifies the data partitioning options used to load data from Azure SQL Database. Allowed values are: None (default), PhysicalPartitionsOfTable, and DynamicRange. When a partition option is enabled (that is, not None), the degree of parallelism to concurrently load data from an Azure SQL Database is controlled by the parallelCopies setting on the copy activity. |
No |
| partitionSettings | Specify the group of the settings for data partitioning. Apply when the partition option isn't None. |
No |
Under partitionSettings: |
||
| partitionColumnName | Specify the name of the source column in integer or date/datetime type (int, smallint, bigint, date, smalldatetime, datetime, datetime2, or datetimeoffset) that will be used by range partitioning for parallel copy. If not specified, the index or the primary key of the table is autodetected and used as the partition column.Apply when the partition option is DynamicRange. If you use a query to retrieve the source data, hook ?DfDynamicRangePartitionCondition in the WHERE clause. For an example, see the Parallel copy from SQL database section. |
No |
| partitionUpperBound | The maximum value of the partition column for partition range splitting. This value is used to decide the partition stride, not for filtering the rows in table. All rows in the table or query result will be partitioned and copied. If not specified, copy activity auto detect the value. Apply when the partition option is DynamicRange. For an example, see the Parallel copy from SQL database section. |
No |
| partitionLowerBound | The minimum value of the partition column for partition range splitting. This value is used to decide the partition stride, not for filtering the rows in table. All rows in the table or query result will be partitioned and copied. If not specified, copy activity auto detect the value. Apply when the partition option is DynamicRange. For an example, see the Parallel copy from SQL database section. |
No |
Note the following points:
- If sqlReaderQuery is specified for AzureSqlSource, the copy activity runs this query against the Azure SQL Database source to get the data. You also can specify a stored procedure by specifying sqlReaderStoredProcedureName and storedProcedureParameters if the stored procedure takes parameters.
- When using stored procedure in source to retrieve data, note if your stored procedure is designed as returning different schema when different parameter value is passed in, you may encounter failure or see unexpected result when importing schema from UI or when copying data to SQL database with auto table creation.
SQL query example
"activities":[
    {
        "name": "CopyFromAzureSQLDatabase",
        "type": "Copy",
        "inputs": [
            {
                "referenceName": "<Azure SQL Database input dataset name>",
                "type": "DatasetReference"
            }
        ],
        "outputs": [
            {
                "referenceName": "<output dataset name>",
                "type": "DatasetReference"
            }
        ],
        "typeProperties": {
            "source": {
                "type": "AzureSqlSource",
                "sqlReaderQuery": "SELECT * FROM MyTable"
            },
            "sink": {
                "type": "<sink type>"
            }
        }
    }
]
Stored procedure example
"activities":[
    {
        "name": "CopyFromAzureSQLDatabase",
        "type": "Copy",
        "inputs": [
            {
                "referenceName": "<Azure SQL Database input dataset name>",
                "type": "DatasetReference"
            }
        ],
        "outputs": [
            {
                "referenceName": "<output dataset name>",
                "type": "DatasetReference"
            }
        ],
        "typeProperties": {
            "source": {
                "type": "AzureSqlSource",
                "sqlReaderStoredProcedureName": "CopyTestSrcStoredProcedureWithParameters",
                "storedProcedureParameters": {
                    "stringData": { "value": "str3" },
                    "identifier": { "value": "$$Text.Format('{0:yyyy}', <datetime parameter>)", "type": "Int"}
                }
            },
            "sink": {
                "type": "<sink type>"
            }
        }
    }
]
Stored procedure definition
CREATE PROCEDURE CopyTestSrcStoredProcedureWithParameters
(
    @stringData varchar(20),
    @identifier int
)
AS
SET NOCOUNT ON;
BEGIN
     select *
     from dbo.UnitTestSrcTable
     where dbo.UnitTestSrcTable.stringData != stringData
    and dbo.UnitTestSrcTable.identifier != identifier
END
GO
Azure SQL Database as the sink
Tip
Learn more about the supported write behaviors, configurations, and best practices from Best practice for loading data into Azure SQL Database.
To copy data to Azure SQL Database, the following properties are supported in the copy activity sink section:
| Property | Description | Required |
|---|---|---|
| type | The type property of the copy activity sink must be set to AzureSqlSink. "SqlSink" type is still supported for backward compatibility. | Yes |
| preCopyScript | Specify a SQL query for the copy activity to run before writing data into Azure SQL Database. It's invoked only once per copy run. Use this property to clean up the preloaded data. | No |
| tableOption | Specifies whether to automatically create the sink table if not exists based on the source schema. Auto table creation is not supported when sink specifies stored procedure. Allowed values are: none (default), autoCreate. |
No |
| sqlWriterStoredProcedureName | The name of the stored procedure that defines how to apply source data into a target table. This stored procedure is invoked per batch. For operations that run only once and have nothing to do with source data, for example, delete or truncate, use the preCopyScript property.See example from Invoke a stored procedure from a SQL sink. |
No |
| storedProcedureTableTypeParameterName | The parameter name of the table type specified in the stored procedure. | No |
| sqlWriterTableType | The table type name to be used in the stored procedure. The copy activity makes the data being moved available in a temp table with this table type. Stored procedure code can then merge the data that's being copied with existing data. | No |
| storedProcedureParameters | Parameters for the stored procedure. Allowed values are name and value pairs. Names and casing of parameters must match the names and casing of the stored procedure parameters. |
No |
| writeBatchSize | Number of rows to insert into the SQL table per batch. The allowed value is integer (number of rows). By default, the service dynamically determines the appropriate batch size based on the row size. |
No |
| writeBatchTimeout | The wait time for the insert, upsert and stored procedure operation to complete before it times out. Allowed values are for the timespan. An example is "00:30:00" for 30 minutes. If no value is specified, the time-out defaults to "00:30:00". |
No |
| disableMetricsCollection | The service collects metrics such as Azure SQL Database DTUs for copy performance optimization and recommendations, which introduces additional master DB access. If you are concerned with this behavior, specify true to turn it off. |
No (default is false) |
| maxConcurrentConnections | The upper limit of concurrent connections established to the data store during the activity run. Specify a value only when you want to limit concurrent connections. | No |
| WriteBehavior | Specify the write behavior for copy activity to load data into Azure SQL Database. The allowed value is Insert and Upsert. By default, the service uses insert to load data. |
No |
| upsertSettings | Specify the group of the settings for write behavior. Apply when the WriteBehavior option is Upsert. |
No |
Under upsertSettings: |
||
| useTempDB | Specify whether to use the global temporary table or physical table as the interim table for upsert. By default, the service uses global temporary table as the interim table. value is true. |
No |
| interimSchemaName | Specify the interim schema for creating interim table if physical table is used. Note: user need to have the permission for creating and deleting table. By default, interim table will share the same schema as sink table. Apply when the useTempDB option is False. |
No |
| keys | Specify the column names for unique row identification. Either a single key or a series of keys can be used. If not specified, the primary key is used. | No |
Example 1: Append data
"activities":[
    {
        "name": "CopyToAzureSQLDatabase",
        "type": "Copy",
        "inputs": [
            {
                "referenceName": "<input dataset name>",
                "type": "DatasetReference"
            }
        ],
        "outputs": [
            {
                "referenceName": "<Azure SQL Database output dataset name>",
                "type": "DatasetReference"
            }
        ],
        "typeProperties": {
            "source": {
                "type": "<source type>"
            },
            "sink": {
                "type": "AzureSqlSink",
                "tableOption": "autoCreate",
                "writeBatchSize": 100000
            }
        }
    }
]
Example 2: Invoke a stored procedure during copy
Learn more details from Invoke a stored procedure from a SQL sink.
"activities":[
    {
        "name": "CopyToAzureSQLDatabase",
        "type": "Copy",
        "inputs": [
            {
                "referenceName": "<input dataset name>",
                "type": "DatasetReference"
            }
        ],
        "outputs": [
            {
                "referenceName": "<Azure SQL Database output dataset name>",
                "type": "DatasetReference"
            }
        ],
        "typeProperties": {
            "source": {
                "type": "<source type>"
            },
            "sink": {
                "type": "AzureSqlSink",
                "sqlWriterStoredProcedureName": "CopyTestStoredProcedureWithParameters",
                "storedProcedureTableTypeParameterName": "MyTable",
                "sqlWriterTableType": "MyTableType",
                "storedProcedureParameters": {
                    "identifier": { "value": "1", "type": "Int" },
                    "stringData": { "value": "str1" }
                }
            }
        }
    }
]
Example 3: Upsert data
"activities":[
    {
        "name": "CopyToAzureSQLDatabase",
        "type": "Copy",
        "inputs": [
            {
                "referenceName": "<input dataset name>",
                "type": "DatasetReference"
            }
        ],
        "outputs": [
            {
                "referenceName": "<Azure SQL Database output dataset name>",
                "type": "DatasetReference"
            }
        ],
        "typeProperties": {
            "source": {
                "type": "<source type>"
            },
            "sink": {
                "type": "AzureSqlSink",
                "tableOption": "autoCreate",
                "writeBehavior": "upsert",
                "upsertSettings": {
                    "useTempDB": true,
                    "keys": [
                        "<column name>"
                    ]
                },
            }
        }
    }
]
Parallel copy from SQL database
The Azure SQL Database connector in copy activity provides built-in data partitioning to copy data in parallel. You can find data partitioning options on the Source tab of the copy activity.
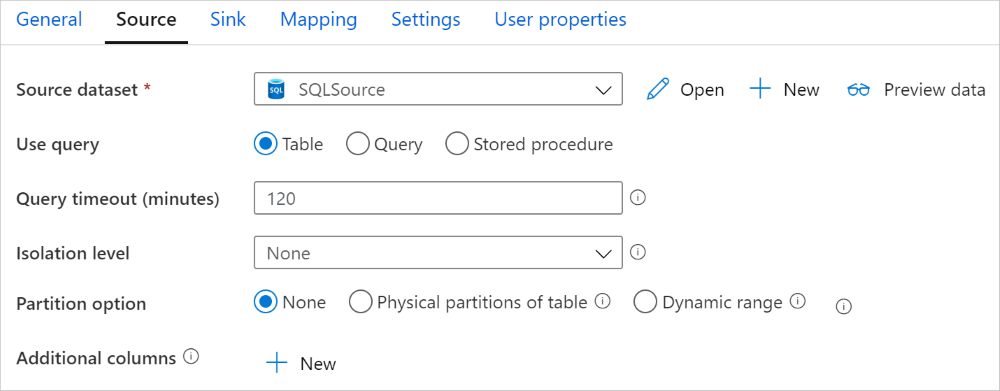
When you enable partitioned copy, copy activity runs parallel queries against your Azure SQL Database source to load data by partitions. The parallel degree is controlled by the parallelCopies setting on the copy activity. For example, if you set parallelCopies to four, the service concurrently generates and runs four queries based on your specified partition option and settings, and each query retrieves a portion of data from your Azure SQL Database.
You are suggested to enable parallel copy with data partitioning especially when you load large amount of data from your Azure SQL Database. The following are suggested configurations for different scenarios. When copying data into file-based data store, it's recommended to write to a folder as multiple files (only specify folder name), in which case the performance is better than writing to a single file.
| Scenario | Suggested settings |
|---|---|
| Full load from large table, with physical partitions. | Partition option: Physical partitions of table. During execution, the service automatically detects the physical partitions, and copies data by partitions. To check if your table has physical partition or not, you can refer to this query. |
| Full load from large table, without physical partitions, while with an integer or datetime column for data partitioning. | Partition options: Dynamic range partition. Partition column (optional): Specify the column used to partition data. If not specified, the index or primary key column is used. Partition upper bound and partition lower bound (optional): Specify if you want to determine the partition stride. This is not for filtering the rows in table, all rows in the table will be partitioned and copied. If not specified, copy activity auto detect the values. For example, if your partition column "ID" has values range from 1 to 100, and you set the lower bound as 20 and the upper bound as 80, with parallel copy as 4, the service retrieves data by 4 partitions - IDs in range <=20, [21, 50], [51, 80], and >=81, respectively. |
| Load a large amount of data by using a custom query, without physical partitions, while with an integer or date/datetime column for data partitioning. | Partition options: Dynamic range partition. Query: SELECT * FROM <TableName> WHERE ?DfDynamicRangePartitionCondition AND <your_additional_where_clause>.Partition column: Specify the column used to partition data. Partition upper bound and partition lower bound (optional): Specify if you want to determine the partition stride. This is not for filtering the rows in table, all rows in the query result will be partitioned and copied. If not specified, copy activity auto detect the value. For example, if your partition column "ID" has values range from 1 to 100, and you set the lower bound as 20 and the upper bound as 80, with parallel copy as 4, the service retrieves data by 4 partitions- IDs in range <=20, [21, 50], [51, 80], and >=81, respectively. Here are more sample queries for different scenarios: 1. Query the whole table: SELECT * FROM <TableName> WHERE ?DfDynamicRangePartitionCondition2. Query from a table with column selection and additional where-clause filters: SELECT <column_list> FROM <TableName> WHERE ?DfDynamicRangePartitionCondition AND <your_additional_where_clause>3. Query with subqueries: SELECT <column_list> FROM (<your_sub_query>) AS T WHERE ?DfDynamicRangePartitionCondition AND <your_additional_where_clause>4. Query with partition in subquery: SELECT <column_list> FROM (SELECT <your_sub_query_column_list> FROM <TableName> WHERE ?DfDynamicRangePartitionCondition) AS T |
Best practices to load data with partition option:
- Choose distinctive column as partition column (like primary key or unique key) to avoid data skew.
- If the table has built-in partition, use partition option "Physical partitions of table" to get better performance.
- If you use Azure Integration Runtime to copy data, you can set larger "Data Integration Units (DIU)" (>4) to utilize more computing resource. Check the applicable scenarios there.
- "Degree of copy parallelism" control the partition numbers, setting this number too large sometime hurts the performance, recommend setting this number as (DIU or number of Self-hosted IR nodes) * (2 to 4).
Example: full load from large table with physical partitions
"source": {
    "type": "AzureSqlSource",
    "partitionOption": "PhysicalPartitionsOfTable"
}
Example: query with dynamic range partition
"source": {
    "type": "AzureSqlSource",
    "query": "SELECT * FROM <TableName> WHERE ?DfDynamicRangePartitionCondition AND <your_additional_where_clause>",
    "partitionOption": "DynamicRange",
    "partitionSettings": {
        "partitionColumnName": "<partition_column_name>",
        "partitionUpperBound": "<upper_value_of_partition_column (optional) to decide the partition stride, not as data filter>",
        "partitionLowerBound": "<lower_value_of_partition_column (optional) to decide the partition stride, not as data filter>"
    }
}
Sample query to check physical partition
SELECT DISTINCT s.name AS SchemaName, t.name AS TableName, pf.name AS PartitionFunctionName, c.name AS ColumnName, iif(pf.name is null, 'no', 'yes') AS HasPartition
FROM sys.tables AS t
LEFT JOIN sys.objects AS o ON t.object_id = o.object_id
LEFT JOIN sys.schemas AS s ON o.schema_id = s.schema_id
LEFT JOIN sys.indexes AS i ON t.object_id = i.object_id
LEFT JOIN sys.index_columns AS ic ON ic.partition_ordinal > 0 AND ic.index_id = i.index_id AND ic.object_id = t.object_id
LEFT JOIN sys.columns AS c ON c.object_id = ic.object_id AND c.column_id = ic.column_id
LEFT JOIN sys.partition_schemes ps ON i.data_space_id = ps.data_space_id
LEFT JOIN sys.partition_functions pf ON pf.function_id = ps.function_id
WHERE s.name='[your schema]' AND t.name = '[your table name]'
If the table has physical partition, you would see "HasPartition" as "yes" like the following.

Best practice for loading data into Azure SQL Database
When you copy data into Azure SQL Database, you might require different write behavior:
- Append: My source data has only new records.
- Upsert: My source data has both inserts and updates.
- Overwrite: I want to reload an entire dimension table each time.
- Write with custom logic: I need extra processing before the final insertion into the destination table.
Refer to the respective sections about how to configure in the service and best practices.
Append data
Appending data is the default behavior of this Azure SQL Database sink connector. The service does a bulk insert to write to your table efficiently. You can configure the source and sink accordingly in the copy activity.
Upsert data
Copy activity now supports natively loading data into a database temporary table and then update the data in sink table if key exists and otherwise insert new data. To learn more about upsert settings in copy activities, see Azure SQL Database as the sink.
Overwrite the entire table
You can configure the preCopyScript property in the copy activity sink. In this case, for each copy activity that runs, the service runs the script first. Then it runs the copy to insert the data. For example, to overwrite the entire table with the latest data, specify a script to first delete all the records before you bulk load the new data from the source.
Write data with custom logic
The steps to write data with custom logic are similar to those described in the Upsert data section. When you need to apply extra processing before the final insertion of source data into the destination table, you can load to a staging table then invoke stored procedure activity, or invoke a stored procedure in copy activity sink to apply data, or use Mapping Data Flow.
Invoke a stored procedure from a SQL sink
When you copy data into Azure SQL Database, you also can configure and invoke a user-specified stored procedure with additional parameters on each batch of the source table. The stored procedure feature takes advantage of table-valued parameters.
You can use a stored procedure when built-in copy mechanisms don't serve the purpose. An example is when you want to apply extra processing before the final insertion of source data into the destination table. Some extra processing examples are when you want to merge columns, look up additional values, and insert into more than one table.
The following sample shows how to use a stored procedure to do an upsert into a table in Azure SQL Database. Assume that the input data and the sink Marketing table each have three columns: ProfileID, State, and Category. Do the upsert based on the ProfileID column, and only apply it for a specific category called "ProductA".
In your database, define the table type with the same name as sqlWriterTableType. The schema of the table type is the same as the schema returned by your input data.
CREATE TYPE [dbo].[MarketingType] AS TABLE(
    [ProfileID] [varchar](256) NOT NULL,
    [State] [varchar](256) NOT NULL,
    [Category] [varchar](256) NOT NULL
)
In your database, define the stored procedure with the same name as sqlWriterStoredProcedureName. It handles input data from your specified source and merges into the output table. The parameter name of the table type in the stored procedure is the same as tableName defined in the dataset.
CREATE PROCEDURE spOverwriteMarketing @Marketing [dbo].[MarketingType] READONLY, @category varchar(256)
AS
BEGIN
MERGE [dbo].[Marketing] AS target
USING @Marketing AS source
ON (target.ProfileID = source.ProfileID and target.Category = @category)
WHEN MATCHED THEN
    UPDATE SET State = source.State
WHEN NOT MATCHED THEN
    INSERT (ProfileID, State, Category)
    VALUES (source.ProfileID, source.State, source.Category);
END
In your Azure Data Factory or Synapse pipeline, define the SQL sink section in the copy activity as follows:
"sink": {
    "type": "AzureSqlSink",
    "sqlWriterStoredProcedureName": "spOverwriteMarketing",
    "storedProcedureTableTypeParameterName": "Marketing",
    "sqlWriterTableType": "MarketingType",
    "storedProcedureParameters": {
        "category": {
            "value": "ProductA"
        }
    }
}
When writing data to into Azure SQL Database using stored procedure, the sink splits the source data into mini batches then do the insert, so the extra query in stored procedure can be executed multiple times. If you have the query for the copy activity to run before writing data into Azure SQL Database, it's not recommended to add it to the stored procedure, add it in the Pre-copy script box.
Mapping data flow properties
When transforming data in mapping data flow, you can read and write to tables from Azure SQL Database. For more information, see the source transformation and sink transformation in mapping data flows.
Source transformation
Settings specific to Azure SQL Database are available in the Source Options tab of the source transformation.
Input: Select whether you point your source at a table (equivalent of Select * from <table-name>) or enter a custom SQL query.
Query: If you select Query in the input field, enter a SQL query for your source. This setting overrides any table that you've chosen in the dataset. Order By clauses aren't supported here, but you can set a full SELECT FROM statement. You can also use user-defined table functions. select * from udfGetData() is a UDF in SQL that returns a table. This query will produce a source table that you can use in your data flow. Using queries is also a great way to reduce rows for testing or for lookups.
Tip
The common table expression (CTE) in SQL is not supported in the mapping data flow Query mode, because the prerequisite of using this mode is that queries can be used in the SQL query FROM clause but CTEs cannot do this. To use CTEs, you need to create a stored procedure using the following query:
CREATE PROC CTESP @query nvarchar(max)
AS
BEGIN
EXECUTE sp_executesql @query;
END
Then use the Stored procedure mode in the source transformation of the mapping data flow and set the @query like example with CTE as (select 'test' as a) select * from CTE. Then you can use CTEs as expected.
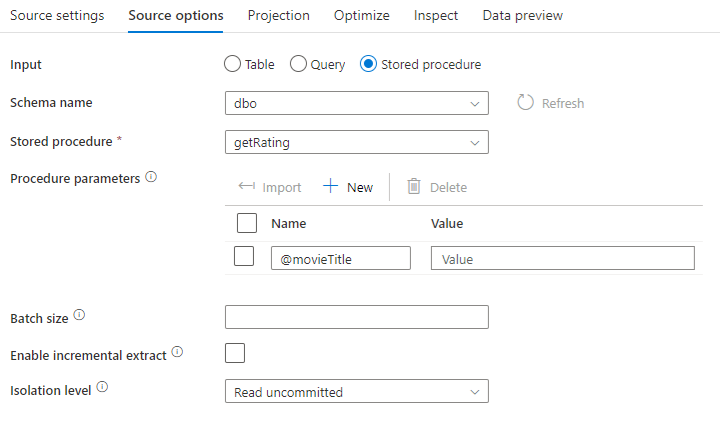
Stored procedure: Choose this option if you wish to generate a projection and source data from a stored procedure that is executed from your source database. You can type in the schema, procedure name, and parameters, or click on Refresh to ask the service to discover the schemas and procedure names. Then you can click on Import to import all procedure parameters using the form @paraName.
- SQL Example:
Select * from MyTable where customerId > 1000 and customerId < 2000 - Parameterized SQL Example:
"select * from {$tablename} where orderyear > {$year}"
Batch size: Enter a batch size to chunk large data into reads.
Isolation Level: The default for SQL sources in mapping data flow is read uncommitted. You can change the isolation level here to one of these values:
- Read Committed
- Read Uncommitted
- Repeatable Read
- Serializable
- None (ignore isolation level)
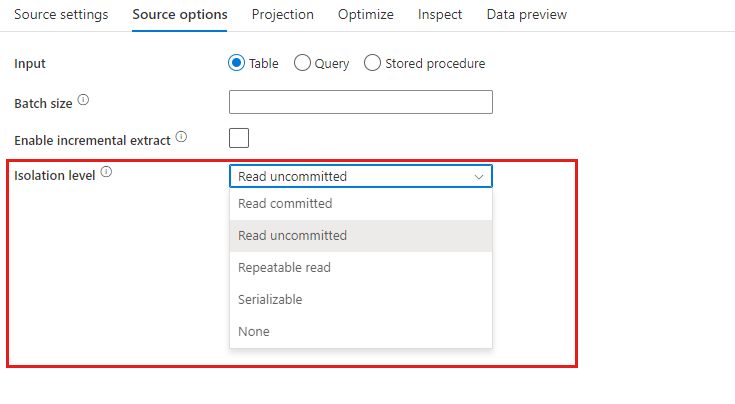
Enable incremental extract: Use this option to tell ADF to only process rows that have changed since the last time that the pipeline executed. To enable incremental extract with schema drift, choose tables based on Incremental / Watermark columns rather than tables that are enabled for Native Change Data Capture.
Incremental column: When using the incremental extract feature, you must choose the date/time or numeric column that you wish to use as the watermark in your source table.
Enable native change data capture(Preview): Use this option to tell ADF to only process delta data captured by SQL change data capture technology since the last time that the pipeline executed. With this option, the delta data including row insert, update and deletion will be loaded automatically without any incremental column required. You need to enable change data capture on Azure SQL DB before using this option in ADF. For more information about this option in ADF, see native change data capture.
Start reading from beginning: Setting this option with incremental extract will instruct ADF to read all rows on first execution of a pipeline with incremental extract turned on.
Sink transformation
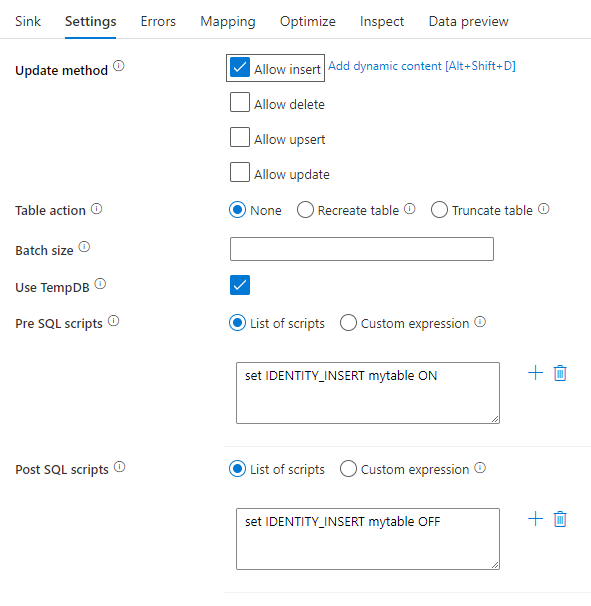
Settings specific to Azure SQL Database are available in the Settings tab of the sink transformation.
Update method: Determines what operations are allowed on your database destination. The default is to only allow inserts. To update, upsert, or delete rows, an alter-row transformation is required to tag rows for those actions. For updates, upserts and deletes, a key column or columns must be set to determine which row to alter.
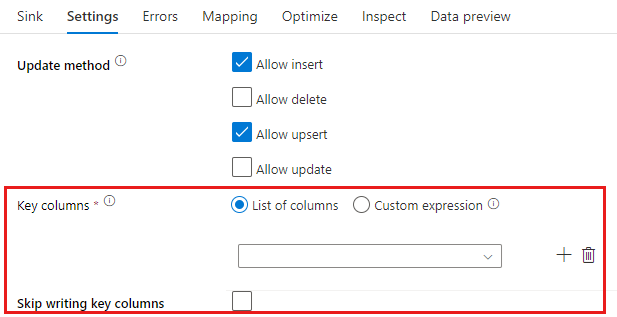
The column name that you pick as the key here will be used by the service as part of the subsequent update, upsert, delete. Therefore, you must pick a column that exists in the Sink mapping. If you wish to not write the value to this key column, then click "Skip writing key columns".
You can parameterize the key column used here for updating your target Azure SQL Database table. If you have multiple columns for a composite key, the click on "Custom Expression" and you will be able to add dynamic content using the data flow expression language, which can include an array of strings with column names for a composite key.
Table action: Determines whether to recreate or remove all rows from the destination table prior to writing.
- None: No action will be done to the table.
- Recreate: The table will get dropped and recreated. Required if creating a new table dynamically.
- Truncate: All rows from the target table will get removed.
Batch size: Controls how many rows are being written in each bucket. Larger batch sizes improve compression and memory optimization, but risk out of memory exceptions when caching data.
Use TempDB: By default, the service will use a global temporary table to store data as part of the loading process. You can alternatively uncheck the "Use TempDB" option and instead, ask the service to store the temporary holding table in a user database that is located in the database that is being used for this Sink.

Pre and Post SQL scripts: Enter multi-line SQL scripts that will execute before (pre-processing) and after (post-processing) data is written to your Sink database
Tip
- It's recommended to break single batch scripts with multiple commands into multiple batches.
- Only Data Definition Language (DDL) and Data Manipulation Language (DML) statements that return a simple update count can be run as part of a batch. Learn more from Performing batch operations
Error row handling
When writing to Azure SQL DB, certain rows of data may fail due to constraints set by the destination. Some common errors include:
- String or binary data would be truncated in table
- Cannot insert the value NULL into column
- The INSERT statement conflicted with the CHECK constraint
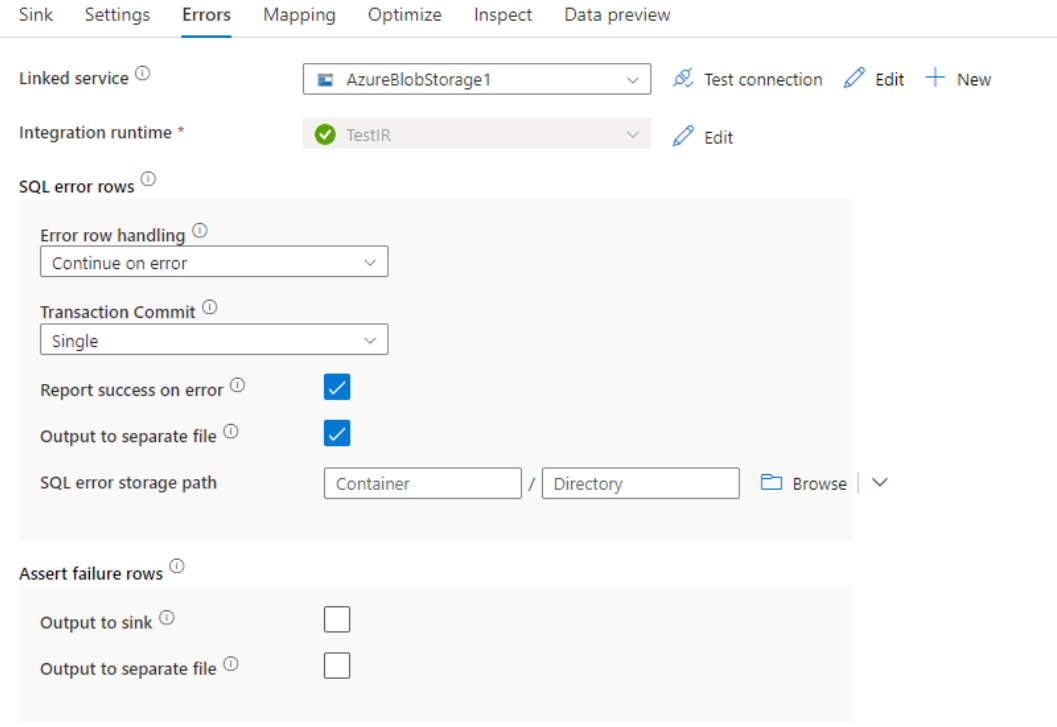
By default, a data flow run will fail on the first error it gets. You can choose to Continue on error that allows your data flow to complete even if individual rows have errors. The service provides different options for you to handle these error rows.
Transaction Commit: Choose whether your data gets written in a single transaction or in batches. Single transaction will provide worse performance but no data written will be visible to others until the transaction completes.
Output rejected data: If enabled, you can output the error rows into a csv file in Azure Blob Storage or an Azure Data Lake Storage Gen2 account of your choosing. This will write the error rows with three additional columns: the SQL operation like INSERT or UPDATE, the data flow error code, and the error message on the row.
Report success on error: If enabled, the data flow will be marked as a success even if error rows are found.
Data type mapping for Azure SQL Database
When data is copied from or to Azure SQL Database, the following mappings are used from Azure SQL Database data types to Azure Data Factory interim data types. The same mappings are used by the Synapse pipeline feature, which implements Azure Data Factory directly. To learn how the copy activity maps the source schema and data type to the sink, see Schema and data type mappings.
| Azure SQL Database data type | Data Factory interim data type |
|---|---|
| bigint | Int64 |
| binary | Byte[] |
| bit | Boolean |
| char | String, Char[] |
| date | DateTime |
| Datetime | DateTime |
| datetime2 | DateTime |
| Datetimeoffset | DateTimeOffset |
| Decimal | Decimal |
| FILESTREAM attribute (varbinary(max)) | Byte[] |
| Float | Double |
| image | Byte[] |
| int | Int32 |
| money | Decimal |
| nchar | String, Char[] |
| ntext | String, Char[] |
| numeric | Decimal |
| nvarchar | String, Char[] |
| real | Single |
| rowversion | Byte[] |
| smalldatetime | DateTime |
| smallint | Int16 |
| smallmoney | Decimal |
| sql_variant | Object |
| text | String, Char[] |
| time | TimeSpan |
| timestamp | Byte[] |
| tinyint | Byte |
| uniqueidentifier | Guid |
| varbinary | Byte[] |
| varchar | String, Char[] |
| xml | String |
Note
For data types that map to the Decimal interim type, currently Copy activity supports precision up to 28. If you have data with precision larger than 28, consider converting to a string in SQL query.
Lookup activity properties
To learn details about the properties, check Lookup activity.
GetMetadata activity properties
To learn details about the properties, check GetMetadata activity
Using Always Encrypted
When you copy data from/to Azure SQL Database with Always Encrypted, follow below steps:
Store the Column Master Key (CMK) in an Azure Key Vault. Learn more on how to configure Always Encrypted by using Azure Key Vault
Make sure to get access to the key vault where the Column Master Key (CMK) is stored. Refer to this article for required permissions.
Create linked service to connect to your SQL database and enable 'Always Encrypted' function by using either managed identity or service principal.
Note
Azure SQL Database Always Encrypted supports below scenarios:
- Either source or sink data stores is using managed identity or service principal as key provider authentication type.
- Both source and sink data stores are using managed identity as key provider authentication type.
- Both source and sink data stores are using the same service principal as key provider authentication type.
Note
Currently, Azure SQL Database Always Encrypted is not supported for sink transformation in mapping data flows.
Native change data capture
Azure Data Factory can support native change data capture capabilities for SQL Server, Azure SQL DB and Azure SQL MI. The changed data including row insert, update and deletion in SQL stores can be automatically detected and extracted by ADF mapping dataflow. With the no code experience in mapping dataflow, users can easily achieve data replication scenario from SQL stores by appending a database as destination store. What is more, users can also compose any data transform logic in between to achieve incremental ETL scenario from SQL stores.
Make sure you keep the pipeline and activity name unchanged, so that the checkpoint can be recorded by ADF for you to get changed data from the last run automatically. If you change your pipeline name or activity name, the checkpoint will be reset, which leads you to start from beginning or get changes from now in the next run. If you do want to change the pipeline name or activity name but still keep the checkpoint to get changed data from the last run automatically, please use your own Checkpoint key in dataflow activity to achieve that.
When you debug the pipeline, this feature works the same. Be aware that the checkpoint will be reset when you refresh your browser during the debug run. After you are satisfied with the pipeline result from debug run, you can go ahead to publish and trigger the pipeline. At the moment when you first time trigger your published pipeline, it automatically restarts from the beginning or gets changes from now on.
In the monitoring section, you always have the chance to rerun a pipeline. When you are doing so, the changed data is always captured from the previous checkpoint of your selected pipeline run.
Example 1:
When you directly chain a source transform referenced to SQL CDC enabled dataset with a sink transform referenced to a database in a mapping dataflow, the changes happened on SQL source will be automatically applied to the target database, so that you will easily get data replication scenario between databases. You can use update method in sink transform to select whether you want to allow insert, allow update or allow delete on target database. The example script in mapping dataflow is as below.
source(output(
		id as integer,
		name as string
	),
	allowSchemaDrift: true,
	validateSchema: false,
	enableNativeCdc: true,
	netChanges: true,
	skipInitialLoad: false,
	isolationLevel: 'READ_UNCOMMITTED',
	format: 'table') ~> source1
source1 sink(allowSchemaDrift: true,
	validateSchema: false,
	deletable:true,
	insertable:true,
	updateable:true,
	upsertable:true,
	keys:['id'],
	format: 'table',
	skipDuplicateMapInputs: true,
	skipDuplicateMapOutputs: true,
	errorHandlingOption: 'stopOnFirstError') ~> sink1
Example 2:
If you want to enable ETL scenario instead of data replication between database via SQL CDC, you can use expressions in mapping dataflow including isInsert(1), isUpdate(1) and isDelete(1) to differentiate the rows with different operation types. The following is one of the example scripts for mapping dataflow on deriving one column with the value: 1 to indicate inserted rows, 2 to indicate updated rows and 3 to indicate deleted rows for downstream transforms to process the delta data.
source(output(
		id as integer,
		name as string
	),
	allowSchemaDrift: true,
	validateSchema: false,
	enableNativeCdc: true,
	netChanges: true,
	skipInitialLoad: false,
	isolationLevel: 'READ_UNCOMMITTED',
	format: 'table') ~> source1
source1 derive(operationType = iif(isInsert(1), 1, iif(isUpdate(1), 2, 3))) ~> derivedColumn1
derivedColumn1 sink(allowSchemaDrift: true,
	validateSchema: false,
	skipDuplicateMapInputs: true,
	skipDuplicateMapOutputs: true) ~> sink1
Known limitation:
- Only net changes from SQL CDC will be loaded by ADF via cdc.fn_cdc_get_net_changes_.
Upgrade the Azure SQL Database version
To upgrade the Azure SQL Database version, in Edit linked service page, select Recommended under Version and configure the linked service by referring to Linked service properties for the recommended version.
Differences between the recommended and the legacy version
The table below shows the differences between Azure SQL Database using the recommended and the legacy version.
| Recommended version | Legacy version |
|---|---|
Support TLS 1.3 via encrypt as strict. |
TLS 1.3 is not supported. |
Related content
For a list of data stores supported as sources and sinks by the copy activity, see Supported data stores and formats.
