Note
Access to this page requires authorization. You can try signing in or changing directories.
Access to this page requires authorization. You can try changing directories.
APPLIES TO:  Azure Data Factory
Azure Synapse Analytics
Azure Data Factory
Azure Synapse Analytics
Data flows are available in both Azure Data Factory pipelines and Azure Synapse Analytics pipelines. This article applies to mapping data flows. If you're new to transformations, refer to the introductory article Transform data using mapping data flows.
After you finish transforming your data, write it into a destination store by using the sink transformation. Every data flow requires at least one sink transformation, but you can write to as many sinks as necessary to complete your transformation flow. To write to additional sinks, create new streams via new branches and conditional splits.
Each sink transformation is associated with exactly one dataset object or linked service. The sink transformation determines the shape and location of the data you want to write to.
Inline datasets
When you create a sink transformation, choose whether your sink information is defined inside a dataset object or within the sink transformation. Most formats are available in only one or the other. To learn how to use a specific connector, see the appropriate connector document.
When a format is supported for both inline and in a dataset object, there are benefits to both. Dataset objects are reusable entities that can be used in other data flows and activities such as Copy. These reusable entities are especially useful when you use a hardened schema. Datasets aren't based in Spark. Occasionally, you might need to override certain settings or schema projection in the sink transformation.
Inline datasets are recommended when you use flexible schemas, one-off sink instances, or parameterized sinks. If your sink is heavily parameterized, inline datasets allow you to not create a "dummy" object. Inline datasets are based in Spark, and their properties are native to data flow.
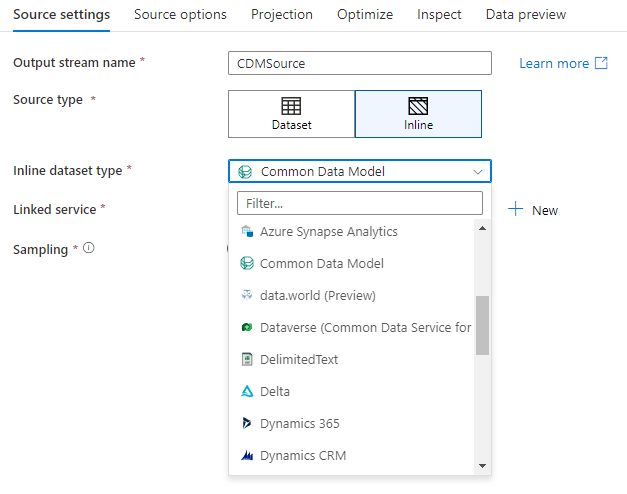
To use an inline dataset, select the format you want in the Sink type selector. Instead of selecting a sink dataset, you select the linked service you want to connect to.
Supported sink types
Mapping data flow follows an extract, load, and transform (ELT) approach and works with staging datasets that are all in Azure. Currently, the following datasets can be used in a sink transformation.
Tip
Your sink can be a different format than your source. This is one step of how you can transform from one format to another. For example, from a CSV to a Parquet sink. You might need to make some transformations in your data flow between source and sink for this to work correctly. (For example, Parquet has more specific header requirements than CSV.)
| Connector | Format | Dataset/inline |
|---|---|---|
| Azure Blob Storage | Avro Delimited text Delta JSON ORC Parquet |
✓/✓ ✓/✓ -/✓ ✓/✓ ✓/✓ ✓/✓ |
| Azure Cosmos DB for NoSQL | ✓/- | |
| Azure Data Lake Storage Gen2 | Avro Common Data Model Delimited text Delta JSON ORC Parquet |
✓/✓ -/✓ ✓/✓ -/✓ ✓/✓ ✓/✓ ✓/✓ |
| Azure Database for MySQL | ✓/✓ | |
| Azure Database for PostgreSQL | ✓/✓ | |
| Azure Data Explorer | ✓/✓ | |
| Azure SQL Database | ✓/✓ | |
| Azure SQL Managed Instance | ✓/- | |
| Azure Synapse Analytics | ✓/- | |
| Dataverse | ✓/✓ | |
| Dynamics 365 | ✓/✓ | |
| Dynamics CRM | ✓/✓ | |
| SFTP | Avro Delimited text JSON ORC Parquet |
✓/✓ ✓/✓ ✓/✓ ✓/✓ ✓/✓ |
| Snowflake | ✓/✓ | |
| SQL Server | ✓/✓ |
Settings specific to these connectors are located on the Settings tab. Information and data flow script examples on these settings are located in the connector documentation.
The service has access to more than 90 native connectors. To write data to those other sources from your data flow, use the Copy Activity to load that data from a supported sink.
Sink settings
After you've added a sink, configure via the Sink tab. Here you can pick or create the dataset your sink writes to. Development values for dataset parameters can be configured in Debug settings. (Debug mode must be turned on.)
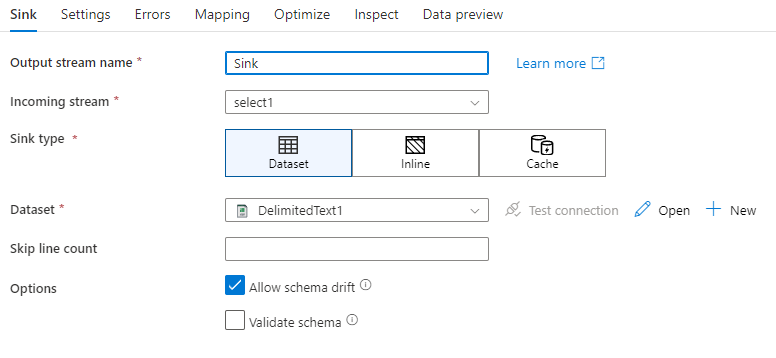
Schema drift: Schema drift is the ability of the service to natively handle flexible schemas in your data flows without needing to explicitly define column changes. Enable Allow schema drift to write additional columns on top of what's defined in the sink data schema.
Validate schema: If validate schema is selected, the data flow will fail if any column in sink projection isn't found in the sink store, or if the data types don't match. Use this setting to enforce that the sink schema meets the contract of your defined projection. It's useful in database sink scenarios to signal that column names or types have changed.
Cache sink
A cache sink is when a data flow writes data into the Spark cache instead of a data store. In mapping data flows, you can reference this data within the same flow many times using a cache lookup. This is useful when you want to reference data as part of an expression but don't want to explicitly join the columns to it. Common examples where a cache sink can help are looking up a max value on a data store and matching error codes to an error message database.
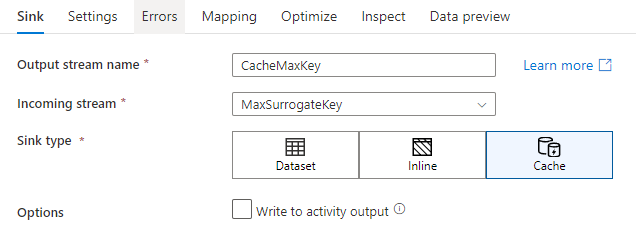
To write to a cache sink, add a sink transformation and select Cache as the sink type. Unlike other sink types, you don't need to select a dataset or linked service because you aren't writing to an external store.
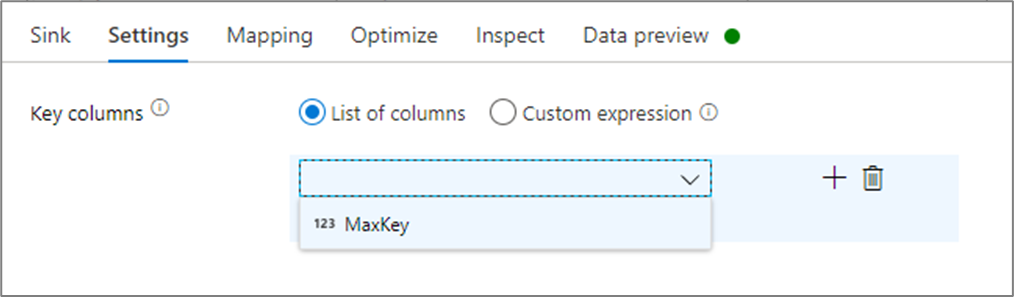
In the sink settings, you can optionally specify the key columns of the cache sink. These are used as matching conditions when using the lookup() function in a cache lookup. If you specify key columns, you can't use the outputs() function in a cache lookup. To learn more about the cache lookup syntax, see cached lookups.
For example, if I specify a single key column of column1 in a cache sink called cacheExample, calling cacheExample#lookup() would have one parameter specifies which row in the cache sink to match on. The function outputs a single complex column with subcolumns for each column mapped.
Note
A cache sink must be in a completely independent data stream from any transformation referencing it via a cache lookup. A cache sink also must be the first sink written.
Write to activity output
The Cache sink can optionally write its data to the output of the Data Flow activity which can then be used as an input to another activity in the pipeline. This will allow you to quickly and easily pass data out of your data flow activity without needing to persist the data in a data store.
Note that the output from Data Flow that is injected directly into your pipeline is limited to 2MB. Thus, Data Flow will attempt to add to output as many rows as it can while staying within the 2MB limit, therefore sometimes you may not see all of the rows in the activity output. Setting "First row only" at the Data Flow activity level also helps you to limit the data output from Data Flow if needed.
Update method
For database sink types, the Settings tab will include an "Update method" property. The default is insert but also includes checkbox options for update, upsert, and delete. To utilize those additional options, you will need to add an Alter Row transformation before the sink. The Alter Row will allow you to define the conditions for each of the database actions. If your source is a native CDC enable source, then you can set the update methods without an Alter Row as ADF is already aware of the row markers for insert, update, upsert, and delete.
Field mapping
Similar to a select transformation, on the Mapping tab of the sink, you can decide which incoming columns will get written. By default, all input columns, including drifted columns, are mapped. This behavior is known as automapping.
When you turn off automapping, you can add either fixed column-based mappings or rule-based mappings. With rule-based mappings, you can write expressions with pattern matching. Fixed mapping maps logical and physical column names. For more information on rule-based mapping, see Column patterns in mapping data flow.
Custom sink ordering
By default, data is written to multiple sinks in a nondeterministic order. The execution engine writes data in parallel as the transformation logic is completed, and the sink ordering might vary each run. To specify an exact sink ordering, enable Custom sink ordering on the General tab of the data flow. When enabled, sinks are written sequentially in increasing order.

Note
When utilizing cached lookups, make sure that your sink ordering has the cached sinks set to 1, the lowest (or first) in ordering.
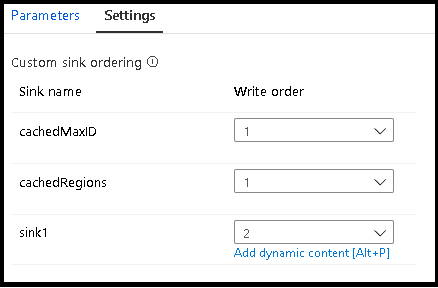
Sink groups
You can group sinks together by applying the same order number for a series of sinks. The service will treat those sinks as groups that can execute in parallel. Options for parallel execution will surface in the pipeline data flow activity.
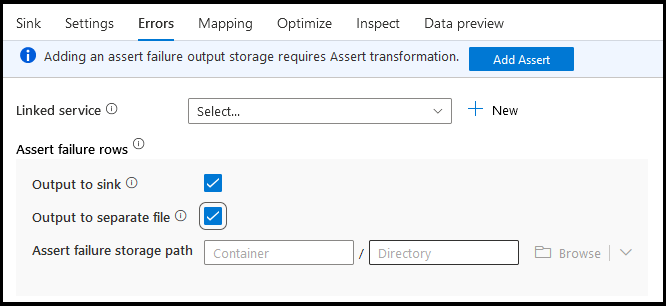
Errors
On the sink errors tab you can configure error row handling to capture and redirect output for database driver errors and failed assertions.
When writing to databases, certain rows of data may fail due to constraints set by the destination. By default, a data flow run will fail on the first error it gets. In certain connectors, you can choose to Continue on error that allows your data flow to complete even if individual rows have errors. Currently, this capability is only available in Azure SQL Database and Azure Synapse. For more information, see error row handling in Azure SQL DB.
For assert failure rows, you can use the Assert transformation upstream in your data flow and then redirect failed assertions to an output file here in the sink errors tab. You also have an option here to ignore rows with assertion failures and not output those rows at all to the sink destination data store.
Data preview in sink
When fetching a data preview in debug mode, no data will be written to your sink. A snapshot of what the data looks like will be returned, but nothing will be written to your destination. To test writing data into your sink, run a pipeline debug from the pipeline canvas.
Data flow script
Example
Below is an example of a sink transformation and its data flow script:
sink(input(
		movie as integer,
		title as string,
		genres as string,
		year as integer,
		Rating as integer
	),
	allowSchemaDrift: true,
	validateSchema: false,
	deletable:false,
	insertable:false,
	updateable:true,
	upsertable:false,
	keys:['movie'],
	format: 'table',
	skipDuplicateMapInputs: true,
	skipDuplicateMapOutputs: true,
	saveOrder: 1,
	errorHandlingOption: 'stopOnFirstError') ~> sink1
Related content
Now that you've created your data flow, add a data flow activity to your pipeline.