Note
Access to this page requires authorization. You can try signing in or changing directories.
Access to this page requires authorization. You can try changing directories.
This article describes how to test a virtual machine (VM) image to ensure it meets the latest Azure Marketplace publishing requirements.
Deploy an Azure VM
To deploy a VM from the Azure Compute Gallery (formerly know as Shared Image Gallery) image:
- Open the Azure Compute Gallery image version.
- Select Create VM.
- Provide a Virtual Machine Name and select a VM Size.
- Select Review + create. Once validation is passed, select Create.
Note
To create a VM from a vhd file, follow the instructions below under Connect the certification tool to a VM image or Using PowerShell to consume the Self-Test API.
Complete these steps before submitting your VM offer:
- Deploy an Azure VM using your generalized image; see Create a virtual machine using an approved base or create a virtual machine using your own image.
- Run validations.
Run validations
There are two ways to run validations on the deployed image.
Use Certification Test Tool for Azure Certified
Important
To run the certification test tool, the Windows Remote Management service must be running and configured on Windows. This enables access to port 5986. For information, see Installation and configuration for Windows Remote Management.
Download and run the certification test tool
The Certification Test Tool for Azure Certified runs on a local Windows machine but tests an Azure-based Windows or Linux VM. It certifies that your user VM image can be used with Azure and that the guidance and requirements around preparing your VHD have been met.
- Download and install the most recent Certification Test Tool for Azure Certified.
- Open the certification tool, then select Start New Test.
- From the Test Information screen, enter a Test Name for the test run.
- Select the Platform for your VM, either Windows Server (allow port 5986 for Windows) or Linux (allow port 22 for Linux). Your platform choice affects the remaining options.
- If your VM is using this database service, select the Test for Azure SQL Database check box.
Connect the certification tool to a VM image
Select the SSH Authentication mode: Password Authentication or Key File Authentication.
If using password-based authentication, enter values for the VM DNS Name, User name, and Password. You can also change the default SSH Port number.
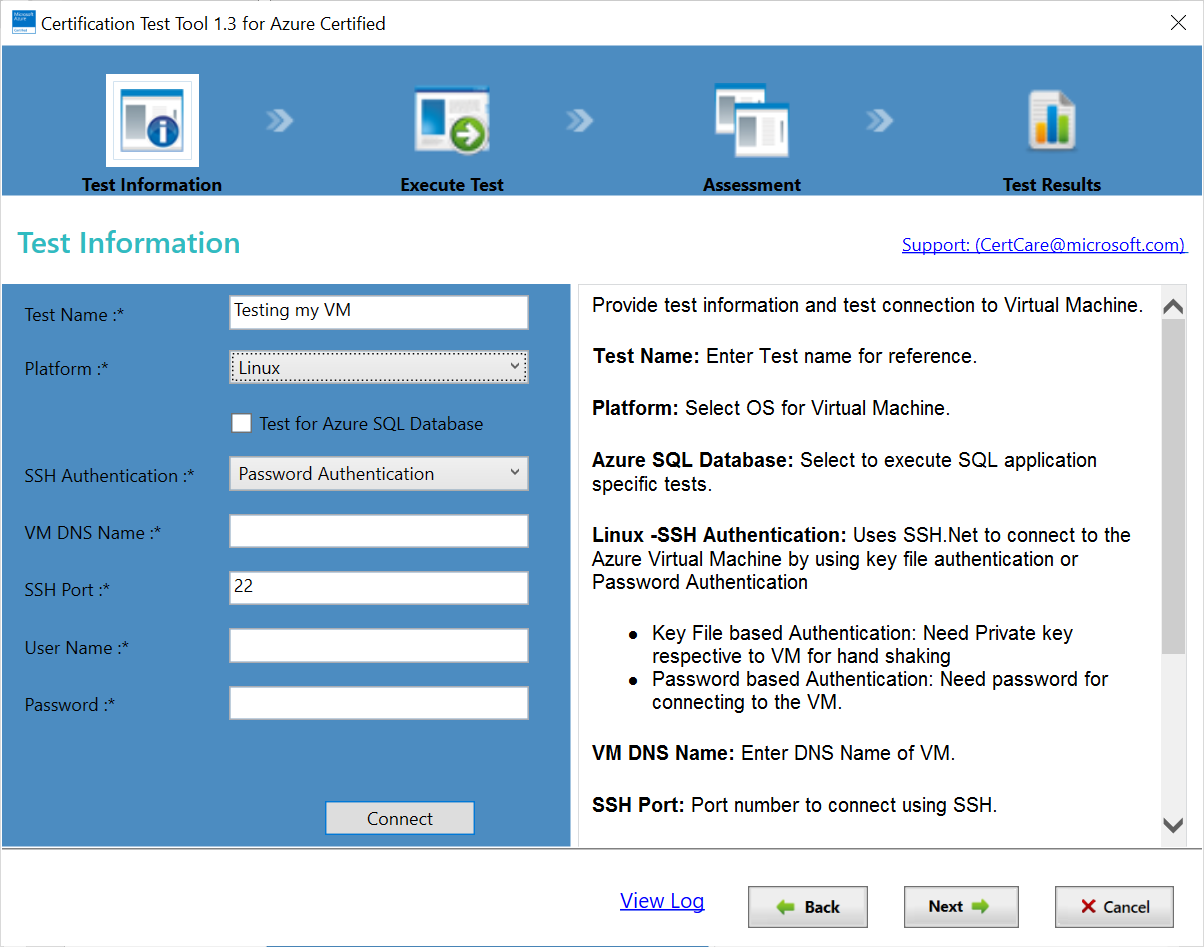
If using key file-based authentication, enter values for the VM DNS Name, User name, and Private key location. You can also include a Passphrase or change the default SSH Port number.
Enter the fully qualified VM DNS name (for example, MyVMName.Cloudapp.net).
Enter User Name and Password.
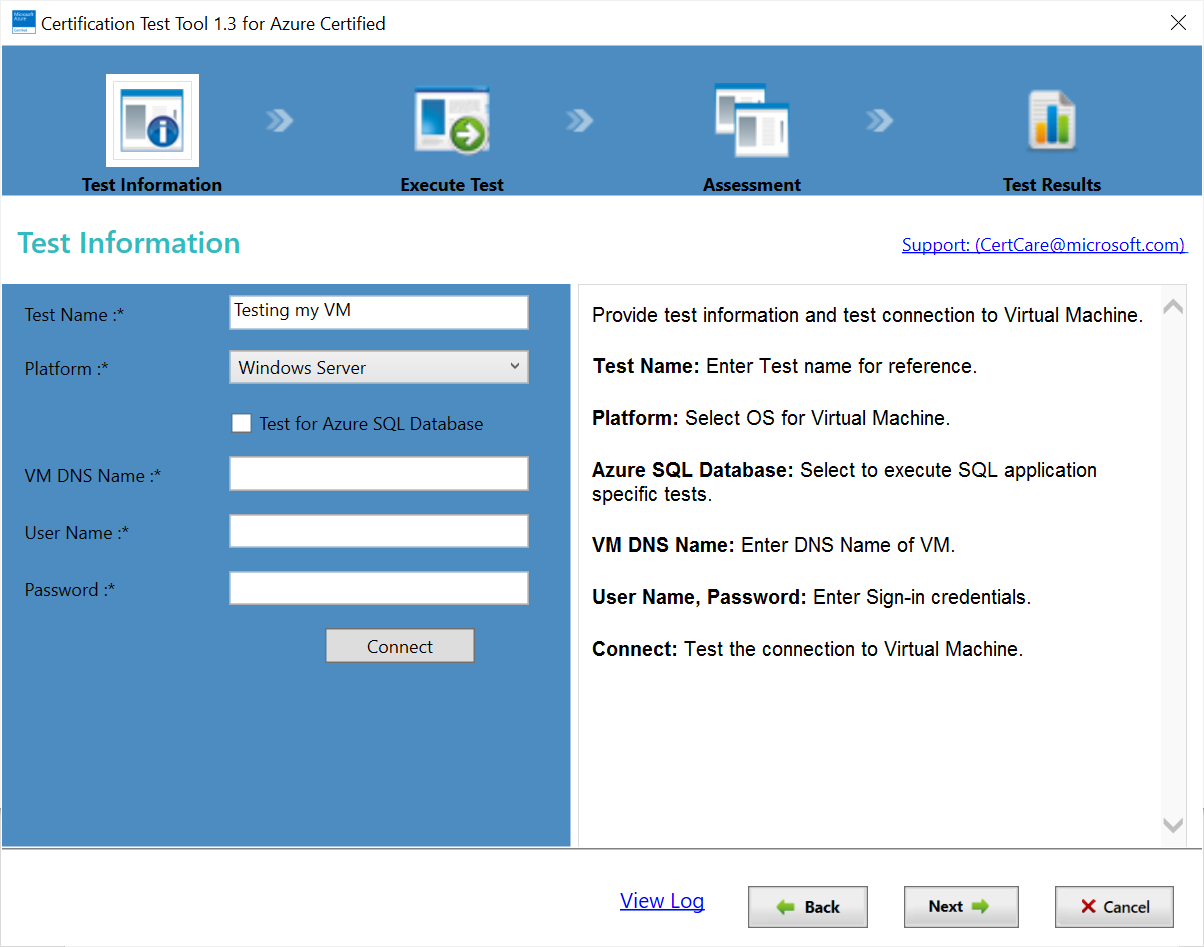
Select Next.
Run a certification test
After you've given the parameter values for your VM image in the certification tool, select Test Connection to create a valid connection to your VM. After a connection is verified, select Next to start the test. When the test is complete, the results display in a table. The Status column shows (Pass/Fail/Warning) for each test. If any of the tests fail, your image is not certified. In this case, review the requirements and failure messages, make the suggested changes, and run the test again.
After the automated test completes, provide additional information about your VM image on the two tabs of the Questionnaire screen, General Assessment and Kernel Customization, and then select Next.
The last screen lets you provide more information, such as SSH access information for a Linux VM image, and an explanation for any failed assessments if you're looking for exceptions.
Finally, select Generate Report to download the test results and log files for the executed test cases along with your answers to the questionnaire.
Note
Few publishers have scenarios where VMs need to be locked as they have software such as firewalls installed on the VM. In this case, download the Certified Test Tool here and submit the report at Partner Center support.
Using PowerShell to consume the Self-Test API
On Linux OS
Call the API in PowerShell:
- Generate the access token.
- Use the Invoke-WebRequest command to call the API.
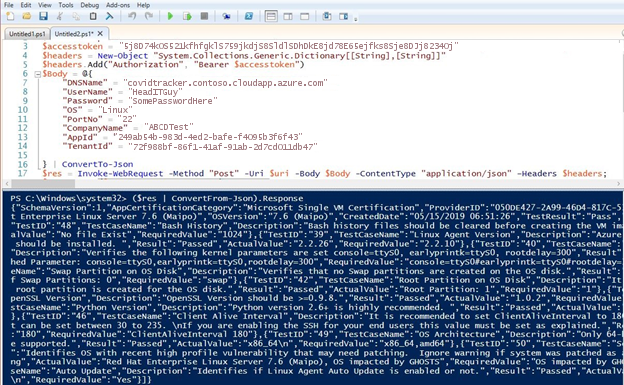
- The method is Post and content type is JSON, as shown in the following code example and screen capture.
- Specify the body parameters in JSON format.
The following commands generate an access token:
$headers = New-Object "System.Collections.Generic.Dictionary[[String],[String]]"
$headers.Add("Content-Type", "application/x-www-form-urlencoded")
$body = "grant_type=client_credentials&client_id=$clientId&client_secret=$clientSecret&resource=https%3A%2F%2Fmanagement.core.chinacloudapi.cn"
$response = Invoke-RestMethod "https://login.chinacloudapi.cn/$tenantId/oauth2/token" -Method 'POST' -Headers $headers -Body $body
$accessToken = $response.access_token
This example shows a PowerShell call to the API (allow port 22 during VM creation):
$accesstoken = "token"
$headers = @{ "Authorization" = "Bearer $accesstoken" }
$DNSName = "<Machine DNS Name>"
$UserName = "<User ID>"
$Password = "<Password>"
$OS = "Linux"
$PortNo = "22"
$CompanyName = "ABCD"
$AppId = "<Application ID>"
$TenantId = "<Tenant ID>"

$body = @{
   "DNSName" = $DNSName
   "UserName" = $UserName
   "Password" = $Password
   "OS" = $OS
   "PortNo" = $PortNo
   "CompanyName" = $CompanyName
   "AppId" = $AppId
   "TenantId" = $TenantId
} | ConvertTo-Json

$body

$uri = "https://isvapp.chinacloudsites.cn/selftest-vm"

$res = (Invoke-WebRequest -Method "Post" -Uri $uri -Body $body -ContentType "application/json" -Headers $headers).Content
Here's an example of calling the API in PowerShell:
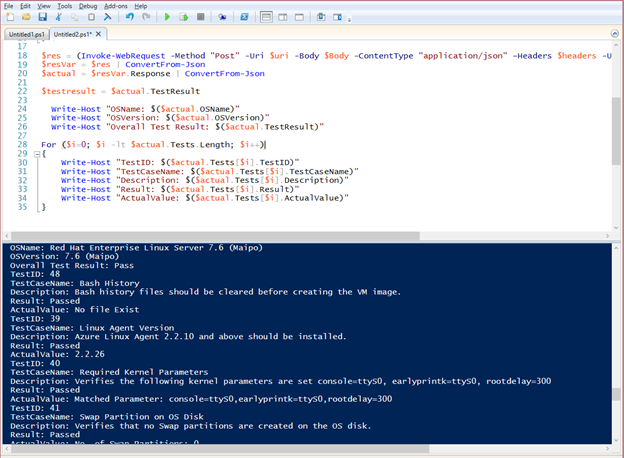
Using the previous example, you can retrieve the JSON and parse it to get the following details:
$resVar = $res | ConvertFrom-Json
$actualresult = $resVar.Response | ConvertFrom-Json

Write-Host "OSName: $($actualresult.OSName)"
Write-Host "OSVersion: $($actualresult.OSVersion)"
Write-Host "Overall Test Result: $($actualresult.TestResult)"

For ($i = 0; $i -lt $actualresult.Tests.Length; $i++) {
   Write-Host "TestID: $($actualresult.Tests[$i].TestID)"
   Write-Host "TestCaseName: $($actualresult.Tests[$i].TestCaseName)"
   Write-Host "Description: $($actualresult.Tests[$i].Description)"
   Write-Host "Result: $($actualresult.Tests[$i].Result)"
   Write-Host "ActualValue: $($actualresult.Tests[$i].ActualValue)"
}
This sample screen, which shows $res.Content, shows details of your test results in JSON format:
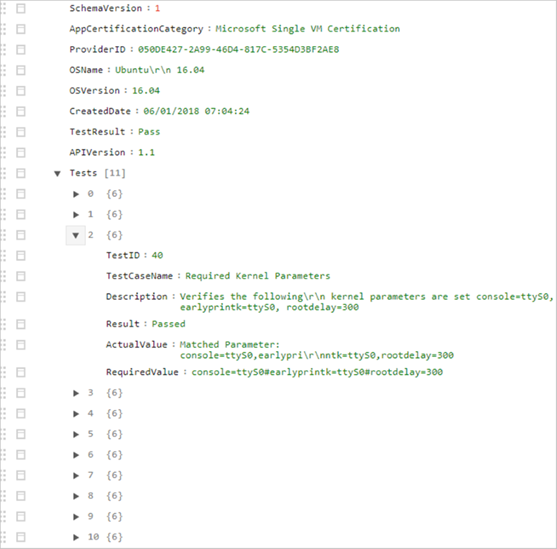
Here's an example of JSON test results viewed in an online JSON viewer (such as Code Beautify or JSON Viewer).
On Windows OS
Call the API in PowerShell:
- Use the Invoke-WebRequest command to call the API.
- The method is Post and content type is JSON, as shown in the following code example and sample screen.
- Create the body parameters in JSON format.
This code sample shows a PowerShell call to the API (allow port 5986 during VM creation):
$accesstoken = "Get token for your Client AAD App"
$headers = @{ "Authorization" = "Bearer $accesstoken" }
$Body = @{
   "DNSName" = "XXXX.chinanorth.cloudapp.chinacloudapi.cn"
   "UserName" = "XXX"
   "Password" = "XXX@123456"
   "OS" = "Windows"
   "PortNo" = "5986"
   "CompanyName" = "ABCD"
   "AppId" = "XXXX-XXXX-XXXX"
   "TenantId" = "XXXX-XXXX-XXXX"
} | ConvertTo-Json

$res = Invoke-WebRequest -Method "Post" -Uri $uri -Body $Body -ContentType "application/json" -Headers $headers;
$Content = $res | ConvertFrom-Json
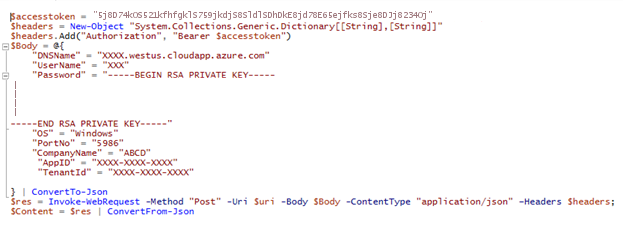
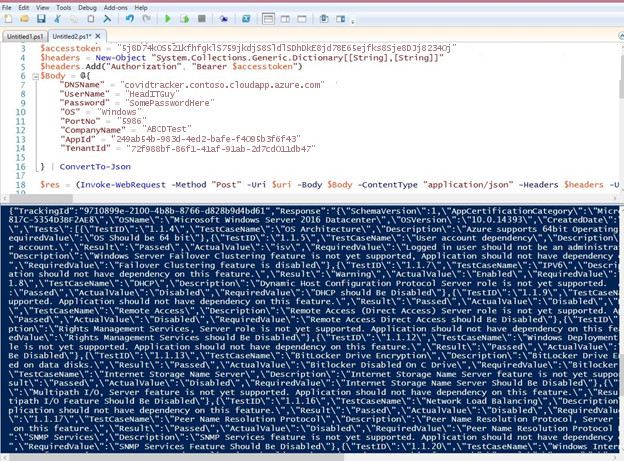
These sample screens show examples for calling the API in PowerShell:
With SSH key:
With password:
Using the previous example, you can retrieve the JSON and parse it to get the following details:
$resVar = $res | ConvertFrom-Json
$actualresult = $resVar.Response | ConvertFrom-Json

Write-Host "OSName: $($actualresult.OSName)"
Write-Host "OSVersion: $($actualresult.OSVersion)"
Write-Host "Overall Test Result: $($actualresult.TestResult)"

For ($i = 0; $i -lt $actualresult.Tests.Length; $i++) {
   Write-Host "TestID: $($actualresult.Tests[$i].TestID)"
   Write-Host "TestCaseName: $($actualresult.Tests[$i].TestCaseName)"
   Write-Host "Description: $($actualresult.Tests[$i].Description)"
   Write-Host "Result: $($actualresult.Tests[$i].Result)"
   Write-Host "ActualValue: $($actualresult.Tests[$i].ActualValue)"
}
This screen, which shows $res.Content, shows the details of your test results in JSON format:
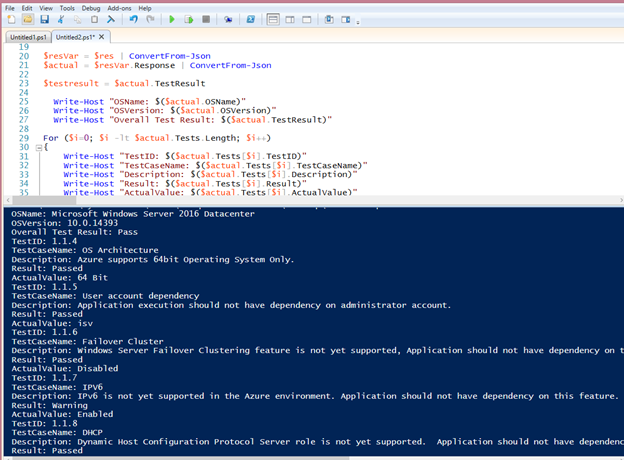
Here's an example of test results viewed in an online JSON viewer (such as Code Beautify or JSON Viewer).
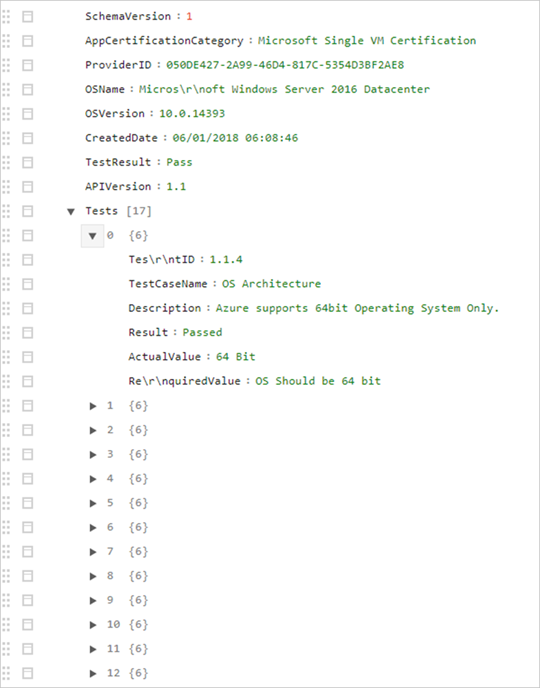
Using CURL to consume the Self-Test API on Linux OS
In this example, curl will be used to to make a POST API call to Azure Active Directory and the Self-Host VM.
Request an Azure AD token to authenticate to self-host VM
Ensure the correct values are substituted in the curl request.
curl --location --request POST 'https://login.chinacloudapi.cn/{TENANT_ID}/oauth2/token' \
--header 'Content-Type: application/x-www-form-urlencoded' \
--data-urlencode 'grant_type=client_credentials' \
--data-urlencode 'client_id={CLIENT_ID} ' \
--data-urlencode 'client_secret={CLIENT_SECRET}' \
--data-urlencode 'resource=https://management.core.chinacloudapi.cn'
Here is an example of the response from the request:
{
    "token_type": "Bearer",
    "expires_in": "86399",
    "ext_expires_in": "86399",
    "expires_on": "1599663998",
    "not_before": "1599577298",
    "resource": "https://management.core.chinacloudapi.cn",
    "access_token": "eyJ0eXAiOiJKV1QiLCJhbGciOiJS…"
}
Submit a request for the self-test VM
Ensure the Bearer token and parameters are substituted with the correct values.
curl --location --request POST 'https://isvapp.chinacloudsites.cn/selftest-vm' \
--header 'Content-Type: application/json' \
--header 'Authorization: Bearer eyJ0eXAiOiJKV1QiLCJhbGciOiJS…' \
--data-raw '{
    "DNSName": "avvm1.chinaeast.cloudapp.chinacloudapi.cn",
    "UserName": "azureuser",
    "Password": "SECURE_PASSWORD_FOR_THE_SSH_INTO_VM",
    "OS": "Linux",
    "PortNo": "22",
    "CompanyName": "COMPANY_NAME",
    "AppId": "CLIENT_ID_SAME_AS_USED_FOR_AAD_TOKEN ",
    "TenantId": "TENANT_ID_SAME_AS_USED_FOR_AAD_TOKEN"
}'
Example response from the self-test VM api call:
{
    "TrackingId": "9bffc887-dd1d-40dd-a8a2-34cee4f4c4c3",
    "Response": "{\"SchemaVersion\":1,\"AppCertificationCategory\":\"Microsoft Single VM Certification\",\"ProviderID\":\"050DE427-2A99-46D4-817C-5354D3BF2AE8\",\"OSName\":\"Ubuntu 18.04\",\"OSDistro\":\"Ubuntu 18.04.5 LTS\",\"KernelVersion\":\"5.4.0-1023-azure\",\"KernelFullVersion\":\"Linux version 5.4.0-1023-azure (buildd@lgw01-amd64-053) (gcc version 7.5.0 (Ubuntu 7.5.0-3ubuntu1~18.04)) #23~18.04.1-Ubuntu SMP Thu Aug 20 14:46:48 UTC 2020\\n\",\"OSVersion\":\"18.04\",\"CreatedDate\":\"09/08/2020 01:13:47\",\"TestResult\":\"Pass\",\"APIVersion\":\"1.5\",\"Tests\":[{\"TestID\":\"48\",\"TestCaseName\":\"Bash History\",\"Description\":\"Bash history files should be cleared before creating the VM image.\",\"Result\":\"Passed\",\"ActualValue\":\"No file Exist\",\"RequiredValue\":\"1024\"},{\"TestID\":\"39\",\"TestCaseName\":\"Linux Agent Version\",\"Description\":\"Azure Linux Agent Version 2.2.41 and above should be installed.\",\"Result\":\"Passed\",\"ActualValue\":\"2.2.49\",\"RequiredValue\":\"2.2.41\"},{\"TestID\":\"40\",\"TestCaseName\":\"Required Kernel Parameters\",\"Description\":\"Verifies the following kernel parameters are set console=ttyS0, earlyprintk=ttyS0, rootdelay=300\",\"Result\":\"Warning\",\"ActualValue\":\"Missing Parameter: rootdelay=300\\r\\nMatched Parameter: console=ttyS0,earlyprintk=ttyS0\",\"RequiredValue\":\"console=ttyS0#earlyprintk=ttyS0#rootdelay=300\"},{\"TestID\":\"41\",\"TestCaseName\":\"Swap Partition on OS Disk\",\"Description\":\"Verifies that no Swap partitions are created on the OS disk.\",\"Result\":\"Passed\",\"ActualValue\":\"No. of Swap Partitions: 0\",\"RequiredValue\":\"swap\"},{\"TestID\":\"42\",\"TestCaseName\":\"Root Partition on OS Disk\",\"Description\":\"It is recommended that a single root partition is created for the OS disk.\",\"Result\":\"Passed\",\"ActualValue\":\"Root Partition: 1\",\"RequiredValue\":\"1\"},{\"TestID\":\"44\",\"TestCaseName\":\"OpenSSL Version\",\"Description\":\"OpenSSL Version should be >=0.9.8.\",\"Result\":\"Passed\",\"ActualValue\":\"1.1.1\",\"RequiredValue\":\"0.9.8\"},{\"TestID\":\"45\",\"TestCaseName\":\"Python Version\",\"Description\":\"Python version 2.6+ is highly recommended. \",\"Result\":\"Passed\",\"ActualValue\":\"2.7.17\",\"RequiredValue\":\"2.6\"},{\"TestID\":\"46\",\"TestCaseName\":\"Client Alive Interval\",\"Description\":\"It is recommended to set ClientAliveInterval to 180. On the application need, it can be set between 30 to 235. \\nIf you are enabling the SSH for your end users this value must be set as explained.\",\"Result\":\"Warning\",\"ActualValue\":\"120\",\"RequiredValue\":\"ClientAliveInterval 180\"},{\"TestID\":\"49\",\"TestCaseName\":\"OS Architecture\",\"Description\":\"Only 64-bit operating system should be supported.\",\"Result\":\"Passed\",\"ActualValue\":\"x86_64\\n\",\"RequiredValue\":\"x86_64,amd64\"},{\"TestID\":\"50\",\"TestCaseName\":\"Security threats\",\"Description\":\"Identifies OS with recent high profile vulnerability that may need patching.  Ignore warning if system was patched as appropriate.\",\"Result\":\"Passed\",\"ActualValue\":\"Ubuntu 18.04\",\"RequiredValue\":\"OS impacted by GHOSTS\"},{\"TestID\":\"51\",\"TestCaseName\":\"Auto Update\",\"Description\":\"Identifies if Linux Agent Auto Update is enabled or not.\",\"Result\":\"Passed\",\"ActualValue\":\"# AutoUpdate.Enabled=y\\n\",\"RequiredValue\":\"Yes\"},{\"TestID\":\"52\",\"TestCaseName\":\"SACK Vulnerability patch verification\",\"Description\":\"Checks if the running Kernel Version has SACK vulnerability patch.\",\"Result\":\"Passed\",\"ActualValue\":\"Ubuntu 18.04.5 LTS,Linux version 5.4.0-1023-azure (buildd@lgw01-amd64-053) (gcc version 7.5.0 (Ubuntu 7.5.0-3ubuntu1~18.04)) #23~18.04.1-Ubuntu SMP Thu Aug 20 14:46:48 UTC 2020\",\"RequiredValue\":\"Yes\"}]}"
}
Next steps
- Sign in to Partner Center.

