重要
自 2025 年 5 月 1 日起,Azure AD B2C 将不再可供新客户购买。 在我们的常见问题解答中了解详细信息。
开始之前,请使用此页顶部的“选择策略类型”选择器来选择要设置的策略类型。 Azure Active Directory B2C 提供了两种定义用户如何与应用程序交互的方法:通过预定义的用户流,或者通过可完全配置的自定义策略。 对于每种方法,本文中所需的步骤都不同。
此功能仅适用于自定义策略。 对于设置步骤,请在前面的选择器中选择“自定义策略”。
在 Azure Active Directory B2C(Azure AD B2C)中,可以使用提供给 Azure AD B2C 的连接字符串将事件数据直接发送到 Application Insights 。 使用 Application Insights 技术配置文件,你可以获取用户旅程的详细自定义事件日志,以便执行以下操作:
- 洞察用户行为。
- 排查自己在开发或生产过程中的策略问题。
- 衡量性能。
- 通过 Application Insights 创建通知。
注意
此功能目前以公共预览版提供。
概述
若要启用自定义事件日志,请添加 Application Insights 技术配置文件。 在技术配置文件中,定义 Application Insights 连接字符串、事件名称和要记录的声明。 若要发布事件,请将此技术配置文件作为业务流程步骤添加到用户旅程中。
使用 Application Insights 时,请考虑以下事项:
- 新日志在 Application Insights 中出现之前会有一小段延迟(通常不到 5 分钟)。
- 通过 Azure AD B2C 可选择要记录的声明。 不要在声明中包含个人数据。
- 若要记录用户会话,可以使用相关 ID 统一事件。
- 直接从用户旅程或子历程调用 Application Insights 技术配置文件。 请勿使用 Application Insights 技术配置文件作为验证技术配置文件。
先决条件
- 完成 Active Directory B2C 中的自定义策略入门中的步骤。 本教程指导你如何更新自定义策略文件以使用 Azure AD B2C 租户配置。
- 如果尚未注册 Web 应用,请按照注册 Web 应用程序中的步骤注册一个。
创建 Application Insights 资源
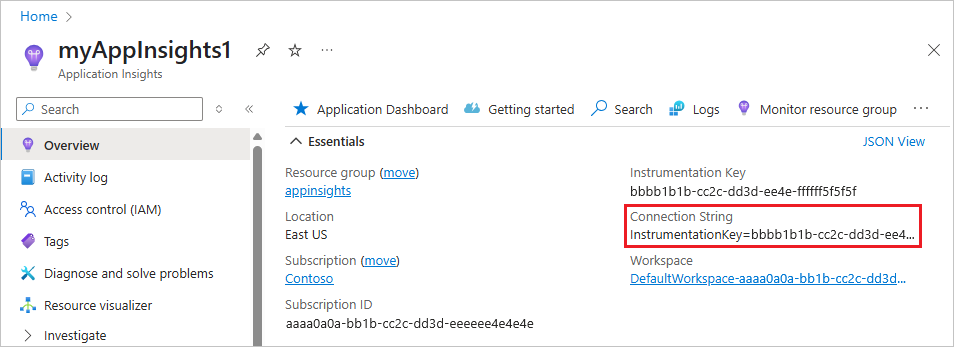
将 Application Insights 与 Azure AD B2C 配合使用时,只需创建资源并获取连接字符串。 有关信息,请参阅创建 Application Insights 资源。
- 登录 Azure 门户。
- 如果有权访问多个租户,请选择顶部菜单中的“设置”图标,切换到“目录 + 订阅”菜单中的 Microsoft Entra ID 租户。
- 选择 Azure 门户左上角的“创建资源”,然后搜索并选择“Application Insights” 。
- 选择“创建” 。
- 对于“名称”,请输入资源的名称。
- 在“应用程序类型”下,选择“ASP.NET web 应用程序”。
- 对于资源组,选择现有的组,或输入新组的名称。
- 选择“创建” 。
- 打开新的 Application Insights 资源,展开 Essentials 并复制连接字符串。
定义声明
声明可在 Azure AD B2C 策略执行过程中提供数据的临时存储。 在 ClaimsSchema 元素中宣布声明。
打开策略的扩展文件, 文件看起来类似于
SocialAndLocalAccounts/TrustFrameworkExtensions.xml。搜索 BuildingBlocks 元素。 如果未看到元素,请添加它。
找到 ClaimsSchema 元素。 如果未看到元素,请添加它。
将以下声明添加到 ClaimsSchema 元素:
<ClaimType Id="EventType">
  <DisplayName>Event type</DisplayName>
  <DataType>string</DataType>
</ClaimType>
<ClaimType Id="EventTimestamp">
  <DisplayName>Event timestamp</DisplayName>
  <DataType>string</DataType>
</ClaimType>
<ClaimType Id="PolicyId">
  <DisplayName>Policy Id</DisplayName>
  <DataType>string</DataType>
</ClaimType>
<ClaimType Id="Culture">
  <DisplayName>Culture ID</DisplayName>
  <DataType>string</DataType>
</ClaimType>
<ClaimType Id="CorrelationId">
  <DisplayName>Correlation Id</DisplayName>
  <DataType>string</DataType>
</ClaimType>
<ClaimType Id="federatedUser">
  <DisplayName>Federated user</DisplayName>
  <DataType>boolean</DataType>
</ClaimType>
<ClaimType Id="parsedDomain">
  <DisplayName>Domain name</DisplayName>
  <DataType>string</DataType>
  <UserHelpText>The domain portion of the email address.</UserHelpText>
</ClaimType>
<ClaimType Id="userInLocalDirectory">
  <DisplayName>userInLocalDirectory</DisplayName>
  <DataType>boolean</DataType>
</ClaimType>
新增技术配置文件
可以将技术配置文件视为自定义策略中的函数。 这些函数使用技术配置文件包含方法,其中技术配置文件包含其他技术配置文件并更改设置或添加新功能。 下表定义技术配置文件,这些文件用于打开会话和发布事件。
| 技术配置文件 | 任务 |
|---|---|
| AppInsights-Common | 具有典型配置的通用技术配置文件。 它包括 Application Insights 连接字符串、要记录的声明集合和开发人员模式。 其他技术配置文件包括通用技术配置文件,并添加更多声明(如事件名称)。 |
| AppInsights-SignInRequest | 在收到登录请求后记录包含一组声明的 SignInRequest 事件。 |
| AppInsights-UserSignUp | 当用户在注册或登录旅程中触发注册选项时记录 UserSignup 事件。 |
| AppInsights-SignInComplete | 在成功进行身份验证(已将令牌发送到信赖方应用程序)时记录 SignInComplete 事件。 |
打开初学者包中的 TrustFrameworkExtensions.xml 文件。 将技术配置文件添加到 ClaimsProvider 元素:
<ClaimsProvider>
  <DisplayName>Application Insights</DisplayName>
  <TechnicalProfiles>
    <TechnicalProfile Id="AppInsights-Common">
      <DisplayName>Application Insights</DisplayName>
      <Protocol Name="Proprietary" Handler="Web.TPEngine.Providers.Insights.AzureApplicationInsightsProvider, Web.TPEngine, Version=1.0.0.0, Culture=neutral, PublicKeyToken=null" />
      <Metadata>
        <!-- The ApplicationInsights connection string, which you use for logging the events -->
        <Item Key="ConnectionString">xxxxxxxx-xxxx-xxxx-xxxx-xxxxxxxxxxxx</Item>
        <Item Key="DeveloperMode">false</Item>
        <Item Key="DisableTelemetry ">false</Item>
      </Metadata>
      <InputClaims>
        <!-- Properties of an event are added through the syntax {property:NAME}, where NAME is the property being added to the event. DefaultValue can be either a static value or a value that's resolved by one of the supported DefaultClaimResolvers. -->
        <InputClaim ClaimTypeReferenceId="EventTimestamp" PartnerClaimType="{property:EventTimestamp}" DefaultValue="{Context:DateTimeInUtc}" />
        <InputClaim ClaimTypeReferenceId="tenantId" PartnerClaimType="{property:TenantId}" DefaultValue="{Policy:TrustFrameworkTenantId}" />
        <InputClaim ClaimTypeReferenceId="PolicyId" PartnerClaimType="{property:Policy}" DefaultValue="{Policy:PolicyId}" />
        <InputClaim ClaimTypeReferenceId="CorrelationId" PartnerClaimType="{property:CorrelationId}" DefaultValue="{Context:CorrelationId}" />
        <InputClaim ClaimTypeReferenceId="Culture" PartnerClaimType="{property:Culture}" DefaultValue="{Culture:RFC5646}" />
      </InputClaims>
    </TechnicalProfile>

    <TechnicalProfile Id="AppInsights-SignInRequest">
      <InputClaims>
        <!-- An input claim with a PartnerClaimType="eventName" is required. This is used by the AzureApplicationInsightsProvider to create an event with the specified value. -->
        <InputClaim ClaimTypeReferenceId="EventType" PartnerClaimType="eventName" DefaultValue="SignInRequest" />
      </InputClaims>
      <IncludeTechnicalProfile ReferenceId="AppInsights-Common" />
    </TechnicalProfile>

    <TechnicalProfile Id="AppInsights-UserSignUp">
      <InputClaims>
        <InputClaim ClaimTypeReferenceId="EventType" PartnerClaimType="eventName" DefaultValue="UserSignUp" />
      </InputClaims>
      <IncludeTechnicalProfile ReferenceId="AppInsights-Common" />
    </TechnicalProfile>

    <TechnicalProfile Id="AppInsights-SignInComplete">
      <InputClaims>
        <InputClaim ClaimTypeReferenceId="EventType" PartnerClaimType="eventName" DefaultValue="SignInComplete" />
        <InputClaim ClaimTypeReferenceId="federatedUser" PartnerClaimType="{property:FederatedUser}" DefaultValue="false" />
        <InputClaim ClaimTypeReferenceId="parsedDomain" PartnerClaimType="{property:FederationPartner}" DefaultValue="Not Applicable" />
        <InputClaim ClaimTypeReferenceId="identityProvider" PartnerClaimType="{property:IDP}" DefaultValue="Local" />
      </InputClaims>
      <IncludeTechnicalProfile ReferenceId="AppInsights-Common" />
    </TechnicalProfile>
  </TechnicalProfiles>
</ClaimsProvider>
重要
将技术配置文件中的 AppInsights-Common 连接字符串更改为 Application Insights 资源提供的 GUID。
添加技术配置文件,作为业务流程步骤
添加引用技术配置文件的新的业务流程步骤。
重要
添加新的业务流程步骤以后,请按顺序对这些步骤重新编号,不要跳过从 1 到 N 的任何整数。
识别包含用户旅程的策略文件(例如
SocialAndLocalAccounts/SignUpOrSignin.xml),然后将其打开。调用
AppInsights-SignInRequest作为第二个业务流程步骤。 此步骤跟踪已收到的注册或登录请求。<!-- Track that we have received a sign in request --> <OrchestrationStep Order="2" Type="ClaimsExchange"> <ClaimsExchanges> <ClaimsExchange Id="TrackSignInRequest" TechnicalProfileReferenceId="AppInsights-SignInRequest" /> </ClaimsExchanges> </OrchestrationStep>添加调用
SendClaims的新步骤后,再执行AppInsights-UserSignup业务流程步骤。 当用户在注册或登录旅程中选择注册按钮时,会触发此步骤。 可能需要更新编排步骤Order="8",以确保不会跳过第一个到最后一个编排步骤的任何整数。<!-- Handles the user selecting the sign-up link in the local account sign-in page The `SendClaims` orchestration step comes after this one, --> <OrchestrationStep Order="8" Type="ClaimsExchange"> <Preconditions> <Precondition Type="ClaimsExist" ExecuteActionsIf="false"> <Value>newUser</Value> <Action>SkipThisOrchestrationStep</Action> </Precondition> <Precondition Type="ClaimEquals" ExecuteActionsIf="true"> <Value>newUser</Value> <Value>false</Value> <Action>SkipThisOrchestrationStep</Action> </Precondition> </Preconditions> <ClaimsExchanges> <ClaimsExchange Id="TrackUserSignUp" TechnicalProfileReferenceId="AppInsights-UserSignup" /> </ClaimsExchanges> </OrchestrationStep>在
SendClaims业务流程步骤后,调用AppInsights-SignInComplete。 此步骤演示成功完成的过程。 可能需要更新编排步骤Order="10",以确保不会跳过第一个到最后一个编排步骤的任何整数。<!-- Track that we have successfully sent a token The `SendClaims` orchestration step come before this one, --> <OrchestrationStep Order="10" Type="ClaimsExchange"> <ClaimsExchanges> <ClaimsExchange Id="TrackSignInComplete" TechnicalProfileReferenceId="AppInsights-SignInComplete" /> </ClaimsExchanges> </OrchestrationStep>
上传文件,运行策略,并查看事件
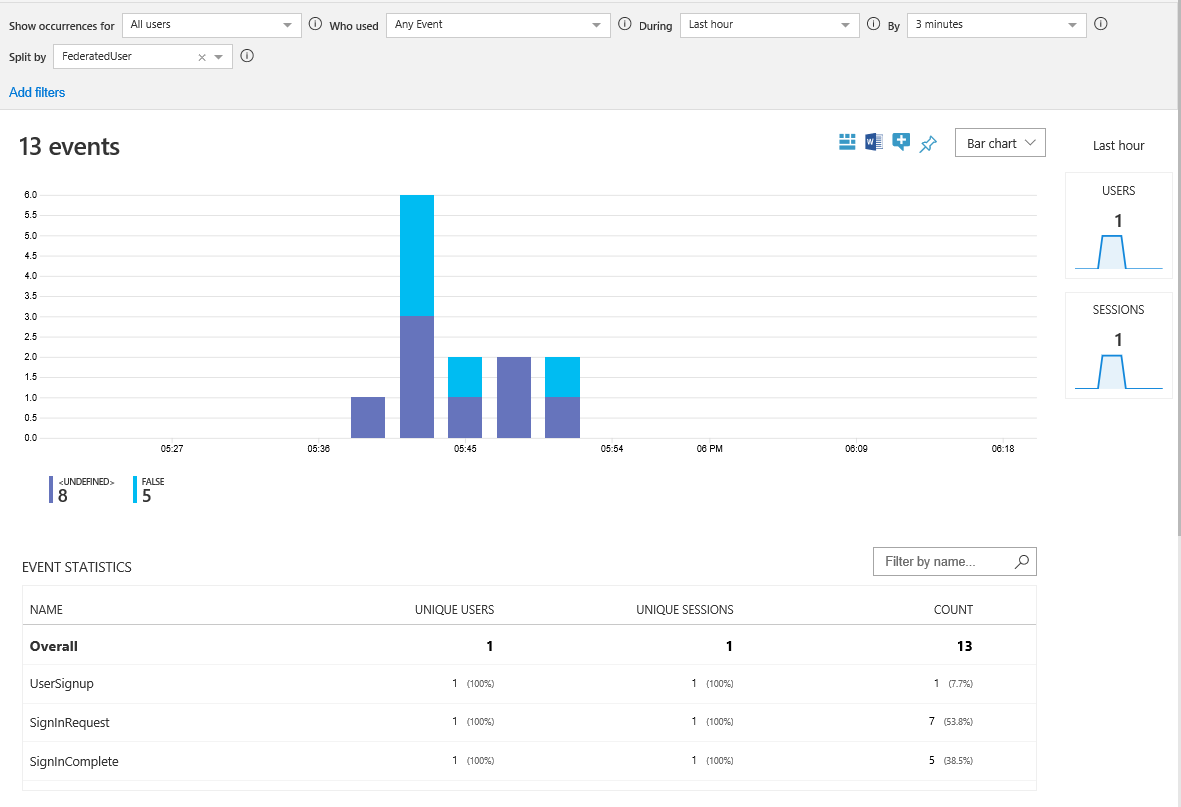
保存并上传 TrustFrameworkExtensions.xml 文件。 然后,通过应用程序调用信赖方策略,或者在 Azure 门户中使用“立即运行”。 等待事件在 Application Insights 中出现。
- 在 Microsoft Entra 租户中打开 Application Insights 资源。
- 选择“使用情况”,然后选择“事件” 。
- 将“期间”设置为“过去一小时”,将“截止时间”设置为“3 分钟”。 你可能需要刷新该窗口才能看到结果。
收集更多数据
为了满足你的业务需求,你可能需要记录更多的声明。 若要添加声明,请先定义声明,然后将声明添加到输入声明集合。 你添加到 AppInsights-Common 技术配置文件中的声明会显示在所有事件中。 你添加到特定技术配置文件的声明仅会显示在该事件中。 输入声明元素包含以下属性:
- ClaimTypeReferenceId 是对声明类型的引用。
- PartnerClaimType 是 Azure Insights 中显示的属性的名称。 使用语法
{property:NAME},其中NAME是要添加到该事件的属性。 - DefaultValue 是要记录的预定义值(如事件名称)。 如果用户旅程中使用的声明为空,则会使用默认值。 例如,
identityProvider声明由联合技术配置文件进行设置。 如果声明为空,则表示用户使用本地帐户登录。 因此,默认值设置为“本地”。 还可以使用上下文值(例如应用程序 ID 或用户 IP 地址)记录声明解析程序。
操作声明
在将输入声明发送到 Application Insights 之前,可以使用输入声明转换来修改输入声明或生成新声明。 在下面的示例中,技术配置文件包含 CheckIsAdmin 输入声明转换。
<TechnicalProfile Id="AppInsights-SignInComplete">
  <InputClaimsTransformations>
    <InputClaimsTransformation ReferenceId="CheckIsAdmin" />
  </InputClaimsTransformations>
  <InputClaims>
    <InputClaim ClaimTypeReferenceId="isAdmin" PartnerClaimType="{property:IsAdmin}"  />
    ...
  </InputClaims>
  <IncludeTechnicalProfile ReferenceId="AppInsights-Common" />
</TechnicalProfile>
添加事件
若要添加事件,请创建包含 AppInsights-Common 技术配置文件的新技术配置文件。 然后将新的技术配置文件作为业务流程步骤添加到用户旅程中。 准备就绪后,使用前置条件元素触发事件。 例如,仅当用户通过多重身份验证运行时才报告事件。
<TechnicalProfile Id="AppInsights-MFA-Completed">
  <InputClaims>
     <InputClaim ClaimTypeReferenceId="EventType" PartnerClaimType="eventName" DefaultValue="MFA-Completed" />
  </InputClaims>
  <IncludeTechnicalProfile ReferenceId="AppInsights-Common" />
</TechnicalProfile>
重要
将事件添加到用户旅程中时,请记得按顺序对业务流程步骤进行重新编号。
<OrchestrationStep Order="8" Type="ClaimsExchange">
  <Precondition Type="ClaimsExist" ExecuteActionsIf="true">
    <Value>isActiveMFASession</Value>
    <Action>SkipThisOrchestrationStep</Action>
    </Precondition>
  </Preconditions>
  <ClaimsExchanges>
    <ClaimsExchange Id="TrackUserMfaCompleted" TechnicalProfileReferenceId="AppInsights-MFA-Completed" />
  </ClaimsExchanges>
</OrchestrationStep>
启用开发人员模式
使用 Application Insights 定义事件时,可以指示是否启用开发人员模式。 开发人员模式控制缓冲事件的方式。 在事件量最少的开发环境中,启用开发人员模式会导致系统立即将事件发送到 Application Insights。 默认值为 false。 不要在生产环境中启用开发人员模式。
若要启用开发人员模式,请在 DeveloperMode 技术配置文件中将 true 元数据更改为 AppInsights-Common:
<TechnicalProfile Id="AppInsights-Common">
  <Metadata>
    ...
    <Item Key="DeveloperMode">true</Item>
  </Metadata>
</TechnicalProfile>
禁用遥测
若要禁用 Application Insights 日志,请在 DisableTelemetry 技术配置文件中将 true 元数据更改为 AppInsights-Common:
<TechnicalProfile Id="AppInsights-Common">
  <Metadata>
    ...
    <Item Key="DisableTelemetry">true</Item>
  </Metadata>
</TechnicalProfile>