Azure Web PubSub服务可帮助你使用 WebSocket 生成实时消息传送 Web 应用程序。 Azure Functions是一个无服务器平台,可让你在不管理任何基础结构的情况下运行代码。 本教程介绍如何使用Azure Web PubSub服务和Azure Functions在通知方案中使用实时消息生成无服务器应用程序。
在本教程中,你将了解如何:
- 生成无服务器通知应用
- 使用 Web PubSub 函数输入和输出绑定
- 在本地运行示例函数
- 将函数部署到 Azure Function App
重要
本文中出现的原始连接字符串仅用于演示目的。
连接字符串包括应用程序访问 Azure Web PubSub 服务所需的授权信息。 连接字符串中的访问密钥类似于服务的根密码。 在生产环境中,始终保护access密钥。 使用Azure 密钥保管库安全地管理和轮换密钥,使用 WebPubSubServiceClient 保护连接。
避免将access密钥分发给其他用户、对其进行硬编码或将它们保存在其他人可访问的纯文本中的任何位置。 如果你认为访问密钥可能已泄露,请轮换密钥。
先决条件
如果没有 Azure 帐户,请在开始前创建一个试用帐户。
登录到 Azure
使用 Azure 帐户登录到 https://portal.azure.cn/ 的 Azure portal。
创建Azure Web PubSub服务实例
应用程序将连接到 Azure 中的 Web PubSub 服务实例。
选择Azure portal左上角的“新建”按钮。 在“新建”屏幕中,在搜索框中键入“Web PubSub”,然后按 Enter。 (还可以从 Web 类别搜索Azure Web PubSub。
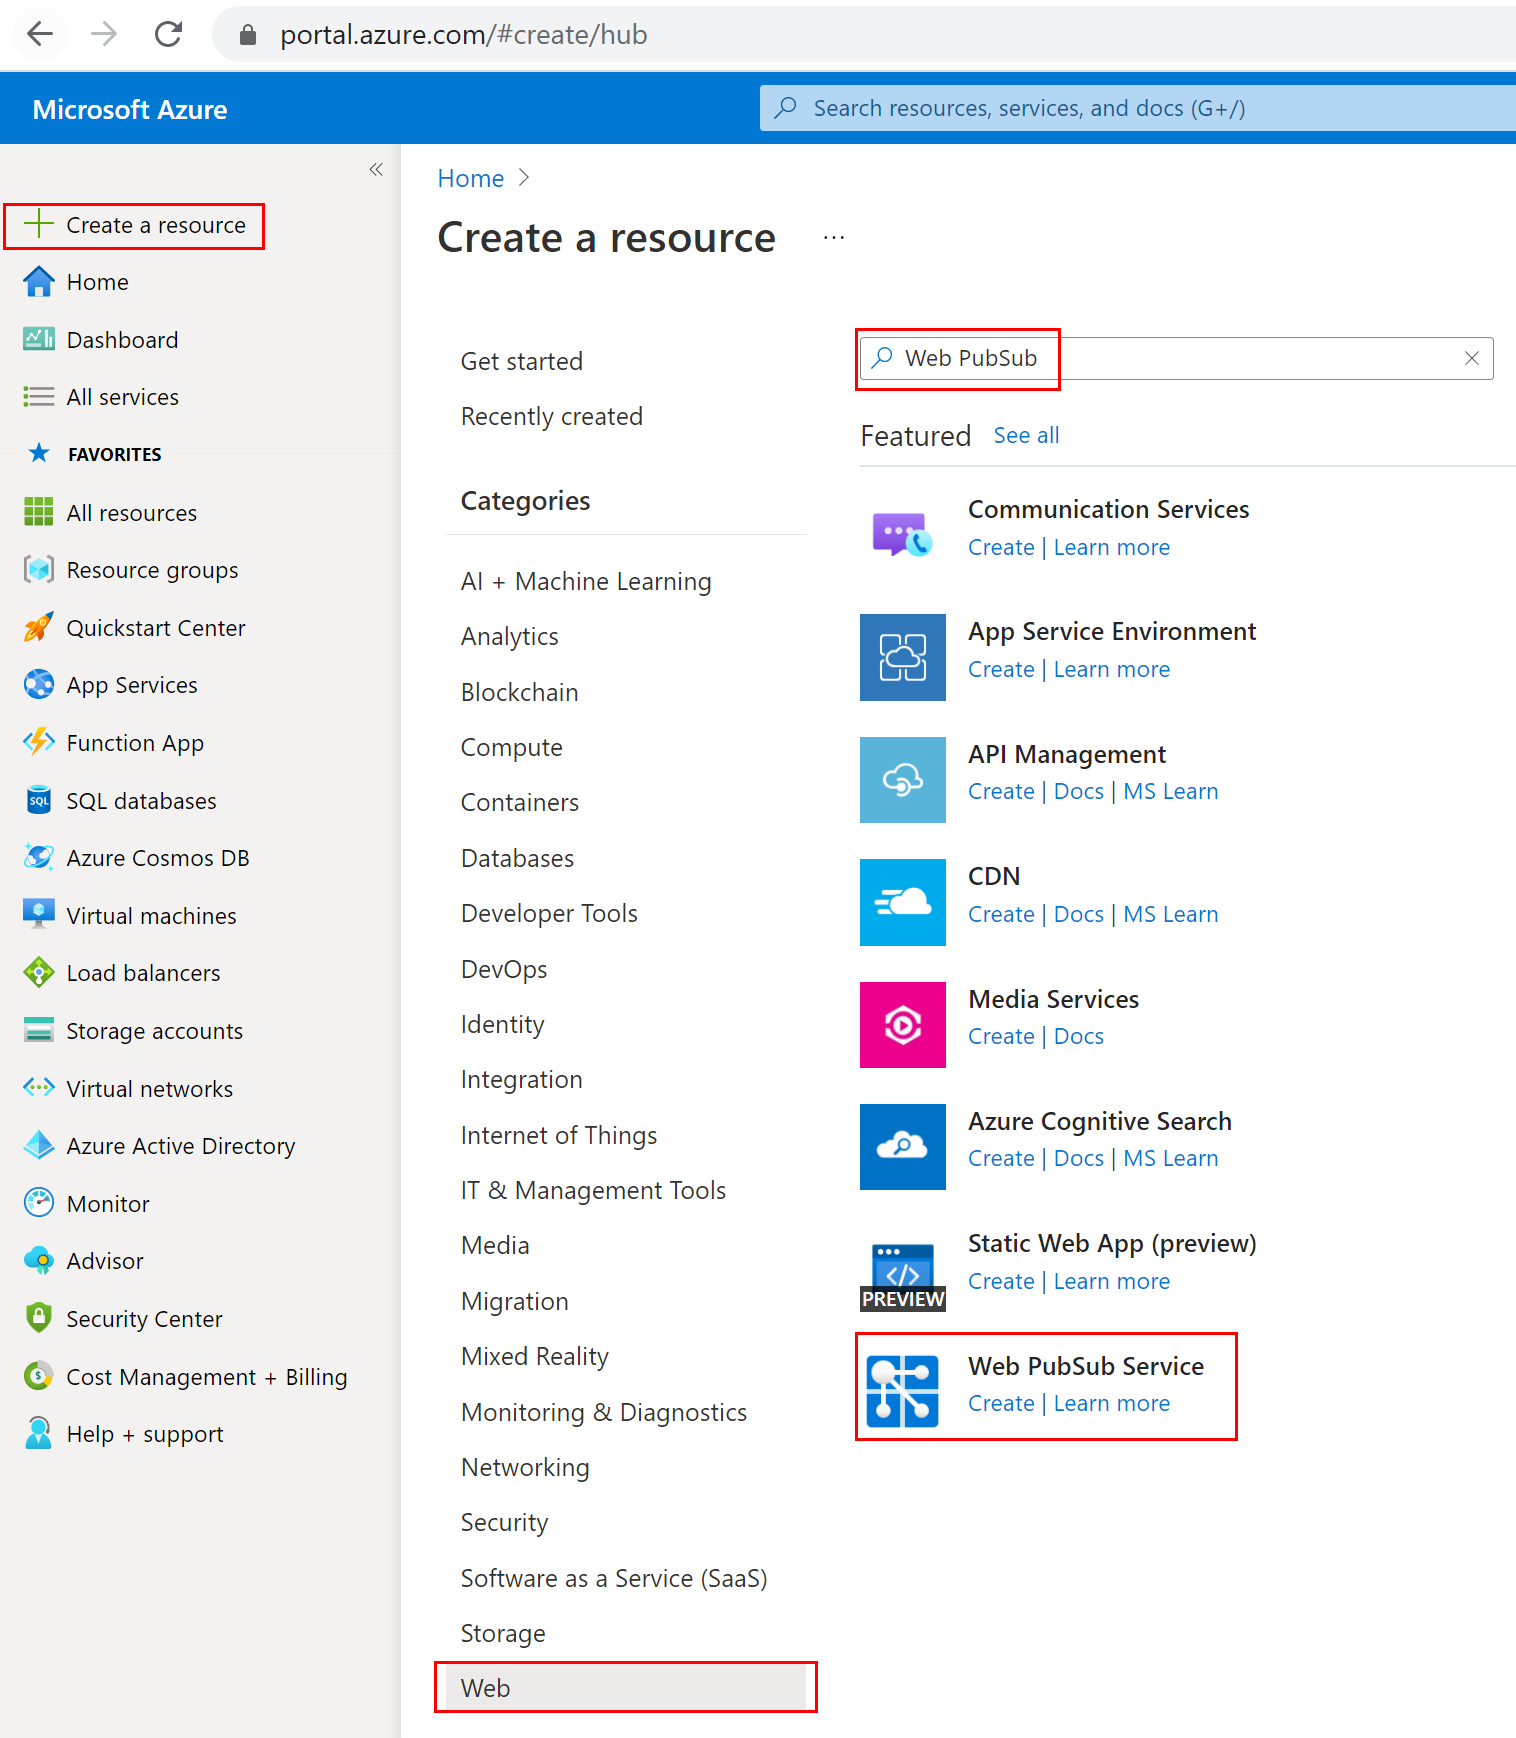
在搜索结果中选择“Web PubSub”,然后选择“创建” 。
输入以下设置。
| 设置 |
建议值 |
说明 |
|
资源名称 |
全局唯一名称 |
标识新 Web PubSub 服务实例的全局唯一名称。 有效字符为 a-z、A-Z、0-9 和 -。 |
|
订阅 |
你的订阅 |
创建此新的 Web PubSub 服务实例的 Azure 订阅。 |
|
资源组 |
myResourceGroup(我的资源组) |
要在其中创建 Web PubSub 服务实例的新资源组的名称。 |
|
位置 |
中国北部 3 |
选择你附近的区域。 |
|
定价层 |
免费 |
可以先免费试用Azure Web PubSub服务。 详细了解 Azure Web PubSub 服务定价层 |
|
单位计数 |
- |
单位计数指定 Web PubSub 服务实例可接受的连接数。 每个单位最多支持 1000 个并发连接。 它只能在标准层中配置。 |
选择“创建”,开始部署 Web PubSub 服务实例。
在本地创建和运行函数
请确保已安装 Azure Functions Core Tools。 现在,为project创建空目录。 在此工作目录下运行命令。 使用以下给定选项之一。
func init --worker-runtime javascript --model V4
func init --worker-runtime javascript --model V3
func init --worker-runtime dotnet
func init --worker-runtime dotnet-isolated
func init --worker-runtime python --model V1
按照步骤安装 Microsoft.Azure.WebJobs.Extensions.WebPubSub。
确认或将 host.json 的 extensionBundle 更新为版本 4.* 或更高版本,以获取 Web PubSub 支持。 若要更新 host.json,请在编辑器中打开该文件,然后将现有的 extensionBundle 版本替换为 4.* 或更高版本。
{
    "extensionBundle": {
        "id": "Microsoft.Azure.Functions.ExtensionBundle",
        "version": "[4.*, 5.0.0)"
    }
}
确认或将 host.json 的 extensionBundle 更新至版本 3.3.0 或更高,以支持 Web PubSub。 若要更新 host.json,请在编辑器中打开该文件,然后将现有的 extensionBundle 替换为 3.3.0 或更高版本。
{
    "extensionBundle": {
        "id": "Microsoft.Azure.Functions.ExtensionBundle",
        "version": "[3.3.*, 4.0.0)"
    }
}
dotnet add package Microsoft.Azure.WebJobs.Extensions.WebPubSub
dotnet add package Microsoft.Azure.Functions.Worker.Extensions.WebPubSub --prerelease
更新 host.json 的 extensionBundle 到版本 3.3.0 或更高版本,以获取 Web PubSub 支持。 若要更新 host.json,请在编辑器中打开该文件,然后将现有的 extensionBundle 替换为 3.3.0 或更高版本。
{
    "extensionBundle": {
        "id": "Microsoft.Azure.Functions.ExtensionBundle",
        "version": "[3.3.*, 4.0.0)"
    }
}
创建 index 函数,为客户端读取和托管静态网页。
func new -n index -t HttpTrigger
- 更新
src/functions/index.js 并复制以下代码。
const { app } = require('@azure/functions');
const { readFile } = require('fs/promises');

app.http('index', {
    methods: ['GET', 'POST'],
    authLevel: 'anonymous',
    handler: async (context) => {
        const content = await readFile('index.html', 'utf8', (err, data) => {
            if (err) {
                context.err(err)
                return
            }
        });

        return {
            status: 200,
            headers: {
                'Content-Type': 'text/html'
            },
            body: content,
        };
    }
});
- 更新
index/function.json 并复制以下 json 代码。
{
  "bindings": [
    {
      "authLevel": "anonymous",
      "type": "httpTrigger",
      "direction": "in",
      "name": "req",
      "methods": [
        "get",
        "post"
      ]
    },
    {
      "type": "http",
      "direction": "out",
      "name": "res"
    }
  ]
}
- 更新
index/index.js 并复制以下代码。
var fs = require('fs');
var path = require('path');

module.exports = function (context, req) {
    var index = context.executionContext.functionDirectory + '/../index.html';
    context.log("index.html path: " + index);
    fs.readFile(index, 'utf8', function (err, data) {
        if (err) {
            console.log(err);
            context.done(err);
        }
        context.res = {
            status: 200,
            headers: {
                'Content-Type': 'text/html'
            },
            body: data
        };
        context.done();
    });
}
- 更新
index.cs 并将 Run 函数替换为以下代码。
[FunctionName("index")]
public static IActionResult Run([HttpTrigger(AuthorizationLevel.Anonymous)] HttpRequest req, ExecutionContext context, ILogger log)
{
    var indexFile = Path.Combine(context.FunctionAppDirectory, "index.html");
    log.LogInformation($"index.html path: {indexFile}.");
    return new ContentResult
    {
        Content = File.ReadAllText(indexFile),
        ContentType = "text/html",
    };
}
- 更新
index.cs 并将 Run 函数替换为以下代码。
[Function("index")]
public HttpResponseData Run([HttpTrigger(AuthorizationLevel.Anonymous, "get", "post")] HttpRequestData req, FunctionContext context)
{
    var path = Path.Combine(context.FunctionDefinition.PathToAssembly, "../index.html");
    _logger.LogInformation($"index.html path: {path}.");

    var response = req.CreateResponse();
    response.WriteString(File.ReadAllText(path));
    response.Headers.Add("Content-Type", "text/html");
    return response;
}
- 更新
index/function.json 并复制以下 json 代码。
{
  "scriptFile": "__init__.py",
  "bindings": [
    {
      "authLevel": "anonymous",
      "type": "httpTrigger",
      "direction": "in",
      "name": "req",
      "methods": [
        "get",
        "post"
      ]
    },
    {
      "type": "http",
      "direction": "out",
      "name": "$return"
    }
  ]
}
- 更新
index/__init__.py 并复制以下代码。
import os

import azure.functions as func

def main(req: func.HttpRequest) -> func.HttpResponse:
    f = open(os.path.dirname(os.path.realpath(__file__)) + '/../index.html')
    return func.HttpResponse(f.read(), mimetype='text/html')
创建 negotiate 函数,帮助客户端使用 access 令牌获取服务连接 URL。
func new -n negotiate -t HttpTrigger
- 更新
src/functions/negotiate.js 并复制以下代码。
const { app, input } = require('@azure/functions');

const connection = input.generic({
    type: 'webPubSubConnection',
    name: 'connection',
    hub: 'notification'
});

app.http('negotiate', {
    methods: ['GET', 'POST'],
    authLevel: 'anonymous',
    extraInputs: [connection],
    handler: async (request, context) => {
        return { body: JSON.stringify(context.extraInputs.get('connection')) };
    },
});
- 更新
negotiate/function.json 并复制以下 json 代码。
{
  "bindings": [
    {
      "authLevel": "anonymous",
      "type": "httpTrigger",
      "direction": "in",
      "name": "req"
    },
    {
      "type": "http",
      "direction": "out",
      "name": "res"
    },
    {
      "type": "webPubSubConnection",
      "name": "connection",
      "hub": "notification",
      "direction": "in"
    }
  ]
}
- 创建文件夹 negotiate,然后更新
negotiate/index.js 并复制以下代码。
module.exports = function (context, req, connection) {
    context.res = { body: connection };
    context.done();
};
- 更新
negotiate.cs 并将 Run 函数替换为以下代码。
[FunctionName("negotiate")]
public static WebPubSubConnection Run(
    [HttpTrigger(AuthorizationLevel.Anonymous, "get", "post", Route = null)] HttpRequest req,
    [WebPubSubConnection(Hub = "notification")] WebPubSubConnection connection,
    ILogger log)
{
    log.LogInformation("Connecting...");

    return connection;
}
- 在标头中添加
using 语句来解析所需的依赖项。
using Microsoft.Azure.WebJobs.Extensions.WebPubSub;
- 更新
negotiate.cs 并将 Run 函数替换为以下代码。
[Function("negotiate")]
public HttpResponseData Run([HttpTrigger(AuthorizationLevel.Anonymous, "get", "post")] HttpRequestData req,
    [WebPubSubConnectionInput(Hub = "notification")] WebPubSubConnection connectionInfo)
{
    var response = req.CreateResponse(HttpStatusCode.OK);
    response.WriteAsJsonAsync(connectionInfo);
    return response;
}
- 创建文件夹 negotiate,然后更新
negotiate/function.json 并复制以下 json 代码。
{
  "scriptFile": "__init__.py",
  "bindings": [
    {
      "authLevel": "anonymous",
      "type": "httpTrigger",
      "direction": "in",
      "name": "req"
    },
    {
      "type": "http",
      "direction": "out",
      "name": "$return"
    },
    {
      "type": "webPubSubConnection",
      "name": "connection",
      "hub": "notification",
      "direction": "in"
    }
  ]
}
- 更新
negotiate/__init__.py 并复制以下代码。
import logging

import azure.functions as func

def main(req: func.HttpRequest, connection) -> func.HttpResponse:
    return func.HttpResponse(connection)
创建 notification 函数,以使用 TimerTrigger 生成通知。
func new -n notification -t TimerTrigger
- 更新
src/functions/notification.js 并复制以下代码。
const { app, output } = require('@azure/functions');

const wpsAction = output.generic({
    type: 'webPubSub',
    name: 'action',
    hub: 'notification'
});

app.timer('notification', {
    schedule: "*/10 * * * * *",
    extraOutputs: [wpsAction],
    handler: (myTimer, context) => {
        context.extraOutputs.set(wpsAction, {
            actionName: 'sendToAll',
            data: `[DateTime: ${new Date()}] Temperature: ${getValue(22, 1)}\xB0C, Humidity: ${getValue(40, 2)}%`,
            dataType: 'text',
        });
    },
});

function getValue(baseNum, floatNum) {
    return (baseNum + 2 * floatNum * (Math.random() - 0.5)).toFixed(3);
}
- 更新
notification/function.json 并复制以下 json 代码。
{
  "bindings": [
    {
      "name": "myTimer",
      "type": "timerTrigger",
      "direction": "in",
      "schedule": "*/10 * * * * *"
    },
    {
      "type": "webPubSub",
      "name": "actions",
      "hub": "notification",
      "direction": "out"
    }
  ]
}
- 更新
notification/index.js 并复制以下代码。
module.exports = function (context, myTimer) {
    context.bindings.actions = {
        "actionName": "sendToAll",
        "data": `[DateTime: ${new Date()}] Temperature: ${getValue(22, 1)}\xB0C, Humidity: ${getValue(40, 2)}%`,
        "dataType": "text"
    }
    context.done();
};

function getValue(baseNum, floatNum) {
    return (baseNum + 2 * floatNum * (Math.random() - 0.5)).toFixed(3);
}
- 更新
notification.cs 并将 Run 函数替换为以下代码。
[FunctionName("notification")]
public static async Task Run([TimerTrigger("*/10 * * * * *")]TimerInfo myTimer, ILogger log,
    [WebPubSub(Hub = "notification")] IAsyncCollector<WebPubSubAction> actions)
{
    await actions.AddAsync(new SendToAllAction
    {
        Data = BinaryData.FromString($"[DateTime: {DateTime.Now}] Temperature: {GetValue(23, 1)}{'\xB0'}C, Humidity: {GetValue(40, 2)}%"),
        DataType = WebPubSubDataType.Text
    });
}

private static string GetValue(double baseNum, double floatNum)
{
    var rng = new Random();
    var value = baseNum + floatNum * 2 * (rng.NextDouble() - 0.5);
    return value.ToString("0.000");
}
- 在标头中添加
using 语句来解析所需的依赖项。
using System.Threading.Tasks;
using Microsoft.Azure.WebJobs.Extensions.WebPubSub;
using Microsoft.Azure.WebPubSub.Common;
- 更新
notification.cs 并将 Run 函数替换为以下代码。
[Function("notification")]
[WebPubSubOutput(Hub = "notification")]
public SendToAllAction Run([TimerTrigger("*/10 * * * * *")] MyInfo myTimer)
{
    return new SendToAllAction
    {
        Data = BinaryData.FromString($"[DateTime: {DateTime.Now}] Temperature: {GetValue(23, 1)}{'\xB0'}C, Humidity: {GetValue(40, 2)}%"),
        DataType = WebPubSubDataType.Text
    };
}

private static string GetValue(double baseNum, double floatNum)
{
    var rng = new Random();
    var value = baseNum + floatNum * 2 * (rng.NextDouble() - 0.5);
    return value.ToString("0.000");
}
- 创建一个文件夹“通知”,然后更新
notification/function.json 并复制以下 JSON 代码。
{
  "scriptFile": "__init__.py",
  "bindings": [
    {
      "name": "myTimer",
      "type": "timerTrigger",
      "direction": "in",
      "schedule": "*/10 * * * * *"
    },
    {
      "type": "webPubSub",
      "name": "actions",
      "hub": "notification",
      "direction": "out"
    }
  ]
}
- 更新
notification/__init__.py 并复制以下代码。
import datetime
import random
import json

import azure.functions as func

def main(myTimer: func.TimerRequest, actions: func.Out[str]) -> None:
    time = datetime.datetime.now().strftime("%A %d-%b-%Y %H:%M:%S")
    actions.set(json.dumps({
        'actionName': 'sendToAll',
        'data': '\x5B DateTime: {0} \x5D Temperature: {1:.3f} \xB0C, Humidity: {2:.3f} \x25'.format(time, 22 + 2 * (random.random() - 0.5), 44 + 4 * (random.random() - 0.5)),
        'dataType': 'text'
    }))
在project根文件夹中添加客户端单页index.html并复制内容。
<html>
    <body>
    <h1>Azure Web PubSub Notification</h1>
    <div id="messages"></div>
    <script>
        (async function () {
            let messages = document.querySelector('#messages');
            let res = await fetch(`${window.location.origin}/api/negotiate`);
            let url = await res.json();
            let ws = new WebSocket(url.url);
            ws.onopen = () => console.log('connected');

            ws.onmessage = event => {
                let m = document.createElement('p');
                m.innerText = event.data;
                messages.appendChild(m);
            };
        })();
    </script>
    </body>
</html>
由于 C# project将文件编译到其他输出文件夹,因此需要更新 *.csproj 以使内容页随其一起。
<ItemGroup>
    <None Update="index.html">
        <CopyToOutputDirectory>PreserveNewest</CopyToOutputDirectory>
    </None>
</ItemGroup>
由于 C# project将文件编译到其他输出文件夹,因此需要更新 *.csproj 以使内容页随其一起。
<ItemGroup>
    <None Update="index.html">
        <CopyToOutputDirectory>PreserveNewest</CopyToOutputDirectory>
    </None>
</ItemGroup>
配置并运行Azure函数应用
本文中出现的原始连接字符串仅用于演示目的。 在生产环境中,始终保护access密钥。 使用Azure 密钥保管库安全地管理和轮换密钥,使用 WebPubSubServiceClient 保护连接。
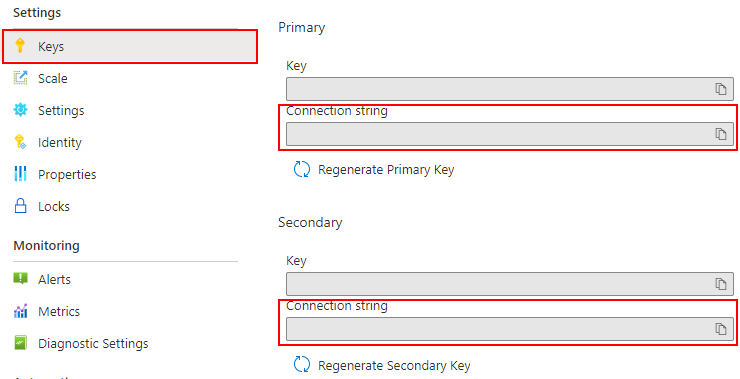
- 在浏览器中,打开 Azure portal 并确认已成功创建之前部署的 Web PubSub 服务实例。 导航到该实例。
- 选择 Keys 并复制连接字符串。
在函数文件夹中运行命令以设置服务连接字符串。 根据需要将 <connection-string> 替换为你的值。
func settings add WebPubSubConnectionString "<connection-string>"
注意事项
示例中使用的 TimerTrigger依赖于 Azure 存储,但在函数在本地运行时,可以使用本地storage模拟器。 如果出现一些错误(如 There was an error performing a read operation on the Blob 存储 Secret Repository. Please ensure the 'AzureWebJobsStorage' 连接字符串 is valid.),则需要下载并启用 Storage Emulator。
现在,可通过命令运行本地函数。
func start --port 7071
若要检查正在运行的日志,可以通过访问 http://localhost:7071/api/index 来访问本地主机静态页面。
注意事项
一些浏览器会自动重定向到 https,这导致错误的 URL。 建议在渲染不成功时使用 Edge 并仔细检查网址。
将 Function App 部署到 Azure
在将函数代码部署到Azure之前,需要创建三个资源:
- 一个资源组:相关资源的逻辑容器。
- 存储帐户,用于维护有关函数的状态和其他信息。
- 一个函数应用:提供用于执行函数代码的环境。 函数应用映射到本地函数project,并允许将函数分组为逻辑单元,以便更轻松地管理、部署和共享资源。
使用以下命令创建这些项。
登录到Azure:
az login
创建资源组,或者可以重用之前Azure Web PubSub服务的资源组来省略该步骤。
az group create -n WebPubSubFunction -l <REGION>
在你的资源组和区域内创建一个通用存储帐户。
az storage account create -n <STORAGE_NAME> -l <REGION> -g WebPubSubFunction
在Azure中创建函数应用:
az functionapp create --resource-group WebPubSubFunction --consumption-plan-location <REGION> --runtime node --runtime-version 18 --functions-version 4 --name <FUNCIONAPP_NAME> --storage-account <STORAGE_NAME>
az functionapp create --resource-group WebPubSubFunction --consumption-plan-location <REGION> --runtime node --runtime-version 18 --functions-version 4 --name <FUNCIONAPP_NAME> --storage-account <STORAGE_NAME>
az functionapp create --resource-group WebPubSubFunction --consumption-plan-location <REGION> --runtime dotnet --functions-version 4 --name <FUNCIONAPP_NAME> --storage-account <STORAGE_NAME>
az functionapp create --resource-group WebPubSubFunction --consumption-plan-location <REGION> --runtime dotnet-isolated --functions-version 4 --name <FUNCIONAPP_NAME> --storage-account <STORAGE_NAME>
az functionapp create --resource-group WebPubSubFunction --consumption-plan-location <REGION> --runtime python --runtime-version 3.9 --functions-version 4 --name <FUNCIONAPP_NAME> --os-type linux --storage-account <STORAGE_NAME>
将函数项目部署到 Azure:
在 Azure 中创建函数应用后,即可使用 func azure functionapp publish 命令部署本地函数project。
func azure functionapp publish <FUNCIONAPP_NAME> --publish-local-settings
注意事项
在这里,我们将本地设置 local.settings.json 与命令参数 --publish-local-settings 一起部署。 如果使用 Azure 存储 Emulator,可以在提示消息时键入 no,以跳过在 Azure 上覆盖此值:App setting AzureWebJobsStorage is different between azure and local.settings.json, Would you like to overwrite value in azure? [yes/no/show]。 此外,还可以更新 Azure portal ->Settings ->Configuration 中的 Function App 设置。
现在,您可以通过 Azure Function App 跳转到 URL:https://<FUNCIONAPP_NAME>.chinacloudsites.cn/api/index,检查您的网站。
清理资源
如果不打算继续使用此应用,请按照以下步骤删除本文档中创建的所有资源,以免产生任何费用:
在Azure portal中,选择最左侧的 Resource groups,然后选择创建的资源组。 改用搜索框按名称查找资源组。
在打开的窗口中选择资源组,然后选择“删除资源组”。
在新窗口中键入要删除的资源组的名称,然后选择“删除”。
后续步骤
本快速入门介绍了如何运行无服务器聊天应用程序。 现在,可以开始构建自己的应用程序。