适用于: Azure 数据工厂
  Azure Synapse Analytics
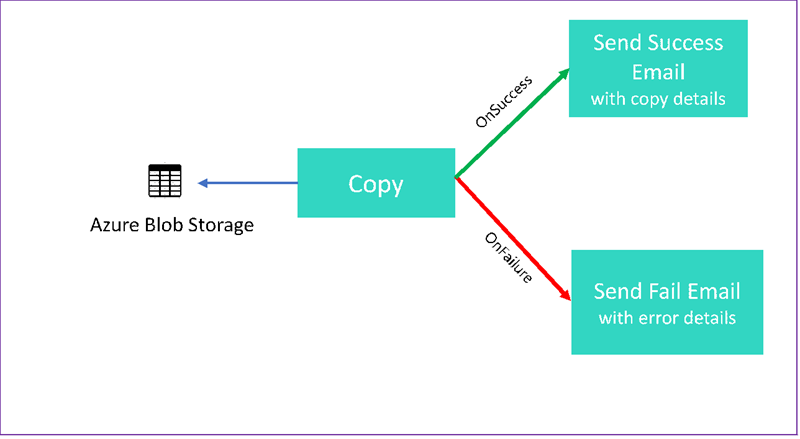
在本教程中,我们将创建一个数据工厂管道来展示某些控制流功能。 此管道从 Azure Blob 存储容器中的某个容器复制到同一存储帐户中的另一个容器。 如果复制活动成功,该管道会在电子邮件中发送成功复制操作的详细信息。 该信息可能包括写入的数据量。 如果复制活动失败,该管道会在电子邮件中发送复制失败的详细信息(例如错误消息)。 整个教程讲解了如何传递参数。
下图概述了该方案:
本教程介绍如何执行以下任务:
- 创建数据工厂
- 创建 Azure 存储链接服务
- 创建 Azure Blob 数据集
- 创建包含复制活动和 Web 活动的管道
- 将活动的输出发送到后续活动
- 使用参数传递和系统变量
- 启动管道运行
- 监视管道和活动运行
本教程使用 .NET SDK。 可以使用其他机制来与 Azure 数据工厂交互。 有关数据工厂的快速入门,请参阅 5 分钟快速入门。
如果没有 Azure 订阅,可在开始前创建一个试用帐户。
先决条件
- Azure 存储帐户。 可将 Blob 存储用作源数据存储。 如果还没有 Azure 存储帐户,请参阅创建存储帐户。
- Azure 存储资源管理器下载。 若要安装此工具,请参阅 Azure 存储资源管理器。
- Azure SQL 数据库。 将数据库用作接收器数据存储。 如果没有 Azure SQL 数据库中的数据库,请参阅在 Azure SQL 数据库中创建数据库。
- Visual Studio。 本文使用 Visual Studio 2019。
- Azure .NET SDK。 下载并安装 Azure .NET SDK。
有关当前可以使用数据工厂的 Azure 区域列表,请参阅各区域的产品可用性。 数据存储和计算可以位于其他区域。 存储包括 Azure 存储和 Azure SQL 数据库。 计算包括数据工厂使用的 HDInsight。
按照《创建 Microsoft Entra 应用程序》中所述创建应用程序。 按照同一文章中的以下说明将应用程序分配到“参与者”角色。 需要获取多个值(例如“应用程序(客户端) ID”和“目录(租户) ID”),以便在本教程的后续部分中使用。
创建 Blob 表
打开文本编辑器。 复制以下文本,并在本地将其保存为 input.txt。
Ethel|Berg
Tamika|Walsh
打开 Azure 存储资源管理器。 展开你的存储帐户。 右键单击“Blob 容器”,并选择“创建 Blob 容器”。
将新容器命名为 adfv2branch,然后选择“上传”将 input.txt 文件添加到该容器。
创建 Visual Studio 项目
创建一个 C# .NET 控制台应用程序:
- 启动 Visual Studio 并选择“创建新项目”。
- 在“创建新项目”中,选择适用于 C# 的“控制台应用(.NET Framework)”,然后选择“下一步”。
- 将项目命名为 ADFv2BranchTutorial。
- 选择“.NET 版本 4.5.2”或更高版本,然后选择“创建”。
安装 NuGet 包
选择“工具”“NuGet 包管理器”>“包管理器控制台”。
在“包管理器控制台”中,运行以下命令来安装包。 有关详细信息,请参阅 Microsoft.Azure.Management.DataFactory NuGet 包。
Install-Package Microsoft.Azure.Management.DataFactory
Install-Package Microsoft.Azure.Management.ResourceManager -IncludePrerelease
Install-Package Microsoft.IdentityModel.Clients.ActiveDirectory
创建数据工厂客户端
打开文件 Program.cs 并添加以下语句:
using System;
using System.Collections.Generic;
using System.Linq;
using Microsoft.Rest;
using Microsoft.Azure.Management.ResourceManager;
using Microsoft.Azure.Management.DataFactory;
using Microsoft.Azure.Management.DataFactory.Models;
using Microsoft.IdentityModel.Clients.ActiveDirectory;
将这些静态变量添加到
Program类。 将占位符替换为自己的值。// Set variables static string tenantID = "<tenant ID>"; static string applicationId = "<application ID>"; static string authenticationKey = "<Authentication key for your application>"; static string subscriptionId = "<Azure subscription ID>"; static string resourceGroup = "<Azure resource group name>"; static string region = "China East 2"; static string dataFactoryName = "<Data factory name>"; // Specify the source Azure Blob information static string storageAccount = "<Azure Storage account name>"; static string storageKey = "<Azure Storage account key>"; // confirm that you have the input.txt file placed in th input folder of the adfv2branch container. static string inputBlobPath = "adfv2branch/input"; static string inputBlobName = "input.txt"; static string outputBlobPath = "adfv2branch/output"; static string emailReceiver = "<specify email address of the receiver>"; static string storageLinkedServiceName = "AzureStorageLinkedService"; static string blobSourceDatasetName = "SourceStorageDataset"; static string blobSinkDatasetName = "SinkStorageDataset"; static string pipelineName = "Adfv2TutorialBranchCopy"; static string copyBlobActivity = "CopyBlobtoBlob"; static string sendFailEmailActivity = "SendFailEmailActivity"; static string sendSuccessEmailActivity = "SendSuccessEmailActivity";将以下代码添加到
Main方法中。 此代码将创建DataFactoryManagementClient类的实例。 然后,你将使用此对象来创建数据工厂、链接服务、数据集和管道。 还可使用此对象来监视管道运行详细信息。// Authenticate and create a data factory management client var context = new AuthenticationContext("https://login.chinacloudapi.cn/" + tenantID); ClientCredential cc = new ClientCredential(applicationId, authenticationKey); AuthenticationResult result = context.AcquireTokenAsync("https://management.chinacloudapi.cn/", cc).Result; ServiceClientCredentials cred = new TokenCredentials(result.AccessToken); var client = new DataFactoryManagementClient(cred) { SubscriptionId = subscriptionId , BaseUri = new Uri("https://management.chinacloudapi.cn/")};
创建数据工厂
将
CreateOrUpdateDataFactory方法添加到 Program.cs 文件中:static Factory CreateOrUpdateDataFactory(DataFactoryManagementClient client) { Console.WriteLine("Creating data factory " + dataFactoryName + "..."); Factory resource = new Factory { Location = region }; Console.WriteLine(SafeJsonConvert.SerializeObject(resource, client.SerializationSettings)); Factory response; { response = client.Factories.CreateOrUpdate(resourceGroup, dataFactoryName, resource); } while (client.Factories.Get(resourceGroup, dataFactoryName).ProvisioningState == "PendingCreation") { System.Threading.Thread.Sleep(1000); } return response; }在
Main方法中添加用于创建数据工厂的以下行:Factory df = CreateOrUpdateDataFactory(client);
创建 Azure 存储链接服务
将
StorageLinkedServiceDefinition方法添加到 Program.cs 文件中:static LinkedServiceResource StorageLinkedServiceDefinition(DataFactoryManagementClient client) { Console.WriteLine("Creating linked service " + storageLinkedServiceName + "..."); AzureStorageLinkedService storageLinkedService = new AzureStorageLinkedService { ConnectionString = new SecureString("DefaultEndpointsProtocol=https;AccountName=" + storageAccount + ";AccountKey=" + storageKey + ";EndpointSuffix=core.chinacloudapi.cn") }; Console.WriteLine(SafeJsonConvert.SerializeObject(storageLinkedService, client.SerializationSettings)); LinkedServiceResource linkedService = new LinkedServiceResource(storageLinkedService, name:storageLinkedServiceName); return linkedService; }在
Main方法中添加用于创建 Azure 存储链接服务的以下行:client.LinkedServices.CreateOrUpdate(resourceGroup, dataFactoryName, storageLinkedServiceName, StorageLinkedServiceDefinition(client));
有关支持的属性和详细信息,请参阅链接服务属性。
创建数据集
在本部分中创建两个数据集:一个用于源,另一个用于接收器。
为源 Azure Blob 创建数据集
添加一个方法用于创建 Azure Blob 数据集。 有关支持的属性和详细信息,请参阅 Azure Blob 数据集属性。
将 SourceBlobDatasetDefinition 方法添加到 Program.cs 文件中:
static DatasetResource SourceBlobDatasetDefinition(DataFactoryManagementClient client)
{
    Console.WriteLine("Creating dataset " + blobSourceDatasetName + "...");
    AzureBlobDataset blobDataset = new AzureBlobDataset
    {
        FolderPath = new Expression { Value = "@pipeline().parameters.sourceBlobContainer" },
        FileName = inputBlobName,
        LinkedServiceName = new LinkedServiceReference
        {
            ReferenceName = storageLinkedServiceName
        }
    };
    Console.WriteLine(SafeJsonConvert.SerializeObject(blobDataset, client.SerializationSettings));
    DatasetResource dataset = new DatasetResource(blobDataset, name:blobSourceDatasetName);
    return dataset;
}
在 Azure Blob 中定义表示源数据的数据集。 此 Blob 数据集引用在上一步骤中支持的 Azure 存储链接服务。 Blob 数据集描述要从中复制 Blob 的位置:FolderPath 和 FileName。
请注意 FolderPath 的参数用法。
sourceBlobContainer 是参数的名称,表达式已替换为在管道运行中传递的值。 用于定义参数的语法为 @pipeline().parameters.<parameterName>
为接收器 Azure Blob 创建数据集
将
SourceBlobDatasetDefinition方法添加到 Program.cs 文件中:static DatasetResource SinkBlobDatasetDefinition(DataFactoryManagementClient client) { Console.WriteLine("Creating dataset " + blobSinkDatasetName + "..."); AzureBlobDataset blobDataset = new AzureBlobDataset { FolderPath = new Expression { Value = "@pipeline().parameters.sinkBlobContainer" }, LinkedServiceName = new LinkedServiceReference { ReferenceName = storageLinkedServiceName } }; Console.WriteLine(SafeJsonConvert.SerializeObject(blobDataset, client.SerializationSettings)); DatasetResource dataset = new DatasetResource(blobDataset, name: blobSinkDatasetName); return dataset; }在
Main方法中添加用于创建 Azure Blob 源和接收器数据集的以下代码。client.Datasets.CreateOrUpdate(resourceGroup, dataFactoryName, blobSourceDatasetName, SourceBlobDatasetDefinition(client)); client.Datasets.CreateOrUpdate(resourceGroup, dataFactoryName, blobSinkDatasetName, SinkBlobDatasetDefinition(client));
创建 C# 类:EmailRequest
在 C# 项目中,创建名为 EmailRequest 的类。 此类定义在发送电子邮件时,管道要在正文请求中发送哪些属性。 在本教程中,管道会将四个属性从管道发送到电子邮件:
- 消息。 电子邮件的正文。 如果复制成功,此属性将包含写入的数据量。 如果复制失败,此属性将包含错误详细信息。
- 数据工厂名称。 数据工厂的名称。
- 管道名称。 管道的名称。
- 收件人。 传递的参数。 此属性指定电子邮件的收件人。
class EmailRequest
{
[Newtonsoft.Json.JsonProperty(PropertyName = "message")]
public string message;
[Newtonsoft.Json.JsonProperty(PropertyName = "dataFactoryName")]
public string dataFactoryName;
[Newtonsoft.Json.JsonProperty(PropertyName = "pipelineName")]
public string pipelineName;
[Newtonsoft.Json.JsonProperty(PropertyName = "receiver")]
public string receiver;
public EmailRequest(string input, string df, string pipeline, string receiverName)
{
message = input;
dataFactoryName = df;
pipelineName = pipeline;
receiver = receiverName;
}
}
创建电子邮件工作流终结点
若要触发电子邮件的发送,可以使用 Azure 逻辑应用来定义工作流。 有关详细信息,请参阅创建示例消耗逻辑应用工作流。
成功电子邮件工作流
在 Azure 门户中,创建一个名为“CopySuccessEmail”的逻辑应用工作流。 添加名为“收到 HTTP 请求时”的“请求”触发器。 在该“请求”触发器中,使用以下 JSON 填写请求正文 JSON 架构方框:
{
"properties": {
"dataFactoryName": {
"type": "string"
},
"message": {
"type": "string"
},
"pipelineName": {
"type": "string"
},
"receiver": {
"type": "string"
}
},
"type": "object"
}
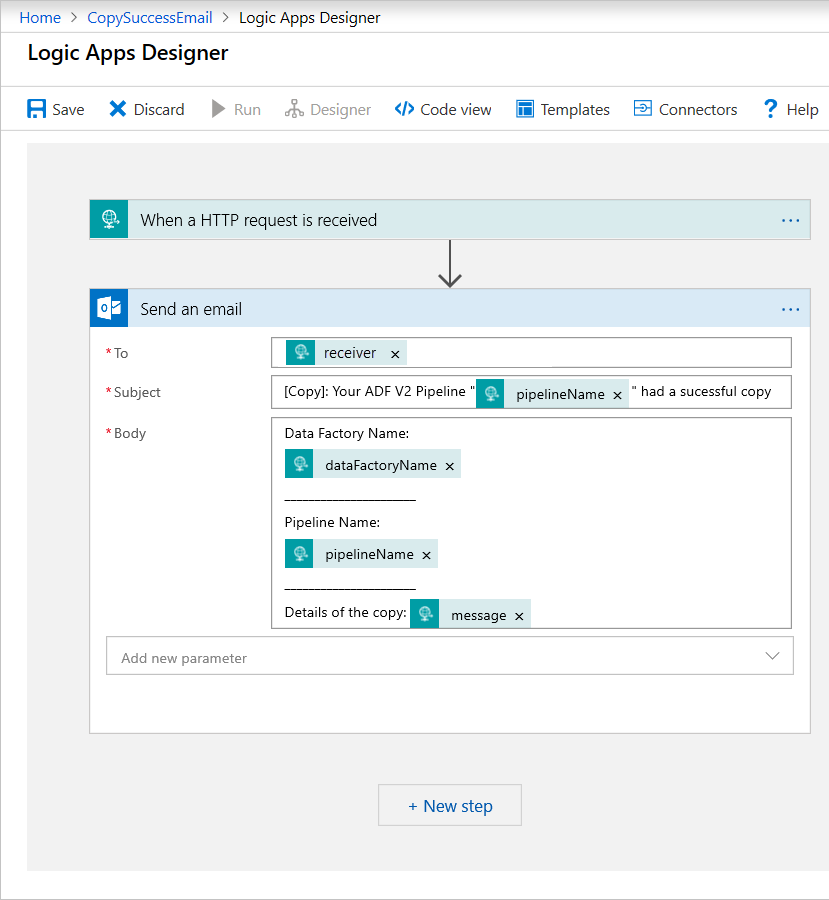
工作流类似于以下示例:
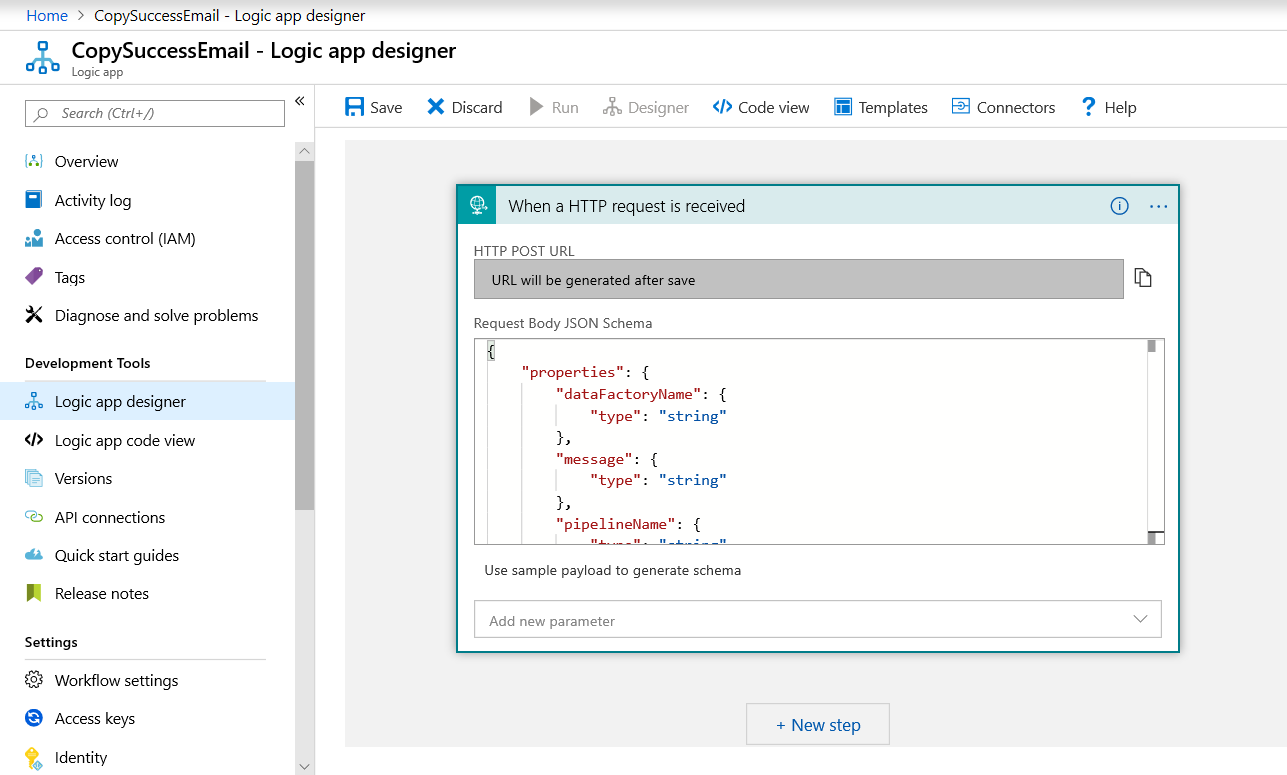
此 JSON 内容与前一部分中创建的 EmailRequest 类相符。
添加名为“发送电子邮件”的 Office 365 Outlook 操作。 对于此操作,请使用传入请求正文 JSON 架构的属性来自定义如何设置电子邮件的格式。 下面是一个示例:
保存工作流后,复制并保存触发器中的“HTTP POST URL”值。
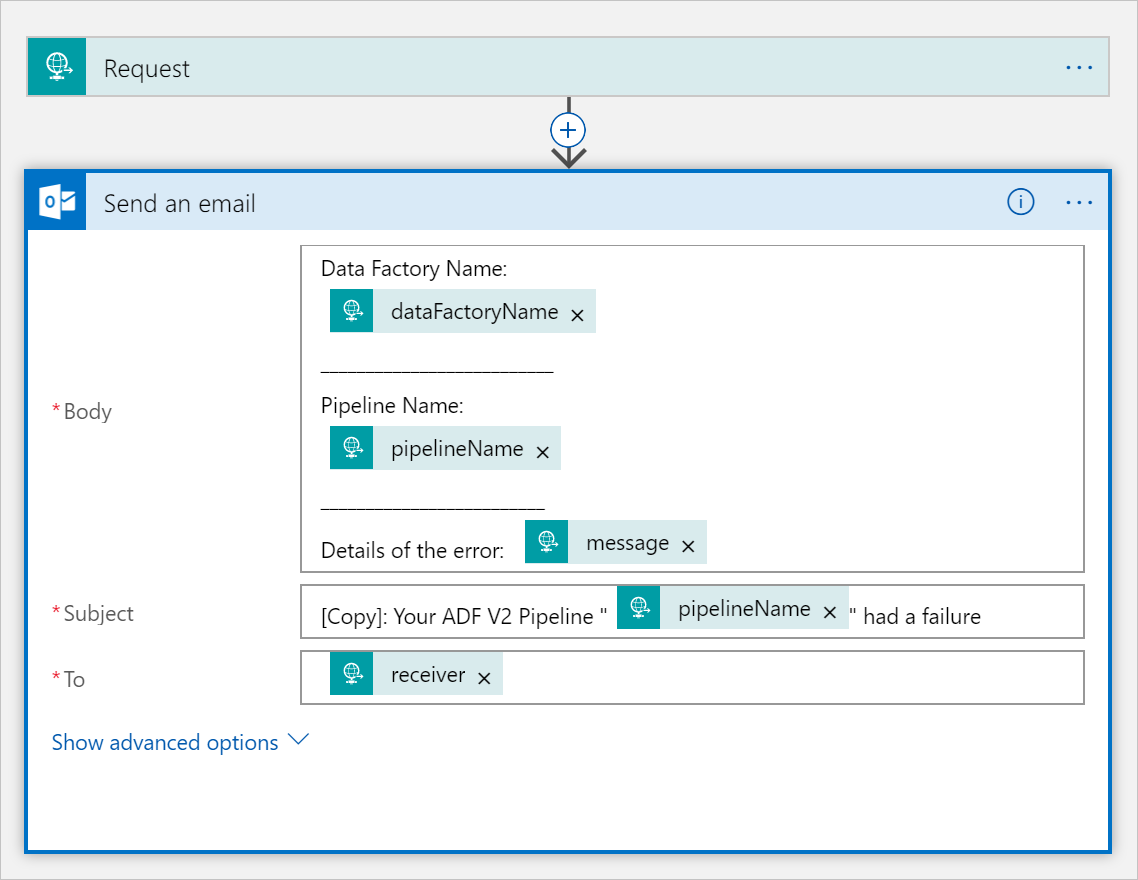
失败电子邮件工作流
将逻辑应用工作流 CopySuccessEmail 克隆到名为“CopyFailEmail”的新工作流。 在请求触发器中,请求正文 JSON 架构是相同的。 更改电子邮件的格式(例如 Subject)即可定制失败电子邮件。 以下是示例:
保存工作流后,复制并保存触发器中的“HTTP POST URL”值。
现在,应有两个工作流 URL,如以下示例所示:
//Success Request Url
https://prodxxx.chinaeast.logic.azure.cn:443/workflows/000000/triggers/manual/paths/invoke?api-version=2016-10-01&sp=%2Ftriggers%2Fmanual%2Frun&sv=1.0&sig=000000
//Fail Request Url
https://prodxxx.chinaeast.logic.azure.cn:443/workflows/000000/triggers/manual/paths/invoke?api-version=2016-10-01&sp=%2Ftriggers%2Fmanual%2Frun&sv=1.0&sig=000000
创建管道
返回 Visual Studio 中的项目。 现在,我们添加代码来创建包含复制活动和 DependsOn 属性的管道。 在本教程中,该管道包含一个活动:这是一个复制活动,它使用 Blob 数据集作为源,使用另一个 Blob 数据集作为接收器。 复制活动成功或失败时,它会调用不同的电子邮件任务。
在此管道中使用以下功能:
- 参数
- Web 活动
- 活动依赖项
- 使用一个活动的输出作为另一活动的输入
将此方法添加到项目。 以下部分提供了更多详细信息。
static PipelineResource PipelineDefinition(DataFactoryManagementClient client) { Console.WriteLine("Creating pipeline " + pipelineName + "..."); PipelineResource resource = new PipelineResource { Parameters = new Dictionary<string, ParameterSpecification> { { "sourceBlobContainer", new ParameterSpecification { Type = ParameterType.String } }, { "sinkBlobContainer", new ParameterSpecification { Type = ParameterType.String } }, { "receiver", new ParameterSpecification { Type = ParameterType.String } } }, Activities = new List<Activity> { new CopyActivity { Name = copyBlobActivity, Inputs = new List<DatasetReference> { new DatasetReference { ReferenceName = blobSourceDatasetName } }, Outputs = new List<DatasetReference> { new DatasetReference { ReferenceName = blobSinkDatasetName } }, Source = new BlobSource { }, Sink = new BlobSink { } }, new WebActivity { Name = sendSuccessEmailActivity, Method = WebActivityMethod.POST, Url = "https://prodxxx.chinaeast.logic.azure.cn:443/workflows/00000000000000000000000000000000000/triggers/manual/paths/invoke?api-version=2016-10-01&sp=%2Ftriggers%2Fmanual%2Frun&sv=1.0&sig=0000000000000000000000000000000000000000000000", Body = new EmailRequest("@{activity('CopyBlobtoBlob').output.dataWritten}", "@{pipeline().DataFactory}", "@{pipeline().Pipeline}", "@pipeline().parameters.receiver"), DependsOn = new List<ActivityDependency> { new ActivityDependency { Activity = copyBlobActivity, DependencyConditions = new List<String> { "Succeeded" } } } }, new WebActivity { Name = sendFailEmailActivity, Method =WebActivityMethod.POST, Url = "https://prodxxx.chinaeast.logic.azure.cn:443/workflows/000000000000000000000000000000000/triggers/manual/paths/invoke?api-version=2016-10-01&sp=%2Ftriggers%2Fmanual%2Frun&sv=1.0&sig=0000000000000000000000000000000000000000000", Body = new EmailRequest("@{activity('CopyBlobtoBlob').error.message}", "@{pipeline().DataFactory}", "@{pipeline().Pipeline}", "@pipeline().parameters.receiver"), DependsOn = new List<ActivityDependency> { new ActivityDependency { Activity = copyBlobActivity, DependencyConditions = new List<String> { "Failed" } } } } } }; Console.WriteLine(SafeJsonConvert.SerializeObject(resource, client.SerializationSettings)); return resource; }在
Main方法中添加用于创建管道的以下行:client.Pipelines.CreateOrUpdate(resourceGroup, dataFactoryName, pipelineName, PipelineDefinition(client));
参数
管道代码的第一个部分定义参数。
-
sourceBlobContainer。 源 Blob 数据集在管道中使用此参数。 -
sinkBlobContainer。 接收器 Blob 数据集在管道中使用此参数。 -
receiver。 管道中的两个 Web 活动使用此参数向收件人发送成功或失败电子邮件。
Parameters = new Dictionary<string, ParameterSpecification>
{
{ "sourceBlobContainer", new ParameterSpecification { Type = ParameterType.String } },
{ "sinkBlobContainer", new ParameterSpecification { Type = ParameterType.String } },
{ "receiver", new ParameterSpecification { Type = ParameterType.String } }
},
Web 活动
Web 活动允许调用任何 REST 终结点。 有关该活动的详细信息,请参阅 Azure 数据工厂中的 Web 活动。 此管道使用 Web 活动调用逻辑应用电子邮件工作流。 创建两个 Web 活动:一个调用 CopySuccessEmail 工作流,另一个调用 CopyFailWorkFlow。
new WebActivity
{
Name = sendCopyEmailActivity,
Method = WebActivityMethod.POST,
Url = "https://prodxxx.chinaeast.logic.azure.cn:443/workflows/12345",
Body = new EmailRequest("@{activity('CopyBlobtoBlob').output.dataWritten}", "@{pipeline().DataFactory}", "@{pipeline().Pipeline}", "@pipeline().parameters.receiver"),
DependsOn = new List<ActivityDependency>
{
new ActivityDependency
{
Activity = copyBlobActivity,
DependencyConditions = new List<String> { "Succeeded" }
}
}
}
在 Url 属性中,粘贴来自逻辑应用工作流的“HTTP POST URL”终结点。 在 Body 属性中,传递 EmailRequest 类的实例。 电子邮件请求包含以下属性:
- 消息。 传递
@{activity('CopyBlobtoBlob').output.dataWritten值。 访问前一复制活动的属性,并传递dataWritten值。 失败时,传递错误输出而不是@{activity('CopyBlobtoBlob').error.message。 - 数据工厂名称。 传递
@{pipeline().DataFactory}值。这是一个系统变量,用于访问相应的数据工厂名称。 有关系统变量的列表,请参阅系统变量。 - 管道名称。 传递
@{pipeline().Pipeline}值。 此系统变量用于访问相应的管道名称。 - 收件人。 传递
"@pipeline().parameters.receiver"值。 访问管道参数。
此代码创建依赖于上一个复制活动的新活动依赖项。
创建管道运行
在 Main 方法中添加用于触发管道运行的以下代码。
// Create a pipeline run
Console.WriteLine("Creating pipeline run...");
Dictionary<string, object> arguments = new Dictionary<string, object>
{
{ "sourceBlobContainer", inputBlobPath },
{ "sinkBlobContainer", outputBlobPath },
{ "receiver", emailReceiver }
};
CreateRunResponse runResponse = client.Pipelines.CreateRunWithHttpMessagesAsync(resourceGroup, dataFactoryName, pipelineName, arguments).Result.Body;
Console.WriteLine("Pipeline run ID: " + runResponse.RunId);
Main 类
最终的 Main 方法应如下所示。
// Authenticate and create a data factory management client
var context = new AuthenticationContext("https://login.chinacloudapi.cn/" + tenantID);
ClientCredential cc = new ClientCredential(applicationId, authenticationKey);
AuthenticationResult result = context.AcquireTokenAsync("https://management.chinacloudapi.cn/", cc).Result;
ServiceClientCredentials cred = new TokenCredentials(result.AccessToken);
var client = new DataFactoryManagementClient(cred) { SubscriptionId = subscriptionId , BaseUri = new Uri("https://management.chinacloudapi.cn")};
Factory df = CreateOrUpdateDataFactory(client);
client.LinkedServices.CreateOrUpdate(resourceGroup, dataFactoryName, storageLinkedServiceName, StorageLinkedServiceDefinition(client));
client.Datasets.CreateOrUpdate(resourceGroup, dataFactoryName, blobSourceDatasetName, SourceBlobDatasetDefinition(client));

client.Datasets.CreateOrUpdate(resourceGroup, dataFactoryName, blobSinkDatasetName, SinkBlobDatasetDefinition(client));
client.Pipelines.CreateOrUpdate(resourceGroup, dataFactoryName, pipelineName, PipelineDefinition(client));
Console.WriteLine("Creating pipeline run...");
Dictionary<string, object> arguments = new Dictionary<string, object>
{
{ "sourceBlobContainer", inputBlobPath },
{ "sinkBlobContainer", outputBlobPath },
{ "receiver", emailReceiver }
};
CreateRunResponse runResponse = client.Pipelines.CreateRunWithHttpMessagesAsync(resourceGroup, dataFactoryName, pipelineName, arguments).Result.Body;
Console.WriteLine("Pipeline run ID: " + runResponse.RunId);
生成并运行程序以触发管道运行!
监视管道运行
将以下代码添加到
Main方法中:// Monitor the pipeline run Console.WriteLine("Checking pipeline run status..."); PipelineRun pipelineRun; while (true) { pipelineRun = client.PipelineRuns.Get(resourceGroup, dataFactoryName, runResponse.RunId); Console.WriteLine("Status: " + pipelineRun.Status); if (pipelineRun.Status == "InProgress") System.Threading.Thread.Sleep(15000); else break; }此代码持续检查运行状态,直到运行完成数据复制。
在
Main方法中添加以下代码用于检索复制活动运行详细信息,例如,读取/写入的数据大小。// Check the copy activity run details Console.WriteLine("Checking copy activity run details..."); List<ActivityRun> activityRuns = client.ActivityRuns.ListByPipelineRun( resourceGroup, dataFactoryName, runResponse.RunId, DateTime.UtcNow.AddMinutes(-10), DateTime.UtcNow.AddMinutes(10)).ToList(); if (pipelineRun.Status == "Succeeded") { Console.WriteLine(activityRuns.First().Output); //SaveToJson(SafeJsonConvert.SerializeObject(activityRuns.First().Output, client.SerializationSettings), "ActivityRunResult.json", folderForJsons); } else Console.WriteLine(activityRuns.First().Error); Console.WriteLine("\nPress any key to exit..."); Console.ReadKey();
运行代码
生成并启动应用程序,然后验证管道执行。
应用程序将显示数据工厂、链接服务、数据集、管道和管道运行的创建进度。 然后,检查管道运行状态。 请等到出现包含数据读取/写入大小的复制活动运行详细信息。 然后,使用 Azure 存储资源管理器等工具检查 Blob 是否已根据变量中指定的 inputBlobPath 复制到 outputBlobPath。
输出应类似于以下示例:
Creating data factory DFTutorialTest...
{
  "location": "China East 2"
}
Creating linked service AzureStorageLinkedService...
{
  "type": "AzureStorage",
  "typeProperties": {
    "connectionString": "DefaultEndpointsProtocol=https;AccountName=***;AccountKey=***;EndpointSuffix=core.chinacloudapi.cn"
  }
}
Creating dataset SourceStorageDataset...
{
  "type": "AzureBlob",
  "typeProperties": {
    "folderPath": {
      "type": "Expression",
      "value": "@pipeline().parameters.sourceBlobContainer"
    },
    "fileName": "input.txt"
  },
  "linkedServiceName": {
    "type": "LinkedServiceReference",
    "referenceName": "AzureStorageLinkedService"
  }
}
Creating dataset SinkStorageDataset...
{
  "type": "AzureBlob",
  "typeProperties": {
    "folderPath": {
      "type": "Expression",
      "value": "@pipeline().parameters.sinkBlobContainer"
    }
  },
  "linkedServiceName": {
    "type": "LinkedServiceReference",
    "referenceName": "AzureStorageLinkedService"
  }
}
Creating pipeline Adfv2TutorialBranchCopy...
{
  "properties": {
    "activities": [
      {
        "type": "Copy",
        "typeProperties": {
          "source": {
            "type": "BlobSource"
          },
          "sink": {
            "type": "BlobSink"
          }
        },
        "inputs": [
          {
            "type": "DatasetReference",
            "referenceName": "SourceStorageDataset"
          }
        ],
        "outputs": [
          {
            "type": "DatasetReference",
            "referenceName": "SinkStorageDataset"
          }
        ],
        "name": "CopyBlobtoBlob"
      },
      {
        "type": "WebActivity",
        "typeProperties": {
          "method": "POST",
          "url": "https://xxxx.chinaeast.logic.azure.cn:443/workflows/... ",
          "body": {
            "message": "@{activity('CopyBlobtoBlob').output.dataWritten}",
            "dataFactoryName": "@{pipeline().DataFactory}",
            "pipelineName": "@{pipeline().Pipeline}",
            "receiver": "@pipeline().parameters.receiver"
          }
        },
        "name": "SendSuccessEmailActivity",
        "dependsOn": [
          {
            "activity": "CopyBlobtoBlob",
            "dependencyConditions": [
              "Succeeded"
            ]
          }
        ]
      },
      {
        "type": "WebActivity",
        "typeProperties": {
          "method": "POST",
          "url": "https://xxx.chinaeast.logic.azure.cn:443/workflows/... ",
          "body": {
            "message": "@{activity('CopyBlobtoBlob').error.message}",
            "dataFactoryName": "@{pipeline().DataFactory}",
            "pipelineName": "@{pipeline().Pipeline}",
            "receiver": "@pipeline().parameters.receiver"
          }
        },
        "name": "SendFailEmailActivity",
        "dependsOn": [
          {
            "activity": "CopyBlobtoBlob",
            "dependencyConditions": [
              "Failed"
            ]
          }
        ]
      }
    ],
    "parameters": {
      "sourceBlobContainer": {
        "type": "String"
      },
      "sinkBlobContainer": {
        "type": "String"
      },
      "receiver": {
        "type": "String"
      }
    }
  }
}
Creating pipeline run...
Pipeline run ID: 00000000-0000-0000-0000-0000000000000
Checking pipeline run status...
Status: InProgress
Status: InProgress
Status: Succeeded
Checking copy activity run details...
{
  "dataRead": 20,
  "dataWritten": 20,
  "copyDuration": 4,
  "throughput": 0.01,
  "errors": [],
  "effectiveIntegrationRuntime": "DefaultIntegrationRuntime (China East 2)"
}
{}

Press any key to exit...
相关内容
在本教程中,你已执行以下任务:
- 创建数据工厂
- 创建 Azure 存储链接服务
- 创建 Azure Blob 数据集
- 创建包含复制活动和 Web 活动的管道
- 将活动的输出发送到后续活动
- 使用参数传递和系统变量
- 启动管道运行
- 监视管道和活动运行
现在可以转到“概念”部分来详细了解 Azure 数据工厂。