可以通过 Azure 基于角色的访问控制 (Azure RBAC) 管理对 Azure 资源的访问权限。 在本快速入门中,你将创建资源组并授予用户在资源组中创建和管理虚拟机的访问权限。 本快速入门使用 Azure 资源管理器模板(ARM 模板)授予访问权限。
Azure 资源管理器模板是定义项目基础结构和配置的 JavaScript 对象表示法 (JSON) 文件。 模板使用声明性语法。 你可以在不编写用于创建部署的编程命令序列的情况下,描述预期部署。
如果你的环境满足先决条件,并且你熟悉如何使用 ARM 模板,请选择“部署到 Azure”按钮。 Azure 门户中会打开模板。

先决条件
若要分配 Azure 角色和删除角色分配,必须满足以下条件:
- 如果没有 Azure 订阅,可在开始前创建一个试用帐户。
-
Microsoft.Authorization/roleAssignments/write和Microsoft.Authorization/roleAssignments/delete权限,例如基于角色的访问控制管理员 - 若要分配角色,必须指定三个要素:安全主体、角色定义和范围。 在本快速入门中,安全主体是你或目录中的其他用户,角色定义是虚拟机参与者,范围是指定的资源组。
查看模板
本快速入门中使用的模板来自 Azure 快速启动模板。 该模板具有两个参数和资源部分。 请注意,资源部分包含角色分配的三个要素:安全主体、角色定义和作用域。
{
  "$schema": "https://schema.management.azure.com/schemas/2019-04-01/deploymentTemplate.json#",
  "contentVersion": "1.0.0.0",
  "metadata": {
    "_generator": {
      "name": "bicep",
      "version": "0.25.53.49325",
      "templateHash": "15160858749942476090"
    }
  },
  "parameters": {
    "roleDefinitionID": {
      "type": "string",
      "metadata": {
        "description": "Specifies the role definition ID used in the role assignment."
      }
    },
    "principalId": {
      "type": "string",
      "metadata": {
        "description": "Specifies the principal ID assigned to the role."
      }
    }
  },
  "variables": {
    "roleAssignmentName": "[guid(parameters('principalId'), parameters('roleDefinitionID'), resourceGroup().id)]"
  },
  "resources": [
    {
      "type": "Microsoft.Authorization/roleAssignments",
      "apiVersion": "2022-04-01",
      "name": "[variables('roleAssignmentName')]",
      "properties": {
        "roleDefinitionId": "[resourceId('Microsoft.Authorization/roleDefinitions', parameters('roleDefinitionID'))]",
        "principalId": "[parameters('principalId')]"
      }
    }
  ],
  "outputs": {
    "name": {
      "type": "string",
      "value": "[variables('roleAssignmentName')]"
    },
    "resourceGroupName": {
      "type": "string",
      "value": "[resourceGroup().name]"
    },
    "resourceId": {
      "type": "string",
      "value": "[resourceId('Microsoft.Authorization/roleAssignments', variables('roleAssignmentName'))]"
    }
  }
}
该模板中定义了以下资源:
部署模板
登录 Azure 门户。
确定与 Azure 订阅关联的电子邮件地址。 或确定目录中其他用户的电子邮件地址。
将以下脚本复制并粘贴到 PowerShell 中。
$resourceGroupName = Read-Host -Prompt "Enter a resource group name (i.e. ExampleGrouprg)"
$emailAddress = Read-Host -Prompt "Enter an email address for a user in your directory"
$location = Read-Host -Prompt "Enter a location (i.e. chinanorth2)"

$roleAssignmentName = New-Guid
$principalId = (Get-AzAdUser -Mail $emailAddress).id
$roleDefinitionId = (Get-AzRoleDefinition -name "Virtual Machine Contributor").id
$templateUri = "https://raw.githubusercontent.com/Azure/azure-quickstart-templates/master/quickstarts/microsoft.authorization/rbac-builtinrole-resourcegroup/azuredeploy.json"

New-AzResourceGroup -Name $resourceGroupName -Location $location
New-AzResourceGroupDeployment -ResourceGroupName $resourceGroupName -TemplateUri $templateUri -roleDefinitionID $roleDefinitionId -principalId $principalId
输入资源组名称,例如 ExampleGrouprg。
输入自己的电子邮件地址或目录中其他用户的电子邮件地址。
输入资源组(如 chinanorth2)的位置。
如有必要,请按 Enter 运行 New-AzResourceGroupDeployment 命令。
New-AzResourceGroup 命令创建新的资源组,New-AzResourceGroupDeployment 命令部署模板以添加角色分配。
应该会看到与下面类似的输出:
PS> New-AzResourceGroupDeployment -ResourceGroupName $resourceGroupName -TemplateUri $templateUri -roleAssignmentName $roleAssignmentName -roleDefinitionID $roleDefinitionId -principalId $principalId

DeploymentName          : azuredeploy
ResourceGroupName       : ExampleGrouprg
ProvisioningState       : Succeeded
Timestamp               : 5/22/2020 9:01:30 PM
Mode                    : Incremental
TemplateLink            :
                          Uri            : https://raw.githubusercontent.com/Azure/azure-quickstart-templates/master/quickstarts/microsoft.authorization/rbac-builtinrole-resourcegroup/azuredeploy.json
                          ContentVersion : 1.0.0.0

Parameters              :
                          Name                  Type                       Value
                          ====================  =========================  ==========
                          roleDefinitionID      String                     9980e02c-c2be-4d73-94e8-173b1dc7cf3c
                          principalId           String                     {principalId}

Outputs                 :
DeploymentDebugLogLevel :
查看已部署的资源
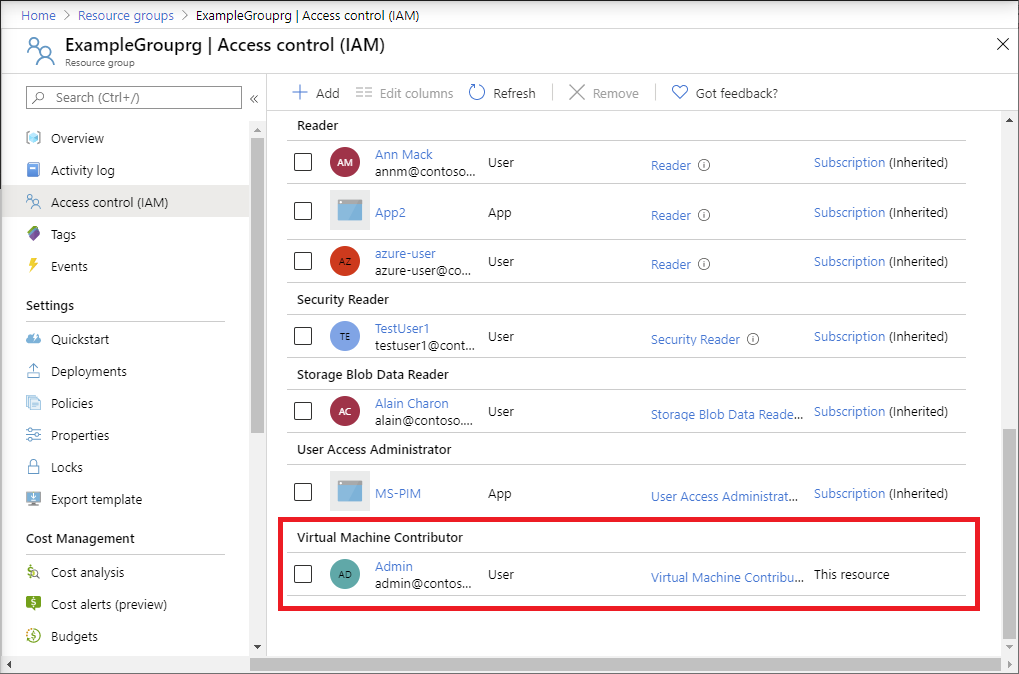
在 Azure 门户中打开创建的资源组。
在左侧菜单中,单击“访问控制(IAM)”。
单击“角色分配”选项卡。
验证是否已将“虚拟机参与者”角色分配给指定的用户。
清理资源
若要删除创建的角色分配和资源组,请执行以下步骤。
将以下脚本复制并粘贴到 PowerShell 中。
$emailAddress = Read-Host -Prompt "Enter the email address of the user with the role assignment to remove"
$resourceGroupName = Read-Host -Prompt "Enter the resource group name to remove (i.e. ExampleGrouprg)"

$principalId = (Get-AzAdUser -Mail $emailAddress).id

Remove-AzRoleAssignment -ObjectId $principalId -RoleDefinitionName "Virtual Machine Contributor" -ResourceGroupName $resourceGroupName
Remove-AzResourceGroup -Name $resourceGroupName
输入要删除其角色分配的用户的电子邮件地址。
输入要删除的资源组名称,如 ExampleGrouprg。
如有必要,请按 Enter 运行 Remove-AzResourceGroup command 命令。
输入“Y”以确认要删除该资源组。