本教程是一个系列的第三部分,介绍如何将 Service Fabric 应用程序部署到 Azure 中的群集。
在该系列的第三部分中,你会学习如何:
- 在 Azure 中创建安全的 Linux 群集
- 将应用程序部署到群集
在此系列教程中,你会学习如何:
- 生成 Java Service Fabric Reliable Services 应用程序
- 在本地群集上部署和调试应用程序
- 将应用程序部署到 Azure 群集
- 设置 CI/CD
先决条件
在开始学习本教程之前:
- 如果没有 Azure 订阅,请创建一个试用版订阅
- 安装 Azure CLI
- 安装用于 Mac 或 Linux 的 Service Fabric SDK
- 安装 Python 3
缩放 Azure 中的 Service Fabric 群集
以下步骤创建的资源是将应用程序部署到 Service Fabric 群集所必需的。 另外还会设置通过 ELK(Elasticsearch、Logstash、Kibana)堆栈监视解决方案的运行状况所需的资源。 具体说来,事件中心用作接收器,接收来自 Service Fabric 的日志。 根据配置,它可以将日志从 Service Fabric 群集发送到 Logstash 实例。
打开一个终端,下载以下包,其中包含的帮助程序脚本和模板是在 Azure 中创建资源所必需的
git clone https://github.com/Azure-Samples/service-fabric-java-quickstart.git登录到 Azure 帐户
az login设置需要用于创建资源的 Azure 订阅
az account set --subscription [SUBSCRIPTION-ID]在 service-fabric-java-quickstart/AzureCluster 文件夹中运行以下命令,以便在 Key Vault 中创建群集证书。 此证书用于保护 Service Fabric 群集。 提供区域(必须与 Service Fabric 群集所在区域相同)、密钥保管库资源组名称、密钥保管库名称、证书密码以及群集 DNS 名称。
./new-service-fabric-cluster-certificate.sh [REGION] [KEY-VAULT-RESOURCE-GROUP] [KEY-VAULT-NAME] [CERTIFICATE-PASSWORD] [CLUSTER-DNS-NAME-FOR-CERTIFICATE]

Example: ./new-service-fabric-cluster-certificate.sh 'chinanorth' 'testkeyvaultrg' 'testkeyvault' '<password>' 'testservicefabric.chinanorth.cloudapp.chinacloudapi.cn'
上述命令返回以下信息,该信息应该记下来供以后使用。
Source Vault Resource Id: /subscriptions/<subscription_id>/resourceGroups/testkeyvaultrg/providers/Microsoft.KeyVault/vaults/<name>
Certificate URL: https://<name>.vault.azure.cn/secrets/<cluster-dns-name-for-certificate>/<guid>
Certificate Thumbprint: <THUMBPRINT>
为存储日志的存储帐户创建一个资源组
az group create --location [REGION] --name [RESOURCE-GROUP-NAME]

Example: az group create --location chinanorth --name teststorageaccountrg
创建一个存储帐户,用来存储要生成的日志
az storage account create -g [RESOURCE-GROUP-NAME] -l [REGION] --name [STORAGE-ACCOUNT-NAME] --kind Storage

Example: az storage account create -g teststorageaccountrg -l chinanorth --name teststorageaccount --kind Storage
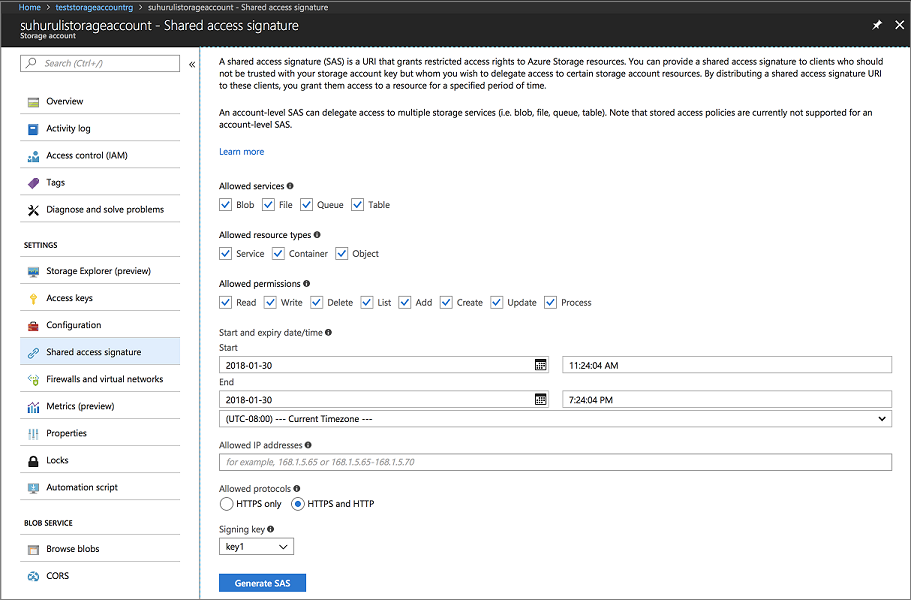
访问 Azure 门户,导航到供存储帐户使用的“共享访问签名”选项卡。 生成 SAS 令牌,如下所示。

复制帐户 SAS URL,留待创建 Service Fabric 群集之用。 它类似于以下 URL:
?sv=2017-04-17&ss=bfqt&srt=sco&sp=rwdlacup&se=2018-01-31T03:24:04Z&st=2018-01-30T19:24:04Z&spr=https,http&sig=IrkO1bVQCHcaKaTiJ5gilLSC5Wxtghu%2FJAeeY5HR%2BPU%3D创建包含事件中心资源的资源组。 事件中心用于将消息从 Service Fabric 发送到运行 ELK 资源的服务器。
az group create --location [REGION] --name [RESOURCE-GROUP-NAME]

Example: az group create --location chinanorth --name testeventhubsrg
使用以下命令创建事件中心资源。 按提示输入 namespaceName、eventHubName、consumerGroupName、sendAuthorizationRule 和 receiveAuthorizationRule 的详细信息。
az deployment group create -g [RESOURCE-GROUP-NAME] --template-file eventhubsdeploy.json

Example:
az deployment group create -g testeventhubsrg --template-file eventhubsdeploy.json
Please provide string value for 'namespaceName' (? for help): testeventhubnamespace
Please provide string value for 'eventHubName' (? for help): testeventhub
Please provide string value for 'consumerGroupName' (? for help): testeventhubconsumergroup
Please provide string value for 'sendAuthorizationRuleName' (? for help): sender
Please provide string value for 'receiveAuthorizationRuleName' (? for help): receiver
将“输出”字段的内容复制到上一命令的 JSON 输出中。 创建 Service Fabric 群集时,使用发送方信息。 接收方名称和密钥应该保存,供下一教程使用。在下一教程中,Logstash 服务配置为接收事件中心的消息。 以下 Blob 为 JSON 输出示例:
"outputs": {
    "receiver Key": {
        "type": "String",
        "value": "[KEY]"
    },
    "receiver Name": {
        "type": "String",
        "value": "receiver"
    },
    "sender Key": {
        "type": "String",
        "value": "[KEY]"
    },
    "sender Name": {
        "type": "String",
        "value": "sender"
    }
}
运行 eventhubssastoken.py 脚本,为创建的 EventHubs 资源生成 SAS URL。 此 SAS URL 由 Service Fabric 群集用来将日志发送到事件中心。 因此,发送方策略用于生成此 URL。 此脚本返回事件中心资源的 SAS URL,该资源用在以下步骤中:
python3 eventhubssastoken.py 'testeventhubs' 'testeventhubs' 'sender' '[PRIMARY-KEY]'复制返回的 JSON 中的 sr 字段的值。 sr 字段值是 EventHubs 的 SAS 令牌。 以下 URL 是 sr 字段的示例:
https%3A%2F%testeventhub.servicebus.chinacloudapi.cn%testeventhub&sig=7AlFYnbvEm%2Bat8ALi54JqHU4i6imoFxkjKHS0zI8z8I%3D&se=1517354876&skn=senderEventHubs 的 SAS URL 遵循以下结构:
https://<namespacename>.servicebus.chinacloudapi.cn/<eventhubsname>?sr=<sastoken>。 例如:https://testeventhubnamespace.servicebus.chinacloudapi.cn/testeventhub?sr=https%3A%2F%testeventhub.servicebus.chinacloudapi.cn%testeventhub&sig=7AlFYnbvEm%2Bat8ALi54JqHU4i6imoFxkjKHS0zI8z8I%3D&se=1517354876&skn=sender打开 sfdeploy.parameters.json 文件,替换前述步骤中的以下内容。 [SAS-URL-STORAGE-ACCOUNT] 已在步骤 8 中记录。 [SAS-URL-EVENT-HUBS] 已在步骤 11 中记录。
"applicationDiagnosticsStorageAccountName": {
    "value": "teststorageaccount"
},
"applicationDiagnosticsStorageAccountSasToken": {
    "value": "[SAS-URL-STORAGE-ACCOUNT]"
},
"loggingEventHubSAS": {
    "value": "[SAS-URL-EVENT-HUBS]"
}
打开 sfdeploy.parameters.json。 更改以下参数,然后保存文件。
- clusterName。 只使用小写字母和数字。
- adminUserName(更改为非空值)
- adminPassword(更改为非空值)
运行以下命令,创建 Service Fabric 群集
az sf cluster create --location 'chinanorth' --resource-group 'testlinux' --template-file sfdeploy.json --parameter-file sfdeploy.parameters.json --secret-identifier <certificate_url_from_step4>
将应用程序部署到群集
在部署应用程序之前,需将以下代码片段添加到 Voting/VotingApplication/ApplicationManifest.xml 文件。 X509FindValue 字段是从“在 Azure 中创建 Service Fabric 群集”部分的步骤 4 返回的指纹。 此代码片段嵌套在 ApplicationManifest 字段(根字段)下。
<Certificates>
      <SecretsCertificate X509FindType="FindByThumbprint" X509FindValue="[CERTIFICATE-THUMBPRINT]" />
</Certificates>
若要将应用程序部署到此群集,必须使用 SFCTL 来建立到群集的连接。 SFCTL 需要一个带有公钥和私钥的 PEM 文件才能连接到群集。 运行以下命令以生成带有公钥和私钥的 PEM 文件。
openssl pkcs12 -in <clustername>.<region>.cloudapp.chinacloudapi.cn.pfx -out sfctlconnection.pem -nodes -passin pass:<password>运行以下命令以连接到群集。
sfctl cluster select --endpoint https://<clustername>.<region>.cloudapp.chinacloudapi.cn:19080 --pem sfctlconnection.pem --no-verify若要部署应用程序,请导航到 Voting/Scripts 文件夹,然后运行 install.sh 脚本。
./install.sh若要访问 Service Fabric Explorer,请打开最常用的浏览器,然后键入
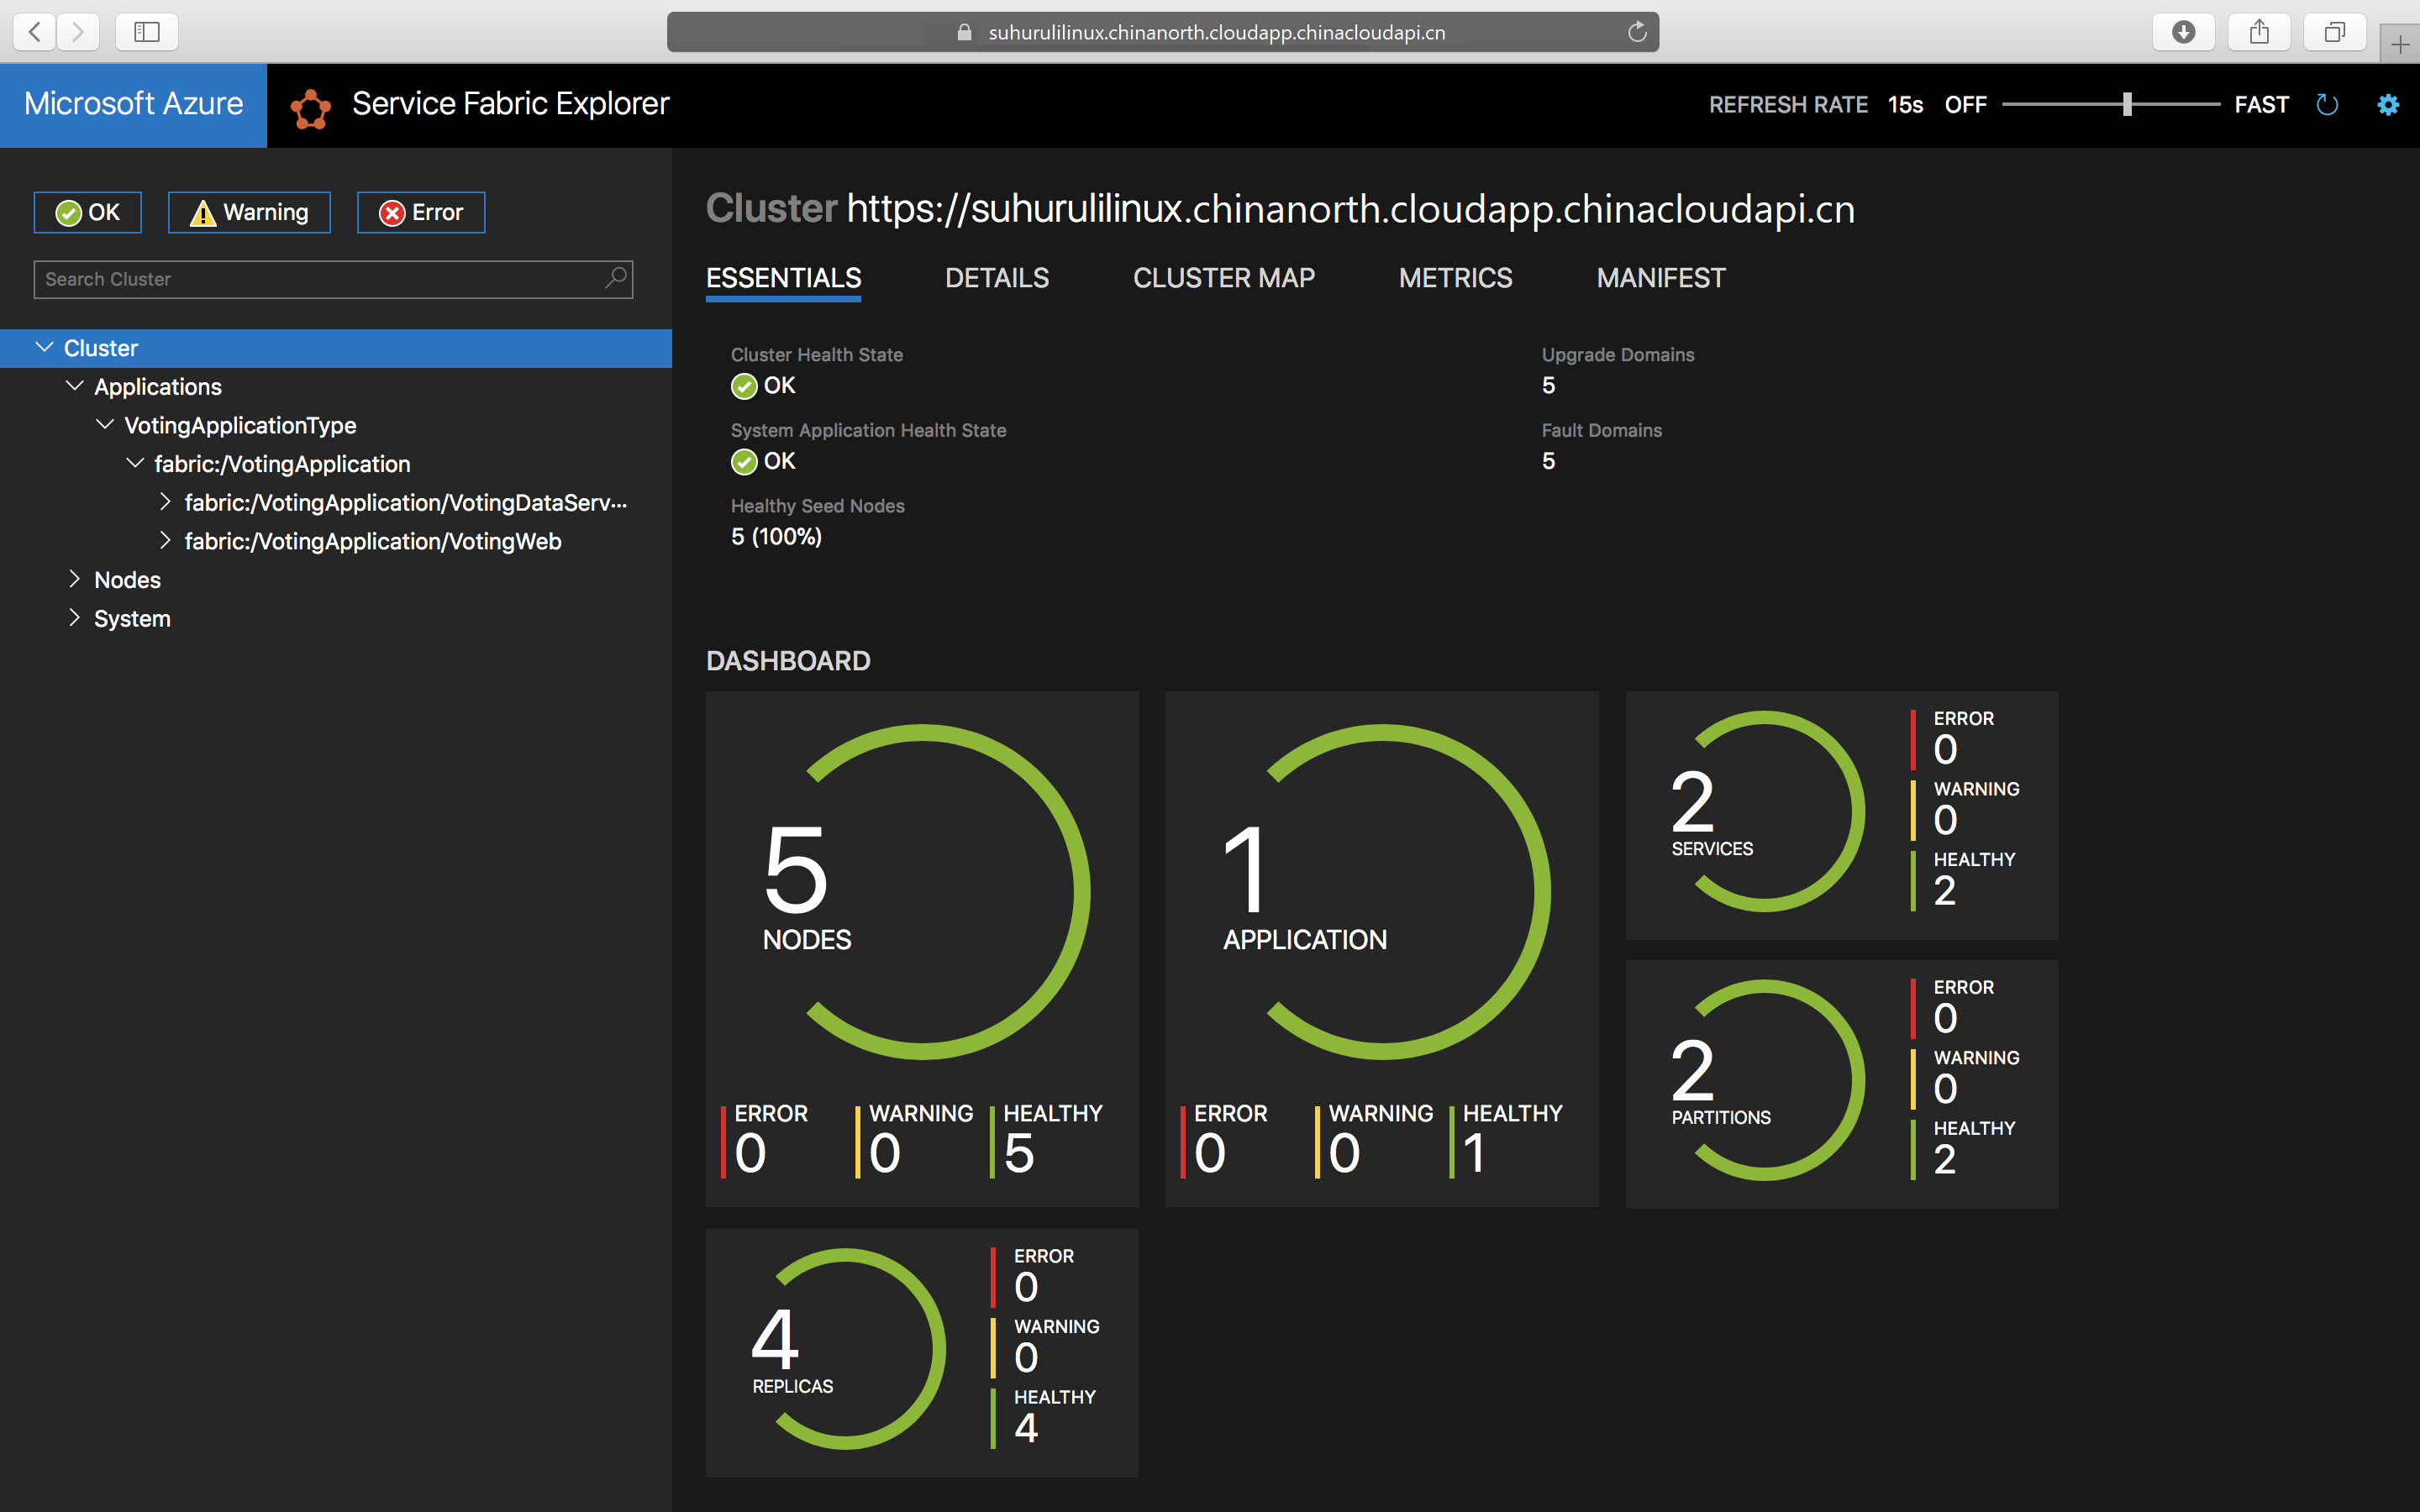
https://testlinuxcluster.chinanorth.cloudapp.chinacloudapi.cn:19080。 从证书存储中选择需要用来连接到此终结点的证书。 如果使用 Linux 计算机,则必须将通过 new-service-fabric-cluster-certificate.sh 脚本生成的证书导入到 Chrome 中,然后才能查看 Service Fabric Explorer。 如果使用 Mac,则必须将 PFX 文件安装到密钥链中。 你注意到应用程序已安装到群集上。
若要访问应用程序,请键入
https://testlinuxcluster.chinanorth.cloudapp.chinacloudapi.cn:8080
若要从群集中卸载应用程序,请在 Scripts 文件夹中运行 uninstall.sh 脚本
./uninstall.sh
后续步骤
在本教程中,你了解了如何执行以下操作:
- 在 Azure 中创建安全的 Linux 群集
- 创建通过 ELK 进行监视所需的资源