Note
Access to this page requires authorization. You can try signing in or changing directories.
Access to this page requires authorization. You can try changing directories.
APPLIES TO: All API Management tiers
API Management provides the capability to secure access to APIs (that is, client to API Management) using client certificates and mutual TLS authentication. You can validate certificates presented by the connecting client and check certificate properties against desired values using policy expressions.
For information about securing access to the backend service of an API using client certificates or API Management to backend, see Secure backend services.
For a conceptual overview of API authorization, see Authentication and authorization.
Certificate options
For certificate validation, API Management can check against certificates managed in your API Management instance. If you choose to use API Management to manage client certificates, you have the following options:
- Reference a certificate managed in Azure Key Vault
- Add a certificate file directly in API Management
We recommend using key vault certificates because the approach helps improve API Management security:
- Certificates stored in key vaults can be reused across services
- You can apply granular access policies to certificates stored in key vaults
- Certificates updated in the key vault are automatically rotated in API Management. After update in the key vault, a certificate in API Management is updated within 4 hours. You can also manually refresh the certificate using the Azure portal or by using the management REST API.
Prerequisites
If you haven't created an API Management service instance yet, see Create an API Management service instance.
You need access to the certificate and the password for management in an Azure key vault or upload to the API Management service. The certificate must be in either CER or PFX format. Self-signed certificates are allowed.
If you use a self-signed certificate, also install trusted root and intermediate CA certificates in your API Management instance.
Note
CA certificates for certificate validation aren't supported in the Consumption tier.
Prerequisites for key vault integration
If you don't already have a key vault, create one. For information about creating a key vault, see Quickstart: Create a key vault using the Azure portal.
Enable a system-assigned or user-assigned managed identity in API Management.
Configure access to key vault
- In the portal, go to your key vault.
- In the left menu, select Settings > Access configuration. Note the Permission model that's configured.
- Depending on the permission model, configure either a key vault access policy or Azure RBAC access for an API Management managed identity.
To add a key vault access policy:
- In the left menu, select Access policies.
- On the Access policies page, select + Create.
- On the Permissions tab, under Secret permissions, select Get and List, and then select Next.
- On the Principal tab, search for the resource name of your managed identity, then select Next. If you're using a system-assigned identity, the principal is the name of your API Management instance.
- Select Next again. On the Review + create tab, select Create.
To create a certificate in the key vault or import a certificate to the key vault, see Quickstart: Set and retrieve a certificate from Azure Key Vault using the Azure portal.
Requirements for Key Vault firewall
If Key Vault firewall is enabled on your key vault, you must meet these requirements:
You must use the API Management instance's system-assigned managed identity to access the key vault. You can't use a user-assigned identity for access from API Management.
In Key Vault firewall, enable the Allow Trusted Microsoft Services to bypass this firewall option:
- In your key vault, select Settings > Networking.
- Under Firewalls and virtual networks, select Allow public access from specific virtual networks and IP addresses.
- Under Exception, select Allow trusted Microsoft services to bypass this firewall.
API Management supports trusted service connectivity to access the key vault for control-plane options.
Ensure that your local client IP address is allowed to access the key vault temporarily. You must select a certificate or secret to add to Azure API Management. For more information, see Configure Azure Key Vault networking settings.
After you complete the configuration, you can block your client address in the key vault firewall.
Virtual network requirements
If the API Management instance is deployed in a virtual network, also configure the following network settings:
- Enable a service endpoint to Key Vault on the API Management subnet.
- Configure a network security group (NSG) rule to allow outbound traffic to the
AzureKeyVaultandAzureActiveDirectoryservice tags.
For more information, see Network configuration when setting up API Management in a virtual network.
Add a key vault certificate
See Prerequisites for key vault integration.
Important
To add a key vault certificate to your API Management instance, you must have permissions to list secrets from the key vault.
Caution
When using a key vault certificate in API Management, be careful not to delete the certificate, key vault, or managed identity that's used to access the key vault.
To add a key vault certificate to API Management:
In the Azure portal, go to your API Management instance.
Under Security, select Certificates.
Select Certificates > + Add.
In Id, enter a name.
In Certificate, select Key vault.
Enter the identifier of a key vault certificate, or choose Select to select a certificate from a key vault.
Important
If you enter a key vault certificate identifier yourself, be sure that it doesn't have version information. Otherwise, the certificate won't rotate automatically in API Management after an update in the key vault.
In Client identity, select a system-assigned identity or an existing user-assigned managed identity. For more information, see Use managed identities in Azure API Management.
Note
The identity needs to have permissions to get and list certificates from the key vault. If you haven't already configured access to the key vault, API Management prompts you so that it can automatically configure the identity with the necessary permissions.
Select Add.
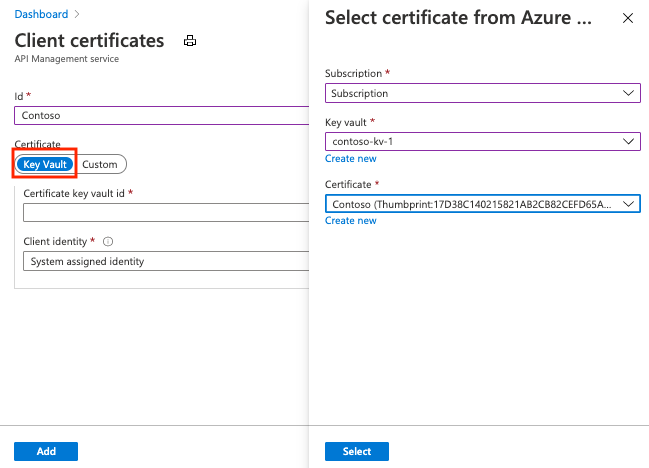
Select Save.

Upload a certificate
To upload a client certificate to API Management:
In the Azure portal, go to your API Management instance.
Under Security, select Certificates.
Select Certificates > + Add.
In Id, enter a name.
In Certificate, select Custom.
Browse to select the certificate .pfx file, and enter its password.
Select Add.
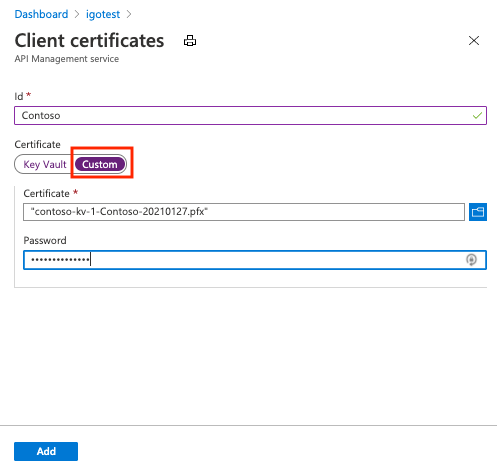
Select Save.
Note
If you only want to use the certificate to authenticate the client with API Management, you can upload a CER file.
Enable API Management instance to receive and verify client certificates
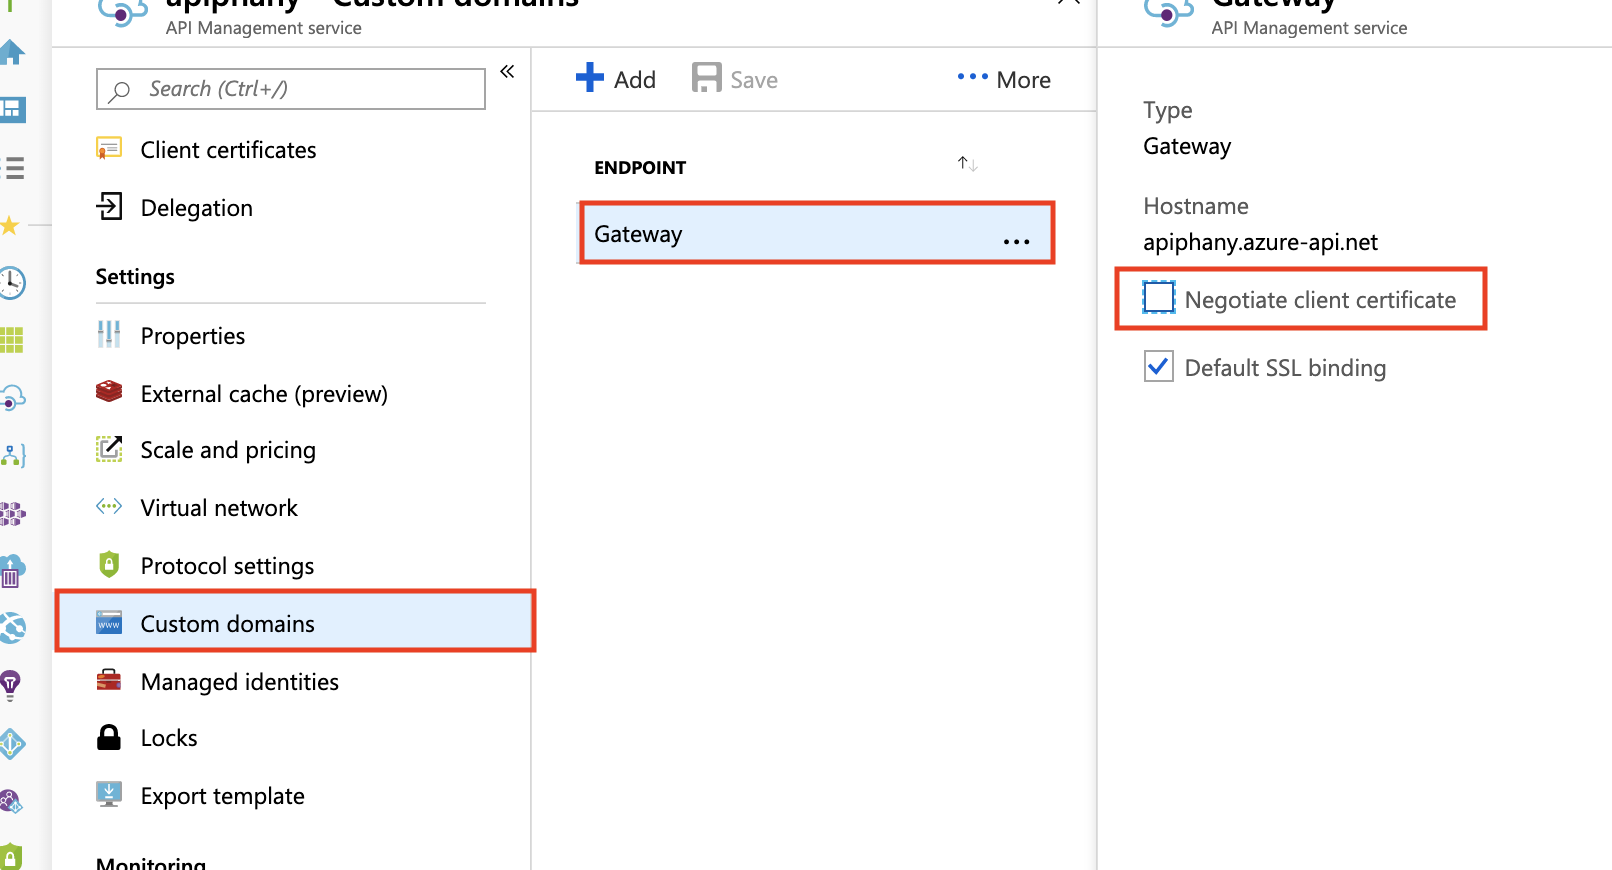
Developer, Basic, Standard, or Premium tier
To receive and verify client certificates over HTTP/2 in the Developer, Basic, Standard, or Premium tiers, you must enable Negotiate client certificate.
Select Deployment + infrastructure, then Custom domains.
Select the gateway hostname.
In the Gateway page, select Negotiate client certificate, then Update.
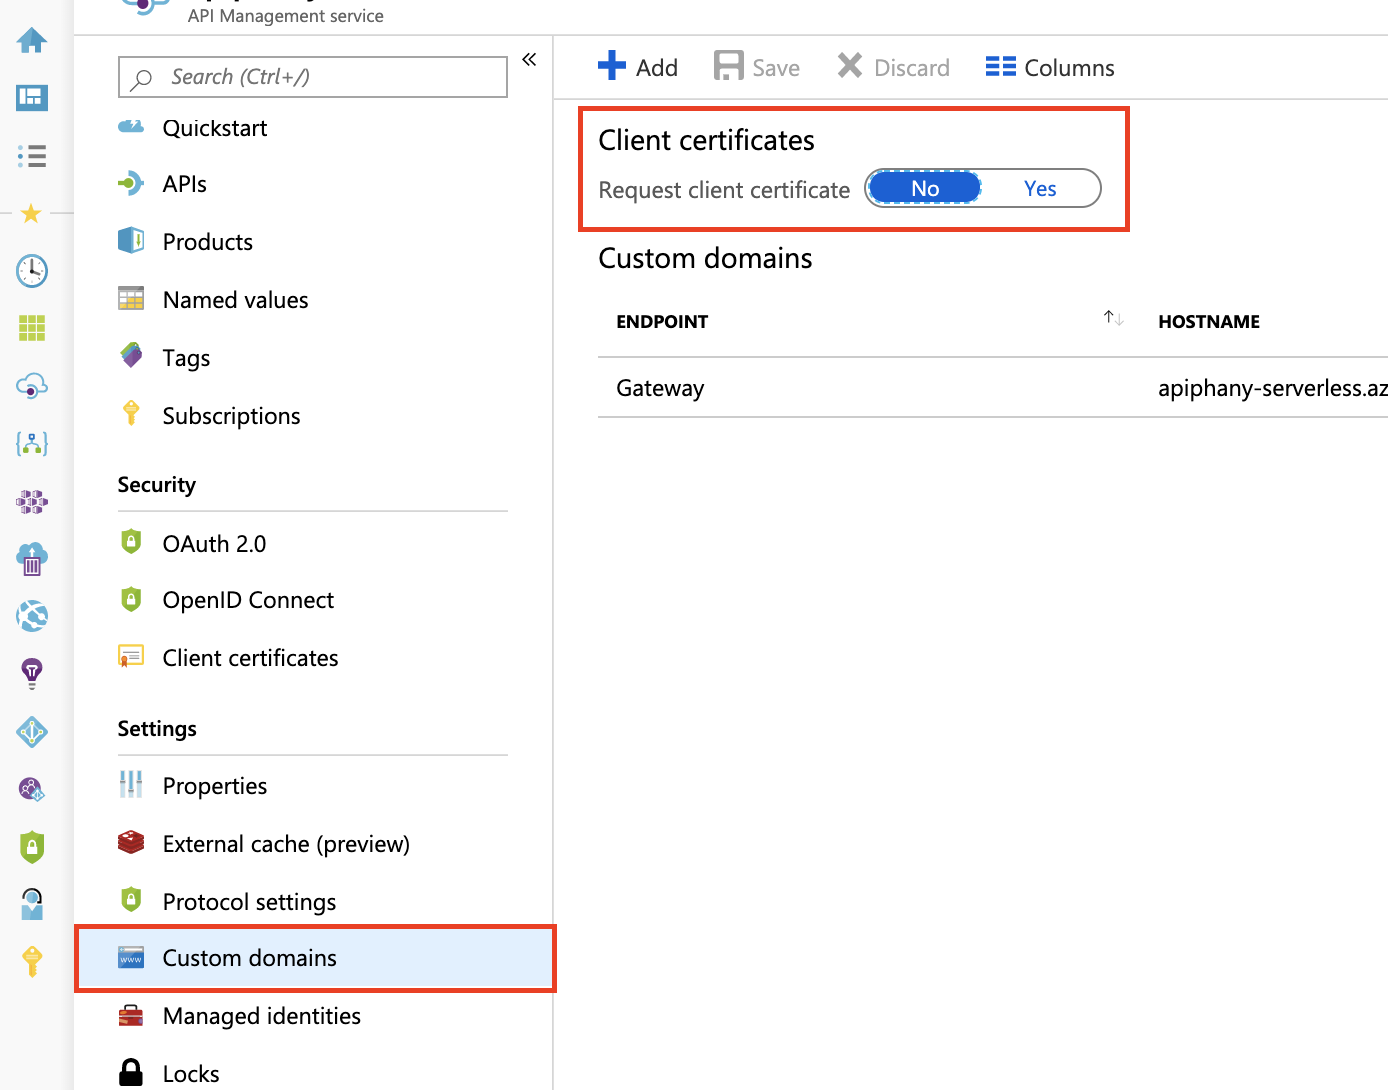
Consumption tier
To receive and verify client certificates in the Consumption tier, you must enable Request client certificate.
Select Deployment + infrastructure, then Custom domains.
Under Client certificates, enable Request client certificate.
Policy to validate client certificates
Use the validate-client-certificate policy to validate one or more attributes of a client certificate used to access APIs hosted in your API Management instance.
Configure the policy to validate one or more attributes including certificate issuer, subject, thumbprint, whether the certificate is validated against online revocation list, and others.
Certificate validation with context variables
You can also create policy expressions with the context variable to check client certificates. Examples in the following sections show expressions using the context.Request.Certificate property and other context properties.
Note
Mutual certificate authentication might not function correctly when the API Management gateway endpoint is exposed through the Application Gateway. The Application Gateway functions as a Layer 7 load balancer, establishing a distinct TLS connection with the backend API Management service. The certificate attached by the client in the initial HTTP request isn't forwarded to APIM.
As a workaround, you can transmit the certificate using the server variables option. For more information, see Mutual Authentication Server Variables.
Important
- Starting May 2021, the
context.Request.Certificateproperty only requests the certificate when the API Management instance'shostnameConfigurationsets thenegotiateClientCertificateproperty to True. By default,negotiateClientCertificateis set to False. - If TLS renegotiation is disabled in your client, you might see TLS errors when requesting the certificate using the
context.Request.Certificateproperty. If the errors appear, enable TLS renegotiation settings in the client.
Checking the issuer and subject
The following policies can be configured to check the issuer and subject of a client certificate:
<choose>
    <when condition="@(context.Request.Certificate == null || !context.Request.Certificate.Verify() || context.Request.Certificate.Issuer != "trusted-issuer" || context.Request.Certificate.SubjectName.Name != "expected-subject-name")" >
        <return-response>
            <set-status code="403" reason="Invalid client certificate" />
        </return-response>
    </when>
</choose>
Note
To disable checking certificate revocation list, use context.Request.Certificate.VerifyNoRevocation() instead of context.Request.Certificate.Verify().
If client certificate is self-signed, root (or intermediate) CA certificates must be uploaded to API Management for context.Request.Certificate.Verify() and context.Request.Certificate.VerifyNoRevocation() to work.
Checking the thumbprint
The following policies can be configured to check the thumbprint of a client certificate:
<choose>
    <when condition="@(context.Request.Certificate == null || !context.Request.Certificate.Verify() || context.Request.Certificate.Thumbprint != "DESIRED-THUMBPRINT-IN-UPPER-CASE")" >
        <return-response>
            <set-status code="403" reason="Invalid client certificate" />
        </return-response>
    </when>
</choose>
Note
To disable checking certificate revocation list, use context.Request.Certificate.VerifyNoRevocation() instead of context.Request.Certificate.Verify().
If client certificate is self-signed, root (or intermediate) CA certificates must be uploaded to API Management for context.Request.Certificate.Verify() and context.Request.Certificate.VerifyNoRevocation() to work.
Checking a thumbprint against certificates uploaded to API Management
The following example shows how to check the thumbprint of a client certificate against certificates uploaded to API Management:
<choose>
    <when condition="@(context.Request.Certificate == null || !context.Request.Certificate.Verify()  || !context.Deployment.Certificates.Any(c => c.Value.Thumbprint == context.Request.Certificate.Thumbprint))" >
        <return-response>
            <set-status code="403" reason="Invalid client certificate" />
        </return-response>
    </when>
</choose>
Note
To disable checking certificate revocation list, use context.Request.Certificate.VerifyNoRevocation() instead of context.Request.Certificate.Verify().
If client certificate is self-signed, root (or intermediate) CA certificates must be uploaded to API Management for context.Request.Certificate.Verify() and context.Request.Certificate.VerifyNoRevocation() to work.
Tip
Client certificate deadlock issue described in this article can manifest itself in several ways. For example, you might see requests freeze, requests result in 403 Forbidden status code after timing out, or context.Request.Certificate is null. This problem usually affects POST and PUT requests with content length of approximately 60KB or larger.
To prevent this issue from occurring, turn on Negotiate client certificate setting for desired hostnames for Custom domains as shown previously in this article. This feature isn't available in the Consumption tier.