Note
Access to this page requires authorization. You can try signing in or changing directories.
Access to this page requires authorization. You can try changing directories.
APPLIES TO: All API Management tiers
This article shows how to create a managed identity for an Azure API Management instance and how to use it to access other resources. By using a managed identity generated by Microsoft Entra ID, API Management can easily and securely access other resources that are protected by Microsoft Entra, like Azure Key Vault. Azure manages these identities, so you don't have to provision or rotate any secrets. For more information about managed identities, see What are managed identities for Azure resources?
You can grant two types of identities to an API Management instance:
- A system-assigned identity is tied to your service and is deleted if your service is deleted. The service can have only one system-assigned identity.
- A user-assigned identity is a standalone Azure resource that you can assign to your service. The service can have multiple user-assigned identities.
Note
- Managed identities are specific to the Microsoft Entra tenant in which your Azure subscription is hosted. They don't get updated if you move a subscription to a different directory. If you move a subscription, you need to recreate and reconfigure the identities.
- API Management managed identities are also specific to the Azure subscription in which the service is hosted. If you move the service to a different subscription in the same tenant, you need to recreate and reconfigure the identities.
Create a system-assigned managed identity
Azure portal
In the Azure portal, you can enable a system-assigned managed identity when you create an API Management instance, or you can create an API Management instance and then enable the feature.
To enable a managed identity in an existing instance:
Create an API Management instance in the portal as you normally would. Go to it in the portal.
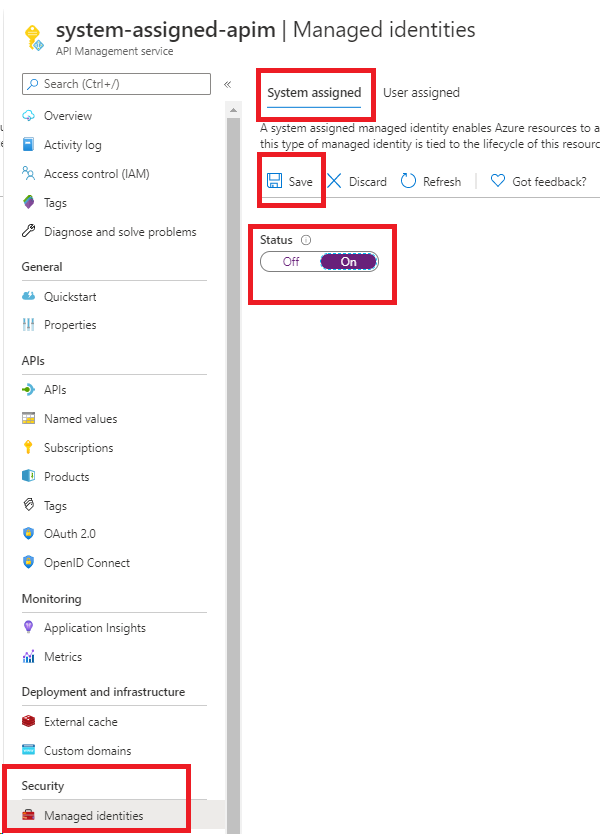
In the left menu, under Security, select Managed identities.
On the System assigned tab, change the Status to On. Select Save.
Azure PowerShell
Note
We recommend that you use the Azure Az PowerShell module to interact with Azure. See Install Azure PowerShell to get started. To learn how to migrate to the Az PowerShell module, see Migrate Azure PowerShell from AzureRM to Az.
The following steps lead you through creating an API Management instance and assigning it an identity by using Azure PowerShell.
If you need to, install Azure PowerShell by following the instructions in the Azure PowerShell guide. Then run
Connect-AzAccount -Environment AzureChinaCloudto create a connection with Azure.Use the following code to create an instance with a system-assigned managed identity. For more examples of how to use Azure PowerShell with API Management, see API Management PowerShell samples.
# Create a resource group.
New-AzResourceGroup -Name $resourceGroupName -Location $location

# Create an API Management Consumption SKU service.
New-AzApiManagement -ResourceGroupName $resourceGroupName -Name consumptionskuservice -Location $location -Sku Consumption -Organization contoso -AdminEmail contoso@contoso.com -SystemAssignedIdentity
You can also update an existing instance to create the identity:
# Get an API Management instance
$apimService = Get-AzApiManagement -ResourceGroupName $resourceGroupName -Name $apiManagementName

# Update an API Management instance
Set-AzApiManagement -InputObject $apimService -SystemAssignedIdentity
Azure Resource Manager (ARM) template
You can create an API Management instance with a system-assigned identity by including the following property in the ARM template resource definition:
"identity" : {
    "type" : "SystemAssigned"
}
This property instructs Azure to create and manage the identity for your API Management instance.
For example, a complete ARM template might look like the following example:
{
    "$schema": "https://schema.management.azure.com/schemas/2019-04-01/deploymentTemplate.json#",
    "contentVersion": "0.9.0.0",
    "resources": [{
        "apiVersion": "2021-08-01",
        "name": "contoso",
        "type": "Microsoft.ApiManagement/service",
        "location": "[resourceGroup().location]",
        "tags": {},
        "sku": {
            "name": "Developer",
            "capacity": "1"
        },
        "properties": {
            "publisherEmail": "admin@contoso.com",
            "publisherName": "Contoso"
        },
        "identity": {
            "type": "systemAssigned"
        }
    }]
}
When the instance is created, it has the following additional properties:
"identity": {
    "type": "SystemAssigned",
    "tenantId": "<TENANTID>",
    "principalId": "<PRINCIPALID>"
}
The tenantId property identifies which Microsoft Entra tenant the identity belongs to. The principalId property is a unique identifier for the instance's new identity. Within Microsoft Entra ID, the service principal has the same name that you gave to your API Management instance.
Note
An API Management instance can have both system-assigned and user-assigned identities. In that scenario, the type property is SystemAssigned,UserAssigned.
Configure Key Vault access by using a managed identity
To use API Management to access certificates or other secrets from an Azure key vault, configure the following settings.
Configure access to key vault
- In the portal, go to your key vault.
- In the left menu, select Settings > Access configuration. Note the Permission model that's configured.
- Depending on the permission model, configure either a key vault access policy or Azure RBAC access for an API Management managed identity.
To add a key vault access policy:
- In the left menu, select Access policies.
- On the Access policies page, select + Create.
- On the Permissions tab, under Secret permissions, select Get and List, and then select Next.
- On the Principal tab, search for the resource name of your managed identity, then select Next. If you're using a system-assigned identity, the principal is the name of your API Management instance.
- Select Next again. On the Review + create tab, select Create.
To configure Azure RBAC access:
- In the left menu, select Access control (IAM).
- On the Access control (IAM) page, select Add role assignment.
- On the Role tab, select Key Vault Certificate User.
- On the Members tab, select Managed identity > + Select members.
- In the Select managed identities window, select the system-assigned managed identity or a user-assigned managed identity that's associated with your API Management instance, and then click Select.
- Select Review + assign.
Requirements for Key Vault firewall
If Key Vault firewall is enabled on your key vault, you must meet these requirements:
You must use the API Management instance's system-assigned managed identity to access the key vault. You can't use a user-assigned identity for access from API Management.
In Key Vault firewall, enable the Allow Trusted Microsoft Services to bypass this firewall option:
- In your key vault, select Settings > Networking.
- Under Firewalls and virtual networks, select Allow public access from specific virtual networks and IP addresses.
- Under Exception, select Allow trusted Microsoft services to bypass this firewall.
API Management supports trusted service connectivity to access the key vault for control-plane options.
Ensure that your local client IP address is allowed to access the key vault temporarily. You must select a certificate or secret to add to Azure API Management. For more information, see Configure Azure Key Vault networking settings.
After you complete the configuration, you can block your client address in the key vault firewall.
Virtual network requirements
If the API Management instance is deployed in a virtual network, also configure the following network settings:
- Enable a service endpoint to Key Vault on the API Management subnet.
- Configure a network security group (NSG) rule to allow outbound traffic to the
AzureKeyVaultandAzureActiveDirectoryservice tags.
For more information, see Network configuration when setting up API Management in a virtual network.
Supported scenarios that use system-assigned identity
The following list shows some common scenarios for using a system-assigned managed identity in Azure API Management.
Obtain a custom TLS/SSL certificate for the API Management instance from Key Vault
You can use the system-assigned identity of an API Management instance to retrieve custom TLS/SSL certificates that are stored in Key Vault. You can then assign these certificates to custom domains in the API Management instance. Consider the following points:
- The content type of the secret must be application/x-pkcs12. For more information, see Domain certificate options.
- You must use the Key Vault certificate secret endpoint, which contains the secret.
Important
If you don't provide the object version of the certificate, API Management automatically obtains any newer version of the certificate within four hours after it's updated in Key Vault.
The following example shows an ARM template that uses the system-assigned managed identity of an API Management instance to retrieve a custom domain certificate from Key Vault.
Prerequisites
- An API Management instance that's configured with a system-assigned managed identity. To create the instance, you can use an Azure Quickstart Template.
- A Key Vault instance in the same resource group. The instance must host a certificate that you use as a custom domain certificate in API Management.
The template contains the following steps:
- Update the access policies of the Key Vault instance and allow the API Management instance to obtain secrets from it.
- Update the API Management instance by setting a custom domain name through the certificate from the Key Vault instance.
When you run the template, provide parameter values that are appropriate for your environment.
{
	"$schema": "https://schema.management.azure.com/schemas/2019-04-01/deploymentTemplate.json#",
	"contentVersion": "1.0.0.0",
	"parameters": {
        "apiManagementServiceName": {
            "type": "string",
            "minLength": 8,
            "metadata":{
                "description": "The name of the API Management instance"
            }
        },
		"publisherEmail": {
			"type": "string",
			"minLength": 1,
			"metadata": {
				"description": "The email address of the owner of the instance"
			}
		},
		"publisherName": {
			"type": "string",
			"minLength": 1,
			"metadata": {
				"description": "The name of the owner of the instance"
			}
		},
		"sku": {
			"type": "string",
			"allowedValues": ["Developer",
			"Standard",
			"Premium"],
			"defaultValue": "Developer",
			"metadata": {
				"description": "The pricing tier of the API Management instance"
			}
		},
		"skuCount": {
			"type": "int",
			"defaultValue": 1,
			"metadata": {
				"description": "The instance size of the API Management instance"
			}
		},
        "keyVaultName": {
            "type": "string",
            "metadata": {
                "description": "The name of the key vault"
            }
        },
		"proxyCustomHostname1": {
			"type": "string",
			"metadata": {
				"description": "Gateway custom hostname 1. Example: api.contoso.com"
			}
		},
		"keyVaultIdToCertificate": {
			"type": "string",
			"metadata": {
				"description": "Reference to the key vault certificate. Example: https://contoso.vault.azure.cn/secrets/contosogatewaycertificate"
			}
		}
	},
	 "variables": {
        "apimServiceIdentityResourceId": "[concat(resourceId('Microsoft.ApiManagement/service', parameters('apiManagementServiceName')),'/providers/Microsoft.ManagedIdentity/Identities/default')]"
		    },
	"resources": [
   {
        "apiVersion": "2021-08-01",
        "name": "[parameters('apiManagementServiceName')]",
        "type": "Microsoft.ApiManagement/service",
        "location": "[resourceGroup().location]",
        "tags": {
        },
        "sku": {
            "name": "[parameters('sku')]",
            "capacity": "[parameters('skuCount')]"
        },
        "properties": {
            "publisherEmail": "[parameters('publisherEmail')]",
            "publisherName": "[parameters('publisherName')]"
        },
        "identity": {
            "type": "systemAssigned"
        }
    },
    {
        "type": "Microsoft.KeyVault/vaults/accessPolicies",
        "name": "[concat(parameters('keyVaultName'), '/add')]",
        "apiVersion": "2018-02-14",
        "properties": {
            "accessPolicies": [{
                "tenantId": "[reference(variables('apimServiceIdentityResourceId'), '2018-11-30').tenantId]",
                "objectId": "[reference(variables('apimServiceIdentityResourceId'), '2018-11-30').principalId]",
                "permissions": {
                     "secrets": ["get", "list"]
                }
            }]
        }
    },
	{
        "apiVersion": "2021-04-01",
		"type": "Microsoft.Resources/deployments",
        "name": "apimWithKeyVault",
		 "dependsOn": [
        "[resourceId('Microsoft.ApiManagement/service', parameters('apiManagementServiceName'))]"
        ],
        "properties": {
            "mode": "incremental",
            "template": {
                "$schema": "http://schema.management.azure.com/schemas/2015-01-01/deploymentTemplate.json#",
				"contentVersion": "1.0.0.0",
				"parameters": {},
				"resources": [{
					"apiVersion": "2021-08-01",
					"name": "[parameters('apiManagementServiceName')]",
					"type": "Microsoft.ApiManagement/service",
					"location": "[resourceGroup().location]",
					"tags": {
					},
					"sku": {
						"name": "[parameters('sku')]",
						"capacity": "[parameters('skuCount')]"
					},
					"properties": {
						"publisherEmail": "[parameters('publisherEmail')]",
						"publisherName": "[parameters('publisherName')]",
						"hostnameConfigurations": [{
							"type": "Proxy",
							"hostName": "[parameters('proxyCustomHostname1')]",
							"keyVaultId": "[parameters('keyVaultIdToCertificate')]"
						}]
					},
					"identity": {
						"type": "systemAssigned"
					}
				}]
		}
		}
	}
]
}
Store and manage named values from Key Vault
You can use a system-assigned managed identity to access Key Vault to store and manage secrets for use in API Management policies. For more information, see Use named values in Azure API Management policies.
Authenticate to a backend by using an API Management identity
Use the system-assigned identity to authenticate to a backend service via the authentication-managed-identity policy. For security considerations when using policy-based authentication, see Security considerations for managed identities.
Connect to Azure resources behind an IP firewall by using a system-assigned managed identity
API Management is a trusted Microsoft service to the following resources. This trusted status enables the service to connect to the following resources behind a firewall when the firewall enables the Allow Trusted Microsoft Services to bypass this firewall setting. After you explicitly assign the appropriate Azure role to the system-assigned managed identity for a resource instance, the scope of access for the instance corresponds to the Azure role that's assigned to the managed identity.
- Trusted access for Key Vault
- Trusted access for Azure Storage
- Trusted access for Azure Service Bus
- Trusted access for Azure Event Hubs
Important
Starting March 2026, trusted service connectivity to Azure services from the API Management gateway by enabling the Allow Trusted Microsoft Services to bypass this firewall firewall setting will no longer be supported. To continue accessing these services from the API Management gateway after this change, ensure that you choose a different supported network access option. For control-plane operations, you can continue to use trusted service connectivity. Learn more.
Log events to an event hub
You can configure and use a system-assigned managed identity to access an event hub to log events from an API Management instance. For more information, see How to log events to Event Hubs in Azure API Management.
Create a user-assigned managed identity
Azure portal
To set up a managed identity in the portal, first create an API Management instance and create a user-assigned identity. Then complete the following steps.
Go to your API Management instance in the portal.
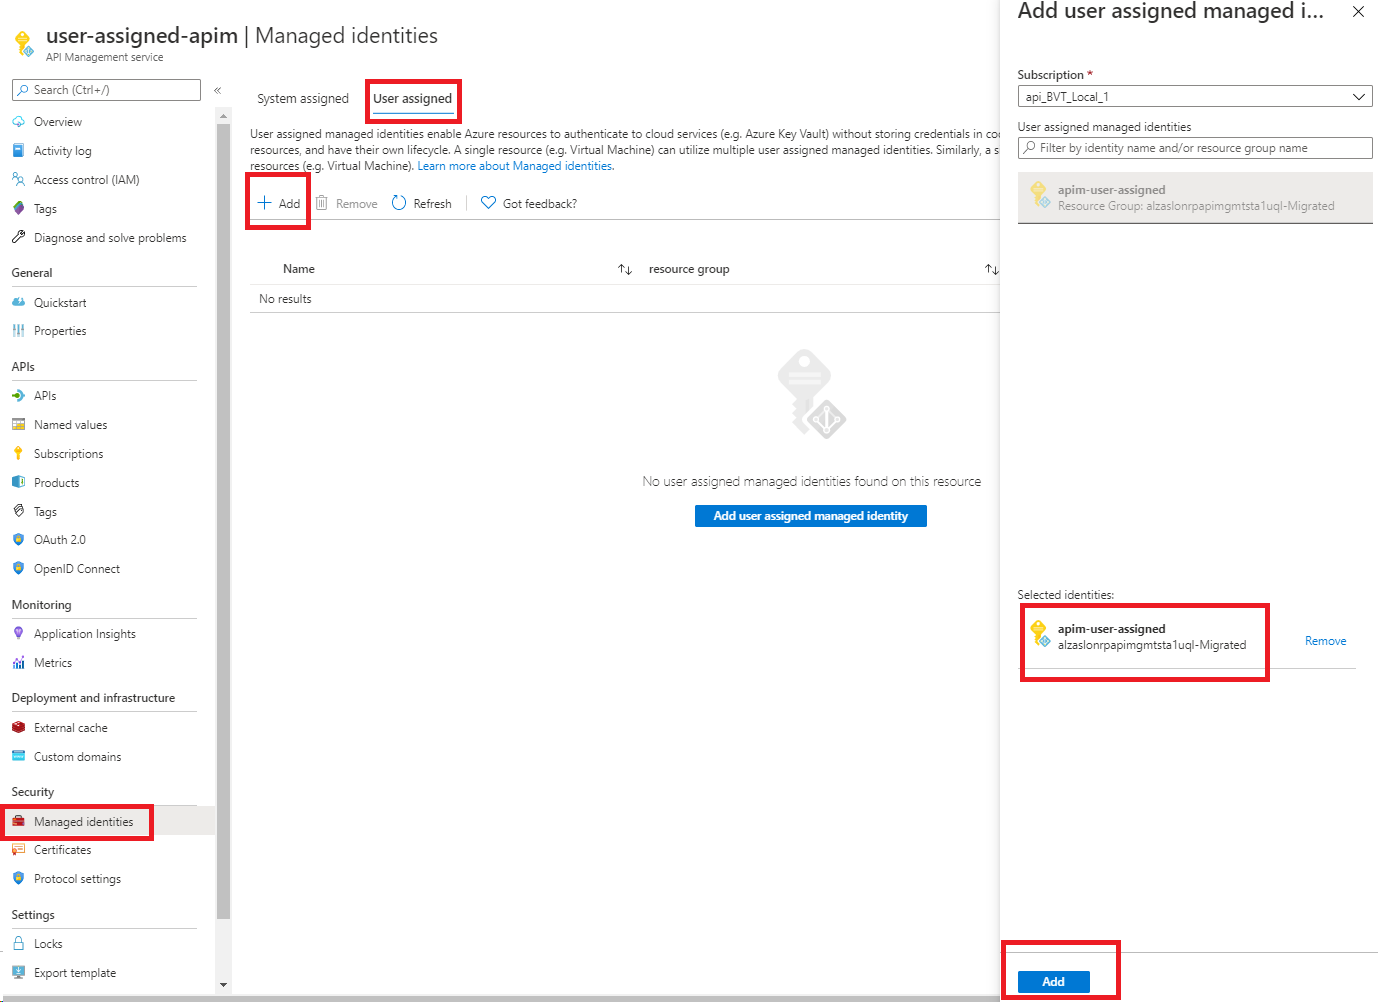
In the left menu, under Security, select Managed identities.
On the User assigned tab, select Add.
Search for the identity that you created earlier and select it. Select Add.

Azure PowerShell
Note
We recommend that you use the Azure Az PowerShell module to interact with Azure. See Install Azure PowerShell to get started. To learn how to migrate to the Az PowerShell module, see Migrate Azure PowerShell from AzureRM to Az.
The following steps lead you through creating an API Management instance and assigning it an identity by using Azure PowerShell.
If you need to, install Azure PowerShell by following the instructions in the Azure PowerShell guide. Then run
Connect-AzAccount -Environment AzureChinaCloudto create a connection with Azure.Use the following code to create the instance. For more examples of how to use Azure PowerShell with API Management, see API Management PowerShell samples.
# Create a resource group.
New-AzResourceGroup -Name $resourceGroupName -Location $location

# Create a user-assigned identity. This code requires installation of the Az.ManagedServiceIdentity module.
$userAssignedIdentity = New-AzUserAssignedIdentity -Name $userAssignedIdentityName -ResourceGroupName $resourceGroupName

# Create an API Management Consumption SKU service.
$userIdentities = @($userAssignedIdentity.Id)

New-AzApiManagement -ResourceGroupName $resourceGroupName -Location $location -Name $apiManagementName -Organization contoso -AdminEmail admin@contoso.com -Sku Consumption -UserAssignedIdentity $userIdentities
You can also update an existing service to assign an identity to the service:
# Get an API Management instance.
$apimService = Get-AzApiManagement -ResourceGroupName $resourceGroupName -Name $apiManagementName

# Create a user-assigned identity. This code requires installation of the Az.ManagedServiceIdentity module.
$userAssignedIdentity = New-AzUserAssignedIdentity -Name $userAssignedIdentityName -ResourceGroupName $resourceGroupName

# Update the API Management instance.
$userIdentities = @($userAssignedIdentity.Id)
Set-AzApiManagement -InputObject $apimService -UserAssignedIdentity $userIdentities
ARM template
You can create an API Management instance that has an identity by including the following property in the resource definition:
"identity": {
    "type": "UserAssigned",
    "userAssignedIdentities": {
        "<RESOURCEID>": {}
    }
}
Adding the user-assigned type informs Azure to use the user-assigned identity that you specify for your instance.
For example, a complete ARM template might look like the following example:
{
    "$schema": "https://schema.management.azure.com/schemas/2014-04-01-preview/deploymentTemplate.json#",
    "contentVersion": "0.9.0.0",
    "resources": [{
        "apiVersion": "2021-08-01",
        "name": "contoso",
        "type": "Microsoft.ApiManagement/service",
        "location": "[resourceGroup().location]",
        "tags": {},
        "sku": {
            "name": "Developer",
            "capacity": "1"
        },
        "properties": {
            "publisherEmail": "admin@contoso.com",
            "publisherName": "Contoso"
        },
        "identity": {
            "type": "UserAssigned",
             "userAssignedIdentities": {
                "[resourceId('Microsoft.ManagedIdentity/userAssignedIdentities', variables('identityName'))]": {}
             }
        },
         "dependsOn": [
          "[resourceId('Microsoft.ManagedIdentity/userAssignedIdentities', variables('identityName'))]"
        ]
    }]
}
When you create the service, it has the following additional properties:
"identity": {
    "type": "UserAssigned",
    "userAssignedIdentities": {
        "<RESOURCEID>": {
            "principalId": "<PRINCIPALID>",
            "clientId": "<CLIENTID>"
        }
    }
}
The principalId property is a unique identifier for the identity that's used for Microsoft Entra administration. The clientId property is a unique identifier for the application's new identity that's used for specifying which identity to use during runtime calls.
Note
An API Management instance can have both system-assigned and user-assigned identities. In that scenario, the type property is SystemAssigned,UserAssigned.
Supported scenarios that use user-assigned managed identities
The following list shows some common scenarios for using a user-assigned managed identity in Azure API Management.
Obtain a custom TLS/SSL certificate for the API Management instance from Key Vault
You can use a user-assigned identity to establish trust between an API Management instance and Key Vault. This trust can then be used to retrieve custom TLS/SSL certificates that are stored in Key Vault. You can then assign these certificates to custom domains in the API Management instance.
Important
If you enable Key Vault firewall on your key vault, you can't use a user-assigned identity for access from API Management. You must use the system-assigned identity instead. For more information, see the section Requirements for key vault firewall.
Consider the following requirements:
- The content type of the secret must be application/x-pkcs12.
- You must use the Key Vault certificate secret endpoint, which contains the secret.
Important
If you don't provide the object version of the certificate, API Management automatically obtains any newer version of the certificate within four hours after it's updated in Key Vault.
Store and manage named values from Key Vault
You can use a user-assigned managed identity to access Key Vault to store and manage secrets for use in API Management policies. For more information, see Use named values in Azure API Management policies.
Note
If you enable Key Vault firewall on your key vault, you can't use a user-assigned identity for access from API Management. You must use the system-assigned identity instead. For more information, see the section Requirements for key vault firewall.
Authenticate to a backend by using a user-assigned identity
You can use the user-assigned identity to authenticate to a backend service via the authentication-managed-identity policy. For security considerations when using policy-based authentication, see Security considerations for managed identities.
Log events to an event hub
You can configure and use a user-assigned managed identity to access an event hub to log events from an API Management instance. For more information, see How to log events to Azure Event Hubs in Azure API Management.
Security considerations for managed identities
When using managed identities in API Management, it's important to follow security best practices to protect your resources and minimize risk:
Caution
Policy editing access grants indirect resource access: Users with permissions to edit API Management policies (for example, users assigned the API Management Service Contributor role, or any custom role with the Microsoft.ApiManagement/service/apis/write or Microsoft.ApiManagement/service/apis/policies/write permissions) can use the authentication-managed-identity policy to authenticate as the service's managed identity. A user cannot directly gain access to resources by simply having policy editing permissions alone. However, they can modify a policy to exfiltrate the authentication token, propagate it to a backend service, or log it for later use—thereby gaining indirect access to resources that the managed identity can reach.
To mitigate this risk:
- Follow the principle of least privilege when assigning Azure roles to managed identities. Grant only the permissions the service requires.
- Only assign the API Management Contributor role or policy editing permissions (such as
Microsoft.ApiManagement/service/apis/writeandMicrosoft.ApiManagement/service/apis/policies/write) to trusted users. - Regularly review and audit managed identity role assignments and monitor who has access to edit API Management policies.
- Implement policy controls and governance to prevent unauthorized modifications to critical policies.
Important
Token forwarding is the customer's responsibility: When using the authentication-managed-identity policy, API Management obtains a token from Microsoft Entra ID and forwards it to the backend as-is in the Authorization header. API Management does not validate which backend the token is sent to. It is the customer's responsibility to ensure that tokens are only forwarded to intended and trusted backend services. Configure backend entities and policies carefully to prevent tokens from being sent to unintended destinations.
Remove an identity
You can remove a system-assigned identity by disabling the feature through the portal or by using an ARM template, just like you created it. You can remove user-assigned identities individually. To remove all identities, set the identity type to "None".
When you remove a system-assigned identity, you also delete it from Microsoft Entra ID. When you delete the API Management instance, the system-assigned identity is automatically removed from Microsoft Entra ID.
To remove all identities by using an ARM template, update this section:
"identity": {
    "type": "None"
}
Important
If you configure an API Management instance with a custom SSL certificate from Key Vault and try to disable a managed identity, the request fails.
You can resolve this problem by switching from a Key Vault certificate to an inline-encoded certificate and then disabling the managed identity. For more information, see Configure a custom domain name.