Note
Access to this page requires authorization. You can try signing in or changing directories.
Access to this page requires authorization. You can try changing directories.
This page covers the options for notebook compute resources. You can run a notebook on an all-purpose compute resource, serverless compute, or, for SQL commands, you can use a SQL warehouse, a type of compute-optimized for SQL analytics. For more information about compute types, see Compute.
Default compute
In workspaces enabled for Unity Catalog, new notebooks default to serverless compute. If you don't manually select a compute resource and run a cell, the notebook automatically connects to serverless compute.
Auto-attach compute
In your developer settings, you can configure notebooks to automatically attach to a compute resource and start a session when you interact with the editor:
Click on your user icon in the top right.
Click Settings.
Click Developer to navigate to your developer settings.
Toggle on Automatically create session on editor interaction to automatically start a compute session on editor interaction. Databricks defaults to a compute resource based on your preferences (serverless or SQL warehouse) and the last compute resource used.
OR
Turn off this setting if you don't want the notebook to automatically connect to and start a compute resource.
Code assistance features, including autocomplete, code formatting, and the debugger, require the notebook to be attached to an active compute session. If the notebook hasn't started a compute session, then code assistance features are inactive.
Serverless compute for notebooks
Serverless compute allows you to quickly connect your notebook to on-demand computing resources.
To attach to the serverless compute, click the compute drop-down menu in the notebook and select Serverless.
See Serverless compute for notebooks for more information.
Automated session restoration for serverless notebooks
Idle termination of serverless compute can cause you to lose in-progress work, such as Python variable values, in your notebooks. To avoid this, turn on Automated session restoration for serverless notebooks.
- Click your username at the upper-right of your workspace, then click Settings in the drop-down list.
- In the Settings sidebar, select Developer.
- Under Experimental features, toggle on the Automated session restoration for serverless notebooks setting.
Enabling this setting allows Databricks to snapshot the serverless notebook's memory state before idle termination. When you return to a notebook after an idle disconnect, a banner appears at the top of the page. Click Reconnect to restore your working state.
When you reconnect, Databricks reinstates your entire working environment, including:
- Python variables, functions, and class definitions: Python state is serialized in-process using pickle/cloudpickle and restored into a fresh REPL, so you don't need to re-import or redeclare.
- Spark DataFrames, cached and temp views: Data you've loaded, transformed, or cached (including temporary views) is preserved, so you avoid costly reloading or recomputation.
- Spark session state: Spark-level configuration settings, temporary views, catalog modifications, and user-defined functions (UDFs) are restored through Spark Connect session migration, so you don't need to reset them.
If the environment has changed in a way that would make deserialization unsafe, for example, incompatible Python or package versions, the snapshot is invalidated and the notebook falls back to a fresh session.
Snapshot data storage
Snapshot data is stored in your workspace's default storage . The notebook itself stores only metadata, including a pointer with the notebook ID, a timestamp, and session information. The data payload is not stored in the notebook. Blob paths are encrypted before being stored in notebook attributes, and snapshot paths are excluded from notebook export and import to prevent restoring state into a different workspace.
Snapshots follow your cloud storage TTL defaults (about one month) and expire automatically. Deleting a notebook also deletes its snapshots. Your cloud account incurs storage costs as part of standard workspace storage usage. The feature uses Python process serialization instead of container-level checkpointing, which keeps snapshots smaller and faster to create.
Security and access control
Snapshot restoration respects notebook permissions. Restoring state requires the RUN permission on the notebook. Encrypted metadata prevents viewers from directly fetching snapshot blobs, and permission checks are enforced on restore.
Limitations
This feature has limitations and doesn't support restoring the following:
- Spark states older than 4 days
- Spark states larger than 50 MB
- Data related to SQL Scripting
- File handles
- Locks and other concurrency primitives
- Network connections
Attach a notebook to an all-purpose compute resource
To attach a notebook to an all-purpose compute resource, you need the CAN ATTACH TO permission on the compute resource.
Important
As long as a notebook is attached to a compute resource, any user with the CAN RUN permission on the notebook has implicit permission to access the compute resource.
To attach a notebook to a compute resource, click the compute selector in the notebook toolbar and select the resource from the drop-down menu.
The menu shows a selection of all-purpose compute and SQL warehouses you have used recently or are currently running.
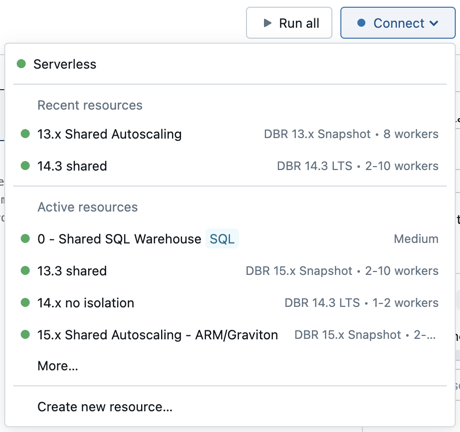
To select from all available compute, click More…. Select from the available general compute or SQL warehouses.

You can also create a new all-purpose compute resource by selecting Create new resource… from the drop-down menu.
Important
An attached notebook has the following Apache Spark variables defined.
| Class | Variable Name |
|---|---|
SparkContext |
sc |
SQLContext/HiveContext |
sqlContext |
SparkSession (Spark 2.x) |
spark |
Don't create a SparkSession, SparkContext, or SQLContext. Doing so leads to inconsistent behavior.
Use a notebook with a SQL warehouse
When a notebook is attached to a SQL warehouse, you can run SQL and Markdown cells. Running a cell in any other language (such as Python or R) throws an error. SQL cells executed on a SQL warehouse appear in the SQL warehouse's query history. The user who ran a query can view the query profile from the notebook by clicking the elapsed time at the bottom of the output.
Notebooks attached to SQL warehouses support SQL warehouse sessions, where you can define variables, create temporary views, and persist state across multiple query runs. You can build SQL logic iteratively without needing to run all statements at once. See What are SQL warehouse sessions?.
Running a notebook requires a pro or serverless SQL warehouse. You must have access to the workspace and the SQL warehouse.
To attach a notebook to a SQL warehouse do the following:
Click the compute selector in the notebook toolbar. The drop-down menu shows compute resources that are currently running or that you have used recently. SQL warehouses are marked with
 .
.From the menu, select a SQL warehouse.
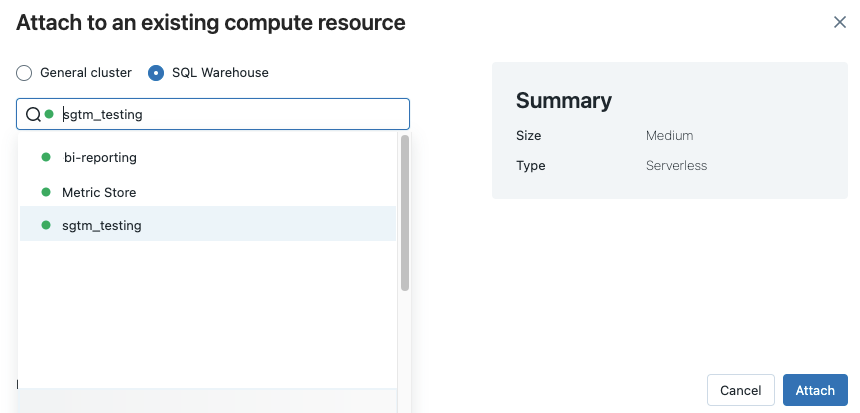
To see all available SQL warehouses, select More… from the drop-down menu. A dialog appears showing compute resources available for the notebook. Select SQL Warehouse, select the warehouse you want to use, and click Attach.
You can also select a SQL warehouse as the compute resource for a SQL notebook when you create a workflow or scheduled job.
SQL warehouse limitations
See Known limitations of Databricks notebooks for more information.