本文介绍如何创建 Azure 托管应用程序,以部署使用客户管理的密钥加密的存储帐户。 存储帐户、Cosmos DB 和 Azure Database for Postgres 支持使用客户管理的密钥或 Azure 管理的密钥进行静态数据加密。 可以使用自己的加密密钥来保护存储帐户中的数据。 指定客户托管密钥时,该密钥用于保护和控制对数据加密密钥的访问。 使用客户托管密钥可以更灵活地管理访问控制。
先决条件
- 具有活动订阅且有权访问 Microsoft Entra 资源(如用户、组或服务主体)的 Azure 帐户。 如果没有帐户,请在开始之前创建一个试用版帐户。
- 包含最新 Azure 资源管理器工具扩展的 Visual Studio Code。 对于 Bicep 文件,请安装适用于 Visual Studio Code 的 Bicep 扩展。
- 安装最新版本的 Azure PowerShell 或 Azure CLI。
- 熟悉如何创建和部署服务目录定义。
托管标识
若要为由托管应用程序部署为受管理资源组中的资源的存储帐户配置客户管理的密钥,需要用户分配的托管标识。 此用户分配的托管标识可用于向托管应用程序授予对其他现有资源的访问权限。 若要了解如何使用用户分配的托管标识配置托管应用程序,请转到使用托管标识的 Azure 托管应用程序。
你的应用程序可以被授予两种类型的标识:
- 系统分配的托管标识会分配给你的应用程序,如果删除应用,标识也会被删除。 一个应用只能有一个系统分配的托管标识。
- 用户分配的托管标识是可以分配给应用的独立 Azure 资源。 一个应用可以有多个用户分配的托管标识。
若要在托管应用程序的受管理资源组中部署使用现有密钥保管库中的客户密钥加密的存储帐户,则需要进行更多配置。 针对有权访问密钥保管库的托管标识,使用托管应用程序配置的托管标识需要其内置的 Azure 基于角色的访问控制“托管标识操作员”。 有关更多详细信息,请转到托管标识操作员角色。
创建具有清除保护功能的密钥保管库
- 登录 Azure 门户。
- 在 Azure 门户菜单或“主页”中,选择“创建资源”。
- 在“搜索”框中输入“Key Vault”。
- 从结果列表中选择“Key Vault”。
- 在“Key Vault”部分,选择“创建”。
- 在“创建密钥保管库”部分,提供以下信息:
- 订阅:选择订阅。
- 资源组:选择“新建”并输入类似于 demo-cmek-rg 的名称。
- 名称:需要唯一名称,如 demo-keyvault-cmek。
- 区域:选择一个位置,例如“中国东部 2”。
- 定价层:从下拉列表中选择“标准”。
- 清除保护:选择“启用清除保护”。
- 选择“下一步”,然后转到“访问策略”选项卡。
- 访问配置:选择“Azure 基于角色的访问控制”。
- 对于所有其他选项,接受默认值。
- 选择“查看 + 创建”。
- 确认设置正确无误,然后选择“创建”。
部署成功后,选择“转到资源”。 在“概述”选项卡上,记下以下属性:
- 保管库名称:在本示例中,保管库名称为 demo-keyvault-cmek。 将在其他步骤中使用该名称。
-
保管库 URI:在此示例中,保管库 URI 为
https://demo-keyvault-cmek.vault.azure.cn/。
创建用户分配的托管标识
若要创建用户分配的托管标识,你的帐户需要分配有托管标识参与者角色。
- 在搜索框中输入“托管标识”。
- 在“服务”下选择“托管标识”。
- 选择“创建”,然后在“基本信息”选项卡中输入以下值:
- 订阅:选择订阅。
- 资源组:选择在前面的步骤中创建的资源组 demo-cmek-rg。
- 区域:选择一个区域,例如“中国东部 2”。
- 名称:输入用户分配的托管标识的名称,例如 demokeyvaultmi。
- 选择“查看 + 创建”。
- 显示“验证已通过”后,选择“创建”。
部署成功后,选择“转到资源”。
创建角色分配
需要为密钥保管库创建两个角色分配。 有关详细信息,请参阅使用 Azure 门户分配 Azure 角色。
向托管标识授予密钥保管库的密钥权限
为密钥保管库托管标识 demokeyvaultmi 创建角色分配,以对密钥进行包装和解包。
- 转到密钥保管库 demo-cmek-keyvault。
- 选择“访问控制(IAM)”。
- 选择“添加”“添加角色分配”。
- 分配以下角色:
- 角色:密钥保管库加密服务加密用户
- 将访问权限分配给:托管标识
- 成员:demokeyvaultmi
- 选择“查看 + 分配”,查看你的设置。
- 选择“查看 + 分配”,创建角色分配。
为帐户创建角色分配
另创建一个角色分配,以便帐户可以在密钥保管库中创建新密钥。
- 分配以下角色:
- 角色:密钥保管库加密主管
- 将访问权限分配给:用户、组或服务主体
- 成员:你的 Microsoft Entra 帐户
- 选择“查看 + 分配”,查看你的设置。
- 选择“查看 + 分配”,创建角色分配。
可以在“访问控制(IAM)”“角色分配”中验证密钥保管库的角色分配。
创建密钥
需要创建供密钥保管库用来加密存储帐户的密钥。
- 转到密钥保管库 demo-cmek-keyvault。
- 选择“密钥”。
- 选择“生成/导入”。
- 在“创建密钥”页上,选择以下值:
- 选项:生成
- 名称:demo-cmek-key
- 对于其他选项,接受默认值。
- 选择“创建”。
记下密钥名称。 在部署托管应用程序时会用到它。
为托管应用程序创建用户分配的托管标识
创建用户分配的托管标识(用作托管应用程序的托管标识)。
- 在搜索框中输入“托管标识”。
- 在“服务”下选择“托管标识”。
- 选择“创建”。
- 订阅:选择订阅。
- 资源组:选择资源组 demo-cmek-rg。
- 区域:选择一个区域,例如“中国东部 2”。
- 名称:输入用户分配的托管标识的名称,例如 demomanagedappmi。
- 选择“查看 + 创建”。
- 显示“验证已通过”后,选择“创建”。
部署成功后,选择“转到资源”。
为托管标识分配角色权限
在名为 demokeyvaultmi 的用户分配的托管标识的范围内,将托管标识操作员角色分配给托管标识。
- 转到名为 demokeyvaultmi 的用户分配的托管标识。
- 选择“访问控制(IAM)”。
- 选择“添加”“添加角色分配”,打开“添加角色分配”页面 。
- 分配以下角色。
- 角色:托管标识操作员
- 将访问权限分配给:托管标识
- 成员:demomanagedappmi
- 选择“查看 + 分配”,查看你的设置。
- 选择“查看 + 分配”,创建角色分配。
可以在“访问控制(IAM)”“角色分配”中验证 demokeyvaultmi 的角色分配。
示例托管应用程序模板
创建一个托管应用程序以在受管理资源组中部署存储帐户,并使用预先存在的密钥保管库的密钥来加密存储帐户中的数据。
要将托管应用程序发布到服务目录,请执行以下任务:
- 根据本文中的示例创建 creatUIDefinition.json 文件。 模板在部署托管应用程序时定义门户的用户界面元素。
- 通过将本文中的 Bicep 文件转换为 JSON,创建名为 mainTemplate.json 的 Azure 资源管理器模板。 该模板定义要与托管应用程序一起部署的资源。
- 创建包含所需 JSON 文件的 .zip 包:createUiDefinition.json 和 mainTemplate.json。
- 发布托管应用程序定义,使其在服务目录中可用。 有关详细信息,请转到快速入门:创建和发布 Azure 托管应用程序定义。
创建模板 createUiDefinition.json
以下模板为托管应用程序创建用户分配的托管标识。 在此示例中,将禁用系统分配的托管标识,因为需要提前使用密钥保管库托管标识的托管标识操作员权限来配置用户分配的托管标识。
- 在 Visual Studio Code 中创建名为 creatUIDefinition.json 的新文件。
- 将以下代码复制并粘贴到该文件中。
- 保存文件。
{
  "$schema": "https://schema.management.azure.com/schemas/0.1.2-preview/CreateUIDefinition.MultiVm.json#",
  "handler": "Microsoft.Azure.CreateUIDef",
  "version": "0.1.2-preview",
  "parameters": {
    "basics": [],
    "steps": [
      {
        "name": "managedApplicationSetting",
        "label": "Application Settings",
        "subLabel": {
          "preValidation": "Configure your application settings and Managed Identity for the application",
          "postValidation": "Done"
        },
        "bladeTitle": "Application Settings - Config",
        "elements": [
          {
            "name": "appIdentity",
            "type": "Microsoft.ManagedIdentity.IdentitySelector",
            "label": "Managed Identity Configuration for the Application (Needs Managed Identity Operator permissions over KV Managed Identity).",
            "toolTip": {
              "systemAssignedIdentity": "Enable system assigned identity to grant the managed application access to additional existing resources.",
              "userAssignedIdentity": "Add user assigned identities to grant the managed application access to additional existing resources."
            },
            "defaultValue": {
              "systemAssignedIdentity": "Off"
            },
            "options": {
              "hideSystemAssignedIdentity": true,
              "hideUserAssignedIdentity": false,
              "readOnlySystemAssignedIdentity": true
            },
            "visible": true
          }
        ]
      },
      {
        "name": "configuration",
        "type": "Microsoft.Common.Section",
        "label": "Configuration",
        "elements": [
          {
            "name": "cmek",
            "type": "Microsoft.Common.Section",
            "label": "Customer Managed Encryption Key (CMEK)",
            "elements": [
              {
                "name": "cmekEnable",
                "type": "Microsoft.Common.CheckBox",
                "label": "Enable CMEK",
                "toolTip": "Enable to provide a CMEK",
                "constraints": {
                  "required": false
                }
              },
              {
                "name": "cmekKeyVaultUrl",
                "type": "Microsoft.Common.TextBox",
                "label": "Key Vault URL",
                "toolTip": "Specify the CMEK Key Vault URL",
                "defaultValue": "",
                "constraints": {
                  "required": "[steps('configuration').cmek.cmekEnable]",
                  "regex": ".*",
                  "validationMessage": "The value must not be empty."
                },
                "visible": "[steps('configuration').cmek.cmekEnable]"
              },
              {
                "name": "cmekKeyName",
                "type": "Microsoft.Common.TextBox",
                "label": "Key Name",
                "toolTip": "Specify the key name from your key vault.",
                "defaultValue": "",
                "constraints": {
                  "required": "[steps('configuration').cmek.cmekEnable]",
                  "regex": ".*",
                  "validationMessage": "The value must not be empty."
                },
                "visible": "[steps('configuration').cmek.cmekEnable]"
              },
              {
                "name": "cmekKeyIdentity",
                "type": "Microsoft.ManagedIdentity.IdentitySelector",
                "label": "Managed Identity Configuration for Key Vault Access",
                "toolTip": {
                  "systemAssignedIdentity": "Enable system assigned identity to grant the managed application access to additional existing resources.",
                  "userAssignedIdentity": "Add user assigned identities to grant the managed application access to additional existing resources."
                },
                "defaultValue": {
                  "systemAssignedIdentity": "Off"
                },
                "options": {
                  "hideSystemAssignedIdentity": true,
                  "hideUserAssignedIdentity": false,
                  "readOnlySystemAssignedIdentity": true
                },
                "visible": "[steps('configuration').cmek.cmekEnable]"
              }
            ],
            "visible": true
          }
        ]
      }
    ],
    "outputs": {
      "location": "[location()]",
      "managedIdentity": "[steps('managedApplicationSetting').appIdentity]",
      "cmekConfig": {
        "kvUrl": "[if(empty(steps('configuration').cmek.cmekKeyVaultUrl), '', steps('configuration').cmek.cmekKeyVaultUrl)]",
        "keyName": "[if(empty(steps('configuration').cmek.cmekKeyName), '', steps('configuration').cmek.cmekKeyName)]",
        "identityId": "[if(empty(steps('configuration').cmek.cmekKeyIdentity), '', steps('configuration').cmek.cmekKeyIdentity)]"
      }
    }
  }
}
创建模板 mainTemplate.json
以下 Bicep 文件是 mainTemplate.json 的源代码。 该模板使用 createUiDefinition.json 文件中定义的用户分配的托管标识。
- 在名为 mainTemplate.bicep 的 Visual Studio Code 中创建一个新文件。
- 将以下代码复制并粘贴到该文件中。
- 保存文件。
param cmekConfig object = {
  kvUrl: ''
  keyName: ''
  identityId: {}
}
@description('Specify the Azure region to place the application definition.')
param location string = resourceGroup().location
/////////////////////////////////
// Common Resources Configuration
/////////////////////////////////
var commonproperties = {
  name: 'cmekdemo'
  displayName: 'Common Resources'
  storage: {
    sku: 'Standard_LRS'
    kind: 'StorageV2'
    accessTier: 'Hot'
    minimumTlsVersion: 'TLS1_2'

  }
}
var identity = items(cmekConfig.identityId.userAssignedIdentities)[0].key

resource storage 'Microsoft.Storage/storageAccounts@2022-05-01' = {
  name: '${commonproperties.name}${uniqueString(resourceGroup().id)}'
  location: location
  sku: {
    name: commonproperties.storage.sku
  }
  kind: commonproperties.storage.kind
  identity: cmekConfig.identityId
  properties: {
    accessTier: commonproperties.storage.accessTier
    minimumTlsVersion: commonproperties.storage.minimumTlsVersion
    encryption: {
      identity: {
        userAssignedIdentity: identity
      }
      services: {
        blob: {
          enabled: true
        }
        table: {
          enabled: true
        }
        file: {
          enabled: true
        }
      }
      keySource: 'Microsoft.Keyvault'
      keyvaultproperties: {
        keyname: '${cmekConfig.keyName}'
        keyvaulturi: '${cmekConfig.kvUrl}'
      }
    }
  }
}
使用 PowerShell 或 Azure CLI 生成 mainTemplate.json 文件。 转到用于保存 Bicep 文件的目录,然后运行 build 命令。
bicep build mainTemplate.bicep
将 Bicep 文件转换为 JSON 后,mainTemplate.json 文件应与以下示例一致。 但 metadata 属性中的 version 和 templateHash 值可能不同。
{
  "$schema": "https://schema.management.azure.com/schemas/2019-04-01/deploymentTemplate.json#",
  "contentVersion": "1.0.0.0",
  "metadata": {
    "_generator": {
      "name": "bicep",
      "version": "0.16.2.56959",
      "templateHash": "1234567891234567890"
    }
  },
  "parameters": {
    "cmekConfig": {
      "type": "object",
      "defaultValue": {
        "kvUrl": "",
        "keyName": "",
        "identityId": {}
      }
    },
    "location": {
      "type": "string",
      "defaultValue": "[resourceGroup().location]",
      "metadata": {
        "description": "Specify the Azure region to place the application definition."
      }
    }
  },
  "variables": {
    "commonproperties": {
      "name": "cmekdemo",
      "displayName": "Common Resources",
      "storage": {
        "sku": "Standard_LRS",
        "kind": "StorageV2",
        "accessTier": "Hot",
        "minimumTlsVersion": "TLS1_2"
      }
    },
    "identity": "[items(parameters('cmekConfig').identityId.userAssignedIdentities)[0].key]"
  },
  "resources": [
    {
      "type": "Microsoft.Storage/storageAccounts",
      "apiVersion": "2022-05-01",
      "name": "[format('{0}{1}', variables('commonproperties').name, uniqueString(resourceGroup().id))]",
      "location": "[parameters('location')]",
      "sku": {
        "name": "[variables('commonproperties').storage.sku]"
      },
      "kind": "[variables('commonproperties').storage.kind]",
      "identity": "[parameters('cmekConfig').identityId]",
      "properties": {
        "accessTier": "[variables('commonproperties').storage.accessTier]",
        "minimumTlsVersion": "[variables('commonproperties').storage.minimumTlsVersion]",
        "encryption": {
          "identity": {
            "userAssignedIdentity": "[variables('identity')]"
          },
          "services": {
            "blob": {
              "enabled": true
            },
            "table": {
              "enabled": true
            },
            "file": {
              "enabled": true
            }
          },
          "keySource": "Microsoft.Keyvault",
          "keyvaultproperties": {
            "keyname": "[format('{0}', parameters('cmekConfig').keyName)]",
            "keyvaulturi": "[format('{0}', parameters('cmekConfig').kvUrl)]"
          }
        }
      }
    }
  ]
}
部署托管应用程序
创建服务目录定义后,可以部署托管应用程序。 有关详细信息,请转到快速入门:部署服务目录托管应用程序。
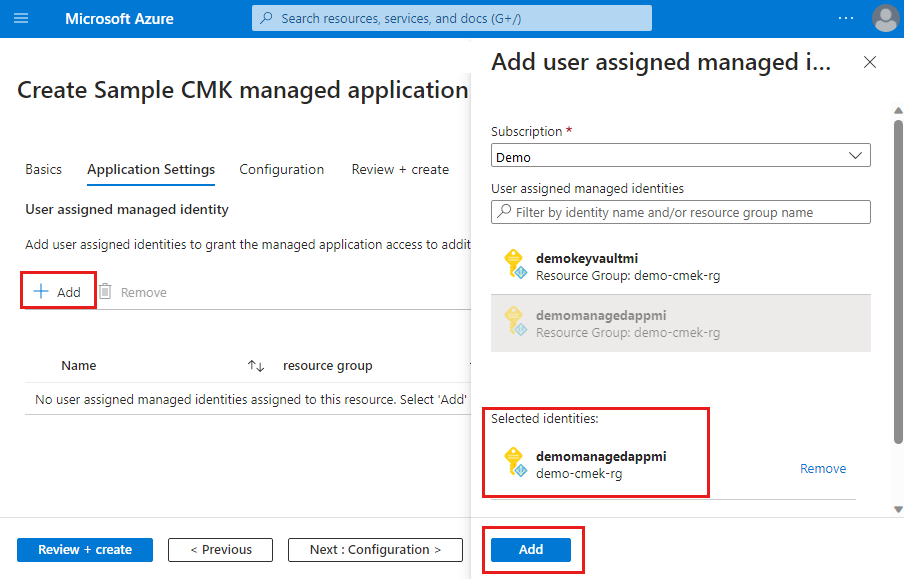
在部署期间,使用用户分配的托管标识、密钥保管库名称、密钥保管库 URL、密钥保管库的密钥名称。 createUiDefinition.json 文件会创建用户界面。
例如,在门户部署中,在“应用程序设置”选项卡上,添加 demomanagedappmi。
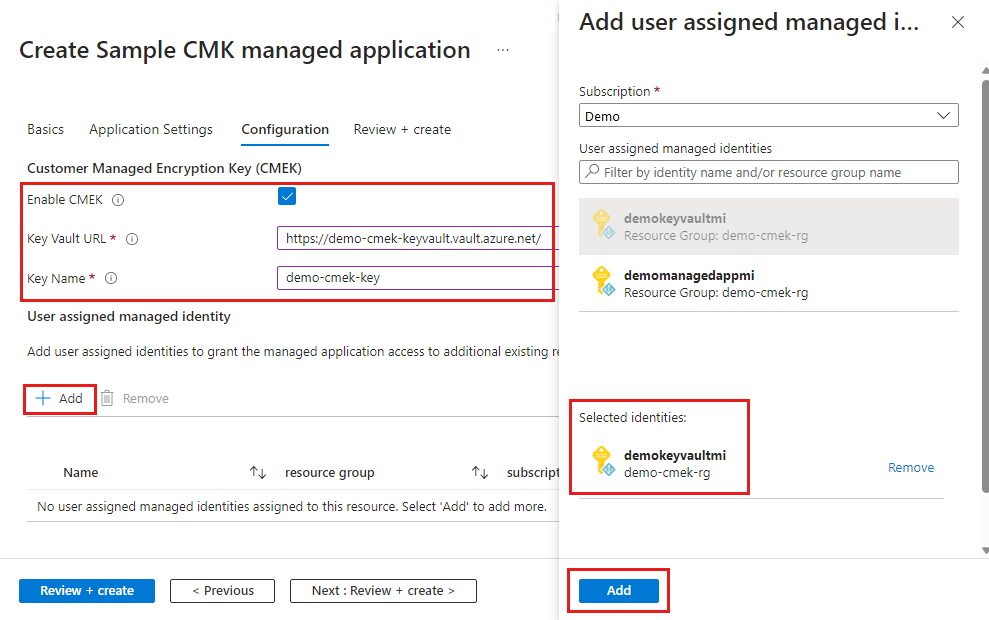
在“配置”选项卡上,启用客户管理的密钥,并为密钥保管库添加用户分配的托管标识 demokeyvaultmi。 还可以指定密钥保管库的 URL 和创建的密钥保管库的密钥名称。
验证部署
部署完成后,可以验证托管应用程序的标识分配。 用户分配的托管标识 demomanagedappmi 将分配给托管应用程序。
- 转到用于部署托管应用程序的资源组。
- 在“设置”“标识”下,选择“用户分配(预览)”。
还可以验证托管应用程序部署的存储帐户。 “加密”选项卡会显示密钥 demo-cmek-key 以及用户分配的托管标识的资源 ID。
- 转到用于部署托管应用程序的存储帐户的受管理资源组。
- 在“安全 + 网络”下,选择“加密”。