适用对象:![]() MongoDB
MongoDB
Azure Cosmos DB 是一种多模型数据库服务,可让你通过多区域分布和水平缩放功能快速创建和查询文档、表、键/值和图数据库。 本文中展示的示例是一个简单的基于命令行的应用程序,它使用 MongoDB Rust 驱动程序。 由于 Azure Cosmos DB MongoDB API 与 MongoDB Wire Protocol 兼容,因此任何 MongoDB 客户端驱动程序都可以与其连接。
你将了解如何通过探索示例代码中实现的 CRUD(创建、读取、更新、删除)操作来使用 MongoDB Rust 驱动程序与 Azure Cosmos DB MongoDB API 进行交互。 最后,你可以在本地运行应用程序,以查看实际运行效果。
必备条件
具有活动订阅的 Azure 帐户。 创建试用版订阅。 你还可以将 Azure Cosmos DB 模拟器与连接字符串
.mongodb://localhost:C2y6yDjf5/R+ob0N8A7Cgv30VRDJIWEHLM+4QDU5DE2nQ9nDuVTqobD4b8mGGyPMbIZnqyMsEcaGQy67XIw/Jw==@localhost:10255/admin?ssl=true配合使用。Rust(1.39 或更高版本)
设置 Azure Cosmos DB
若要设置 Azure Cosmos DB 帐户,请按照此处的说明进行操作。 应用程序将需要 MongoDB 连接字符串,你可以使用 Azure 门户提取该字符串。 如需了解详情,请参阅获取 MongoDB 连接字符串进行自定义。
运行应用程序
克隆示例应用程序
运行以下命令克隆示例存储库。
打开命令提示符,新建一个名为
git-samples的文件夹,然后关闭命令提示符。mkdir "C:\git-samples"打开诸如 git bash 之类的 git 终端窗口,并使用
cd命令更改为要安装示例应用的新文件夹。cd "C:\git-samples"运行下列命令,克隆示例存储库。 此命令在计算机上创建示例应用程序的副本。
git clone https://github.com/Azure-Samples/cosmosdb-rust-mongodb-quickstart
生成应用程序
生成二进制文件:
cargo build --release
配置应用程序
将连接字符串、MongoDB 数据库和集合名称导出为环境变量。
export MONGODB_URL="mongodb://<COSMOSDB_ACCOUNT_NAME>:<COSMOSDB_PASSWORD>@<COSMOSDB_ACCOUNT_NAME>.mongo.cosmos.azure.cn:10255/?ssl=true&replicaSet=globaldb&maxIdleTimeMS=120000&appName=@<COSMOSDB_ACCOUNT_NAME>@"
注意
由于 Cosmos DB 的要求,ssl=true 选项很重要。 有关详细信息,请参阅连接字符串要求。
对于 MONGODB_URL 环境变量,请替换 <COSMOSDB_ACCOUNT_NAME> 和 <COSMOSDB_PASSWORD> 的占位符
<COSMOSDB_ACCOUNT_NAME>:创建的 Azure Cosmos DB 帐户的名称<COSMOSDB_PASSWORD>:上一步中提取的数据库密钥
export MONGODB_DATABASE=todos_db
export MONGODB_COLLECTION=todos
可以为 MONGODB_DATABASE 和 MONGODB_COLLECTION 选择首选值,也可以将其保留原样。
若要运行应用程序,请切换到正确的文件夹(应用程序二进制文件所在文件夹):
cd target/release
创建一个 todo
./todo create "Create an Azure Cosmos DB database account"
如果成功,则会看到一个输出,其中包含新建文档的 MongoDB _id:
inserted todo with id = ObjectId("5ffd1ca3004cc935004a0959")
再创建一个 todo
./todo create "Get the MongoDB connection string using the Azure CLI"
列出所有 todo
./todo list all
你应该会看到刚才添加的内容:
todo_id: 5ffd1ca3004cc935004a0959 | description: Create an Azure Cosmos DB database account | status: pending
todo_id: 5ffd1cbe003bcec40022c81c | description: Get the MongoDB connection string using the Azure CLI | status: pending
若要更新 todo 的状态(例如,将其更改为 completed 状态),请使用 todo ID,如下所示:
./todo update 5ffd1ca3004cc935004a0959 completed

#output
updating todo_id 5ffd1ca3004cc935004a0959 status to completed
updated status for todo id 5ffd1ca3004cc935004a0959
仅列出已完成的 todo
./todo list completed
应该会看到刚刚更新的那一项
listing 'completed' todos

todo_id: 5ffd1ca3004cc935004a0959 | description: Create an Azure Cosmos DB database account | status: completed
使用 ID 删除 todo
./todo delete 5ffd1ca3004cc935004a0959
列出要确认的 todo
./todo list all
刚刚删除的 todo 不应出现。
在数据资源管理器中查看数据
Azure Cosmos DB 中存储的数据可用于在 Azure 门户中查看和查询。
若要查看、查询和处理在上一步骤中创建的用户数据,请在 Web 浏览器中登录到 Azure 门户。
在顶部搜索框中,输入 Azure Cosmos DB。 打开 Cosmos 帐户边栏选项卡后,请选择 Cosmos 帐户。 在左侧导航栏中,选择“数据资源管理器”。 在“集合”窗格中展开你的集合,即可查看该集合中的文档,查询数据,甚至可以创建和运行存储过程、触发器与 UDF。
查看代码(可选)
如果有意了解应用程序的工作原理,可以查看本部分中的以下代码片段。 以下代码片段摘自 src/main.rs 文件。
main 函数是 todo 应用程序的入口点。 它希望 Azure Cosmos DB MongoDB API 的连接 URL 由 MONGODB_URL 环境变量提供。 将创建 TodoManager 的新实例,后跟 match 表达式,它基于用户选择的操作(create、update、list 或 delete)委托给适当的 TodoManager 方法。
fn main() {
    let conn_string = std::env::var_os("MONGODB_URL").expect("missing environment variable MONGODB_URL").to_str().expect("failed to get MONGODB_URL").to_owned();
    let todos_db_name = std::env::var_os("MONGODB_DATABASE").expect("missing environment variable MONGODB_DATABASE").to_str().expect("failed to get MONGODB_DATABASE").to_owned();
    let todos_collection_name = std::env::var_os("MONGODB_COLLECTION").expect("missing environment variable MONGODB_COLLECTION").to_str().expect("failed to get MONGODB_COLLECTION").to_owned();

    let tm = TodoManager::new(conn_string,todos_db_name.as_str(), todos_collection_name.as_str());

    let ops: Vec<String> = std::env::args().collect();
    let op = ops[1].as_str();

    match op {
        CREATE_OPERATION_NAME => tm.add_todo(ops[2].as_str()),
        LIST_OPERATION_NAME => tm.list_todos(ops[2].as_str()),
        UPDATE_OPERATION_NAME => tm.update_todo_status(ops[2].as_str(), ops[3].as_str()),
        DELETE_OPERATION_NAME => tm.delete_todo(ops[2].as_str()),
        _ => panic!(INVALID_OP_ERR_MSG)
    }
}
TodoManager 是封装 mongodb::sync::Collection 的 struct。 尝试使用 new 函数实例化 TodoManager 时,它会建立与 Azure Cosmos DB MongoDB API 的连接。
struct TodoManager {
    coll: Collection
}
....
impl TodoManager{
    fn new(conn_string: String, db_name: &str, coll_name: &str) -> Self{
        let mongo_client = Client::with_uri_str(&*conn_string).expect("failed to create client");
        let todo_coll = mongo_client.database(db_name).collection(coll_name);

        TodoManager{coll: todo_coll}
    }
....
最重要的是,TodoManager 提供有助于管理 todo 的方法。 让我们逐个进行配置。
add_todo 方法采用用户提供的 todo 说明,并创建 Todo 结构的实例,如下所示。 serde 框架用于将 BSON 数据映射(序列化/反序列化)到 Todo 结构的实例。 注意 serde 字段属性是如何用于自定义序列化/反序列化过程的。 例如,todo_id 字段在 Todo struct 中是 ObjectId,它在 MongoDB 中存储为 _id。
#[derive(Serialize, Deserialize)]
struct Todo {
    #[serde(rename = "_id", skip_serializing_if = "Option::is_none")]
    todo_id: Option<bson::oid::ObjectId>,
    #[serde(rename = "description")]
    desc: String,
    status: String,
}
Collection.insert_one 接受表示要添加的 todo 详细信息的 Document。 注意,从 Todo 到 Document 的转换过程分为两个步骤,通过组合使用 to_bson 和 as_document 来实现。
fn add_todo(self, desc: &str) {
    let new_todo = Todo {
        todo_id: None,
        desc: String::from(desc),
        status: String::from(TODO_PENDING_STATUS),
    };

    let todo_doc = mongodb::bson::to_bson(&new_todo).expect("struct to BSON conversion failed").as_document().expect("BSON to Document conversion failed").to_owned();

    let r = self.coll.insert_one(todo_doc, None).expect("failed to add todo");
    println!("inserted todo with id = {}", r.inserted_id);
}
Collection.find 用于检索所有 todo,或者根据用户提供的状态(pending 或 completed)对其进行筛选。 注意在 while 循环中,每个作为搜索结果获得的 Document 都是如何通过 bson::from_bson 转换为 Todo 结构的。 这与 add_todo 方法中的操作相反。
fn list_todos(self, status_filter: &str) {
    let mut filter = doc!{};
    if status_filter == TODO_PENDING_STATUS ||  status_filter == TODO_COMPLETED_STATUS{
        println!("listing '{}' todos",status_filter);
        filter = doc!{"status": status_filter}
    } else if status_filter != "all" {
        panic!(INVALID_FILTER_ERR_MSG)
    }

    let mut todos = self.coll.find(filter, None).expect("failed to find todos");

    while let Some(result) = todos.next() {
        let todo_doc = result.expect("todo not present");
        let todo: Todo = bson::from_bson(Bson::Document(todo_doc)).expect("BSON to struct conversion failed");
        println!("todo_id: {} | description: {} | status: {}", todo.todo_id.expect("todo id missing"), todo.desc, todo.status);
    }
}
todo 状态可以进行更新(从 pending 更新到 completed 或相反)。 todo 转换为 bson::oid::ObjectId,然后 Collection.update_one 用其查找需要更新的文档。
fn update_todo_status(self, todo_id: &str, status: &str) {

    if status != TODO_COMPLETED_STATUS && status != TODO_PENDING_STATUS {
        panic!(INVALID_FILTER_ERR_MSG)
    }

    println!("updating todo_id {} status to {}", todo_id, status);

    let id_filter = doc! {"_id": bson::oid::ObjectId::with_string(todo_id).expect("todo_id is not valid ObjectID")};

    let r = self.coll.update_one(id_filter, doc! {"$set": { "status": status }}, None).expect("update failed");
    if r.modified_count == 1 {
        println!("updated status for todo id {}",todo_id);
    } else if r.matched_count == 0 {
        println!("could not update. check todo id {}",todo_id);
    }
}
使用 Collection.delete_one 方法删除 todo 非常简单。
fn delete_todo(self, todo_id: &str) {
    println!("deleting todo {}", todo_id);

    let id_filter = doc! {"_id": bson::oid::ObjectId::with_string(todo_id).expect("todo_id is not valid ObjectID")};

    self.coll.delete_one(id_filter, None).expect("delete failed").deleted_count;
}
清理资源
执行完应用和 Azure Cosmos DB 帐户的操作以后,可以删除所创建的 Azure 资源,以免产生更多费用。 若要删除资源,请执行以下操作:
在 Azure 门户的“搜索”栏中,搜索并选择“资源组”。
从列表中选择为本快速入门创建的资源组。
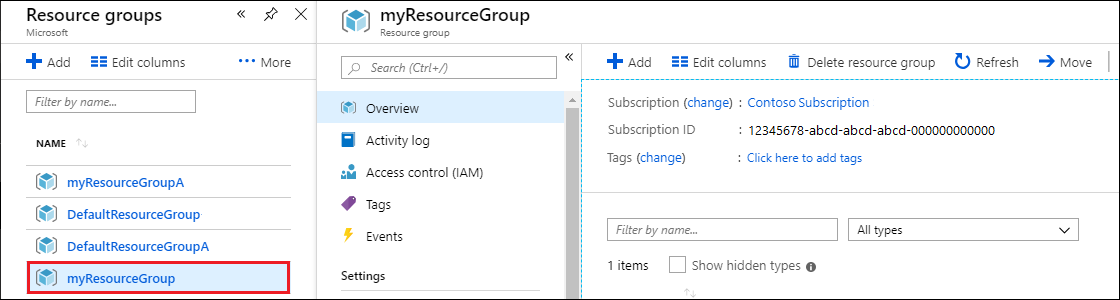
在资源组“概览”页上,选择“删除资源组”。
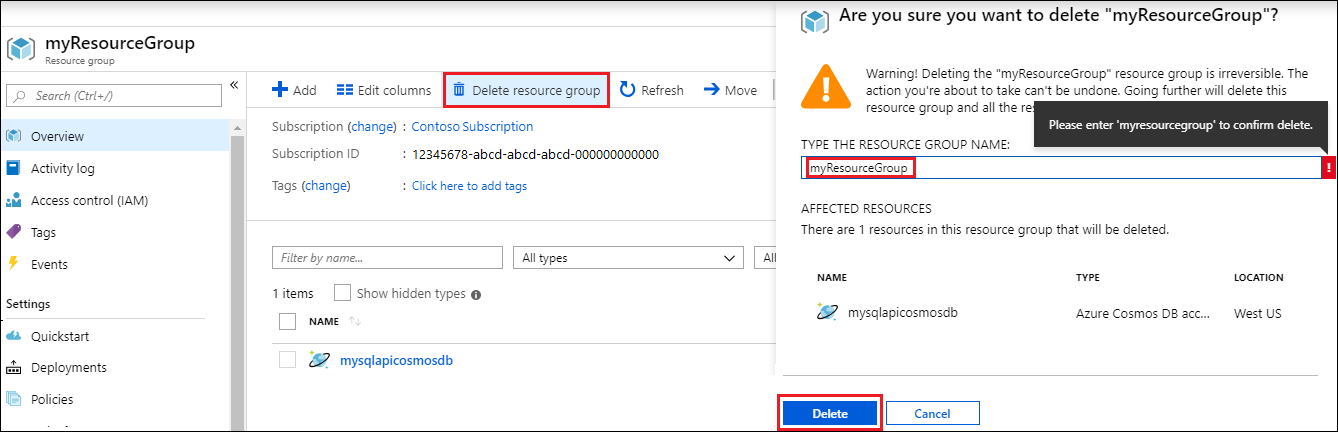
在下一窗口中输入要删除的资源组的名称,然后选择“删除”。
后续步骤
在本快速入门中,你已了解了如何使用 Azure 本地 Shell 创建 Azure Cosmos DB MongoDB API 帐户,以及如何创建和运行 Rust 命令行应用以管理 todo。 现在可以将其他数据导入 Azure Cosmos DB 帐户了。
尝试为迁移到 Azure Cosmos DB 进行容量规划? 可以使用有关现有数据库群集的信息进行容量规划。
- 如果只知道现有数据库群集中的 vCore 和服务器数量,请阅读使用 vCore 或 vCPU 估算请求单位
- 若知道当前数据库工作负载的典型请求速率,请阅读使用 Azure Cosmos DB 容量计划工具估算请求单位