适用对象:
![]() Mongodb
Mongodb
重要
你是否正在寻找一种数据库解决方案,以应对需要高扩展性、99.999% 可用性服务级别协议(SLA)、即时自动扩展和跨多个区域的自动故障转移的场景? 请考虑使用 Azure Cosmos DB for NoSQL。
本教程包含多个部分,演示了如何通过 Express 和 Angular 创建以 Node.js 编写的新应用,然后将其连接到使用 Azure Cosmos DB 的 API for MongoDB 配置的 Azure Cosmos DB 帐户。
本教程的第 3 部分基于第 2 部分,涵盖以下任务:
- 生成 Angular UI
- 使用 CSS 设置外观
- 在本地测试应用
先决条件
开始教程的此部分之前,请确保已完成教程第 2 部分的步骤。
小窍门
本教程介绍生成应用程序的各个步骤。 若要下载完成的项目,可从 GitHub 上的 angular-cosmosdb 存储库获取完成的应用程序。
生成 UI
在 Visual Studio Code 中,单击“停止”按钮
 以停止 Node 应用。
在 Windows 命令提示符或 Mac Terminal 窗口中输入以下命令,生成 heroes 组件。 在此代码中,g=generate(生成),c=component(组件),heroes=组件名称,并且由于使用的是平面文件结构 (--flat),因此没有为其创建子文件夹。
ng g c heroes --flatTerminal 窗口显示新组件的确认信息。
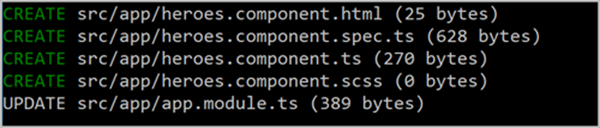
请看看已创建和更新的文件。
在 Visual Studio Code 的“资源管理器”窗格中,导航到新的 src\app 文件夹并打开在应用文件夹内生成的新 heroes.component.ts 文件。 此 TypeScript 组件文件是上一命令创建的。
小窍门
如果应用文件夹没有显示在 Visual Studio Code 中,请在 Mac 中输入 CMD + SHIFT P 或在 Windows 中输入 Ctrl + Shift + P 以打开命令面板,然后键入“Reload Window”以获取系统更改。
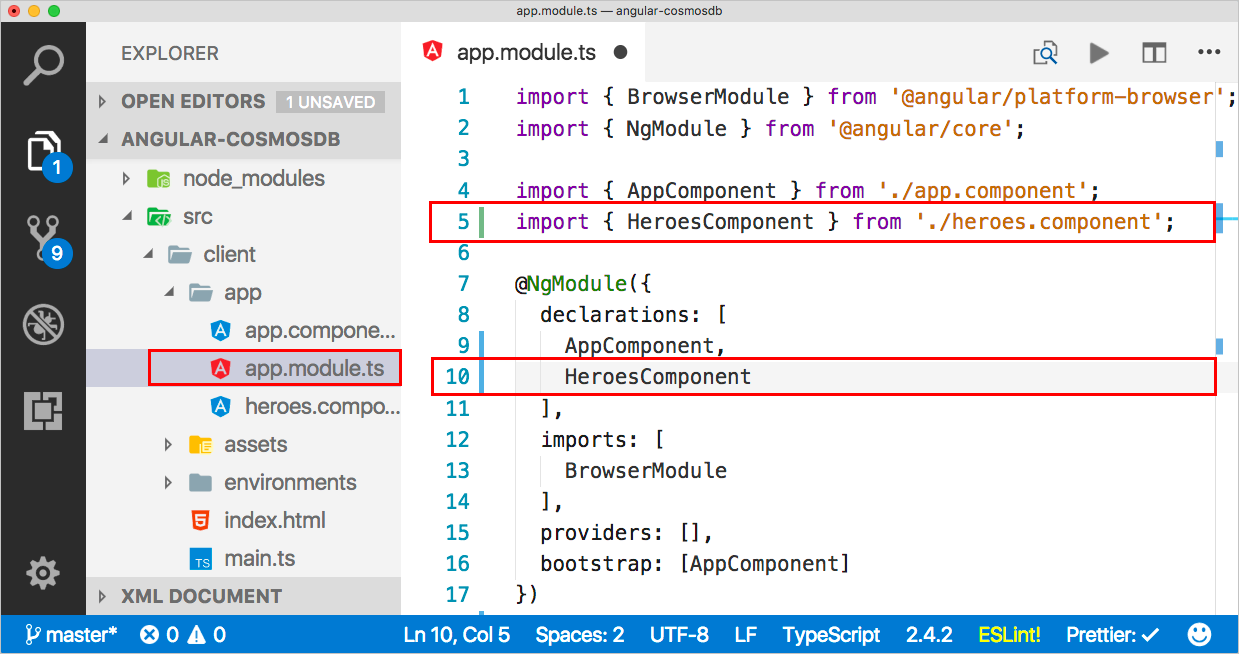
在同一文件夹中打开 app.module.ts 文件。请注意,该文件在第 5 行向声明添加了 ,并在第 10 行对其进行了导入操作。
返回到 heroes.component.html 文件,将此代码复制到其中。
<div>是整个页面的容器。 在容器内部有一个我们需要创建的英雄列表,以便在 UI 中点击其中一位英雄时,可以选择、编辑或删除它。 然后在 HTML 中,我们可以通过某些样式来识别哪个被选中了。 此外还有编辑区域,用于添加新的 hero 或编辑现有的 hero。<div> <ul class="heroes"> <li *ngFor="let hero of heroes" (click)="onSelect(hero)" [class.selected]="hero === selectedHero"> <button class="delete-button" (click)="deleteHero(hero)">Delete</button> <div class="hero-element"> <div class="badge">{{hero.id}}</div> <div class="name">{{hero.name}}</div> <div class="saying">{{hero.saying}}</div> </div> </li> </ul> <div class="editarea"> <button (click)="enableAddMode()">Add New Hero</button> <div *ngIf="selectedHero"> <div class="editfields"> <div> <label>id: </label> <input [(ngModel)]="selectedHero.id" placeholder="id" *ngIf="addingHero" /> <label *ngIf="!addingHero" class="value">{{selectedHero.id}}</label> </div> <div> <label>name: </label> <input [(ngModel)]="selectedHero.name" placeholder="name" /> </div> <div> <label>saying: </label> <input [(ngModel)]="selectedHero.saying" placeholder="saying" /> </div> </div> <button (click)="cancel()">Cancel</button> <button (click)="save()">Save</button> </div> </div> </div>准备好 HTML 之后,需将其添加到 heroes.component.ts 文件,然后才能与模板交互。 以下代码将模板添加到组件文件中。 已添加了一个构造函数,该函数用于获取某些英雄,并初始化英雄服务组件,以检索所有数据。 此代码还添加了所有必需的方法,用于在 UI 中处理事件。 可以复制以下代码,覆盖 heroes.component.ts 中的现有代码。 应在 Hero 和 HeroService 区域中发现错误,因为相应的组件尚未导入,将在下一部分中解决这些错误。
import { Component, OnInit } from '@angular/core';

@Component({
  selector: 'app-heroes',
  templateUrl: './heroes.component.html',
  styleUrls: ['./heroes.component.scss']
})
export class HeroesComponent implements OnInit {
  addingHero = false;
  heroes: any = [];
  selectedHero: Hero;

  constructor(private heroService: HeroService) {}

  ngOnInit() {
   this.getHeroes();
  }

  cancel() {
    this.addingHero = false;
    this.selectedHero = null;
  }

  deleteHero(hero: Hero) {
    this.heroService.deleteHero(hero).subscribe(res => {
      this.heroes = this.heroes.filter(h => h !== hero);
      if (this.selectedHero === hero) {
        this.selectedHero = null;
      }
    });
  }

  getHeroes() {
    return this.heroService.getHeroes().subscribe(heroes => {
      this.heroes = heroes;
    });
  }

  enableAddMode() {
    this.addingHero = true;
    this.selectedHero = new Hero();
  }

  onSelect(hero: Hero) {
    this.addingHero = false;
    this.selectedHero = hero;
  }

  save() {
    if (this.addingHero) {
      this.heroService.addHero(this.selectedHero).subscribe(hero => {
        this.addingHero = false;
        this.selectedHero = null;
        this.heroes.push(hero);
      });
    } else {
      this.heroService.updateHero(this.selectedHero).subscribe(hero => {
        this.addingHero = false;
        this.selectedHero = null;
      });
    }
  }
}
在资源管理器中打开 app/app.module.ts 文件,更新导入部分以添加 的导入。 导入部分现在应该如下所示:
imports: [
  BrowserModule,
  FormsModule
],
在 app/app.module.ts 文件的第 3 行中,为新的 FormsModule 模块添加导入。
import { BrowserModule } from '@angular/platform-browser';
import { NgModule } from '@angular/core';
import { FormsModule } from '@angular/forms';
使用 CSS 设置外观
在“资源管理器”窗格中,打开 src/styles.scss 文件。
将以下代码复制到 styles.scss 文件中,替换文件的现有内容。
/* You can add global styles to this file, and also import other style files */

* {
  font-family: Arial;
}
h2 {
  color: #444;
  font-weight: lighter;
}
body {
  margin: 2em;
}

body,
input[text],
button {
  color: #888;
  // font-family: Cambria, Georgia;
}
button {
  font-size: 14px;
  font-family: Arial;
  background-color: #eee;
  border: none;
  padding: 5px 10px;
  border-radius: 4px;
  cursor: pointer;
  cursor: hand;
  &:hover {
    background-color: #cfd8dc;
  }
  &.delete-button {
    float: right;
    background-color: gray !important;
    background-color: rgb(216, 59, 1) !important;
    color: white;
    padding: 4px;
    position: relative;
    font-size: 12px;
  }
}
div {
  margin: .1em;
}

.selected {
  background-color: #cfd8dc !important;
  background-color: rgb(0, 120, 215) !important;
  color: white;
}

.heroes {
  float: left;
  margin: 0 0 2em 0;
  list-style-type: none;
  padding: 0;
  li {
    cursor: pointer;
    position: relative;
    left: 0;
    background-color: #eee;
    margin: .5em;
    padding: .5em;
    height: 3.0em;
    border-radius: 4px;
    width: 17em;
    &:hover {
      color: #607d8b;
      color: rgb(0, 120, 215);
      background-color: #ddd;
      left: .1em;
    }
    &.selected:hover {
      /*background-color: #BBD8DC !important;*/
      color: white;
    }
  }
  .text {
    position: relative;
    top: -3px;
  }
  .saying {
    margin: 5px 0;
  }
  .name {
    font-weight: bold;
  }
  .badge {
    /* display: inline-block; */
    float: left;
    font-size: small;
    color: white;
    padding: 0.7em 0.7em 0 0.5em;
    background-color: #607d8b;
    background-color: rgb(0, 120, 215);
    background-color:rgb(134, 183, 221);
    line-height: 1em;
    position: relative;
    left: -1px;
    top: -4px;
    height: 3.0em;
    margin-right: .8em;
    border-radius: 4px 0 0 4px;
    width: 1.2em;
  }
}

.header-bar {
  background-color: rgb(0, 120, 215);
  height: 4px;
  margin-top: 10px;
  margin-bottom: 10px;
}

label {
  display: inline-block;
  width: 4em;
  margin: .5em 0;
  color: #888;
  &.value {
    margin-left: 10px;
    font-size: 14px;
  }
}

input {
  height: 2em;
  font-size: 1em;
  padding-left: .4em;
  &::placeholder {
      color: lightgray;
      font-weight: normal;
      font-size: 12px;
      letter-spacing: 3px;
  }
}

.editarea {
  float: left;
  input {
    margin: 4px;
    height: 20px;
    color: rgb(0, 120, 215);
  }
  button {
    margin: 8px;
  }
  .editfields {
    margin-left: 12px;
  }
}
保存文件。
显示组件
有了组件以后,如何让其显示在屏幕上? 请修改 app.component.ts 中的默认组件。
在“资源管理器”窗格中,打开 /app/app.component.ts,将标题更改为 Heroes,然后将已创建组件的名称置于 heroes.components.ts (app-heroes) 中,以便引用该新组件。 文件的内容现在应如下所示:
import { Component } from '@angular/core';

@Component({
  selector: 'app-root',
  templateUrl: './app.component.html',
  styleUrls: ['./app.component.scss'],
  template: `
  <h1>Heroes</h1>
  <div class="header-bar"></div>
  <app-heroes></app-heroes>
`
})
export class AppComponent {
  title = 'app';
}
heroes.components.ts 中有其他需要引用的组件(类似于 Hero 组件),因此还需创建此类组件。 在 Angular CLI 命令提示符中,使用以下命令创建一个 hero 模型和一个名为 hero.ts 的文件,其中,g=generate(生成),cl=class(类),hero=类名。
ng g cl hero在“资源管理器”窗格中,打开src\app\hero.ts。 在 hero.ts 中,将文件的内容替换为以下代码,以便添加带 ID、name 和 saying 的 Hero 类。
export class Hero { id: number; name: string; saying: string; }回到heroes.components.ts,注意在第10行(
selectedHero: Hero;行)下方,Hero有一条红色下划线。左键单击
Hero一词,Visual Studio 会在代码块左侧显示一个灯泡图标。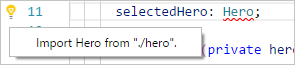
单击灯泡,然后单击“从‘/app/hero’导入 Hero”或“从‘./hero’导入 Hero”(消息会根据你的设置而更改)
此时会在第 2 行出现新的代码行。 如果第 2 行引用 /app/hero,请对其进行修改,使之引用本地文件夹中的 hero 文件 (./hero)。 第 2 行应如下所示:
import { Hero } from "./hero";模型已处理完毕,但我们仍需创建服务。
创建服务
在 Angular CLI 命令提示符中输入以下命令,以便在 app.module.ts 中创建 hero 服务,其中,g=generate(生成),s=service(服务),hero=服务名称,-m=置于 app.module 中。
ng g s hero -m app.module在 Visual Studio Code 中返回到 heroes.components.ts。 请注意,
constructor(private heroService: HeroService) {}行(第 13 行)的HeroService下方有一条红线。 单击HeroService,此时会在代码块左侧出现灯泡。 单击灯泡,然后单击“Import HeroService from './hero.service'”或“Import HeroService from '/app/hero.service'”。单击灯泡会在第 2 行中插入新的代码行。 如果第 2 行引用 /app/hero.service 文件夹,请对其进行修改,使之引用本地文件夹中的 hero 文件 (./hero.service)。 第 2 行应如下所示:
import { HeroService } from "./hero.service"在 Visual Studio Code 中打开 hero.service.ts,将以下代码复制到其中,替换文件的内容。
import { Injectable } from '@angular/core';
import { HttpClient } from '@angular/common/http';

import { Hero } from './hero';

const api = '/api';

@Injectable()
export class HeroService {
  constructor(private http: HttpClient) {}

  getHeroes() {
    return this.http.get<Array<Hero>>(`${api}/heroes`)
  }

  deleteHero(hero: Hero) {
    return this.http.delete(`${api}/hero/${hero.id}`);
  }

  addHero(hero: Hero) {
    return this.http.post<Hero>(`${api}/hero/`, hero);
  }

  updateHero(hero: Hero) {
    return this.http.put<Hero>(`${api}/hero/${hero.id}`, hero);
  }
}
此代码使用 Angular 提供的最新版 HttpClient,这是你需要提供的一个模块,因此我们接下来会进行相应的操作。
在 Visual Studio Code 中打开 app.module.ts 文件,并通过更新导入部分来包括 HttpClientModule,从而导入 HttpClientModule。
imports: [
  BrowserModule,
  FormsModule,
  HttpClientModule
],
在 app.module.ts 中,在导入列表中添加 HttpClientModule 语句。
import { HttpClientModule } from '@angular/common/http';在 Visual Studio Code 中保存所有文件。
生成应用
在命令提示符处输入以下命令,生成 Angular 应用程序。
ng b如果存在问题,Terminal 窗口会显示要修改的文件的相关信息。 生成操作完成后,新文件会进入 dist 文件夹中。 可以根据需要查看 dist 文件夹中的新文件。
现在运行该应用。
在 Visual Studio Code 中,单击左侧的“调试”按钮 ,然后单击“启动调试”按钮
 。
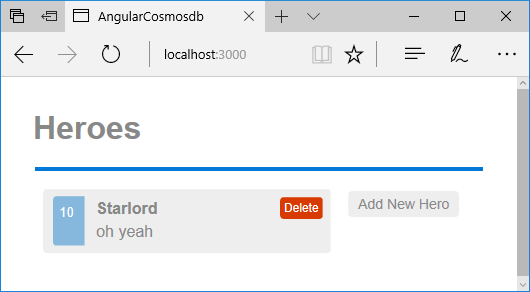
。现在请打开 Internet 浏览器,导航到 localhost:3000,然后就会看到该应用在本地运行。
后续步骤
在本教程的此部分,你已完成以下操作:
- 生成 Angular UI
- 在本地测试应用
你可以转到本教程的下一部分,了解如何创建 Azure Cosmos DB 帐户。
尝试为迁移到 Azure Cosmos DB 进行容量规划? 可以使用有关现有数据库群集的信息进行容量规划。
- 若只知道现有数据库群集中的 vCore 和服务器数量,请阅读使用 vCore 或 vCPU 估算请求单位
- 如果您知道当前数据库工作负荷的典型请求速率,请阅读有关使用 Azure Cosmos DB 容量规划工具来估计请求单位的文章