适用于: Azure 数据工厂
  Azure Synapse Analytics
此快速入门教程介绍了如何使用 Bicep 创建一个 Azure 数据工厂。 在此数据工厂中创建的管道将数据从一个文件夹 复制到 Azure Blob 存储中的另一个文件夹。 有关如何使用 Azure 数据工厂 转换 数据的教程,请参阅 教程:使用 Spark 转换数据。
Bicep 是一种特定于域的语言(DSL),它使用声明性语法部署 Azure 资源。 它提供简明的语法、可靠的类型安全性以及对代码重用的支持。 Bicep 会针对你的 Azure 基础结构即代码解决方案提供最佳创作体验。
注意
本文不提供数据工厂服务的详细介绍。 有关 Azure 数据工厂服务的简介,请参阅 Azure 数据工厂简介。
先决条件
Azure 订阅
如果您还没有 Azure 订阅,请在开始之前创建一个试用帐户。
查阅 Bicep 文件
本快速入门中使用的 Bicep 文件来自 Azure 快速入门模板。
@description('Data Factory Name')
param dataFactoryName string = 'datafactory${uniqueString(resourceGroup().id)}'

@description('Location of the data factory.')
param location string = resourceGroup().location

@description('Name of the Azure storage account that contains the input/output data.')
param storageAccountName string = 'storage${uniqueString(resourceGroup().id)}'

@description('Name of the blob container in the Azure Storage account.')
param blobContainerName string = 'blob${uniqueString(resourceGroup().id)}'

var dataFactoryLinkedServiceName = 'ArmtemplateStorageLinkedService'
var dataFactoryDataSetInName = 'ArmtemplateTestDatasetIn'
var dataFactoryDataSetOutName = 'ArmtemplateTestDatasetOut'
var pipelineName = 'ArmtemplateSampleCopyPipeline'

resource storageAccount 'Microsoft.Storage/storageAccounts@2021-08-01' = {
  name: storageAccountName
  location: location
  sku: {
    name: 'Standard_LRS'
  }
  kind: 'StorageV2'
}

resource blobContainer 'Microsoft.Storage/storageAccounts/blobServices/containers@2021-08-01' = {
  name: '${storageAccount.name}/default/${blobContainerName}'
}

resource dataFactory 'Microsoft.DataFactory/factories@2018-06-01' = {
  name: dataFactoryName
  location: location
  identity: {
    type: 'SystemAssigned'
  }
}

resource dataFactoryLinkedService 'Microsoft.DataFactory/factories/linkedservices@2018-06-01' = {
  parent: dataFactory
  name: dataFactoryLinkedServiceName
  properties: {
    type: 'AzureBlobStorage'
    typeProperties: {
      connectionString: 'DefaultEndpointsProtocol=https;AccountName=${storageAccount.name};AccountKey=${storageAccount.listKeys().keys[0].value};EndpointSuffix=core.chinacloudapi.cn'
    }
  }
}

resource dataFactoryDataSetIn 'Microsoft.DataFactory/factories/datasets@2018-06-01' = {
  parent: dataFactory
  name: dataFactoryDataSetInName
  properties: {
    linkedServiceName: {
      referenceName: dataFactoryLinkedService.name
      type: 'LinkedServiceReference'
    }
    type: 'Binary'
    typeProperties: {
      location: {
        type: 'AzureBlobStorageLocation'
        container: blobContainerName
        folderPath: 'input'
        fileName: 'emp.txt'
      }
    }
  }
}

resource dataFactoryDataSetOut 'Microsoft.DataFactory/factories/datasets@2018-06-01' = {
  parent: dataFactory
  name: dataFactoryDataSetOutName
  properties: {
    linkedServiceName: {
      referenceName: dataFactoryLinkedService.name
      type: 'LinkedServiceReference'
    }
    type: 'Binary'
    typeProperties: {
      location: {
        type: 'AzureBlobStorageLocation'
        container: blobContainerName
        folderPath: 'output'
      }
    }
  }
}

resource dataFactoryPipeline 'Microsoft.DataFactory/factories/pipelines@2018-06-01' = {
  parent: dataFactory
  name: pipelineName
  properties: {
    activities: [
      any({
        name: 'MyCopyActivity'
        type: 'Copy'
        policy: {
          timeout: '7.00:00:00'
          retry: 0
          retryIntervalInSeconds: 30
          secureOutput: false
          secureInput: false
        }
        typeProperties: {
          source: {
            type: 'BinarySource'
            storeSettings: {
              type: 'AzureBlobStorageReadSettings'
              recursive: true
            }
          }
          sink: {
            type: 'BinarySink'
            storeSettings: {
              type: 'AzureBlobStorageWriterSettings'
            }
          }
          enableStaging: false
        }
        inputs: [
          {
            referenceName: dataFactoryDataSetIn.name
            type: 'DatasetReference'
          }
        ]
        outputs: [
          {
            referenceName: dataFactoryDataSetOut.name
            type: 'DatasetReference'
          }
        ]
      })
    ]
  }
}
Bicep 文件中定义了多个 Azure 资源:
- Microsoft.Storage/storageAccounts:定义存储帐户。
- Microsoft.DataFactory/factories:创建 Azure 数据工厂。
- Microsoft.DataFactory/factories/linkedServices:创建 Azure 数据工厂链接服务。
- Microsoft.DataFactory/factories/datasets:创建 Azure 数据工厂数据集。
- Microsoft.DataFactory/factories/pipelines:创建 Azure 数据工厂管道。
创建文件
打开文本编辑器(如记事本),并创建包含以下内容的名为“emp.txt”的文件:
John, Doe
Jane, Doe
在本地保存该文件。 稍后你将在本快速入门中使用它。
部署 Bicep 文件
将 Azure 快速入门模板 中的 Bicep 文件另存为 main.bicep 到本地计算机。
使用 Azure CLI 或 Azure PowerShell 来部署该 Bicep 文件。
az group create --name exampleRG --location chinaeast2 az deployment group create --resource-group exampleRG --template-file main.bicep部署完成后,应会看到一条指出部署成功的消息。
查看已部署的资源
使用 Azure CLI 或 Azure PowerShell 列出资源组中已部署的资源。
az resource list --resource-group exampleRG
还可以使用 Azure 门户来查看已部署的资源。
- 登录到 Azure 门户。
- 导航到资源组。
- 你会看到你的资源已列出。 选择每个资源以查看概述。
上载文件
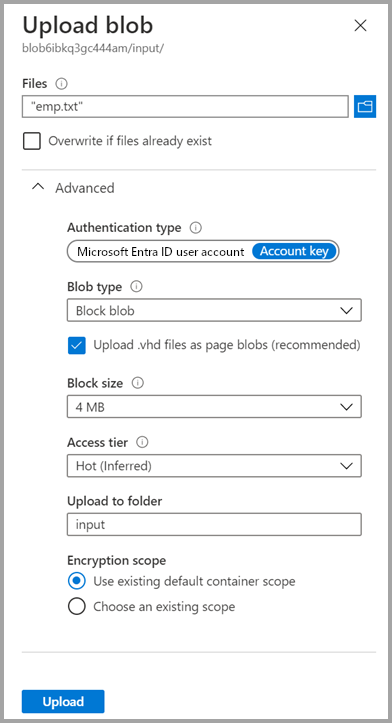
使用 Azure 门户上传 emp.txt 文件。
导航到资源组并选择创建的存储帐户。 然后,选择左侧面板中的“容器”选项卡。
在“容器”页上,选择创建的 blob 容器。 名称的格式为 blob<uniqueid>。
选择“上传”,然后选择右窗格中的“文件”框图标。 导航到先前创建的 emp.txt 文件并将其选中。
展开“高级”标题。
在“上传到文件夹”框中,输入“输入”。
选择“上传”按钮。 应该会在列表中看到 emp.txt 文件和上传状态。
选择“关闭”图标 (X) 以关闭“上传 Blob”页面 。
使容器页保持打开状态,因为你可以使用它在本快速入门结束时验证输出。
启动触发器
导航到资源组页,选择创建的数据工厂。
在“打开 Azure 数据工厂工作室”磁贴上选择“打开”。

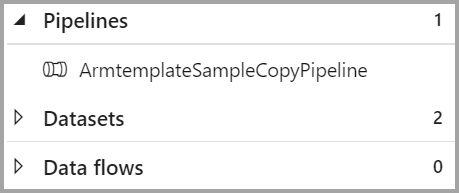
选择“创作”选项卡 。
选择创建的管道 ArmtemplateSampleCopyPipeline。
选择“添加触发器”“立即触发器”。

在“管道运行”下的右窗格中,选择“确定”。
监视管道
选择“监视器”选项卡。
此时会看到与管道运行相关联的活动运行。 在本快速入门中,管道只有一个类型为“复制”的活动。 你应该会看到该活动的一个运行。

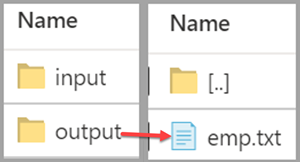
验证输出文件
该管道自动在 blob 容器中创建一个输出文件夹。 然后,它会将 emp.txt 文件从 input 文件夹复制到 output 文件夹。
在 Azure 门户中的“容器”页上选择“刷新”,以查看 output 文件夹。
在文件夹列表中,选择“output”。
确认 emp.txt 已复制到 output 文件夹。
清理资源
如果不再需要资源组及其所有资源,请使用 Azure CLI 或 Azure PowerShell 将其删除。
az group delete --name exampleRG
还可使用 Azure 门户删除资源组。
- 在 Azure 门户中导航到资源组。
- 选择“删除资源组”。
- 将显示一个选项卡。 输入资源组名称,然后选择“ 删除”。
相关内容
在本快速入门中,你使用 Bicep 创建了 Azure 数据工厂,并验证了部署。 若要详细了解 Azure 数据工厂和 Bicep,请阅读以下文章。
- Azure 数据工厂文档
- 详细了解 Bicep