在设备生命周期中,可能需要从后端服务配置 IoT 设备。 将所需的配置发送到设备时,还需要从这些设备接收状态与符合性更新。 例如,可以设置设备的目标工作温度范围,或者从设备收集固件版本信息。
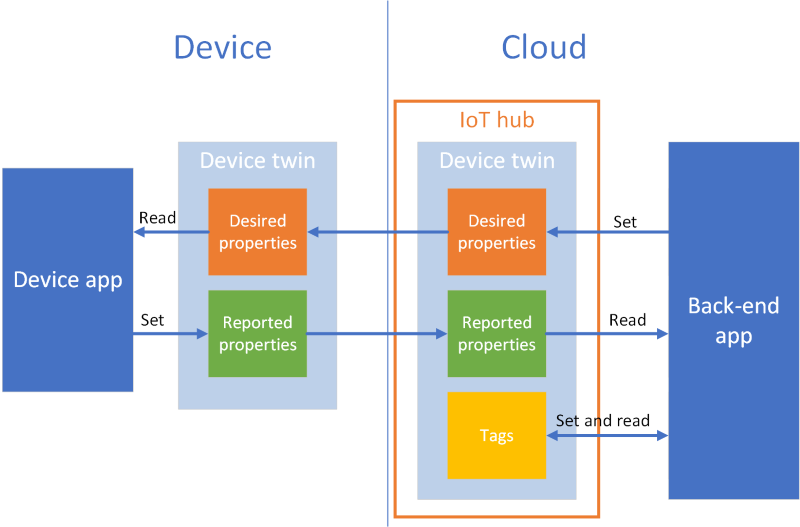
若要在设备与 IoT 中心之间同步状态信息,请使用设备孪生。 设备孪生是与特定设备关联的 JSON 文档,由云中的 IoT 中心存储,可在 IoT 中心对其进行查询。 设备孪生包含所需属性、报告属性和标记。
- 所需属性由后端应用程序设置,由设备读取。
- 报告的属性由设备设置,由后端应用程序读取。
- 标记由后端应用程序设置,永远不会发送到设备。 使用标记可以组织设备。
本教程介绍如何使用所需属性和报告的属性来同步状态信息。
将在本教程中执行以下任务:
- 创建 IoT 中心并将测试设备添加到标识注册表。
- 使用所需属性将状态信息发送到模拟设备。
- 使用报告属性从模拟设备接收状态信息。
如果没有 Azure 订阅,可在开始前创建一个试用帐户。
先决条件
本教程使用 Azure CLI 创建云资源。 如果已经有一个已将设备注册到其中的 IoT 中心,则可以跳过这些步骤。 可通过以下方式运行 CLI 命令:
如需在本地运行 CLI 参考命令,请安装 Azure CLI。 如果在 Windows 或 macOS 上运行,请考虑在 Docker 容器中运行 Azure CLI。 有关详细信息,请参阅如何在 Docker 容器中运行 Azure CLI。
- 通过使用 az login 命令登录到 Azure CLI。
- 出现提示时,请在首次使用时安装 Azure CLI 扩展。 有关扩展详细信息,请参阅使用 Azure CLI 的扩展。
- 运行 az version 以查找安装的版本和依赖库。 若要升级到最新版本,请运行 az upgrade。
本教程中运行的两个示例应用程序是使用 Node.js 编写的。 开发计算机上需要有 Node.js v10.x.x 或更高版本。
可从 nodejs.org 下载适用于多个平台的 Node.js。
可以使用以下命令验证开发计算机上 Node.js 当前的版本:
node --version
从适用于 Node.js 的 Azure IoT 示例克隆或下载示例 Node.js 项目。
确保已在防火墙中打开端口 8883。 本教程中的设备示例使用 MQTT 协议,该协议通过端口 8883 进行通信。 在某些公司和教育网络环境中,此端口可能被阻止。 有关解决此问题的更多信息和方法,请参阅连接到 IoT 中心(MQTT)。
设置 Azure 资源
若要完成本教程,你的 Azure 订阅必须包含一个 IoT 中心,其中的某个设备已添加到设备标识注册表。 在本教程中运行的模拟设备可以通过设备标识注册表中的条目连接到中心。
如果尚未在订阅中设置 IoT 中心,可使用以下 CLI 脚本设置一个。 此脚本使用名称“tutorial-iot-hub”,并为 IoT 中心名称追加了一个随机数字。 运行它时,可以将此名称替换为你自己的全局唯一名称。 此脚本在“中国北部”区域创建资源组和中心。可以将其更改为更靠近自己的区域。 此脚本将检索 IoT 中心服务连接字符串,在后端示例中,我们将使用该连接字符串连接到 IoT 中心:
let "randomIdentifier=$RANDOM*$RANDOM"
hubname="tutorial-iot-hub-$randomIdentifier"
location=chinaeast

# Install the IoT extension if it's not already installed:
az extension add --name azure-iot

# Create a resource group:
az group create --name tutorial-iot-hub-rg --location $location

# Create your free-tier IoT hub. You can only have one free IoT hub per subscription.
# Change the sku to S1 to create a standard-tier hub if necessary.
az iot hub create --name $hubname --location $location --resource-group tutorial-iot-hub-rg --partition-count 2 --sku F1

# Make a note of the service connection string, you need it later:
az iot hub connection-string show --hub-name $hubname --policy-name service -o table
本教程使用名为 MyTwinDevice 的模拟设备。 以下脚本将此设备添加到标识注册表,并检索其连接字符串:
# Create the device in the identity registry:
az iot hub device-identity create --device-id MyTwinDevice --hub-name $hubname --resource-group tutorial-iot-hub-rg

# Retrieve the device connection string, you need this later:
az iot hub device-identity connection-string show --device-id MyTwinDevice --hub-name $hubname --resource-group tutorial-iot-hub-rg -o table
将状态信息发送到设备
使用所需属性将状态信息从后端应用程序发送到设备。 本部分介绍以下操作:
- 将设备配置为接收并处理所需属性。
- 从后端应用程序向设备发送所需属性。
所需属性示例
可以使用对应用程序有利的任何方式来构建所需属性。 本示例使用一个名为 fanOn 的顶级属性,并将剩余的属性分组到单独的组件中。 以下 JSON 片段显示了本教程所用的所需属性的结构。 JSON 位于 desired.json 文件中。
{
  "fanOn": "true",
  "components": {
    "system": {
      "id": "17",
      "units": "farenheit",
      "firmwareVersion": "9.75"
    },
    "wifi" : {
      "channel" : "6",
      "ssid": "my_network"
    },
    "climate" : {
      "minTemperature": "68",
      "maxTemperature": "76"
    }
  }
}
在设备应用程序中接收所需属性
若要查看接收所需属性的模拟设备示例代码,请导航到下载的示例 Node.js 项目中的 iot-hub/Tutorials/DeviceTwins 文件夹。 然后在文本编辑器中打开 SimulatedDevice.js 文件。
以下部分描述了在模拟设备上运行的、对发送自后端应用程序的所需属性更改做出响应的代码。
检索设备孪生对象
你已在向 IoT 中心注册设备时获得作为输出的设备连接字符串。 设备使用设备连接字符串通过其在云中注册的标识进行身份验证。 以下代码使用设备连接字符串连接到 IoT 中心:
// Get the device connection string from a command line argument
var connectionString = process.argv[2];
以下代码从客户端对象中获取孪生:
// Get the device twin
client.getTwin(function(err, twin) {
  if (err) {
    console.error(chalk.red('Could not get device twin'));
  } else {
    console.log(chalk.green('Device twin created'));
创建处理程序
可针对所需属性更新创建处理程序,用于响应 JSON 层次结构中的不同级别发生的更新。 例如,此处理程序可以监视从后端应用程序发送到设备的所有所需属性更改。 delta 变量包含从解决方案后端发送的所需属性:
// Handle all desired property updates
twin.on('properties.desired', function(delta) {
    console.log(chalk.yellow('\nNew desired properties received in patch:'));
以下处理程序仅响应对 fanOn 所需属性所做的更改:
// Handle changes to the fanOn desired property
twin.on('properties.desired.fanOn', function(fanOn) {
    console.log(chalk.green('\nSetting fan state to ' + fanOn));

    // Update the reported property after processing the desired property
    reportedPropertiesPatch.fanOn = fanOn ? fanOn : '{unknown}';
});
多个属性的处理程序
在本教程的示例性的所需属性 JSON 中,components 下的 climate 节点包含两个属性:minTemperature 和 maxTemperature。
设备的本地 twin 对象存储一组完整的所需属性和报告属性。 从后端发送的 delta 可能只会更新所需属性的某个子集。 在以下代码片段中,如果模拟设备只是收到了对某个 minTemperature 和 maxTemperature 的更新,则它会使用另一个值的本地孪生中的值来配置设备:
// Handle desired properties updates to the climate component
twin.on('properties.desired.components.climate', function(delta) {
    if (delta.minTemperature || delta.maxTemperature) {
      console.log(chalk.green('\nUpdating desired tempertures in climate component:'));
      console.log('Configuring minimum temperature: ' + twin.properties.desired.components.climate.minTemperature);
      console.log('Configuring maximum temperture: ' + twin.properties.desired.components.climate.maxTemperature);

      // Update the reported properties and send them to the hub
      reportedPropertiesPatch.minTemperature = twin.properties.desired.components.climate.minTemperature;
      reportedPropertiesPatch.maxTemperature = twin.properties.desired.components.climate.maxTemperature;
      sendReportedProperties();
    }
});
处理插入、更新和删除操作
从后端发送的所需属性并不会指示当前正在对特定的所需属性执行哪个操作。 代码需要根据当前存储在本地的所需属性集,以及中心发送的更改来推断操作。
以下片段演示模拟设备如何处理针对所需属性中的组件列表执行的插入、更新和删除操作。 可以查看如何使用 null 值来指示应删除某个组件:
// Keep track of all the components the device knows about
var componentList = {};

// Use this componentList list and compare it to the delta to infer
// if anything was added, deleted, or updated.
twin.on('properties.desired.components', function(delta) {
  if (delta === null) {
    componentList = {};
  }
  else {
    Object.keys(delta).forEach(function(key) {

      if (delta[key] === null && componentList[key]) {
        // The delta contains a null value, and the
        // device has a record of this component.
        // Must be a delete operation.
        console.log(chalk.green('\nDeleting component ' + key));
        delete componentList[key];

      } else if (delta[key]) {
        if (componentList[key]) {
          // The delta contains a component, and the
          // device has a record of it.
          // Must be an update operation.
          console.log(chalk.green('\nUpdating component ' + key + ':'));
          console.log(JSON.stringify(delta[key]));
          // Store the complete object instead of just the delta
          componentList[key] = twin.properties.desired.components[key];

        } else {
          // The delta contains a component, and the
          // device has no record of it.
          // Must be an add operation.
          console.log(chalk.green('\nAdding component ' + key + ':'));
          console.log(JSON.stringify(delta[key]));
          // Store the complete object instead of just the delta
          componentList[key] = twin.properties.desired.components[key];
        }
      }
    });
  }
});
从后端应用程序发送所需属性
前面已介绍设备如何实现处理程序来接收所需属性的更新。 本部分介绍如何将所需属性更改从后端应用程序发送到设备。
若要查看接收所需属性的模拟设备示例代码,请导航到下载的示例 Node.js 项目中的 iot-hub/Tutorials/DeviceTwins 文件夹。 然后在文本编辑器中打开 ServiceClient.js 文件。
以下代码片段演示如何连接到设备标识注册表并访问特定设备的孪生:
// Create a device identity registry object
var registry = Registry.fromConnectionString(connectionString);

// Get the device twin and send desired property update patches at intervals.
// Print the reported properties after some of the desired property updates.
registry.getTwin(deviceId, async (err, twin) => {
  if (err) {
    console.error(err.message);
  } else {
    console.log('Got device twin');
以下片段演示后端应用程序发送到设备的不同所需属性补丁:
// Turn the fan on
var twinPatchFanOn = {
  properties: {
    desired: {
      patchId: "Switch fan on",
      fanOn: "false",
    }
  }
};

// Set the maximum temperature for the climate component
var twinPatchSetMaxTemperature = {
  properties: {
    desired: {
      patchId: "Set maximum temperature",
      components: {
        climate: {
          maxTemperature: "92"
        }
      }
    }
  }
};

// Add a new component
var twinPatchAddWifiComponent = {
  properties: {
    desired: {
      patchId: "Add WiFi component",
      components: {
        wifi: {
          channel: "6",
          ssid: "my_network"
        }
      }
    }
  }
};

// Update the WiFi component
var twinPatchUpdateWifiComponent = {
  properties: {
    desired: {
      patchId: "Update WiFi component",
      components: {
        wifi: {
          channel: "13",
          ssid: "my_other_network"
        }
      }
    }
  }
};

// Delete the WiFi component
var twinPatchDeleteWifiComponent = {
  properties: {
    desired: {
      patchId: "Delete WiFi component",
      components: {
        wifi: null
      }
    }
  }
};
以下片段演示后端应用程序如何将所需属性更新发送到设备:
// Send a desired property update patch
async function sendDesiredProperties(twin, patch) {
  twin.update(patch, (err, twin) => {
    if (err) {
      console.error(err.message);
    } else {
      console.log(chalk.green(`\nSent ${twin.properties.desired.patchId} patch:`));
      console.log(JSON.stringify(patch, null, 2));
    }
  });
}
从设备接收状态信息
后端应用程序从设备接收报告属性形式的状态信息。 设备会设置报告属性,并将其发送到中心。 后端应用程序可以从中心内存储的设备孪生读取报告属性的当前值。
从设备发送报告属性
可以补丁的形式发送对报告属性值所做的更新。 以下片段演示了模拟设备发送的补丁的模板。 模拟设备先更新补丁中的字段,然后将补丁发送到中心:
// Create a patch to send to the hub
var reportedPropertiesPatch = {
  firmwareVersion:'1.2.1',
  lastPatchReceivedId: '',
  fanOn:'',
  minTemperature:'',
  maxTemperature:''
};
模拟设备使用以下函数将包含报告属性的补丁发送到中心:
// Send the reported properties patch to the hub
function sendReportedProperties() {
  twin.properties.reported.update(reportedPropertiesPatch, function(err) {
    if (err) throw err;
    console.log(chalk.blue('\nTwin state reported'));
    console.log(JSON.stringify(reportedPropertiesPatch, null, 2));
  });
}
处理报告属性
后端应用程序通过设备孪生访问设备的当前报告属性值。 以下片段演示后端应用程序如何读取模拟设备的报告属性值:
// Display the reported properties from the device
function printReportedProperties(twin) {
  console.log("Last received patch: " + twin.properties.reported.lastPatchReceivedId);
  console.log("Firmware version: " + twin.properties.reported.firmwareVersion);
  console.log("Fan status: " + twin.properties.reported.fanOn);
  console.log("Min temperature set: " + twin.properties.reported.minTemperature);
  console.log("Max temperature set: " + twin.properties.reported.maxTemperature);
}
运行应用程序
在本部分,我们运行两个示例应用程序,以观察后端应用程序如何将所需属性更新发送到模拟设备应用程序。
若要运行模拟设备和后端应用程序,需要使用设备和服务连接字符串。 在本教程的开头部分创建资源时,我们已记下这些连接字符串。
若要运行模拟设备应用程序,请打开 shell 或命令提示符窗口,并导航到下载的 Node.js 项目中的 iot-hub/Tutorials/DeviceTwins 文件夹。 然后运行以下命令:
npm install
node SimulatedDevice.js "{your device connection string}"
若要运行后端应用程序,请打开另一个 shell 或命令提示符窗口。 导航到下载的 Node.js 项目中的 iot-hub/Tutorials/DeviceTwins 文件夹。 然后运行以下命令:
npm install
node ServiceClient.js "{your service connection string}"
观察所需的属性更新
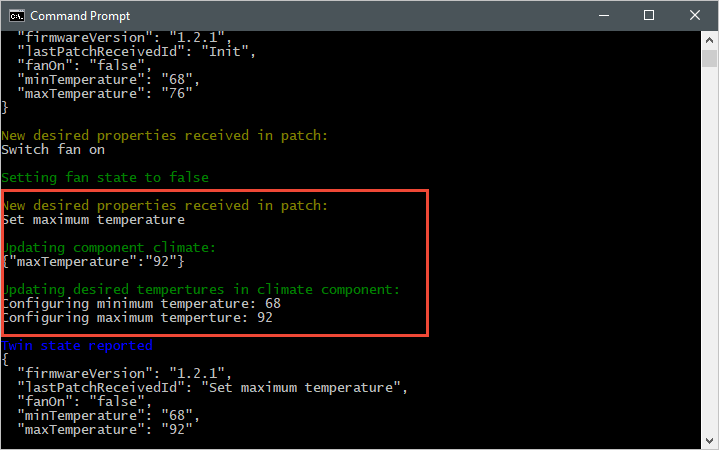
以下屏幕截图显示模拟设备应用程序的输出,并突出显示它如何处理对 maxTemperature 所需属性做出的更新。 可以看到顶级处理程序和气候组件处理程序的运行方式:
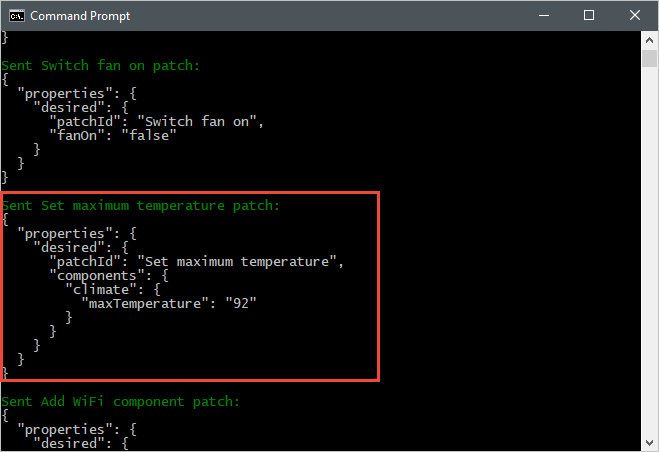
以下屏幕截图显示后端应用程序的输出,并突出显示它如何发送对 maxTemperature 所需属性做出的更新:
观察报告的属性更新
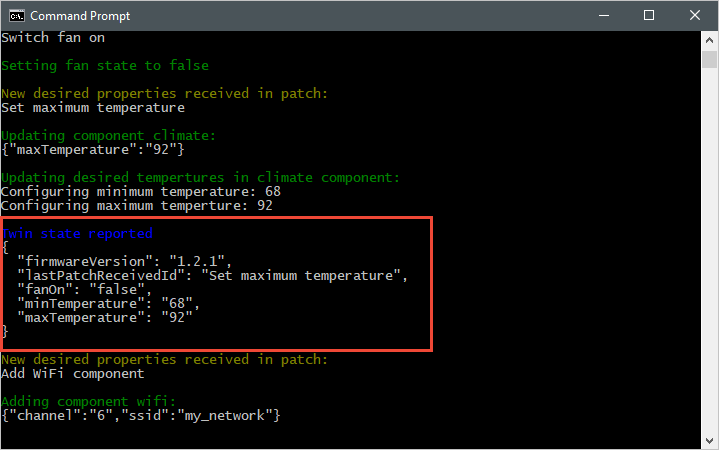
以下屏幕截图显示模拟设备应用程序的输出,并突出显示它如何将报告属性更新发送到中心:
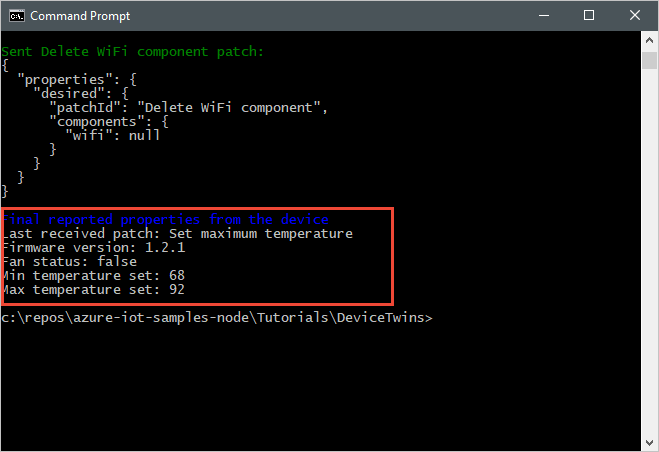
以下屏幕截图显示后端应用程序的输出,并突出显示它如何从设备接收和处理报告属性更新:
清理资源
如果你打算完成下一篇教程,请保留资源组和 IoT 中心,以便到时重复使用。
如果不再需要 IoT 中心,请在门户中删除该中心与资源组。 为此,请选择包含 IoT 中心的 tutorial-iot-hub-rg 资源组,然后选择“删除”。
或者使用 CLI:
# Delete your resource group and its contents
az group delete --name tutorial-iot-hub-rg
后续步骤
在本教程中,你已学习了如何在设备与 IoT 中心之间同步状态信息。 请继续学习下一篇教程,了解如何使用设备孪生实现设备更新过程。