在本教程中,将完成以下步骤:
- 使用 Azure 门户创建服务总线命名空间。
- 使用 Azure 门户创建服务总线主题。
- 使用 Azure 门户创建该主题的服务总线订阅。
- 编写 JavaScript 应用程序,以使用 @azure/service-bus 包来执行以下操作:
- 将一组消息发送到主题。
- 从订阅接收这些消息。
注意
本快速入门分步说明将一批消息发送到某个服务总线主题并从该主题的订阅接收这些消息这一简单场景。 可在 GitHub 上的 Azure SDK for JavaScript 存储库中找到预生成的 Azure 服务总线 JavaScript 和 TypeScript 示例。
先决条件
- Azure 订阅。 若要完成本教程,需要一个 Azure 帐户。 你可以激活 MSDN 订阅者权益或注册试用版订阅。
- Node.js LTS
- 遵循快速入门:使用 Azure 门户创建一个服务总线主题和多个对该主题的订阅。 本快速入门仅需使用一个订阅。
若要通过你自己的 Azure 帐户来使用本快速入门,你需要:
- 安装 Azure CLI,它提供向开发人员计算机进行无密码身份验证的功能。
- 在终端或命令提示符处通过
az login使用 Azure 帐户登录。 - 将适当的角色添加到资源时,请使用同一帐户。
- 在同样的终端或命令提示符中运行代码。
- 记下服务总线命名空间的主题名称和订阅。 需要在代码中使用它。
注意
- 本教程将演练可以使用 Nodejs 复制和运行的示例。 有关如何创建 Node.js 应用程序的说明,请参阅创建 Node.js 应用程序并将其部署到 Azure 网站或使用 Windows PowerShell 创建 Node.js 云服务。
在 Azure 门户中创建命名空间
若要开始使用 Azure 中的服务总线消息传送实体,请创建一个名称在 Azure 中唯一的命名空间。 命名空间为应用程序中的服务总线资源(例如队列和主题)提供范围容器。
创建命名空间:
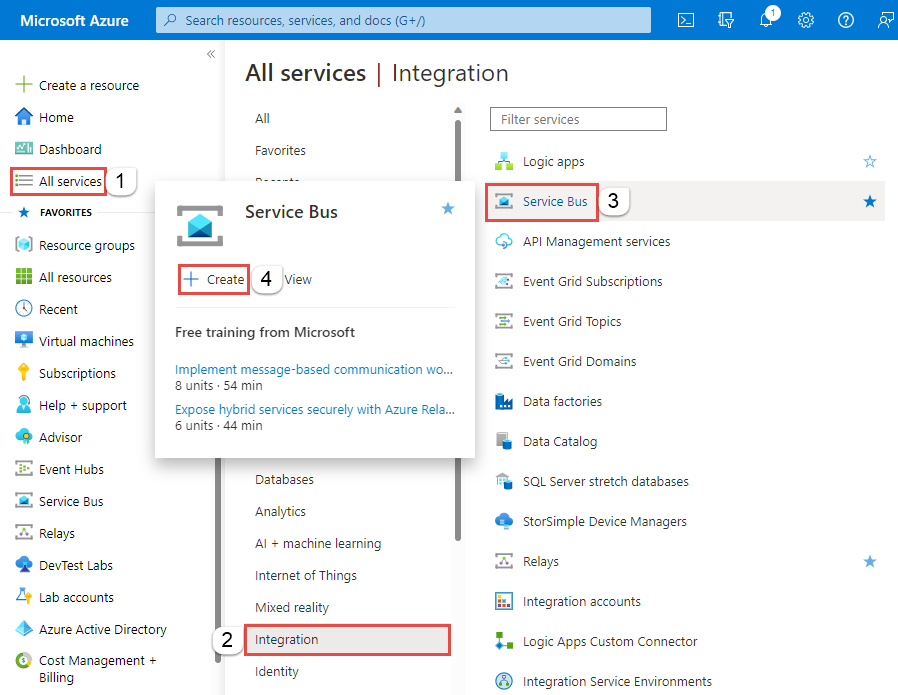
登录 Azure 门户。
从左上角选择浮出控件菜单,然后导航到 “所有服务 ”页。
在左侧导航栏上,选择 “集成”。
向下滚动到 消息服务服务>总线 ,然后选择“ 创建”。
在“创建命名空间”页的“基本信息”选项卡中,执行以下步骤:
对于“订阅”,请选择要在其中创建命名空间的 Azure 订阅。
对于资源组,选择现有资源组或创建新的资源组。
输入符合以下命名约定的 命名空间名称 :
- 该名称在 Azure 中必须唯一。 系统会立即检查该名称是否可用。
- 名称长度最少为 6 个字符,最多为 50 个字符。
- 名称只能包含字母、数字、连字符
-。 - 名称必须以字母开头,并且必须以字母或数字结尾。
- 名称不以
-sb或-mgmt结尾。
对于 “位置”,请选择要托管命名空间的区域。
对于“定价层”,请选择命名空间的定价层(“基本”、“标准”或“高级”)。 对于本快速入门,请选择“标准”。
如果选择 “高级 ”层,则可以为命名空间启用 异地复制 。 异地复制功能可确保命名空间的元数据和数据从主要区域持续复制到一个或多个次要区域。
重要
若要使用主题和订阅,请选择“标准”或“高级”。 基本定价层不支持主题和订阅。
如果选择了“高级”定价层,请指定“消息传送单元”数 。 高级层在 CPU 和内存级别提供资源隔离,使每个工作负荷在隔离的环境中运行。 此资源容器称为 消息传送单元。 高级命名空间至少具有一个消息传送单元。 可为每个服务总线高级命名空间选择 1、2、4、8 或 16 个消息传送单元。 有关详细信息,请参阅 服务总线高级消息传送层。
在页面底部选择“查看 + 创建”。
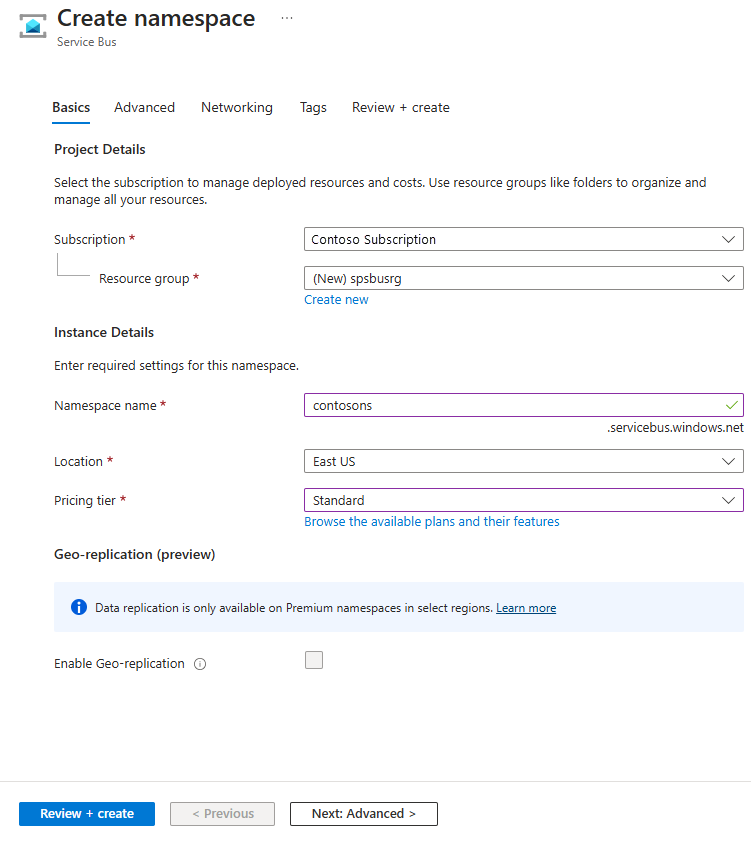
在“查看 + 创建”页上,查看设置,然后选择“创建” 。
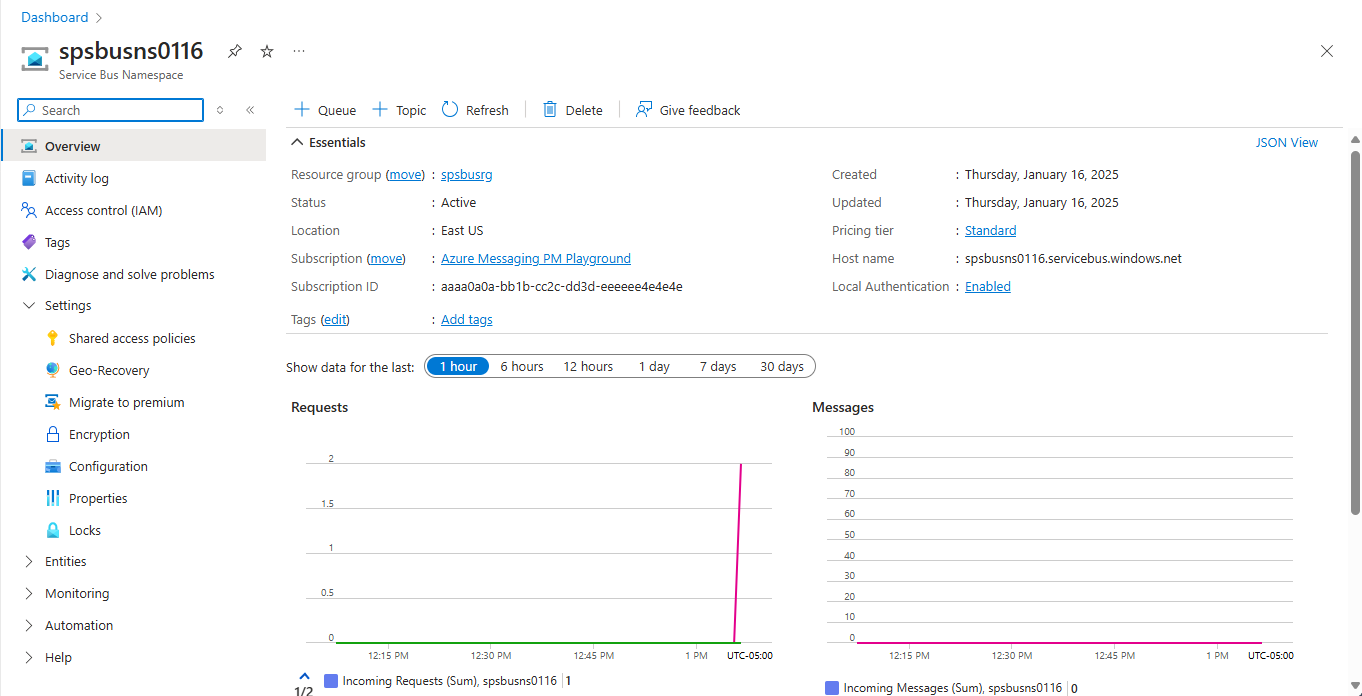
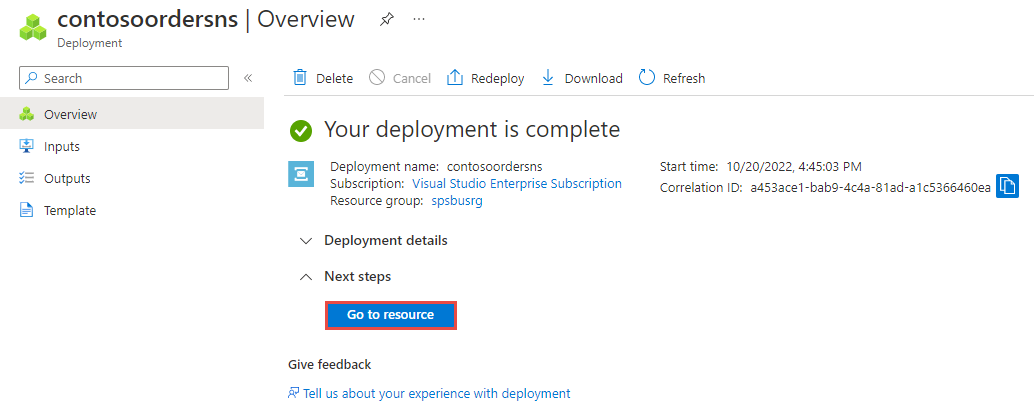
部署资源成功后,在部署页上选择 “转到资源 ”。
将会看到服务总线命名空间的主页。
使用 Azure 门户创建主题
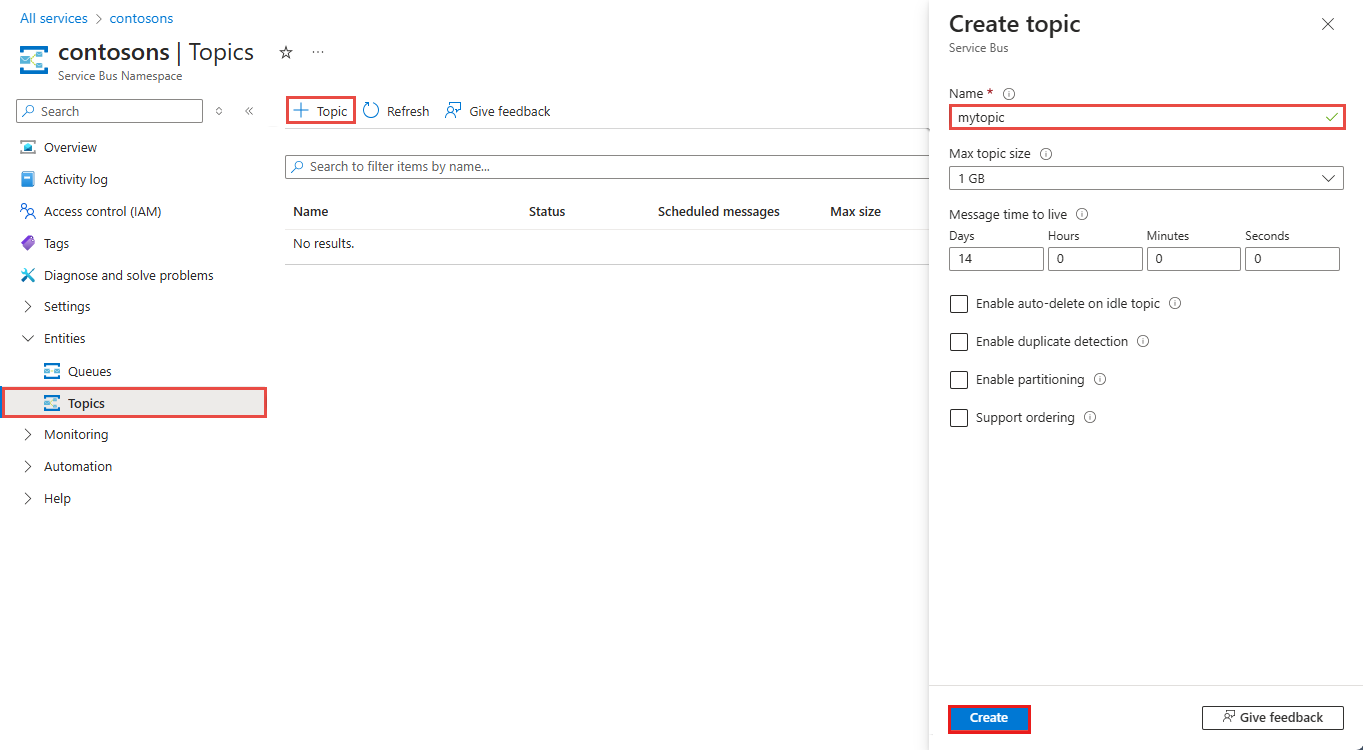
在“服务总线命名空间”页上,展开左侧导航菜单上的“实体”,然后在左侧菜单中选择“主题”。
在工具栏中选择“+ 主题”。
输入主题名称。 将其他选项保留默认值。
选择“创建”。
创建主题的订阅
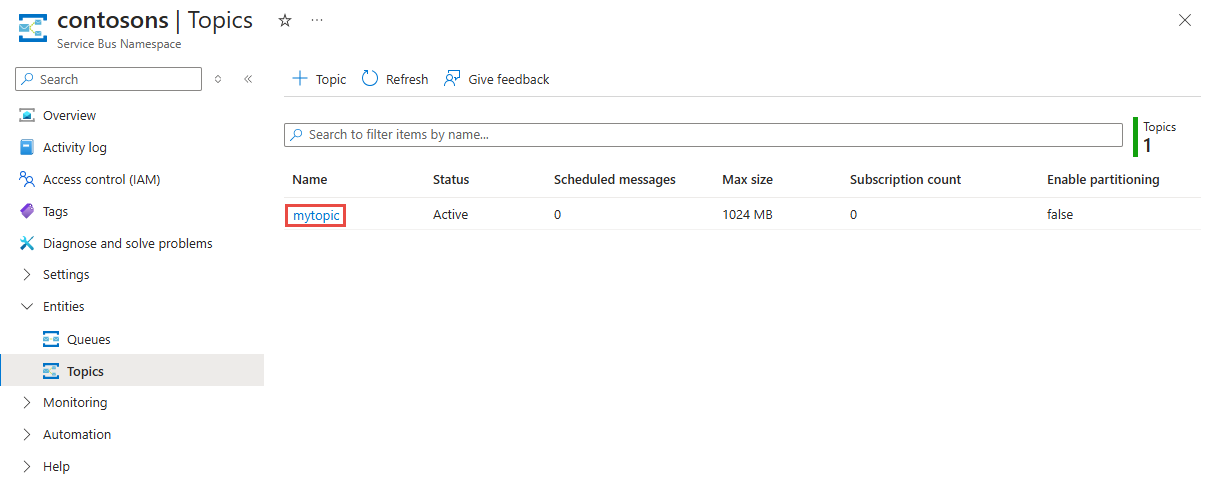
选择在上一部分创建的主题。
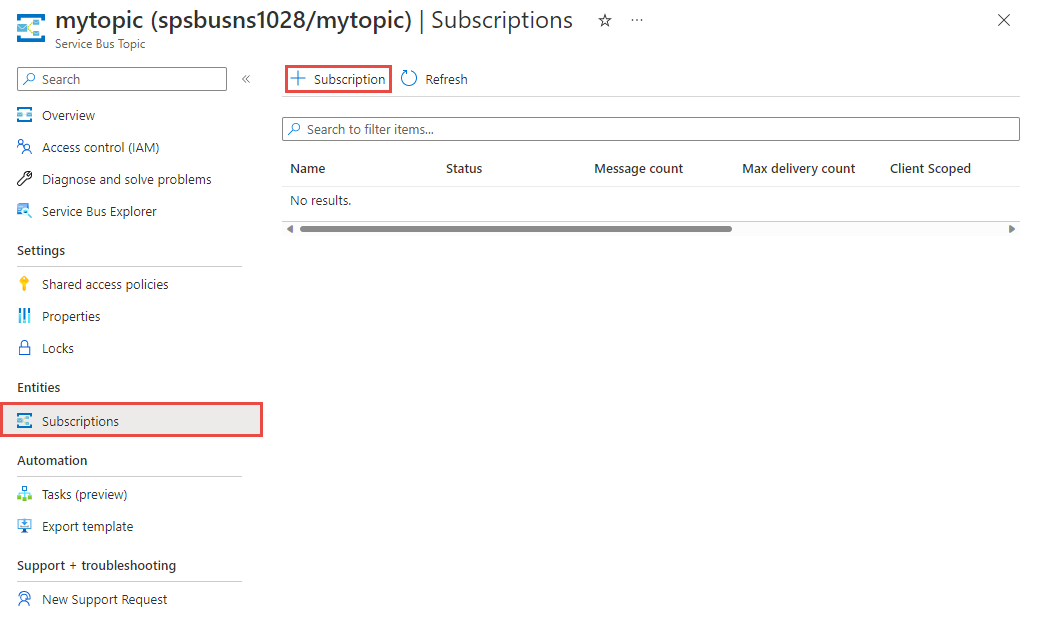
在“服务总线主题”页面上,选择工具栏上的“+ 订阅” 。
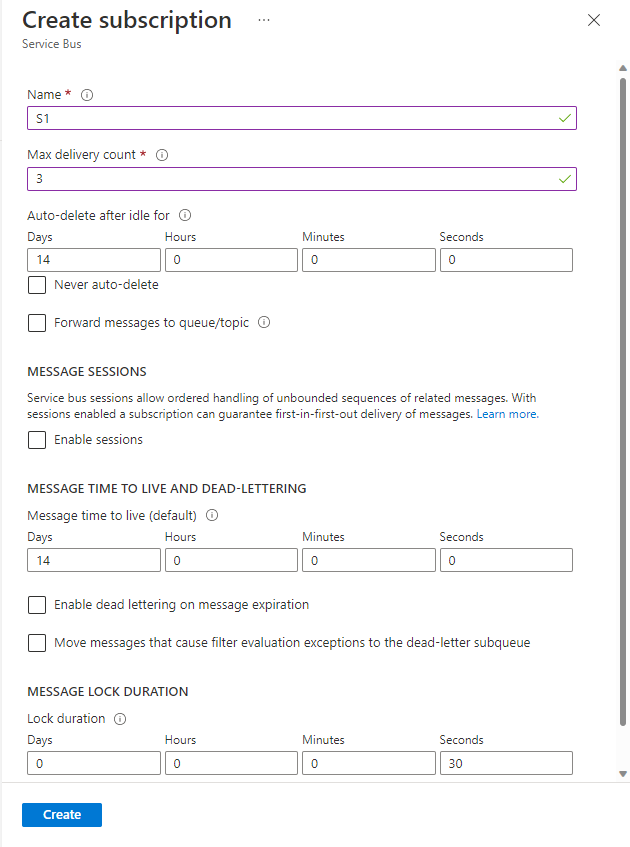
在“创建订阅”页上执行以下步骤:
对于订阅名称,输入“S1” 。
然后,选择“创建”以创建订阅。
向 Azure 验证应用
本文介绍连接到 Azure 服务总线的两种方法: 无密码 和 连接字符串。
第一个选项展示如何使用 Microsoft Entra ID 中的安全主体和基于角色的访问控制 (RBAC) 连接到服务总线命名空间。 无需担心在代码、配置文件或安全存储(如 Azure Key Vault)中具有硬编码连接字符串。
第二个选项展示如何使用连接字符串连接到服务总线命名空间。 如果不熟悉 Azure,你可能会感觉“连接字符串”选项更易于使用。 建议在实际应用程序和生产环境中使用无密码选项。 有关详细信息,请参阅 服务总线身份验证和授权。 若要详细了解无密码身份验证,请参阅 “对 .NET 应用进行身份验证”。
将角色分配给 Microsoft Entra 用户
在本地开发时,请确保连接到 Azure 服务总线的用户帐户具有正确的权限。 需要 Azure 服务总线数据所有者 角色才能发送和接收消息。 若要将此角色分配给自己,您需要 "User Access Administrator" 角色或其他包含 Microsoft.Authorization/roleAssignments/write 操作的角色。
可使用 Azure 门户、Azure CLI 或 Azure PowerShell 向用户分配 Azure RBAC 角色。 若要详细了解角色分配的可用范围,请参阅 了解 Azure RBAC 的范围。
以下示例将 Azure Service Bus Data Owner 角色分配给用户帐户,该角色提供对 Azure 服务总线资源的完全访问权限。 在实际方案中,遵循 最低特权原则 ,仅向用户授予更安全的生产环境所需的最低权限。
适用于 Azure 服务总线的 Azure 内置角色
对于 Azure 服务总线,通过 Azure 门户和 Azure 资源管理 API 对命名空间和所有相关资源的管理已使用 Azure RBAC 模型进行了保护。 Azure 提供了以下 Azure 内置角色,用于授予对服务总线命名空间的访问权限:
- Azure 服务总线数据所有者:允许数据访问服务总线命名空间及其实体,包括队列、主题、订阅和筛选器。 此角色的成员可以从队列或主题/订阅发送和接收消息。
-
Azure 服务总线数据发送方:使用此角色授予
send对服务总线命名空间及其实体的访问权限。 -
Azure 服务总线数据接收器:使用此角色授予
receive对服务总线命名空间及其实体的访问权限。
如果要创建自定义角色,请参阅执行服务总线操作所需的权限。
将 Microsoft Entra 用户添加到“Azure 服务总线所有者”角色
将 Microsoft Entra 用户名添加到服务总线命名空间级别的 Azure 服务总线数据所有者角色。 此配置允许在用户帐户上下文中运行的应用将消息发送到队列或主题。 它可以接收来自队列或主题订阅的消息。
重要
在大多数情况下,角色分配在 Azure 中传播需要一两分钟。 在极少数情况下,最多可能需要 8 分钟才能完成。 如果在首次运行代码时收到身份验证错误,请稍等片刻再试。
如果未在 Azure 门户中打开“服务总线命名空间”页,请使用主搜索栏或左侧导航找到你的服务总线命名空间。
在 “概述 ”页上,从左侧菜单中选择 “访问控制”(IAM )。
在“访问控制 (IAM)”页上,选择“角色分配”选项卡。
从顶部菜单中选择 “+ 添加” ,然后 添加角色分配。
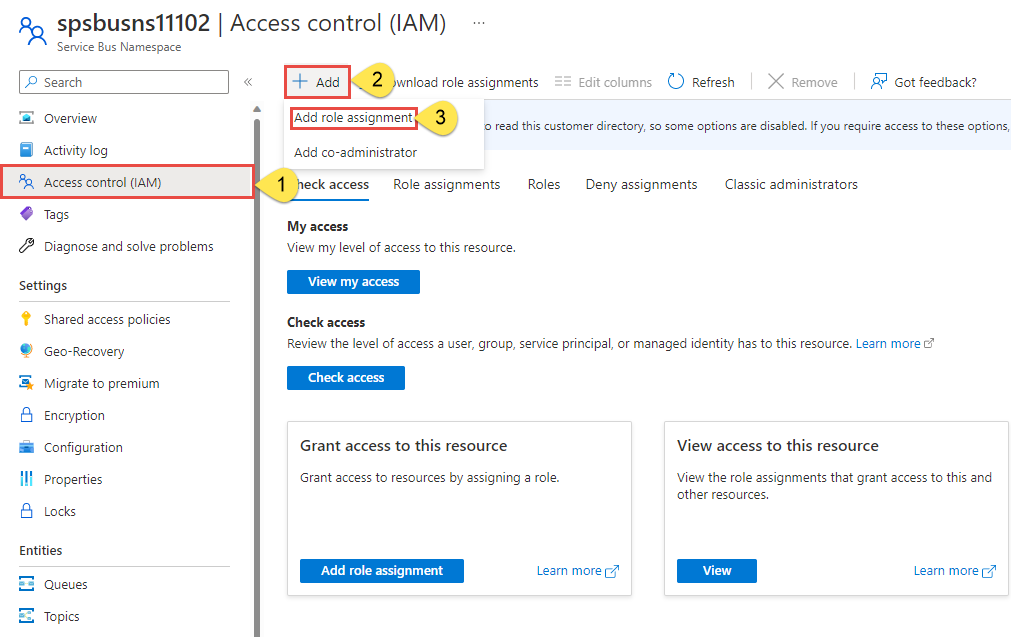
使用搜索框将结果筛选为所需角色。 对于此示例,请搜索
Azure Service Bus Data Owner并选择匹配的结果。 然后选择“下一步” 。在“访问权限分配对象”下,选择“用户、组或服务主体”,然后选择“+ 选择成员”。
在对话框中,搜索你的 Microsoft Entra 用户名(通常是你的 user@domain 电子邮件地址),然后在对话框的底部选择“选择”。
选择“查看 + 分配”转到最后一页,然后再次选择“查看 + 分配”完成该过程。
使用 Node 包管理器 (NPM) 安装包
若要安装服务总线所需的 npm 包,请打开路径中包含
npm的命令提示符,将目录更改为要包含示例的文件夹,然后运行此命令。安装以下包:
npm install @azure/service-bus @azure/identity
将消息发送到主题
下面的示例代码演示如何将一批消息发送到服务总线主题。 请参阅代码注释以了解详细信息。
必须已使用 Azure CLI 的 az login 进行登录,以便本地计算机提供此代码中所需的无密码身份验证。
打开你喜好的编辑器,例如 Visual Studio Code
创建一个名为
sendtotopic.js的文件,并将下面的代码粘贴到其中。 此代码向主题发送一条消息。重要
无密码凭据随 DefaultAzureCredential 一起提供。
const { ServiceBusClient } = require("@azure/service-bus");
const { DefaultAzureCredential } = require("@azure/identity");

// Replace `<SERVICE-BUS-NAMESPACE>` with your namespace
const fullyQualifiedNamespace = "<SERVICE-BUS-NAMESPACE>.servicebus.chinacloudapi.cn";

// Passwordless credential
const credential = new DefaultAzureCredential();

const topicName = "<TOPIC NAME>";

const messages = [
    { body: "Albert Einstein" },
    { body: "Werner Heisenberg" },
    { body: "Marie Curie" },
    { body: "Steven Hawking" },
    { body: "Isaac Newton" },
    { body: "Niels Bohr" },
    { body: "Michael Faraday" },
    { body: "Galileo Galilei" },
    { body: "Johannes Kepler" },
    { body: "Nikolaus Kopernikus" }
 ];

 async function main() {
    // create a Service Bus client using the passwordless authentication to the Service Bus namespace
    const sbClient = new ServiceBusClient(fullyQualifiedNamespace, credential);

    // createSender() can also be used to create a sender for a queue.
    const sender = sbClient.createSender(topicName);

    try {
        // Tries to send all messages in a single batch.
        // Will fail if the messages cannot fit in a batch.
        // await sender.sendMessages(messages);

        // create a batch object
        let batch = await sender.createMessageBatch();
        for (let i = 0; i < messages.length; i++) {
            // for each message in the array

            // try to add the message to the batch
            if (!batch.tryAddMessage(messages[i])) {
                // if it fails to add the message to the current batch
                // send the current batch as it is full
                await sender.sendMessages(batch);

                // then, create a new batch
                batch = await sender.createMessageBatch();

                // now, add the message failed to be added to the previous batch to this batch
                if (!batch.tryAddMessage(messages[i])) {
                    // if it still can't be added to the batch, the message is probably too big to fit in a batch
                    throw new Error("Message too big to fit in a batch");
                }
            }
        }

        // Send the last created batch of messages to the topic
        await sender.sendMessages(batch);

        console.log(`Sent a batch of messages to the topic: ${topicName}`);

        // Close the sender
        await sender.close();
    } finally {
        await sbClient.close();
    }
}

// call the main function
main().catch((err) => {
    console.log("Error occurred: ", err);
    process.exit(1);
 });
将
<SERVICE BUS NAMESPACE CONNECTION STRING>替换为服务总线命名空间的连接字符串。将
<TOPIC NAME>替换为主题名称。然后,在命令提示符中运行该命令以执行此文件。
node sendtotopic.js你会看到以下输出。
Sent a batch of messages to the topic: mytopic
从订阅接收消息
必须已使用 Azure CLI 的 az login 进行登录,以便本地计算机提供此代码中所需的无密码身份验证。
打开你喜好的编辑器,例如 Visual Studio Code
创建名为 receivefromsubscription.js 的文件,然后将以下代码粘贴到其中。 请参阅代码注释以了解详细信息。
const { delay, ServiceBusClient, ServiceBusMessage } = require("@azure/service-bus");
const { DefaultAzureCredential } = require("@azure/identity");

// Replace `<SERVICE-BUS-NAMESPACE>` with your namespace
const fullyQualifiedNamespace = "<SERVICE-BUS-NAMESPACE>.servicebus.chinacloudapi.cn";

// Passwordless credential
const credential = new DefaultAzureCredential();

const topicName = "<TOPIC NAME>";
const subscriptionName = "<SUBSCRIPTION NAME>";

 async function main() {
    // create a Service Bus client using the passwordless authentication to the Service Bus namespace
    const sbClient = new ServiceBusClient(fullyQualifiedNamespace, credential);

    // createReceiver() can also be used to create a receiver for a queue.
    const receiver = sbClient.createReceiver(topicName, subscriptionName);

    // function to handle messages
    const myMessageHandler = async (messageReceived) => {
        console.log(`Received message: ${messageReceived.body}`);
    };

    // function to handle any errors
    const myErrorHandler = async (error) => {
        console.log(error);
    };

    // subscribe and specify the message and error handlers
    receiver.subscribe({
        processMessage: myMessageHandler,
        processError: myErrorHandler
    });

    // Waiting long enough before closing the sender to send messages
    await delay(5000);

    await receiver.close();
    await sbClient.close();
}

// call the main function
main().catch((err) => {
    console.log("Error occurred: ", err);
    process.exit(1);
 });
将
<SERVICE BUS NAMESPACE CONNECTION STRING>替换为命名空间的连接字符串。将
<TOPIC NAME>替换为主题名称。将
<SUBSCRIPTION NAME>替换为主题的订阅名称。然后,在命令提示符中运行该命令以执行此文件。
node receivefromsubscription.js
你会看到以下输出。
Received message: Albert Einstein
Received message: Werner Heisenberg
Received message: Marie Curie
Received message: Steven Hawking
Received message: Isaac Newton
Received message: Niels Bohr
Received message: Michael Faraday
Received message: Galileo Galilei
Received message: Johannes Kepler
Received message: Nikolaus Kopernikus
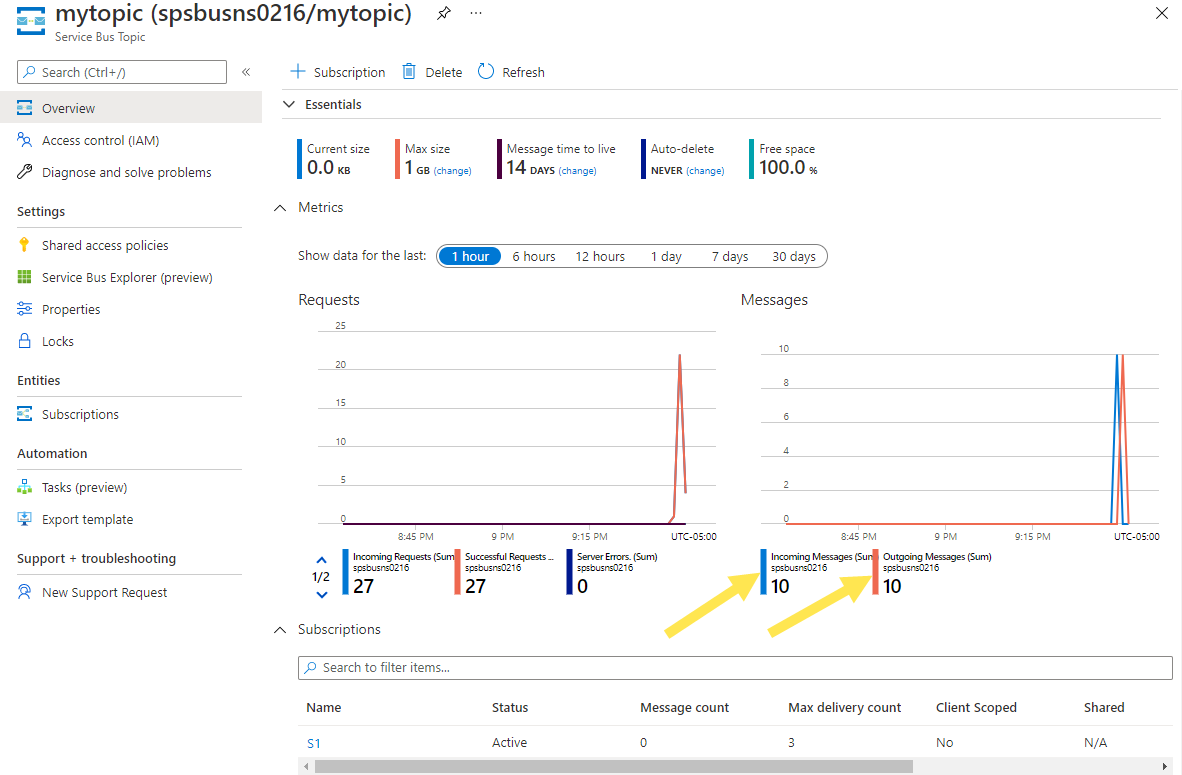
在 Azure 门户中,导航到你的服务总线命名空间,切换到底部窗格中的“主题”,然后选择你的主题,以查看你的主题的“服务总线主题”页面。 在此页上,“消息”图表中应显示 10 条传入消息和 10 条传出消息。
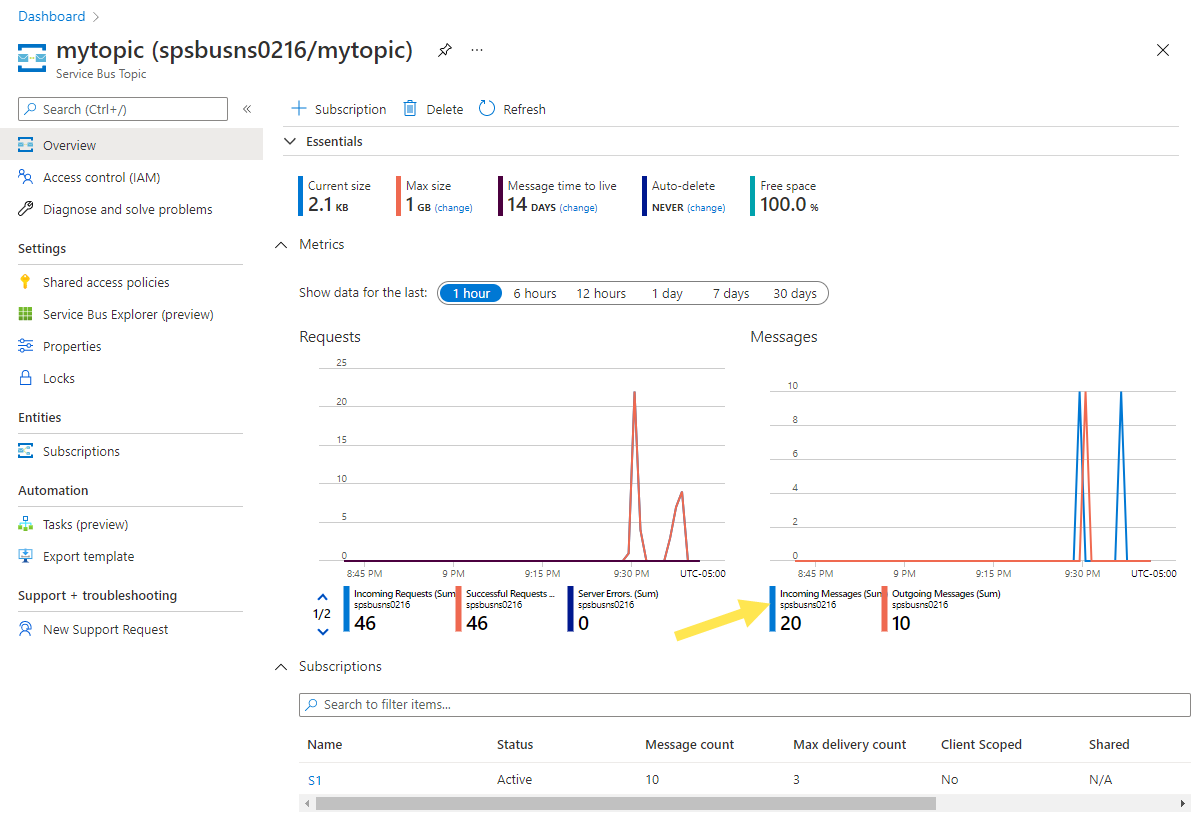
如果你下次只运行发送应用,那么,在“服务总线主题”页上,除 10 条传出消息外,你还会看到 20 条传入消息(10 条新消息)。
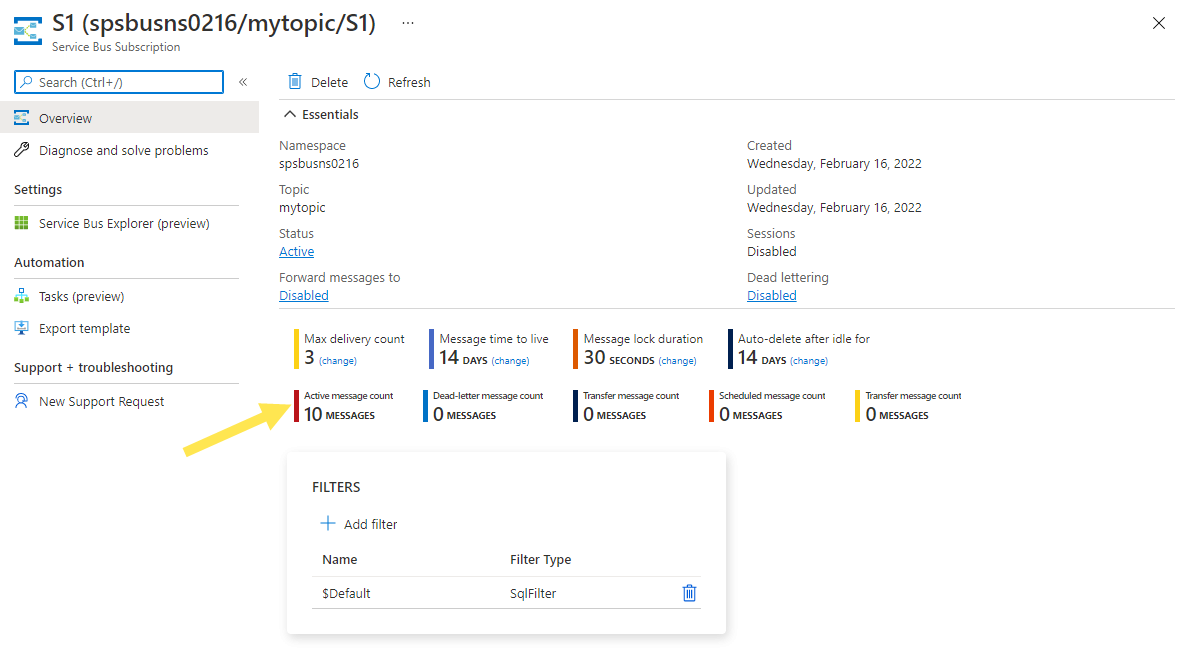
在此页上,如果在底部窗格中选择订阅,则会转到“服务总线订阅”页。 可以在此页上查看活动消息计数、死信消息计数等。 在此示例中,还有 10 条活动消息未被接收器接收。
疑难解答
如果在运行 JavaScript 代码的无密码版本时收到有关所需项的错误,请确保通过 Azure CLI 命令 登录,并将az login应用到 Azure 用户帐户。
清理资源
导航到 Azure 门户中的服务总线命名空间,然后在 Azure 门户上选择“删除”以删除命名空间及其中的队列。
后续步骤
请参阅以下文档和示例:
