Note
Access to this page requires authorization. You can try signing in or changing directories.
Access to this page requires authorization. You can try changing directories.
Overview
Azure Content Delivery Network Image Processing is a reliable, secure, and affordable image processing service provided by Content Delivery Network services. Its functions include scaling, cropping, rotating, sharpening, blurring, pipeline, watermark brightness and contrast, format conversion, and getting image information. It can flexibly adapt to a variety of requirements, including varied device sizes, image display styles for different pages, and anti-theft watermarks.
With Content Delivery Network Image Processing, you can use Content Delivery Network services to obtain processed versions of images from any location and any device at any time.
Service Details
Content Delivery Network Image Processing was introduced as a value-added function for Content Delivery Network services. To use Image Processing, you must first create a Content Delivery Network-accelerated node with the acceleration type of image processing.
Note
The image service cannot be used as a standalone Azure service.
There is currently no graphical user interface (GUI) for the Content Delivery Network image service. After you have created the corresponding Content Delivery Network-accelerated node, directly use the Content Delivery Network-accelerated domain and add image processing parameters to control the dimensions, crop mode, and quality of the image to access the processed version of the image.
Limitations
- Conversion of the following file formats is supported: JPG, PNG, BMP, WEBP, GIF and TIF.
- The original image file must not be larger than 20MB.
- The maximum resolution for images before and after processing is 4096 x 4096, and no side may be longer than 4096 pixels.
- CDN to Origin trip is limited to HTTP protocol.
Service-creation process
Content Delivery Network nodes with the "image processing" acceleration type can only be created from the Azure Portal.
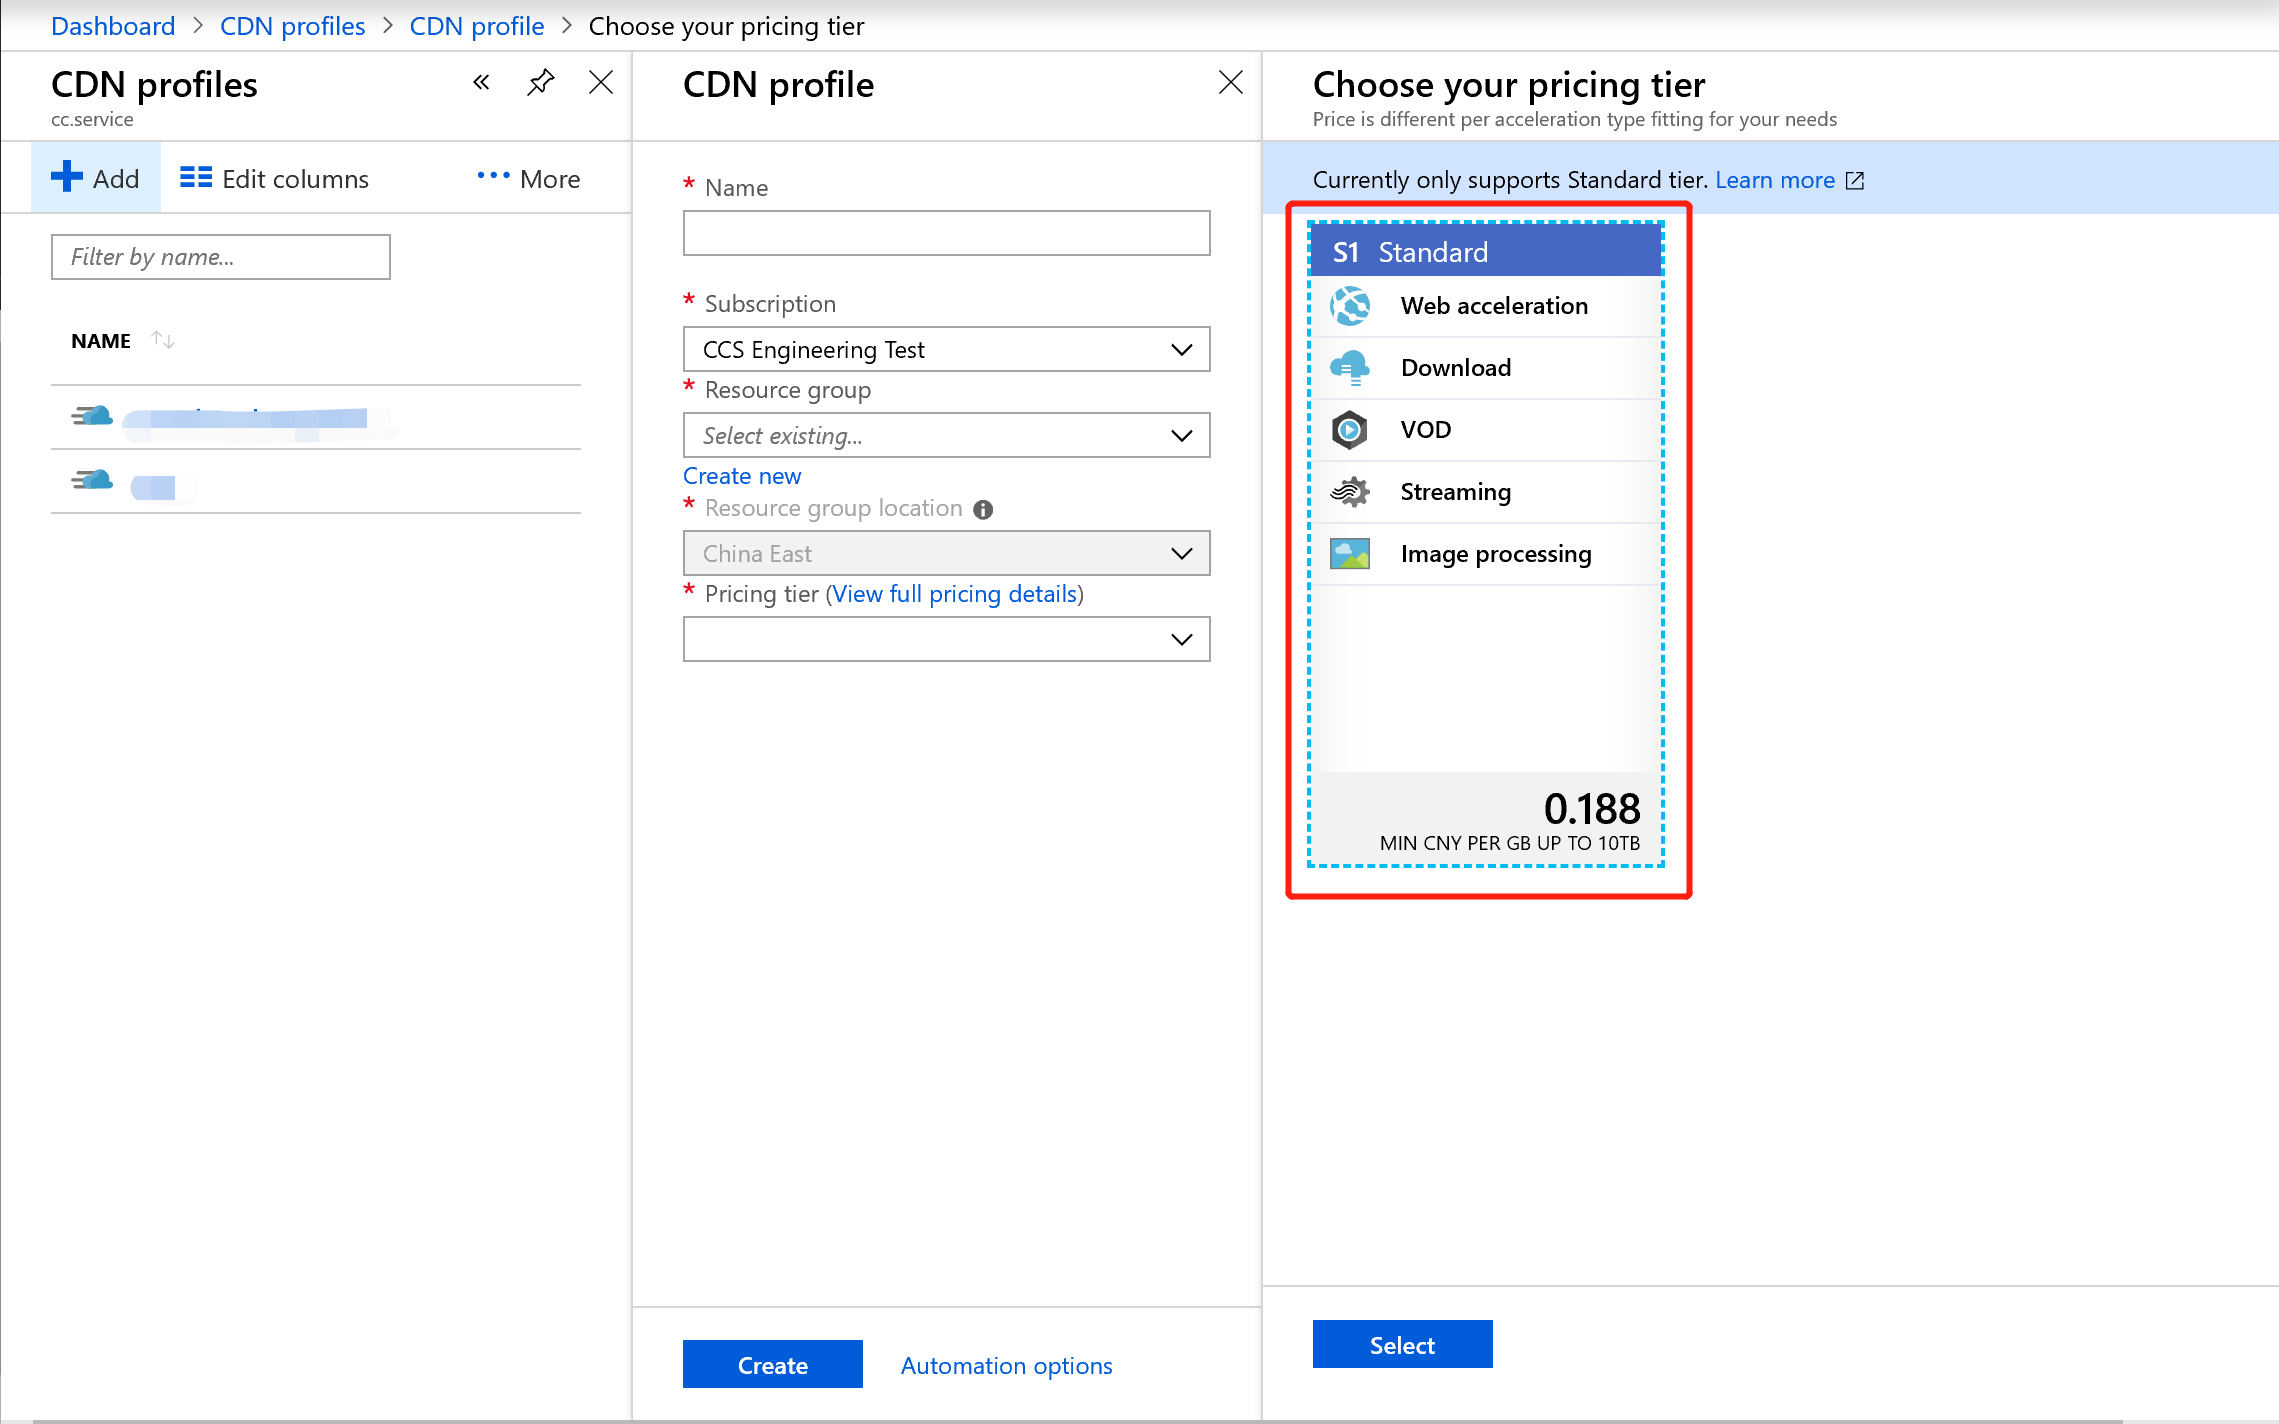
Step 1: Create a Content Delivery Network profile
In "CDN profiles," click "Add."
Enter "Name," "Subscription," "Resource Group," "Resource Group Location," and "Pricing Tier," for which the default "S1 Standard" should be selected.
- "S1 Standard" is the Standard edition of the CDN, which supports Static Content Acceleration, including Web Acceleration, Download Acceleration, and VOD Acceleration.
- "P1 Standard Plus" is the Standard Plus edition, which refers to Live Streaming Acceleration.
- "P1 Premium" is the Premium edition of the CDN. It refers to customers who requested Azure CDN to apply for a certificate on their behalf, who are still being served using this certificate, and who are still paying for the Premium edition. Support for HTTPS functions with Azure applying for certificates on the customer's behalf will be discontinued from July 1, 2019. See Pricing Details for more information.
Click the "Create" button.
Note
If images are to be stored in Storage, you must ensure that the Azure subscription selected in this step is the same as the subscription used to create the Storage account in Step 1. Select "S1 Standard" for the price tier, as shown in the image above. The S1 Standard includes the new "Image Processing" acceleration type.
Step 2: Create a Content Delivery Network-accelerated node with the image processing acceleration type
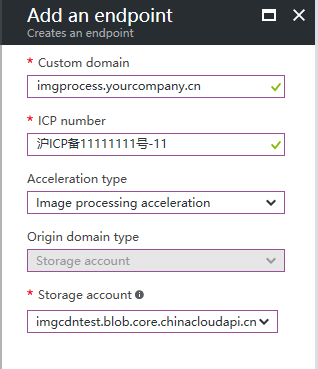
As shown in the image above, do the following:
- Choose image processing acceleration for the acceleration type.
- Choose the corresponding source station type for your source station.
- After the Content Delivery Network-accelerated node has been configured, you can CNAME the custom domain name to the Content Delivery Network platform.
- After the CNAME takes effect, you can start processing images. All original images and processed images will subsequently be accelerated by the Content Delivery Network.
Step 3: Verify that an image is accessible
Before you start doing any specific processing of images, verify that all the configurations you've created so far have taken effect. If you stored the original image in an account that is not a Storage account, go directly to the section "Access verification". If the original image is stored in an Azure Storage account, follow the steps in the following three sections:
3.1 Create a Storage account and select the Storage account as the source station.
To find out how to create an Azure Storage account, see Create a Storage Account.
You can also use an existing Storage account instead of creating a new one.
3.2 Upload the original image
After you have created a Storage account, you can upload the original image into the blob.
There are three methods for uploading:
3.3 Access verification
Assuming that the access link for your original image is
http://yourstorageaccount.blob.core.chinacloudapi.cn/container_name/img_name.jpghttp://yourstorageaccount.blob.core.chinacloudapi.cn/container_name/img_name.jpg, first confirm that the link is accessible (that is, the corresponding container and blob files are publicly accessible).If you can access the Content Delivery Network-accelerated access link for the original image (taking the custom domain name that's used in the previous image as an example)
http://imgprocess.yourcompany.cn/container_name/img_name.jpg, you can be sure that all the configurations have taken effect.
Image Processing
Image processing access rules
For access, use the following URL:
http://your_CDN_custom_domain/container_name/image_object?basic=<处理字符串>
your_CDN_custom_domain: The custom domain name that you used to create the image processing acceleration-type Content Delivery Network node (for example, imgprocess.yourcompany.cn).
container_name: The name of the Storage container where the original image is located
image_object: The name of the original image for processing, (for example, image.jpg).
A specific explanation of 处理字符串 is provided below.
Image Processing Syntax
Detailed definitions for processing strings
处理字符串 A combination of parameters in a form such as {值}{参数关键字}, wherein all the parameters are linked by _.
To perform format conversion, Process String must have the ending .{目标格式扩展名}.
Supported basic image operations (parameters)
| Operation name | Syntax | Notes |
|---|---|---|
| Scale and crop |
|
|
| Advanced crop |
|
A crop start position outside the range of the original image will cause a 400 |
| Region crop |
|
Setting width/height values larger than the original dimensions will return the original image, while an empty |
| Inscribed circle |
|
|
| Rounded rectangle |
|
The rounded corner radius cannot be larger than half the length of the shortest side of the original image |
| Indexed crop | |
The slice sequence numbers start from zero, while the original image will be returned if the number is larger than the slice setting for the original image |
| Rotate | |
|
| Sharpen |
|
|
| Blur | |
|
| Brightness and contrast |
|
|
| Image quality |
|
Only valid when the output format is |
| Format conversion |
|
The following formats are currently supported: |
| Progressive display |
|
Only valid when the output format is |
| Image information |
|
Cannot be used together with other parameters |
| Image EXIF information | |
Cannot be used together with other parameters |
| Image main color |
|
Cannot be used together with other parameters |
| Pipeline |
|
|
| Watermark | See the corresponding subsection that follows. | Cannot coexist with other parameters in the same section of the pipeline. |
Location
| Value | Definition |
|---|---|
| 1 | Top left |
| 2 | Top |
| 3 | Top right |
| 4 | Left side |
| 5 | Center |
| 6 | Right side |
| 7 | Bottom left |
| 8 | Bottom |
| 9 | Bottom right |
Scale and crop
Parameter
| Name | Description |
|---|---|
|
An integer with a value in the range 1-1,000 that indicates the processing performed on the width/height |
|
The height value and width value of the required image, which must be a non-negative integer that does not exceed the dimension limits |
|
An integer that defines the scale mode; see the following table for details. |
|
An integer with a value of 0 or 1, wherein no other operations are performed when it is the default value 0, but the original image is automatically cropped to specified dimensions when the value is 1 |
|
An integer with a value of 0 or 1, wherein the default value 1 permits the image to be scaled up to dimensions larger than the original dimensions, while a value of 0 means that the original image dimensions are used when the specified dimensions are larger than the original image |
|
Integer values in the range 0-255, which respectively represent the red, green, and blue channel values filled in in the RGB color space |
Note:
The results of processing in any situation must not make the image dimensions larger than the limits. See the
限制section in简介for specific limits.PercentageMay be used together withHeightorWidth; the image will be scaled to a size where the specified width and height are multiplied by a specified percentage,
HeightandWidthcan all exist independently. Any of the values that are missing will default to the original image dimensionsand
Percentagemay exist independently. The image will be scaled to a size where the original dimensions are multiplied by a specific percentageand
Cutonly takes effect when it coexists withHeightandWidthThe background color must be used together with
{ScaleType}4
Scale mode
| Value | Presentation |
|---|---|
| 0 or undefined | Locked aspect ratio and long side prioritized |
| 1 | Locked aspect ratio and short side prioritized |
| 2 | Forced width/height |
| 4 | Locked aspect ratio and short side prioritized, and fill in empty regions with a specified color after scaling (automatically filled in white if the color is not specified). |
Note: The concepts of 长边 and 短边 here are determined based on the ratioof 原始长度 / 目标长度.
Image information response body
Includes at least the JSON objects for the following strings:
| Name | Content |
|---|---|
| Width | Image width in pixels |
| Height | Image height in pixels |
| Size | Image file size in bytes |
| MimeType | Original image file type |
Response body example
{
    "Width": 221,
    "Height": 284,
    "Size": 119540,
    "AveColor": null,
    "MimeType": "Jpeg"
}
Image main color response header
Includes at least the JSON objects for the following strings:
| Name | Content |
|---|---|
| RGB | The image's main colors indicated by a hexadecimal value in the RGB color space |
Response body example
JSON
{
    "RGB": "273B2A"
}
Example (updates ongoing)
Assuming http://imgprocess.yourcompany.cn/container_name/img_name.jpg is the original image URL that has undergone Azure Content Delivery Network acceleration.

1. Scale the image down to 60% of the original size:
http://imgprocess.yourcompany.cn/container_name/img_name.jpg?basic=60p

2. Process the original image with rounded corners (with a corner radius of 20):
http://imgprocess.yourcompany.cn/container_name/img_name.jpg?basic=20-2ci

3. First, scale the image down to 60% of the original size, and then process the image with rounded corners (with a corner radius of 20):
http://imgprocess.yourcompany.cn/container_name/img_name.jpg?basic=60p_20-2ci

4. Get the image information:
http://imgprocess.yourcompany.cn/container_name/img_name.jpg?basic=info
JSON
{
    "Width": 800,
    "Height": 400,
    "Size": 87341,
    "AveColor": null,
    "MimeType": "Jpeg"
}
5. Get the image's EXIF information:
http://imgprocess.yourcompany.cn/container_name/img_name.jpg?basic=exif
JSON
{
    "Orientation": 1,
    "XResolution": 72.0,
    "YResolution": 72.0,
    "ResolutionUnit": 2,
    "Software": "Adobe Photoshop CS5 Windows",
    "DateTime": "2014:04:15 16:43:14",
    "ColorSpace": 1,
    "PixelXDimension": 800,
    "PixelYDimension": 400
}
6. Get the image's main colors:
http://imgprocess.yourcompany.cn/container_name/img_name.jpg?basic=imageAve
JSON
{
    "RGB": "0296C8"
}
Watermark operations
The watermark function's 处理字符串 is a query string that may include the following fields:
| Name | Description |
|---|---|
| watermark | Integer that defines the watermark type, value in the range 1-3; see the following table for detailed explanations. |
| p | Integer value that defines the watermark position, with a value in the range 1-9; see the previous table for detailed explanations. |
| t | Integer that defines the transparency of the watermark, valid when the watermark type is image watermark. Value between 0-100 |
| text | String that has been |
| type | String that has been |
| color | Six-digit hexadecimal number in the 8-bit RGB color space that has been |
| size | Positive integer that defines the watermark text font size |
| object | String that has been |
Note:
- The
watermarkfield is mandatory and must be the first field in the query string - Images used in image watermarks must be stored in the same Storage account as the original image.
- Base64 encoding conversion can be directly processed by using online tools, such as base64encode
- The file content and filename distinguish between upper- and lowercase, so pay attention to capitalization when performing base64 transcoding.
Watermark type
| Value | Definition |
|---|---|
| 1 | Image watermark |
| 2 | Text watermark |
Supported fonts
| Name | Definition | Base64 encoding |
|---|---|---|
| dengxian | Sans Serif | ZGVuZ3hpYW4= |
| fangsong | Fang Song | ZmFuZ3Nvbmc= |
| fangzhengshuti | FZShuTi | ZmFuZ3poZW5nc2h1dGk= |
| fangzhengyaoti | FZYaoTi | ZmFuZ3poZW5neWFvdGk= |
| kaiti | Kaiti | a2FpdGk= |
| lishu | Lishu | bGlzaHU= |
| microsoftyahei | Microsoft YaHei | bWljcm9zb2Z0eWFoZWk= |
| microsoftyaheiui | Microsoft YaHei UI | bWljcm9zb2Z0eWFoZWl1aQ== |
| xinsongti | NSimSun | eGluc29uZ3Rp |
| heiti | Heiti | aGVpdGk= |
| songti | SimSun | c29uZ3Rp |
| huawencaiyun | STCaiyun | aHVhd2VuY2FpeXVu |
| huawenfangsong | STFangsong | aHVhd2VuZmFuZ3Nvbmc= |
| huawenhupo | STHupo | aHVhd2VuaHVwbw== |
| huawenkaiti | STKaiti | aHVhd2Vua2FpdGk= |
| huawenlishu | STLiti | aHVhd2VubGlzaHU= |
| huawensongti | STSong | aHVhd2Vuc29uZ3Rp |
| huawenxihei | STXihei | aHVhd2VueGloZWk= |
| huawenxingkai | STXingkai | aHVhd2VueGluZ2thaQ== |
| huawenxinwei | STXinwei | aHVhd2VueGlud2Vp |
| huawenzhongsong | STZhongsong | aHVhd2Vuemhvbmdzb25n |
| youyuan | Simyou | eW91eXVhbg== |
Sample
Assuming the watermark image file exists and uses container_name/watermark.jpg, the corresponding Base64 encoding for it is Y29udGFpbmVyX25hbWUvd2F0ZXJtYXJrLmpwZw==

1. Add a watermark image to the original image:
http://imgprocess.yourcompany.cn/container_name/img_name.jpg?basic=watermark=1;p=3;s=50;object=Y29udGFpbmVyX25hbWUvd2F0ZXJtYXJrLmpwZw==

2. The original image is first scaled down to 60% of the original size, then processed with rounded corners (with a corner radius of 20), and finally an image watermark is added (note that this uses the pipeline | operator):
http://imgprocess.yourcompany.cn/container_name/img_name.jpg?basic=60p_20-2ci|watermark=1;p=3;s=50;object=Y29udGFpbmVyX25hbWUvd2F0ZXJtYXJrLmpwZw==

3. The original image is first scaled down to 60% of the original size, then processed with rounded corners (with a corner radius of 20), and finally an image watermark is added (note that this uses the pipeline | operator), the text content is "Azure operated by 21Vianet CDN" and the font is "Microsoft Yahei":
http://imgprocess.yourcompany.cn/container_name/img_name.jpg?basic=60p_20-2ci|watermark=2;p=3;s=50;text=QXp1cmUgQ2hpbmEgQ0RO;type=bWljcm9zb2Z0eWFoZWk=