Note
Access to this page requires authorization. You can try signing in or changing directories.
Access to this page requires authorization. You can try changing directories.
Azure Logic Apps relies on Azure Storage to store and automatically encrypt data at rest. This encryption protects your data and helps you meet your organizational security and compliance commitments. By default, Azure Storage uses Microsoft-managed keys to encrypt your data. For more information, review Azure Storage encryption for data at rest.
To further control access and protect sensitive data in Azure Logic Apps, you can set up more security in these areas:
- Access to logic app operations
- Access to run history inputs and outputs
- Access to parameter inputs
- Authentication types for triggers and actions that support authentication
- Access for inbound calls to request-based triggers
- Access for outbound calls to other services and systems
- Block creating connections for specific connectors
- Azure Security Baseline for Azure Logic Apps
For more information about security in Azure, review these topics:
Access to logic app operations
For Consumption logic apps only, before you can create or manage logic apps and their connections, you need specific permissions, which are provided through roles using Azure role-based access control (Azure RBAC). You can also set up permissions so that only specific users or groups can run specific tasks, such as managing, editing, and viewing logic apps. To control their permissions, you can assign built-in or customized roles to members who have access to your Azure subscription. Azure Logic Apps has the following specific roles, based on whether you have a Consumption or Standard logic app workflow:
Consumption workflows
| Role | Description |
|---|---|
| Logic App Contributor | You can manage logic app workflows, but you can't change access to them. |
| Logic App Operator | You can read, enable, and disable logic app workflows, but you can't edit or update them. |
| Contributor | You have full access to manage all resources, but you can't assign roles in Azure RBAC, manage assignments in Azure Blueprints, or share image galleries. |
For example, suppose you have to work with a logic app workflow that you didn't create and authenticate connections used by that logic app workflow. Your Azure subscription requires Contributor permissions for the resource group that contains that logic app resource. If you create a logic app resource, you automatically have Contributor access.
To prevent others from changing or deleting your logic app workflow, you can use Azure Resource Lock. This capability prevents others from changing or deleting production resources. For more information about connection security, review Connection configuration in Azure Logic Apps and Connection security and encryption.
Standard workflows
Note
This capability is in preview and is subject to the Supplemental Terms of Use for Azure Previews.
| Role | Description |
|---|---|
| Logic Apps Standard Reader (Preview) | You have read-only access to all resources in a Standard logic app and workflows, including the workflow runs and their history. |
| Logic Apps Standard Operator (Preview) | You have access to enable, resubmit, and disable workflows and to create connections to services, systems, and networks for a Standard logic app. The Operator role can perform administration and support tasks on the Azure Logic Apps platform, but doesn't have permissions to edit workflows or settings. |
| Logic Apps Standard Developer (Preview) | You have access to create and edit workflows, connections, and settings for a Standard logic app. The Developer role doesn't have permissions to make changes outside the scope of workflows, for example, application-wide changes such as configure virtual network integration. App Service Plans aren't supported. |
| Logic Apps Standard Contributor (Preview) | You have access to manage all aspects of a Standard logic app, but you can't change access or ownership. |
Access to run history data
During a logic app run, all the data is encrypted during transit by using Transport Layer Security (TLS) and at rest. When your logic app finishes running, you can view the history for that run, including the steps that ran along with the status, duration, inputs, and outputs for each action. This rich detail provides insight into how your logic app ran and where you might start troubleshooting any problems that arise.
When you view your logic app's run history, Azure Logic Apps authenticates your access and then provides links to the inputs and outputs for the requests and responses for each run. However, for actions that handle any passwords, secrets, keys, or other sensitive information, you want to prevent others from viewing and accessing that data. For example, if your logic app gets a secret from Azure Key Vault to use when authenticating an HTTP action, you want to hide that secret from view.
To control access to the inputs and outputs in your logic app's run history, you have these options:
Restrict access by IP address range.
This option helps you secure access to run history based on the requests from a specific IP address range.
Secure data in run history by using obfuscation.
In many triggers and actions, you can secure the inputs, outputs, or both in a logic app's run history.
Restrict access by IP address range
You can limit access to the inputs and outputs in the run history for your logic app workflows so that only requests from specific IP address ranges can view that data.
For example, to block anyone from accessing inputs and outputs, specify an IP address range such as 0.0.0.0-0.0.0.0. Only a person with administrator permissions can remove this restriction, which provides the possibility for "just-in-time" access to data in your logic app workflows. A valid IP range uses these formats: x.x.x.x/x or x.x.x.x-x.x.x.x
To specify the allowed IP ranges, follow these steps for your Consumption or Standard logic app in the Azure portal or your Azure Resource Manager template:
Consumption workflows
In the Azure portal, open your Consumption logic app workflow in the designer.
On the logic app menu, under Settings, select Workflow settings.
In the Access control configuration section, under Allowed inbound IP addresses, from the Trigger access option list, select Specific IP ranges.
In the IP ranges for contents box, specify the IP address ranges that can access content from inputs and outputs.
Standard workflows
In the Azure portal, open your Standard logic app resource.
On the logic app menu, under Settings, select Networking.
In the Inbound traffic configuration section, next to Public network access, select Enabled with no access restriction.
On the Access restrictions page, under App access, select Enabled from select virtual networks and IP addresses.
Under Site access and rules, on the Main site tab, add one or more rules to either Allow or Deny requests from specific IP ranges. You can also use the HTTP header filter settings and forwarding settings. A valid IP range uses these formats: x.x.x.x/x or x.x.x.x-x.x.x.x
For more information, see Blocking inbound IP addresses in Azure Logic Apps (Standard).
Secure data in run history by using obfuscation
Many triggers and actions have settings to secure inputs, outputs, or both from a logic app's run history. All managed connectors and custom connectors support these options. However, the following built-in operations don't support these options:
| Secure Inputs - Unsupported | Secure Outputs - Unsupported |
|---|---|
| Append to array variable Append to string variable Decrement variable For each If Increment variable Initialize variable Recurrence Scope Set variable Switch Terminate Until |
Append to array variable Append to string variable Compose Decrement variable For each If Increment variable Initialize variable Parse JSON Recurrence Response Scope Set variable Switch Terminate Until Wait |
Considerations for securing inputs and outputs
Before using these settings to help you secure this data, review these considerations:
When you obscure the inputs or outputs on a trigger or action, Azure Logic Apps doesn't send the secured data to Azure Log Analytics. Also, you can't add tracked properties to that trigger or action for monitoring.
The Azure Logic Apps API for handling workflow history doesn't return secured outputs.
To secure outputs from an action that obscures inputs or explicitly obscures outputs, manually turn on Secure Outputs in that action.
Make sure that you turn on Secure Inputs or Secure Outputs in downstream actions where you expect the run history to obscure that data.
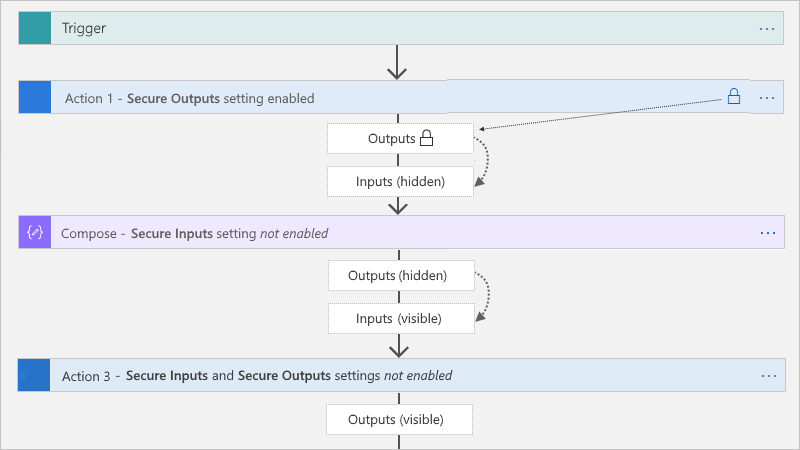
Secure Outputs setting
When you manually turn on Secure Outputs in a trigger or action, Azure Logic Apps hides these outputs in the run history. If a downstream action explicitly uses these secured outputs as inputs, Azure Logic Apps hides this action's inputs in the run history, but doesn't enable the action's Secure Inputs setting.

The Compose, Parse JSON, and Response actions have only the Secure Inputs setting. When turned on, the setting also hides these actions' outputs. If these actions explicitly use the upstream secured outputs as inputs, Azure Logic Apps hides these actions' inputs and outputs, but doesn't enable these actions' Secure Inputs setting. If a downstream action explicitly uses the hidden outputs from the Compose, Parse JSON, or Response actions as inputs, Azure Logic Apps doesn't hide this downstream action's inputs or outputs.
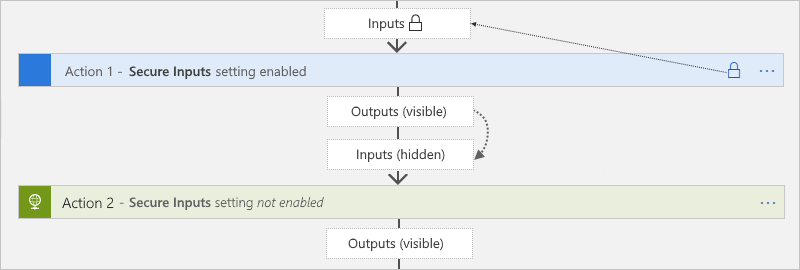
Secure Inputs setting
When you manually turn on Secure Inputs in a trigger or action, Azure Logic Apps hides these inputs in the run history. If a downstream action explicitly uses the visible outputs from that trigger or action as inputs, Azure Logic Apps hides this downstream action's inputs in the run history, but doesn't enable Secure Inputs in this action and doesn't hide this action's outputs.
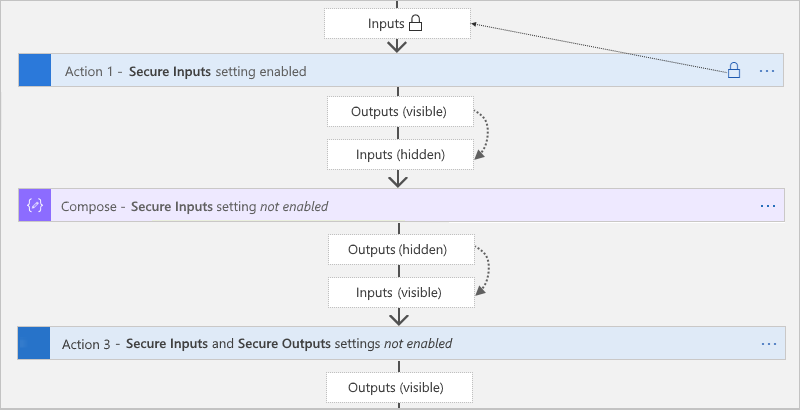
If the Compose, Parse JSON, and Response actions explicitly use the visible outputs from the trigger or action that has the secured inputs, Azure Logic Apps hides these actions' inputs and outputs, but doesn't enable these action's Secure Inputs setting. If a downstream action explicitly uses the hidden outputs from the Compose, Parse JSON, or Response actions as inputs, Azure Logic Apps doesn't hide this downstream action's inputs or outputs.
Secure inputs and outputs in the designer
In the Azure portal, open your logic app workflow in the designer.
On the designer, select the trigger or action where you want to secure sensitive data.
On the information pane that opens, select Settings, and expand Security.
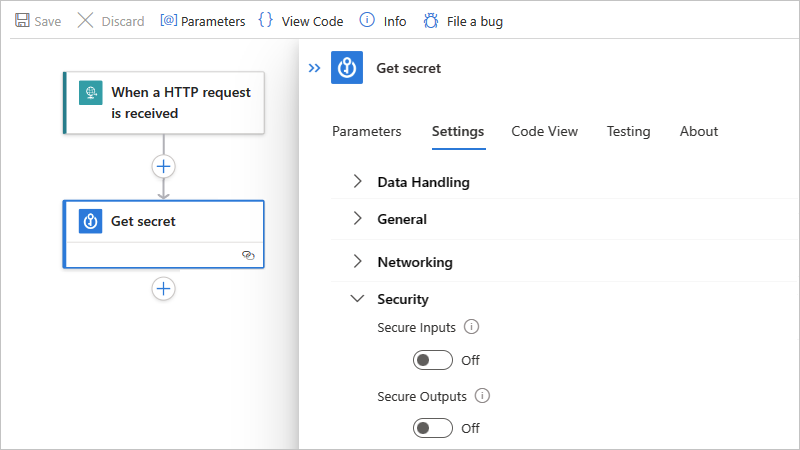
Turn on either Secure Inputs, Secure Outputs, or both.
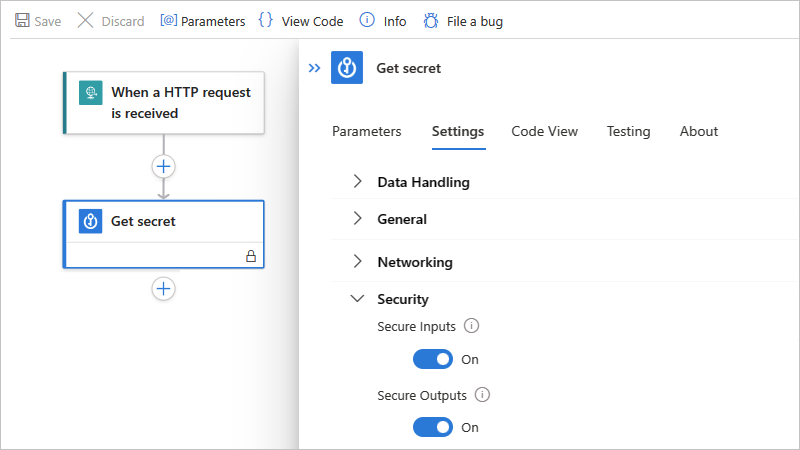
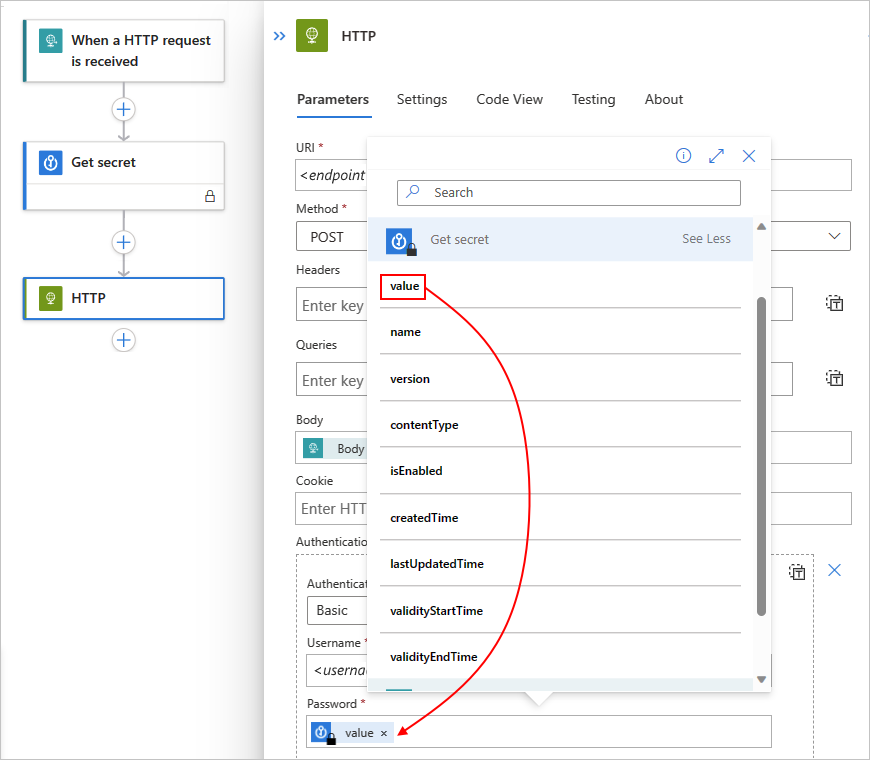
The trigger or action now shows a lock icon in the title bar. Any tokens that represent secured outputs from previous actions also show lock icons. For example, in a subsequent action, after you select a token for a secured output from the dynamic content list, that token shows a lock icon.
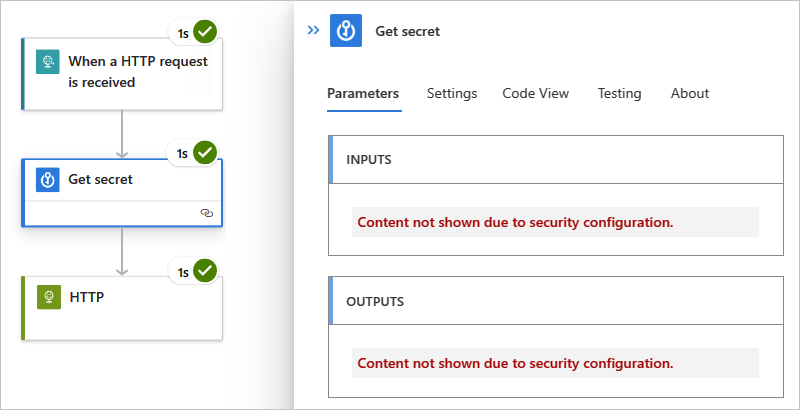
After the workflow runs, you can view the history for that run.
Select Overview either on the Consumption logic app menu or on the Standard workflow menu.
Under Runs history, select the run that you want to view.
On the workflow run history pane, select the actions that you want to review.
If you chose to hide both inputs and outputs, those values now appear hidden.


Secure inputs and outputs in code view
In the underlying trigger or action definition, add or update the runtimeConfiguration.secureData.properties array with either or both of these values:
"inputs": Secures inputs in run history."outputs": Secures outputs in run history.
"<trigger-or-action-name>": {
   "type": "<trigger-or-action-type>",
   "inputs": {
      <trigger-or-action-inputs>
   },
   "runtimeConfiguration": {
      "secureData": {
         "properties": [
            "inputs",
            "outputs"
         ]
      }
   },
   <other-attributes>
}
Access to parameter inputs
If you deploy across different environments, consider parameterizing the values in your workflow definition that vary based on those environments. That way, you can avoid hard-coded data by using an Azure Resource Manager template to deploy your logic app, protect sensitive data by defining secured parameters, and pass that data as separate inputs through the template's parameters by using a parameter file.
For example, if you authenticate HTTP actions with OAuth with Microsoft Entra ID, you can define and obscure the parameters that accept the client ID and client secret that are used for authentication. To define these parameters in your logic app workflow, use the parameters section in your logic app's workflow definition and Resource Manager template for deployment. To help secure parameter values that you don't want shown when editing your logic app or viewing run history, define the parameters by using the securestring or secureobject type and use encoding as necessary. Parameters that have this type aren't returned with the resource definition and aren't accessible when viewing the resource after deployment. To access these parameter values during runtime, use the @parameters('<parameter-name>') expression inside your workflow definition. This expression is evaluated only at runtime and is described by the Workflow Definition Language.
Note
If you use a parameter in a request header or body, that parameter might be visible
when you view your workflow's run history and outgoing HTTP request. Make sure that
you also set your content access policies accordingly. You can also use
obfuscation to hide inputs and outputs in your run history.
By default, Authorization headers aren't visible through inputs or outputs.
So if a secret is used there, that secret isn't retrievable.
For more information, review these sections in this topic:
If you automate deployment for logic apps by using Resource Manager templates, you can define secured template parameters, which are evaluated at deployment, by using the securestring and secureobject types. To define template parameters, use your template's top level parameters section, which is separate and different from your workflow definition's parameters section. To provide the values for template parameters, use a separate parameter file.
For example, if you use secrets, you can define and use secured template parameters that retrieve those secrets from Azure Key Vault at deployment. You can then reference the key vault and secret in your parameter file. For more information, review these topics:
- Pass sensitive values at deployment by using Azure Key Vault
- Secure parameters in Azure Resource Manager templates later in this topic
Secure parameters in workflow definitions (Consumption workflow)
To protect sensitive information in your logic app's workflow definition, use secured parameters so this information isn't visible after you save your logic app workflow. For example, suppose you have an HTTP action requires basic authentication, which uses a username and password. In the workflow definition, the parameters section defines the basicAuthPasswordParam and basicAuthUsernameParam parameters by using the securestring type. The action definition then references these parameters in the authentication section.
Important
For optimal security, Microsoft recommends using Microsoft Entra ID with managed identities for authentication when possible. This option provides superior security without having to provide credentials. Azure manages this identity and helps keep authentication information secure so that you don't have to manage this sensitive information. To set up a managed identity for Azure Logic Apps, see Authenticate access and connections to Azure resources with managed identities in Azure Logic Apps.
"definition": {
   "$schema": "https://schema.management.azure.com/providers/Microsoft.Logic/schemas/2016-06-01/workflowdefinition.json#",
   "actions": {
      "HTTP": {
         "type": "Http",
         "inputs": {
            "method": "GET",
            "uri": "https://www.microsoft.com",
            "authentication": {
               "type": "Basic",
               "username": "@parameters('basicAuthUsernameParam')",
               "password": "@parameters('basicAuthPasswordParam')"
            }
         },
         "runAfter": {}
      }
   },
   "parameters": {
      "basicAuthPasswordParam": {
         "type": "securestring"
      },
      "basicAuthUsernameParam": {
         "type": "securestring"
      }
   },
   "triggers": {
      "manual": {
         "type": "Request",
         "kind": "Http",
         "inputs": {
            "schema": {}
         }
      }
   },
   "contentVersion": "1.0.0.0",
   "outputs": {}
}
Secure parameters in Azure Resource Manager templates (Consumption workflow)
A Resource Manager template for a logic app resource and workflow has multiple parameters sections. To protect passwords, keys, secrets, and other sensitive information, define secured parameters at the template level and workflow definition level by using the securestring or secureobject type. You can then store these values in Azure Key Vault and use the parameter file to reference the key vault and secret. Your template then retrieves that information at deployment. For more information, review Pass sensitive values at deployment by using Azure Key Vault.
Important
For optimal security, Microsoft recommends using Microsoft Entra ID with managed identities for authentication when possible. This option provides superior security without having to provide credentials. Azure manages this identity and helps keep authentication information secure so that you don't have to manage this sensitive information. To set up a managed identity for Azure Logic Apps, see Authenticate access and connections to Azure resources with managed identities in Azure Logic Apps.
This list includes more information about these parameters sections:
At the template's top level, a
parameterssection defines the parameters for the values that the template uses at deployment. For example, these values can include connection strings for a specific deployment environment. You can then store these values in a separate parameter file, which makes changing these values easier.Inside your logic app's resource definition, but outside your workflow definition, a
parameterssection specifies the values for your workflow definition's parameters. In this section, you can assign these values by using template expressions that reference your template's parameters. These expressions are evaluated at deployment.Inside your workflow definition, a
parameterssection defines the parameters that your logic app workflow uses at runtime. You can then reference these parameters inside your logic app's workflow by using workflow definition expressions, which are evaluated at runtime.
This example template that has multiple secured parameter definitions that use the securestring type:
| Parameter name | Description |
|---|---|
TemplatePasswordParam |
A template parameter that accepts a password that is then passed to the workflow definition's basicAuthPasswordParam parameter |
TemplateUsernameParam |
A template parameter that accepts a username that is then passed to the workflow definition's basicAuthUserNameParam parameter |
basicAuthPasswordParam |
A workflow definition parameter that accepts the password for basic authentication in an HTTP action |
basicAuthUserNameParam |
A workflow definition parameter that accepts the username for basic authentication in an HTTP action |
{
   "$schema": "https://schema.management.azure.com/schemas/2015-01-01/deploymentTemplate.json#",
   "contentVersion": "1.0.0.0",
   "parameters": {
      "LogicAppName": {
         "type": "string",
         "minLength": 1,
         "maxLength": 80,
         "metadata": {
            "description": "Name of the Logic App."
         }
      },
      "TemplatePasswordParam": {
         "type": "securestring"
      },
      "TemplateUsernameParam": {
         "type": "securestring"
      },
      "LogicAppLocation": {
         "type": "string",
         "defaultValue": "[resourceGroup().location]",
         "allowedValues": [
            "[resourceGroup().location]",
            "chinaeast2",
            "chinanorth2",
	         "chinanorth3"
         ],
         "metadata": {
            "description": "Location of the Logic App."
         }
      }
   },
   "variables": {},
   "resources": [
      {
         "name": "[parameters('LogicAppName')]",
         "type": "Microsoft.Logic/workflows",
         "location": "[parameters('LogicAppLocation')]",
         "tags": {
            "displayName": "LogicApp"
         },
         "apiVersion": "2016-06-01",
         "properties": {
            "definition": {
               "$schema": "https://schema.management.azure.com/providers/Microsoft.Logic/schemas/2016-06-01/workflowdefinition.json#",
               "actions": {
                  "HTTP": {
                     "type": "Http",
                     "inputs": {
                        "method": "GET",
                        "uri": "https://www.microsoft.com",
                        "authentication": {
                           "type": "Basic",
                           "username": "@parameters('basicAuthUsernameParam')",
                           "password": "@parameters('basicAuthPasswordParam')"
                        }
                     },
                  "runAfter": {}
                  }
               },
               "parameters": {
                  "basicAuthPasswordParam": {
                     "type": "securestring"
                  },
                  "basicAuthUsernameParam": {
                     "type": "securestring"
                  }
               },
               "triggers": {
                  "manual": {
                     "type": "Request",
                     "kind": "Http",
                     "inputs": {
                        "schema": {}
                     }
                  }
               },
               "contentVersion": "1.0.0.0",
               "outputs": {}
            },
            "parameters": {
               "basicAuthPasswordParam": {
                  "value": "[parameters('TemplatePasswordParam')]"
               },
               "basicAuthUsernameParam": {
                  "value": "[parameters('TemplateUsernameParam')]"
               }
            }
         }
      }
   ],
   "outputs": {}
}
Authentication types for connectors that support authentication
The following table identifies the authentication types that are available on the connector operations where you can select an authentication type:
| Authentication type | Logic app & supported connectors |
|---|---|
| Basic | Azure API Management, Azure App Service, HTTP, HTTP + Swagger, HTTP Webhook |
| Client certificate | Azure API Management, Azure App Service, HTTP, HTTP + Swagger, HTTP Webhook |
| Active Directory OAuth (OAuth 2.0 with Microsoft Entra ID) | - Consumption: Azure API Management, Azure App Service, Azure Functions, HTTP, HTTP + Swagger, HTTP Webhook - Standard: Azure Automation, Azure Blob Storage, Azure Event Hubs, Azure Queues, Azure Service Bus, Azure Tables, HTTP, HTTP Webhook, SQL Server |
| Raw | Azure API Management, Azure App Service, Azure Functions, HTTP, HTTP + Swagger, HTTP Webhook |
| Managed identity | Built-in connectors: - Consumption: Azure API Management, Azure App Service, Azure Functions, HTTP, HTTP Webhook - Standard: Azure Automation, Azure Blob Storage, Azure Event Hubs, Azure Queues, Azure Service Bus, Azure Tables, HTTP, HTTP Webhook, SQL Server Note: Currently, most built-in, service provider-based connectors don't support selecting user-assigned managed identities for authentication. Managed connectors: Azure App Service, Azure Automation, Azure Blob Storage, Azure Container Instance, Azure Cosmos DB, Azure Data Explorer, Azure Data Factory, Azure Data Lake, Azure Event Grid, Azure Event Hubs, Azure IoT Central V2, Azure IoT Central V3, Azure Key Vault, Azure Log Analytics, Azure Queues, Azure Resource Manager, Azure Service Bus, Azure Sentinel, Azure Table Storage, Azure VM, HTTP with Microsoft Entra ID, SQL Server |
Important
For optimal security, Microsoft recommends using Microsoft Entra ID with managed identities for authentication when possible. This option provides superior security without having to provide credentials. Azure manages this identity and helps keep authentication information secure so that you don't have to manage this sensitive information. To set up a managed identity for Azure Logic Apps, see Authenticate access and connections to Azure resources with managed identities in Azure Logic Apps.
Access for inbound calls to request-based triggers
Inbound calls that a logic app receives through a request-based trigger, such as the Request trigger or HTTP Webhook trigger, support encryption and are secured with Transport Layer Security (TLS) 1.2 at minimum, previously known as Secure Sockets Layer (SSL). Azure Logic Apps enforces this version when receiving an inbound call to a Request trigger or a callback to the HTTP Webhook trigger or action.
For inbound calls, use the following cipher suites:
- TLS_ECDHE_ECDSA_WITH_AES_256_GCM_SHA384
- TLS_ECDHE_ECDSA_WITH_AES_128_GCM_SHA256
- TLS_ECDHE_RSA_WITH_AES_256_GCM_SHA384
- TLS_ECDHE_RSA_WITH_AES_128_GCM_SHA256
- TLS_ECDHE_ECDSA_WITH_AES_256_CBC_SHA384
- TLS_ECDHE_ECDSA_WITH_AES_128_CBC_SHA256
- TLS_ECDHE_RSA_WITH_AES_256_CBC_SHA384
- TLS_ECDHE_RSA_WITH_AES_128_CBC_SHA256
Important
For backward compatibility, Azure Logic Apps currently supports some older cipher suites. However, don't use older cipher suites when you develop new apps because such suites might not be supported in the future.
For example, you might find the following cipher suites if you inspect the TLS handshake messages in Azure Logic Apps or by using a security tool on your logic app's URL. Again, don't use these older suites:
- TLS_ECDHE_ECDSA_WITH_AES_256_CBC_SHA
- TLS_ECDHE_ECDSA_WITH_AES_128_CBC_SHA
- TLS_ECDHE_RSA_WITH_AES_256_CBC_SHA
- TLS_ECDHE_RSA_WITH_AES_128_CBC_SHA
- TLS_RSA_WITH_AES_256_GCM_SHA384
- TLS_RSA_WITH_AES_128_GCM_SHA256
- TLS_RSA_WITH_AES_256_CBC_SHA256
- TLS_RSA_WITH_AES_128_CBC_SHA256
- TLS_RSA_WITH_AES_256_CBC_SHA
- TLS_RSA_WITH_AES_128_CBC_SHA
- TLS_RSA_WITH_3DES_EDE_CBC_SHA
The following list includes ways that you can limit access to triggers that receive inbound calls to your logic app workflow so that only authorized clients can call your workflow:
- Enable OAuth with Microsoft Entra ID
- Generate shared access signature (SAS) keys or tokens
- Disable shared access signature (SAS) authentication
- Restrict inbound IP addresses
- Expose your logic app with Azure API Management
Enable OAuth 2.0 with Microsoft Entra ID
In a Consumption workflow that starts with a request-based trigger, you can authenticate and authorize inbound calls sent to the endpoint created by that trigger by enabling OAuth 2.0 with Microsoft Entra ID. To set up this authentication, define or add an authorization policy at the logic app resource level. This way, inbound calls use OAuth access tokens for authorization.
When your logic app workflow receives an inbound request that includes an OAuth access token, Azure Logic Apps compares the token's claims against the claims specified by each authorization policy. If a match exists between the token's claims and all the claims in at least one policy, authorization succeeds for the inbound request. The token can have more claims than the number specified by the authorization policy.
In a Standard workflow that starts with the Request trigger (but not a webhook trigger), you can use the Azure Functions provision for authenticating inbound calls sent to the endpoint created by the Request trigger by using a managed identity. This provision is also known as "Easy Auth". For more information, see Trigger workflows in Standard logic apps with Easy Auth.
Considerations before you enable OAuth 2.0 with Microsoft Entra ID
For optimal security, Microsoft recommends using Microsoft Entra ID with managed identities for authentication when possible. This option provides superior security without having to provide credentials. Azure manages this identity and helps keep authentication information secure so that you don't have to manage this sensitive information. To set up a managed identity for Azure Logic Apps, see Authenticate access and connections to Azure resources with managed identities in Azure Logic Apps.
In Consumption workflows, inbound calls to the endpoint URL for a request-based trigger can use only one authorization scheme, either OAuth 2.0 with Microsoft Entra ID or Shared Access Signature (SAS). Although using one scheme doesn't disable the other scheme, if you use both schemes at the same time, Azure Logic Apps generates an error because the service doesn't know which scheme to choose. If your Consumption workflow starts with the Request trigger, you can disable SAS authentication as well as restrict authorization to use only OAuth 2.0 with Microsoft Entra ID. For Standard workflows, you can use other authentication types without disabling SAS.
Azure Logic Apps supports either the bearer type or proof-of-possession type (Consumption logic app only) authorization schemes for Microsoft Entra ID OAuth access tokens. However, the
Authorizationheader for the access token must specify either theBearertype orPoPtype. For more information about how to get and use a PoP token, see Get a Proof of Possession (PoP) token.Your Consumption logic app resource is limited to a maximum number of authorization policies. Each authorization policy also has a maximum number of claims. For more information, see Limits and configuration for Azure Logic Apps.
An authorization policy must include at least the Issuer claim, which has a value that starts with either
https://sts.chinacloudapi.cn/orhttps://login.chinacloudapi.cn/(OAuth V2) as the issuer for Microsoft Entra ID.For example, suppose that your logic app resource has an authorization policy that requires two claim types, Audience and Issuer. This sample payload section for a decoded access token includes both claim types where
audis the Audience value andissis the Issuer value:{ "aud": "https://management.core.chinacloudapi.cn/", "iss": "https://sts.chinacloudapi.cn/<Azure-AD-issuer-ID>/", "iat": 1582056988, "nbf": 1582056988, "exp": 1582060888, "_claim_names": { "groups": "src1" }, "_claim_sources": { "src1": { "endpoint": "https://graph.chinacloudapi.cn/7200000-86f1-41af-91ab-2d7cd011db47/users/00000-f433-403e-b3aa-7d8406464625d7/getMemberObjects" } }, "acr": "1", "aio": "AVQAq/8OAAAA7k1O1C2fRfeG604U9e6EzYcy52wb65Cx2OkaHIqDOkuyyr0IBa/YuaImaydaf/twVaeW/etbzzlKFNI4Q=", "amr": [ "rsa", "mfa" ], "appid": "c44b4083-3bb0-00001-b47d-97400853cbdf3c", "appidacr": "2", "deviceid": "bfk817a1-3d981-4dddf82-8ade-2bddd2f5f8172ab", "family_name": "Sophia Owen", "given_name": "Sophia Owen (Fabrikam)", "ipaddr": "167.220.2.46", "name": "sophiaowen", "oid": "3d5053d9-f433-00000e-b3aa-7d84041625d7", "onprem_sid": "S-1-5-21-2497521184-1604012920-1887927527-21913475", "puid": "1003000000098FE48CE", "scp": "user_impersonation", "sub": "KGlhIodTx3XCVIWjJarRfJbsLX9JcdYYWDPkufGVij7_7k", "tid": "aaaabbbb-0000-cccc-1111-dddd2222eeee", "unique_name": "SophiaOwen@fabrikam.com", "upn": "SophiaOwen@fabrikam.com", "uti": "TPJ7nNNMMZkOSx6_uVczUAA", "ver": "1.0" }
Enable OAuth 2.0 with Microsoft Entra ID as the only option to call a request endpoint
For request-based endpoints, you can restrict authorization to use only OAuth 2.0 with Microsoft Entra ID. This option works even if you also disable shared access signature (SAS) authentication.
For your workflow, set up your Request trigger or HTTP Webhook trigger with the capability to check the OAuth access token by following the steps to include the 'Authorization' header in the Request or HTTP webhook trigger outputs.
Note
This step makes the
Authorizationheader visible in the workflow's run history and in the trigger's outputs.In the Azure portal, open your workflow in the designer.
On the designer, select the trigger. On the information pane that opens, select Settings.
Under General > Trigger conditions, select Add. In the trigger condition box, enter either of the following expressions, based on the token type that you want to use:
@startsWith(triggerOutputs()?['headers']?['Authorization'], 'Bearer')-or-
@startsWith(triggerOutputs()?['headers']?['Authorization'], 'PoP')
If you call the trigger endpoint without the correct authorization, the run history just shows the trigger as Skipped without any message that the trigger condition has failed.
Get a Proof-of-Possession (PoP) token
The Microsoft Authentication Library (MSAL) libraries provide PoP tokens for you to use. If the Consumption logic app workflow that you want to call requires a PoP token, you can get this token using the MSAL libraries. The following samples show how to acquire PoP tokens:
To use the PoP token with your Consumption logic app workflow, follow the steps to set up OAuth with Microsoft Entra ID.
Enable OAuth with Microsoft Entra ID for your Consumption logic app resource
To add an authorization policy to your Consumption logic app, follow the steps for either the Azure portal or Azure Resource Manager template:
In the Azure portal, open your Consumption logic app and workflow in the designer.
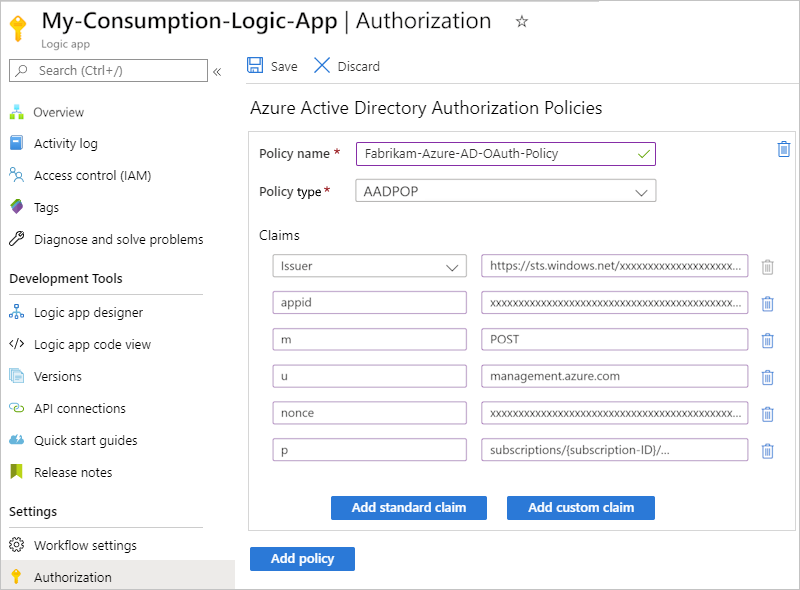
On the logic app menu, under Settings, select Authorization.
On the Authorization page, select Add policy.

Provide information about the authorization policy by specifying the claim types and values that your logic app expects in the access token presented by each inbound call to the Request trigger:
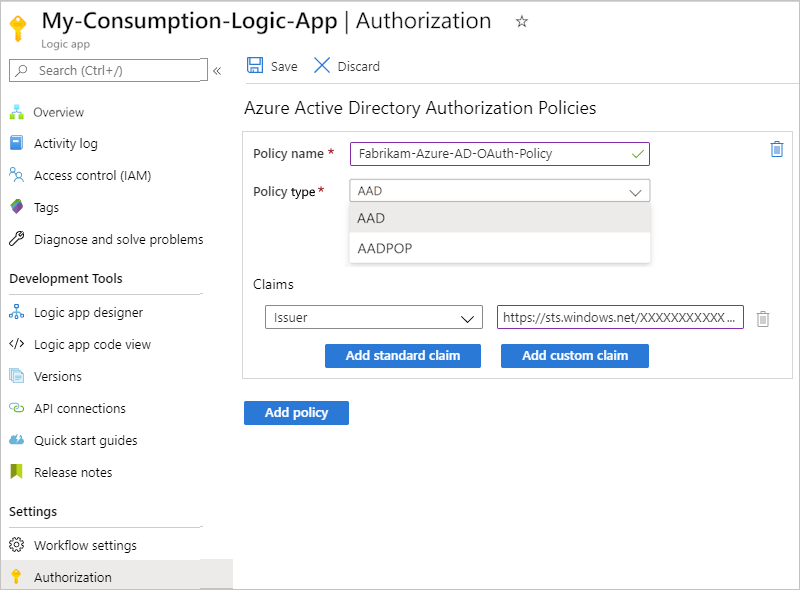
Property Required Type Description Policy name Yes String The name that you want to use for the authorization policy Policy type Yes String Either AAD for bearer type tokens or AADPOP for Proof-of-Possession type tokens. Claims Yes String A key-value pair that specifies the claim type and value that the workflow's Request trigger expects in the access token presented by each inbound call to the trigger. You can add any standard claim you want by selecting Add standard claim. To add a claim that's specific to a PoP token, select Add custom claim.
Available standard claim types:
- Issuer
- Audience
- Subject
- JWT ID (JSON Web Token identifier)
Requirements:
- At a minimum, the Claims list must include the following claim types:
-- Issuer: Set the value to start withhttps://sts.chinacloudapi.cn/orhttps://login.chinacloudapi.cn/as the Microsoft Entra issuer ID.
-- Audience: The value is set to the expected audience for your logic app resource.
- Each claim must be a single string value, not an array of values. For example, you can have a claim with Role as the type and Developer as the value. You can't have a claim that has Role as the type and the values set to Developer and Program Manager.
- The claim value is limited to a maximum number of characters.
You can also specify your own claim type and value. For more information about these claim types, see Claims in Microsoft Entra security tokens.The following example shows the information for a PoP token:
To add another claim, select from these options:
To add another claim type, select Add standard claim, select the claim type, and specify the claim value.
To add your own claim, select Add custom claim. For more information, review how to provide optional claims to your app. Your custom claim is then stored as a part of your JWT ID; for example,
"tid": "aaaabbbb-0000-cccc-1111-dddd2222eeee".
To add another authorization policy, select Add policy. Repeat the previous steps to set up the policy.
When you're done, select Save.
To include the
Authorizationheader from the access token in the request-based trigger outputs, review Include 'Authorization' header in request and HTTP webhook trigger outputs.


Workflow properties such as policies don't appear in your workflow's code view in the Azure portal. To access your policies programmatically, call the following API through Azure Resource Manager: https://management.chinacloudapi.cn/subscriptions/{Azure-subscription-ID}/resourceGroups/{Azure-resource-group-name}/providers/Microsoft.Logic/workflows/{your-workflow-name}?api-version=2016-10-01&_=1612212851820. Make sure that you replace the placeholder values for your Azure subscription ID, resource group name, and workflow name.
Include 'Authorization' header in Request or HTTP webhook trigger outputs
For logic apps that enable OAuth with Microsoft Entra ID for authorizing inbound calls to access request-based triggers, you can enable the Request trigger or HTTP Webhook trigger outputs to include the Authorization header from the OAuth access token. In the trigger's underlying JSON definition, add and set the operationOptions property to IncludeAuthorizationHeadersInOutputs. Here's an example for the Request trigger:
"triggers": {
   "manual": {
      "inputs": {
         "schema": {}
      },
      "kind": "Http",
      "type": "Request",
      "operationOptions": "IncludeAuthorizationHeadersInOutputs"
   }
}
For more information, review these topics:
- Schema reference for trigger and action types - Request trigger
- Schema reference for trigger and action types - HTTP Webhook trigger
- Schema reference for trigger and action types - Operation options
Generate a shared access signature (SAS) key or token
When a workflow starts with a request-based trigger, and you save that workflow for the first time, Azure Logic Apps creates a callable endpoint on that trigger. This endpoint has a URL that can receive inbound calls or requests to start the workflow. The URL includes a Shared Access Signature (SAS), which is a key or token that grants permissions, for example, to storage services. This endpoint URL uses the following format:
https://<request-endpoint-URI>sp=<permissions>sv=<SAS-version>sig=<signature>
For example, to view this URL in a Request trigger, find the trigger's HTTP URL property:
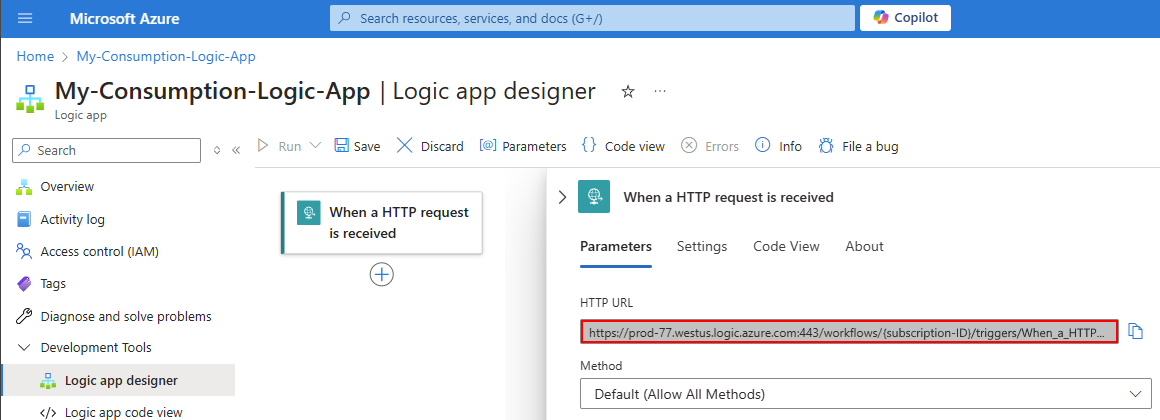
The complete URL looks like the following example:
https://{domain}:443/workflows/XXXXXXXXXXXXXXXXXXXXXXXXXXXXXXXXXXXX/triggers/When_a_HTTP_request_is_received/paths/invoke?api-version=2016-10-01&sp=%2Ftriggers%2FWhen_a_HTTP_request_is_received%2Frun&sv=1.0&sig=ZZZZZZZZZZZZZZZZZZZZZZZZZZZZZZZZZZZZZ
The SAS in the URL has query parameters, which the following table describes:
| Query parameter | Description |
|---|---|
sp |
Specifies permissions for the allowed HTTP methods to use. |
sv |
Specifies the SAS version to use for generating the signature. |
sig |
Specifies the signature to use for authenticating access to the trigger. This signature is generated by using the SHA256 algorithm with a secret access key on all the URL paths and properties. This key is kept secret and encrypted, stored with the logic app, and is never exposed or published. Your logic app authorizes only those triggers that contain a valid signature created with the secret key. |
Important
Make sure to protect your SAS key just as you protect an account key from unauthorized use. Set up or have a plan for revoking a compromised access key. Use discretion when you distribute URIs that use access keys, and only distribute such URIs over a secure connection such as HTTPS. Make sure to only perform operations that use an access key over an HTTPS connection. Anyone that has a URI with valid key can access the associated resource. To maintain security and protect access to your logic app workflow, regenerate access keys on a regular schedule as they might need to comply with security policies or become compromised. This way, you can make sure that only authorized requests can trigger your workflow, which protects your data and processes from unauthorized access.
If you use an SAS key to access storage services, Microsoft recommends that you create a user delegation SAS, which is secured with Microsoft Entra ID, rather than an account key.
For optimal security, Microsoft recommends using Microsoft Entra ID with managed identities for authentication whenever possible. This option provides superior security without having to provide credentials. Azure manages this identity and helps keep authentication information secure so that you don't have to manage this sensitive information. To set up a managed identity for Azure Logic Apps, see Authenticate access and connections to Azure resources with managed identities in Azure Logic Apps.
Inbound calls to the endpoint on a request-based trigger can use only one authorization scheme, either SAS or OAuth 2.0 with Microsoft Entra ID. Although using one scheme doesn't disable the other, if you use both schemes at the same time, Azure Logic Apps generates an error because the service doesn't know which scheme to choose.
If you have a Consumption workflow that starts with the Request trigger, you can disable SAS authentication. This option works even if you also restrict authorization to use only OAuth 2.0 with Microsoft Entra ID. For Standard workflows, you can use other authentication types without disabling SAS.
For more information about security when you use an SAS key, see the following sections in this guide:
Disable shared access signature (SAS) authentication
By default, a request-based trigger has SAS authentication enabled. The trigger's endpoint URL includes an SAS, starting with the query parameters, sp-<permissions>sv-<SAS-version>sig=<signature>, for example:
https://{domain}:443/workflows/XXXXXXXXXXXXXXXXXXXXXXXXXXXXXXXXXXXX/triggers/When_a_HTTP_request_is_received/paths/invoke?api-version=2016-10-01&sp=%2Ftriggers%2FWhen_a_HTTP_request_is_received%2Frun&sv=1.0&sig=ZZZZZZZZZZZZZZZZZZZZZZZZZZZZZZZZZZZZZ
If your workflow starts with the Request trigger, and you want to use OAuth with Microsoft Entra ID, you can disable SAS authentication to avoid errors and problems running your workflow. You also add a security layer by removing the dependency on secrets, which reduces the risk in having secrets logged or leaked.
This option works even if you also enable OAuth 2.0 with Microsoft Entra ID as the only option to call a request-based endpoint. For Standard workflows, you can use other authentication types without disabling SAS.
Note
This action disables SAS authentication for incoming requests and blocks existing SAS keys or signatures from working. However, your SAS keys or signatures remain valid and still work if you enable SAS authentication again. To disable SAS keys and signatures by creating new versions, see Regenerate access keys.
After you disable SAS authentication, the endpoint URL for the Request trigger no longer includes the SAS key, for example:
https://{domain}:443/workflows/XXXXXXXXXXXXXXXXXXXXXXXXXXXXXXXXXXXX/triggers/When_a_HTTP_request_is_received/paths/invoke?api-version=2016-10-01
Prerequisites
For this task, you need a tool to send REST API calls, for example:
- Visual Studio Code with an extension from Visual Studio Marketplace
- PowerShell Invoke-RestMethod
- Bruno
- curl
Caution
For scenarios where you have sensitive data, such as credentials, secrets, access tokens, API keys, and other similar information, make sure to use a tool that protects your data with the necessary security features, works offline or locally, doesn't sync your data to the cloud, and doesn't require that you sign in to an online account. This way, you reduce the risk around exposing sensitive data to the public.
Check for triggers with SAS enabled or disabled
When SAS authentication is disabled, the trigger's endpoint URL doesn't include the SAS key anymore. Also, the Consumption workflow definition includes the sasAuthenticationPolicy JSON object. This object has a state property that is set to Disabled, for example:
"properties": {
    "accessControl": {
        "triggers": {
            "sasAuthenticationPolicy": {
                "state": "Disabled"
            }
        }
    }
}
To find Consumption workflows where SAS is either enabled or disabled, check whether the workflow definition includes the sasAuthenticationPolicy object where the state property is set to Disabled.
With your tool that sends REST API calls, get information about your workflow by running the Workflows - Get operation using the following GET request, for example:
GET https://management.chinacloudapi.cn/subscriptions/{subscription-ID}/resourceGroups/{resource-group-name}/providers/Microsoft.Logic/workflows/{workflow-name}?api-version=2016-06-01Take the output from the Workflows - Get operation, and check whether the sasAuthenticationPolicy object exists where the state property is set to Disabled.
Add the sasAuthenticationPolicy property to your workflow definition
For Consumption workflows where you want to disable SAS authentication, follow these steps:
If you haven't done so already, get information about your workflow by running the Workflows - Get operation using the following GET request, for example:
GET https://management.chinacloudapi.cn/subscriptions/{subscription-ID}/resourceGroups/{resource-group-name}/providers/Microsoft.Logic/workflows/{workflow-name}?api-version=2016-06-01Take the output from the Workflows - Get operation, and manually add the following elements:
In the
propertiesobject, add anaccessControlobject that contains atriggersobject, if none exists.In the
triggersobject, add ansasAuthenticationPolicyobject that contains thestateproperty set toDisabled.
When you finish, the edited part looks like the following example:
"properties": {
    "accessControl": {
        "triggers": {
            "sasAuthenticationPolicy": {
                "state": "Disabled"
            }
        }
    }
}
Send another request to update your workflow with the edited output, which you use as input in the request body, by running the Workflows - Update operation using the following PUT request, for example:
PUT https://management.chinacloudapi.cn/subscriptions/{subscription-ID}/resourceGroups/{resource-group-name}/providers/Microsoft.Logic/workflows/{workflow-name}?api-version=2016-06-01In the Azure portal, go to your Consumption workflow in the designer, and confirm that the Request trigger's URL no longer includes the SAS.
To enable OAuth 2.0 with Microsoft Entra ID, at the logic app resource level, add an authorization policy for OAuth with Microsoft Entra ID.
For more information, see Enable OAuth 2.0 with Microsoft Entra ID.
Regenerate access keys
To maintain security and protect access to your logic app workflow, regenerate access keys on a regular schedule as they might need to comply with security policies or become compromised. This way, you can make sure that only authorized requests can trigger your workflow, which protects your data and processes from unauthorized access.
To generate a new access key at any time, use the Azure REST API or Azure portal. All previously generated URIs or URLs that use the old key are invalidated and no longer have authorization to trigger your logic app workflow. The URIs that you retrieve after regeneration are signed with the new access key.
In the Azure portal, open the logic app resource that uses the key you want to regenerate.
On the logic app resource menu, under Settings, select Access Keys.
Select the key that you want to regenerate and finish the process.
Important
Make sure to protect your access key just as you protect an account key from unauthorized use. Set up or have a plan for revoking a compromised access key. Use discretion when you distribute URIs that use access keys, and only distribute such URIs over a secure connection such as HTTPS. Make sure to only perform operations that use an access key over an HTTPS connection. Anyone that has a URI with valid key can access the associated resource.
If you use an SAS key to access storage services, Microsoft recommends that you create a user delegation SAS, which is secured with Microsoft Entra ID, rather than an account key.
For optimal security, Microsoft recommends using Microsoft Entra ID with managed identities for authentication when possible. This option provides superior security without having to provide credentials. Azure manages this identity and helps keep authentication information secure so that you don't have to manage this sensitive information. To set up a managed identity for Azure Logic Apps, see Authenticate access and connections to Azure resources with managed identities in Azure Logic Apps.
Create expiring callback URLs
If you share the endpoint URL for a request-based trigger with other parties, you can generate callback URLs that use specific keys and have expiration dates. That way, you can seamlessly roll keys or restrict access to triggering your logic app based on a specific timespan. To specify an expiration date for a URL, use the Azure Logic Apps REST API, for example:
POST /subscriptions/{subscription-ID}/resourceGroups/{resource-group-name}/providers/Microsoft.Logic/workflows/{workflow-name}/triggers/{trigger-name}/listCallbackUrl?api-version=2016-06-01
In the body, include the NotAfter property by using a JSON date string. This property returns a callback URL that's valid only until the NotAfter date and time.
Create URLs with primary or secondary secret key
When you generate or list callback URLs for a request-based trigger, you can specify the key to use for signing the URL. To generate a URL that's signed by a specific key, use the Azure Logic Apps REST API, for example:
POST /subscriptions/{subscription-ID}/resourceGroups/{resource-group-name}/providers/Microsoft.Logic/workflows/{workflow-name}/triggers/{trigger-name}/listCallbackUrl?api-version=2016-06-01
In the body, include the KeyType property as either Primary or Secondary. This property returns a URL that's signed by the specified security key.
Expose your logic app workflow with Azure API Management
For more authentication protocols and options, consider exposing your logic app workflow as an API by using Azure API Management. This service provides rich monitoring, security, policy, and documentation capabilities for any endpoint. API Management can expose a public or private endpoint for your logic app. To authorize access to this endpoint, you can use OAuth with Microsoft Entra ID, client certificate, or other security standards. When API Management receives a request, the service sends the request to your logic app and makes any necessary transformations or restrictions along the way. To let only API Management call your logic app workflow, you can restrict your logic app's inbound IP addresses.
For more information, see the following documentation:
- About API Management
- Protect a web API backend in Azure API Management by using OAuth 2.0 authorization with Microsoft Entra ID
- Secure APIs using client certificate authentication in API Management
- API Management authentication policies
Restrict inbound IP addresses
Along with Shared Access Signature (SAS), you might want to specifically limit the clients that can call your logic app workflow. For example, if you manage your request endpoint by using Azure API Management, you can restrict your logic app workflow to accept requests only from the IP address for the API Management service instance that you create.
Regardless of any IP addresses that you specify, you can still run a logic app workflow that has a request-based trigger by using the Workflow Triggers - Run operation request or by using API Management. However, this scenario still requires authentication against the Azure REST API. All events appear in the Azure Audit Log. Make sure that you set access control policies accordingly.
To restrict the inbound IP addresses for your logic app workflow, follow the corresponding steps for either the Azure portal or your Azure Resource Manager template. A valid IP range uses these formats: x.x.x.x/x or x.x.x.x-x.x.x.x
In the Azure portal, IP address restriction affects both triggers and actions, contrary to the description in the portal under Allowed inbound IP addresses. To set up this filter separately for triggers and for actions, use the accessControl object in an Azure Resource Manager template for your logic app resource or the Workflow - Create Or Update operation in the Azure Logic Apps REST API.
Consumption workflows
In the Azure portal, open your Consumption logic app in the workflow designer.
On the logic app menu, under Settings, select Workflow settings.
In the Access control configuration section, under Allowed inbound IP addresses, choose the path for your scenario:
To make your workflow callable using the Azure Logic Apps built-in action, but only as a nested workflow, select Only other Logic Apps. This option works only when you use the Azure Logic Apps action to call the nested workflow.
This option writes an empty array to your logic app resource and requires that only calls from parent workflows that use the built-in Azure Logic Apps action can trigger the nested workflow.
To make your workflow callable using the HTTP action, but only as a nested workflow, select Specific IP ranges. When the IP ranges for triggers box appears, enter the parent workflow's outbound IP addresses. A valid IP range uses these formats: x.x.x.x/x or x.x.x.x-x.x.x.x
Note
If you use the Only other Logic Apps option and the HTTP action to call your nested workflow, the call is blocked, and you get a "401 Unauthorized" error.
For scenarios where you want to restrict inbound calls from other IPs, when the IP ranges for triggers box appears, specify the IP address ranges that the trigger accepts. A valid IP range uses these formats: x.x.x.x/x or x.x.x.x-x.x.x.x
Optionally, under Restrict calls to get input and output messages from run history to the provided IP addresses, you can specify the IP address ranges for inbound calls that can access input and output messages in run history.
Standard workflows
In the Azure portal, open your Standard logic app resource.
On the logic app menu, under Settings, select Networking.
In the Inbound traffic configuration section, next to Public network access, select Enabled with no access restriction.
On the Access restrictions page, under App access, select Enabled from select virtual networks and IP addresses.
Under Site access and rules, on the Main site tab, add one or more rules to either Allow or Deny requests from specific IP ranges. A valid IP range uses these formats: x.x.x.x/x or x.x.x.x-x.x.x.x
For more information, see Blocking inbound IP addresses in Azure Logic Apps (Standard).
Access for outbound calls to other services and systems
Based on the target endpoint's capability, outbound calls sent by the HTTP trigger or HTTP action, support encryption and are secured with Transport Layer Security (TLS) 1.0, 1.1, 1.2 or 1.3, previously known as Secure Sockets Layer (SSL). Azure Logic Apps negotiates with the target endpoint over using the highest possible version that's supported. For example, if the target endpoint supports 1.3, the HTTP trigger or action uses 1.3 first. Otherwise, the connector uses the next highest supported version.
This list includes information about TLS/SSL self-signed certificates:
For Consumption logic app workflows in the multitenant Azure Logic Apps environment, HTTP operations don't permit self-signed TLS/SSL certificates. If your logic app makes an HTTP call to a server and presents a TLS/SSL self-signed certificate, the HTTP call fails with a
TrustFailureerror.For Standard logic app workflows in the single-tenant Azure Logic Apps environment, HTTP operations support self-signed TLS/SSL certificates. However, you have to complete a few extra steps for this authentication type. Otherwise, the call fails. For more information, review TLS/SSL certificate authentication for single-tenant Azure Logic Apps.
If you want to use client certificate or OAuth with Microsoft Entra ID with the "Certificate" credential type instead, you still have to complete a few extra steps for this authentication type. Otherwise, the call fails. For more information, review Client certificate or OAuth with Microsoft Entra ID with the "Certificate" credential type for single-tenant Azure Logic Apps.
Here are more ways that you can help secure endpoints that handle calls sent from your logic app workflows:
Add authentication to outbound requests.
When you use the HTTP trigger or action to send outbound calls, you can add authentication to the request that's sent by your logic app. For example, you can select these authentication types:
Restrict access from logic app workflow IP addresses.
All calls to endpoints from logic app workflows originate from specific designated IP addresses that are based on your logic apps' regions. You can add filtering that accepts requests only from those IP addresses. To get these IP addresses, review Limits and configuration for Azure Logic Apps.
Improve security for connections to on-premises systems.
Azure Logic Apps provides integration with these services to help provide more secure and reliable on-premises communication.
On-premises data gateway
Many managed connectors in Azure Logic Apps facilitate secured connections to on-premises systems, such as File System, SQL, SharePoint, and DB2. The gateway sends data from on-premises sources on encrypted channels through the Azure Service Bus. All traffic originates as secured outbound traffic from the gateway agent. Learn how the on-premises data gateway works.
Connect through Azure API Management
Azure API Management provides on-premises connection options, such as site-to-site virtual private network and ExpressRoute integration for secured proxy and communication to on-premises systems. If you have an API that provides access to your on-premises system, and you exposed that API by creating an API Management service instance, you can call that API from your logic app's workflow by selecting the corresponding API Management operation in the workflow designer.
Note
The connector shows only those API Management services where you have permissions to view and connect, but doesn't show consumption-based API Management services.
Based on your logic app resource type, follow the corresponding steps:
Consumption workflows
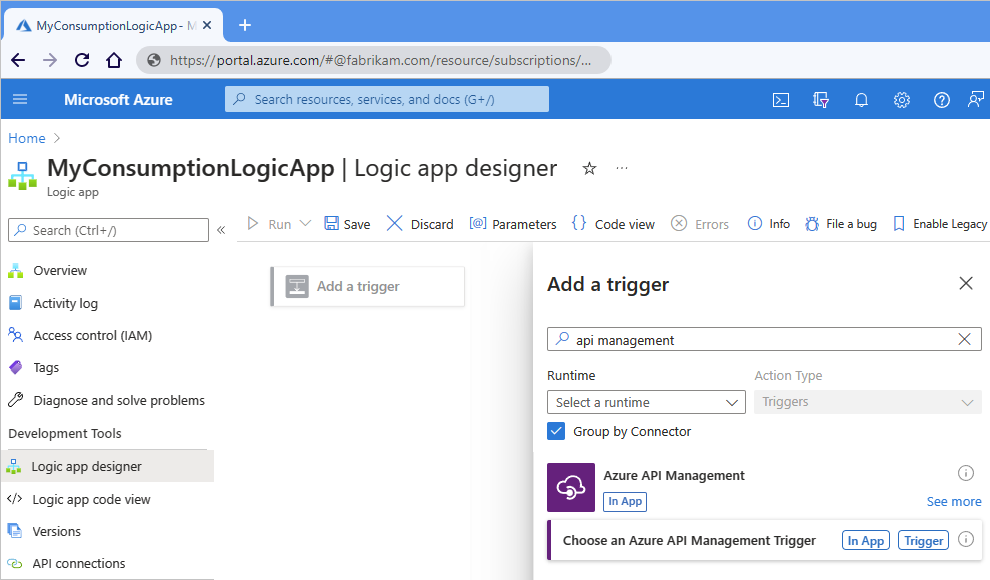
Based on whether you're adding an API Management trigger or action, follow these steps:
Trigger:
On the workflow designer, select Add a trigger.
After the Add a trigger pane opens, in the search box, enter API Management.
From the trigger results list, select Choose an Azure API Management Trigger.
Action:
On the workflow designer, select the plus sign (+) where you want to add the action.
After the Add an action pane opens, in the search box, enter API Management.
From the action results list, select Choose an Azure API Management action.
The following example shows finding an Azure API Management trigger:
From the API Management service instance list, select your previously created API Management service instance.
From the API operations list, select the API operation to call, and then select Add Action.
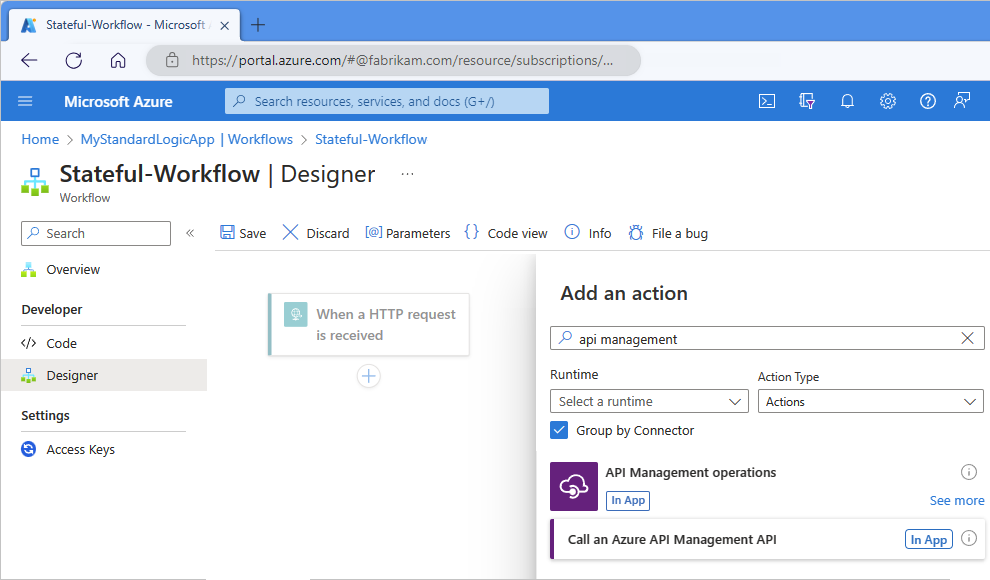
Standard workflows
For Standard workflows, you can only add API Management actions, not triggers.
On the workflow designer, select the plus sign (+) where you want to add the action.
After the Add an action pane opens, in the search box, enter API Management.
From the action results list, select Call an Azure API Management API.
From the API Management service instance list, select your previously created API Management service instance.
From the API operations list, select the API operation to call, and then select Create New.


Add authentication to outbound calls
HTTP and HTTPS endpoints support various kinds of authentication. On some triggers and actions that you use for sending outbound calls or requests to these endpoints, you can specify an authentication type. In the workflow designer, triggers and actions that support choosing an authentication type have an Authentication property. However, this property might not always appear by default. In these cases, on the trigger or action, open the Advanced parameters list, and select Authentication.
Important
To protect sensitive information that your logic app workflow handles, use secured parameters and encode data as necessary. For more information about using and securing parameters, review Access to parameter inputs.
For optimal security, Microsoft recommends using Microsoft Entra ID with managed identities for authentication when possible. This option provides superior security without having to provide credentials. Azure manages this identity and helps keep authentication information secure so that you don't have to manage this sensitive information. To set up a managed identity for Azure Logic Apps, see Authenticate access and connections to Azure resources with managed identities in Azure Logic Apps.
Basic authentication
For HTTP calls, basic authentication uses a base64-encoded string that contains a username and password to make a request. This method transmits credentials without encryption and poses increased security risks unless you use this option with the HTTPS/SSL protocol.
Important
For optimal security, Microsoft recommends using Microsoft Entra ID with managed identities for authentication when possible. This option provides superior security without having to provide credentials. Azure manages this identity and helps keep authentication information secure so that you don't have to manage this sensitive information. To set up a managed identity for Azure Logic Apps, see Authenticate access and connections to Azure resources with managed identities in Azure Logic Apps.
If the Basic option is available and selected, specify these property values:
| Property (designer) | Property (JSON) | Required | Value | Description |
|---|---|---|---|---|
| Authentication | type |
Yes | Basic | The authentication type to use |
| Username | username |
Yes | <user-name> | The user name for authenticating access to the target service endpoint |
| Password | password |
Yes | <password> | The password for authenticating access to the target service endpoint |
When you use secured parameters to handle and secure sensitive information, for example, in an Azure Resource Manager template for automating deployment, you can use expressions to access these parameter values at runtime. This example HTTP action definition specifies the authentication type as Basic and uses the parameters() function to get the parameter values:
"HTTP": {
   "type": "Http",
   "inputs": {
      "method": "GET",
      "uri": "@parameters('endpointUrlParam')",
      "authentication": {
         "type": "Basic",
         "username": "@parameters('userNameParam')",
         "password": "@parameters('passwordParam')"
      }
  },
  "runAfter": {}
}
Client certificate authentication
Client certificate authentication allows or requires users to authenticate directly with X.509 certificates against their Microsoft Entra ID for applications and browser sign-in. This capability helps you adopt a phishing resistant authentication and authenticate with an X.509 certificate against your Public Key Infrastructure (PKI).
Important
For optimal security, Microsoft recommends using Microsoft Entra ID with managed identities for authentication when possible. This option provides superior security without having to provide credentials. Azure manages this identity and helps keep authentication information secure so that you don't have to manage this sensitive information. To set up a managed identity for Azure Logic Apps, see Authenticate access and connections to Azure resources with managed identities in Azure Logic Apps.
If the Client certificate option is available and selected, specify these property values:
| Property (designer) | Property (JSON) | Required | Value | Description |
|---|---|---|---|---|
| Authentication | type |
Yes | Client certificate or ClientCertificate |
The authentication type to use. You can manage certificates with Azure API Management. Note: Custom connectors don't support certificate-based authentication for both inbound and outbound calls. |
| Pfx | pfx |
Yes | <encoded-pfx-file-content> | The base64-encoded content from a Personal Information Exchange (PFX) file To convert the PFX file into base64-encoded format, you can use PowerShell 7 by following these steps: 1. Save the certificate content into a variable: $pfx_cert = [System.IO.File]::ReadAllBytes('c:\certificate.pfx') 2. Convert the certificate content by using the ToBase64String() function and save that content to a text file: [System.Convert]::ToBase64String($pfx_cert) | Out-File 'pfx-encoded-bytes.txt' Troubleshooting: If you use the cert mmc/PowerShell command, you might get this error: Could not load the certificate private key. Please check the authentication certificate password is correct and try again. To resolve this error, try converting the PFX file to a PEM file and back again by using the openssl command: openssl pkcs12 -in certificate.pfx -out certificate.pem openssl pkcs12 -in certificate.pem -export -out certificate2.pfx Afterwards, when you get the base64-encoded string for the certificate's newly converted PFX file, the string now works in Azure Logic Apps. |
| Password | password |
No | <password-for-pfx-file> | The password for accessing the PFX file |
Note
If you try to authenticate with a client certificate using OpenSSL, you might get the following error:
BadRequest: Could not load private key
To resolve this error, follow these steps:
- Uninstall all OpenSSL instances.
- Install OpenSSL version 1.1.1t.
- Resign your certificate using the new update.
- Add the new certificate to the HTTP operation when using client certificate authentication.
When you use secured parameters to handle and secure sensitive information, for example, in an Azure Resource Manager template for automating deployment, you can use expressions to access these parameter values at runtime. This example HTTP action definition specifies the authentication type as ClientCertificate and uses the parameters() function to get the parameter values:
"HTTP": {
   "type": "Http",
   "inputs": {
      "method": "GET",
      "uri": "@parameters('endpointUrlParam')",
      "authentication": {
         "type": "ClientCertificate",
         "pfx": "@parameters('pfxParam')",
         "password": "@parameters('passwordParam')"
      }
   },
   "runAfter": {}
}
Important
If you have a Standard logic app resource in single-tenant Azure Logic Apps, and you want to use an HTTP
operation with a TSL/SSL certificate, client certificate, or Microsoft Entra ID Open Authentication
(Microsoft Entra ID OAuth) with the Certificate credential type, make sure to complete the extra setup
steps for this authentication type. Otherwise, the call fails. For more information, review
Authentication in single-tenant environment.
For more information about securing services by using client certificate authentication, review these topics:
- Improve security for APIs by using client certificate authentication in Azure API Management
- Improve security for back-end services by using client certificate authentication in Azure API Management
- Certificate credentials for application authentication
- Use a TLS/SSL certificate in your code in Azure App Service
Microsoft Entra platform
On the Request trigger, you can use the Microsoft Entra platform to authenticate incoming calls after you set up Microsoft Entra authorization policies for your logic app.
Important
For optimal security, Microsoft recommends using Microsoft Entra ID with managed identities for authentication when possible. This option provides superior security without having to provide credentials. Azure manages this identity and helps keep authentication information secure so that you don't have to manage this sensitive information. To set up a managed identity for Azure Logic Apps, see Authenticate access and connections to Azure resources with managed identities in Azure Logic Apps.
On all other triggers and actions that support the Active Directory OAuth (OAuth 2.0 with Microsoft Entra ID) authentication type, specify these property values:
| Property (designer) | Property (JSON) | Required | Value | Description |
|---|---|---|---|---|
| Authentication | type |
Yes | Active Directory OAuth (OAuth 2.0 with Microsoft Entra ID) or ActiveDirectoryOAuth |
The authentication type to use. Azure Logic Apps currently follows the OAuth 2.0 protocol. |
| Authority | authority |
No | <URL-for-authority-token-issuer> | The URL for the authority that provides the access token, such as https://login.chinacloudapi.cn/ for Azure global service regions. For other national clouds, review Microsoft Entra authentication endpoints - Choosing your identity authority. |
| Tenant | tenant |
Yes | <tenant-ID> | The tenant ID for the Microsoft Entra tenant |
| Audience | audience |
Yes | <resource-to-authorize> | The resource that you want to use for authorization, for example, https://management.core.chinacloudapi.cn/ |
| Client ID | clientId |
Yes | <client-ID> | The client ID for the app requesting authorization |
| Credential Type | credentialType |
Yes | Certificate or Secret |
The credential type that the client uses for requesting authorization. This property and value don't appear in your logic app's underlying definition, but determines the properties that appear for the selected credential type. |
| Secret | secret |
Yes, but only for the "Secret" credential type | <client-secret> | The client secret for requesting authorization |
| Pfx | pfx |
Yes, but only for the "Certificate" credential type | <encoded-pfx-file-content> | The base64-encoded content from a Personal Information Exchange (PFX) file |
| Password | password |
Yes, but only for the "Certificate" credential type | <password-for-pfx-file> | The password for accessing the PFX file |
When you use secured parameters to handle and secure sensitive information, for example, in an Azure Resource Manager template for automating deployment, you can use expressions to access these parameter values at runtime. This example HTTP action definition specifies the authentication type as ActiveDirectoryOAuth, the credential type as Secret, and uses the parameters() function to get the parameter values:
"HTTP": {
   "type": "Http",
   "inputs": {
      "method": "GET",
      "uri": "@parameters('endpointUrlParam')",
      "authentication": {
         "type": "ActiveDirectoryOAuth",
         "tenant": "@parameters('tenantIdParam')",
         "audience": "https://management.core.chinacloudapi.cn/",
         "clientId": "@parameters('clientIdParam')",
         "credentialType": "Secret",
         "secret": "@parameters('secretParam')"
     }
   },
   "runAfter": {}
}
Important
If you have a Standard logic app resource in single-tenant Azure Logic Apps, and you want to use an HTTP
operation with a TSL/SSL certificate, client certificate, or Microsoft Entra ID OAuth with the Certificate
credential type, make sure to complete the extra setup steps for this authentication type. Otherwise, the call
fails. For more information, see Authentication in single-tenant environment.
Raw authentication
If the Raw option is available, you can use this authentication type when you have to use authentication schemes that don't follow the OAuth 2.0 protocol. With this type, you manually create the authorization header value that you send with the outgoing request, and specify that header value in your trigger or action.
Important
For optimal security, Microsoft recommends using Microsoft Entra ID with managed identities for authentication when possible. This option provides superior security without having to provide credentials. Azure manages this identity and helps keep authentication information secure so that you don't have to manage this sensitive information. To set up a managed identity for Azure Logic Apps, see Authenticate access and connections to Azure resources with managed identities in Azure Logic Apps.
The following example shows a sample header for an HTTPS request that follows the OAuth 1.0 protocol:
Authorization: OAuth realm="Photos",
   oauth_consumer_key="dpf43f3p2l4k3l03",
   oauth_signature_method="HMAC-SHA1",
   oauth_timestamp="137131200",
   oauth_nonce="wIjqoS",
   oauth_callback="http%3A%2F%2Fprinter.example.com%2Fready",
   oauth_signature="74KNZJeDHnMBp0EMJ9ZHt%2FXKycU%3D"
In the trigger or action that supports raw authentication, specify these property values:
| Property (designer) | Property (JSON) | Required | Value | Description |
|---|---|---|---|---|
| Authentication | type |
Yes | Raw | The authentication type to use |
| Value | value |
Yes | <authorization-header-value> | The authorization header value to use for authentication |
When you use secured parameters to handle and secure sensitive information, for example, in an Azure Resource Manager template for automating deployment, you can use expressions to access these parameter values at runtime. This example HTTP action definition specifies the authentication type as Raw, and uses the parameters() function to get the parameter values:
"HTTP": {
   "type": "Http",
   "inputs": {
      "method": "GET",
      "uri": "@parameters('endpointUrlParam')",
      "authentication": {
         "type": "Raw",
         "value": "@parameters('authHeaderParam')"
      }
   },
   "runAfter": {}
}
Managed identity authentication
When the managed identity option is available on the trigger or action that supports managed identity authentication, your logic app can use this identity for authenticating access to Azure resources that are protected by Microsoft Entra ID, rather than credentials, secrets, or Microsoft Entra tokens. Azure manages this identity for you and helps you secure your credentials because you don't have to manage secrets or directly use Microsoft Entra tokens. Learn more about Azure services that support managed identities for Microsoft Entra authentication.
A Consumption logic app resource can use the system-assigned identity or a single manually created user-assigned identity.
A Standard logic app resource supports having the system-assigned managed identity and multiple user-assigned managed identities enabled at the same time, though you still can only select one identity to use at any time.
Note
By default, the system-assigned identity is already enabled to authenticate connections at run time. This identity differs from the authentication credentials or connection string that you use when you create a connection. If you disable this identity, connections won't work at run time. To view this setting, on your logic app menu, under Settings, select Identity.
Before your logic app can use a managed identity, follow the steps in Authenticate access to Azure resources by using managed identities in Azure Logic Apps. These steps enable the managed identity on your logic app and set up that identity's access to the target Azure resource.
Before an Azure function can use a managed identity, first enable authentication for Azure functions.
In the trigger or action that supports using a managed identity, provide this information:
Built-in triggers and actions
Property (designer) Property (JSON) Required Value Description Authentication typeYes Managed Identity
orManagedServiceIdentityThe authentication type to use Managed Identity identityNo <user-assigned-identity-ID> The user-assigned managed identity to use. Note: Don't include this property when using the system-assigned managed identity. Audience audienceYes <target-resource-ID> The resource ID for the target resource that you want to access.
For example,https://storage.azure.com/makes the access tokens for authentication valid for all storage accounts. However, you can also specify a root service URL, such ashttps://fabrikamstorageaccount.blob.core.chinacloudapi.cnfor a specific storage account.
Note: The Audience property might be hidden in some triggers or actions. To make this property visible, in the trigger or action, open the Advanced parameters list, and select Audience.
Important: Make sure that this target resource ID exactly matches the value that Microsoft Entra ID expects, including any required trailing slashes. So, thehttps://storage.azure.com/resource ID for all Azure Blob Storage accounts requires a trailing slash. However, the resource ID for a specific storage account doesn't require a trailing slash. To find these resource IDs, review Azure services that support Microsoft Entra ID.When you use secured parameters to handle and secure sensitive information, for example, in an Azure Resource Manager template for automating deployment, you can use expressions to access these parameter values at runtime. For example, this HTTP action definition specifies the authentication
typeasManagedServiceIdentityand uses the parameters() function to get the parameter values:"HTTP": { "type": "Http", "inputs": { "method": "GET", "uri": "@parameters('endpointUrlParam')", "authentication": { "type": "ManagedServiceIdentity", "audience": "https://management.chinacloudapi.cn/" }, }, "runAfter": {} }Managed connector triggers and actions
Property (designer) Required Value Description Connection name Yes <connection-name> Managed identity Yes System-assigned managed identity
or
<user-assigned-managed-identity-name>The authentication type to use
Block creating connections
If your organization doesn't permit connecting to specific resources by using their connectors in Azure Logic Apps, you can block the capability to create those connections for specific connectors in logic app workflows by using Azure Policy. For more information, review Block connections created by specific connectors in Azure Logic Apps.