本文演示如何使用 Java 将文件上传到 Azure Blob 存储的 IoT 中心的文件上传功能。
使用《将遥测数据从设备发送到 IoT 中心》快速入门教程和《使用 IoT 中心发送云到设备的消息》文章,展示了 IoT 中心的基本设备到云和云到设备的消息传送功能。 使用 IoT 中心配置消息路由 教程演示了在 Azure Blob 存储中可靠地存储设备到云的消息的方法。 但是,在某些情况下,你无法轻松地将设备发送的数据映射到 IoT 中心接受的相对较小的设备到云消息中。 例如:
- Videos
- 包含图像的大型文件
- 以高频率采样的振动数据
- 某种形式的预处理数据。
通常使用 Azure 数据工厂或 Hadoop 堆栈等工具在云中批处理这些文件。 需要从设备上传文件时,仍可以使用 IoT 中心的安全性和可靠性。 本文将向您介绍如何做。 在 GitHub 中查看 azure-iot-sdk-java 中的两个示例。
注释
IoT 中心通过 Azure IoT 设备 SDK 支持许多设备平台和语言(包括 C、.NET 和 JavaScript)。 请参阅 Azure IoT 开发人员中心 ,了解如何将设备连接到 Azure IoT 中心。
重要
使用 X.509 证书颁发机构(CA)身份验证的设备上的文件上传功能处于公共预览状态,并且必须启用预览模式。 通常适用于通过 Azure 设备预配服务,使用 X.509 指纹身份验证或 X.509 证书证明的设备。 若要了解有关使用 IoT 中心进行 x.509 身份验证的详细信息,请参阅支持的 x.509 证书。
先决条件
已注册的设备。 在 Azure 门户中注册一个。
Java SE 开发工具包 8。 请确保在长期支持下选择 Java 8,以获取 JDK 8 的下载。
端口 8883 应在防火墙中打开。 本文中的设备示例使用通过端口 8883 进行通信的 MQTT 协议。 某些企业和教育网络环境中可能会阻止此端口。 有关解决此问题的详细信息和方法,请参阅“连接到 IoT 中心”(MQTT)。
将 Azure 存储帐户关联到 IoT 中心
若要从设备上传文件,必须具有与 IoT 中心关联的 Azure 存储帐户和 Azure Blob 存储容器。 将存储帐户和容器与 IoT 中心关联后,IoT 中心可以在设备请求时提供 SAS URI 的元素。 然后,设备可以使用这些元素构造 SAS URI,该 URI 用于对 Azure 存储进行身份验证,并将文件上传到 Blob 容器。
将 Azure 存储帐户与 IoT 中心相关联:
在 中心设置下,选择 IoT 中心左侧窗格中的文件上传。
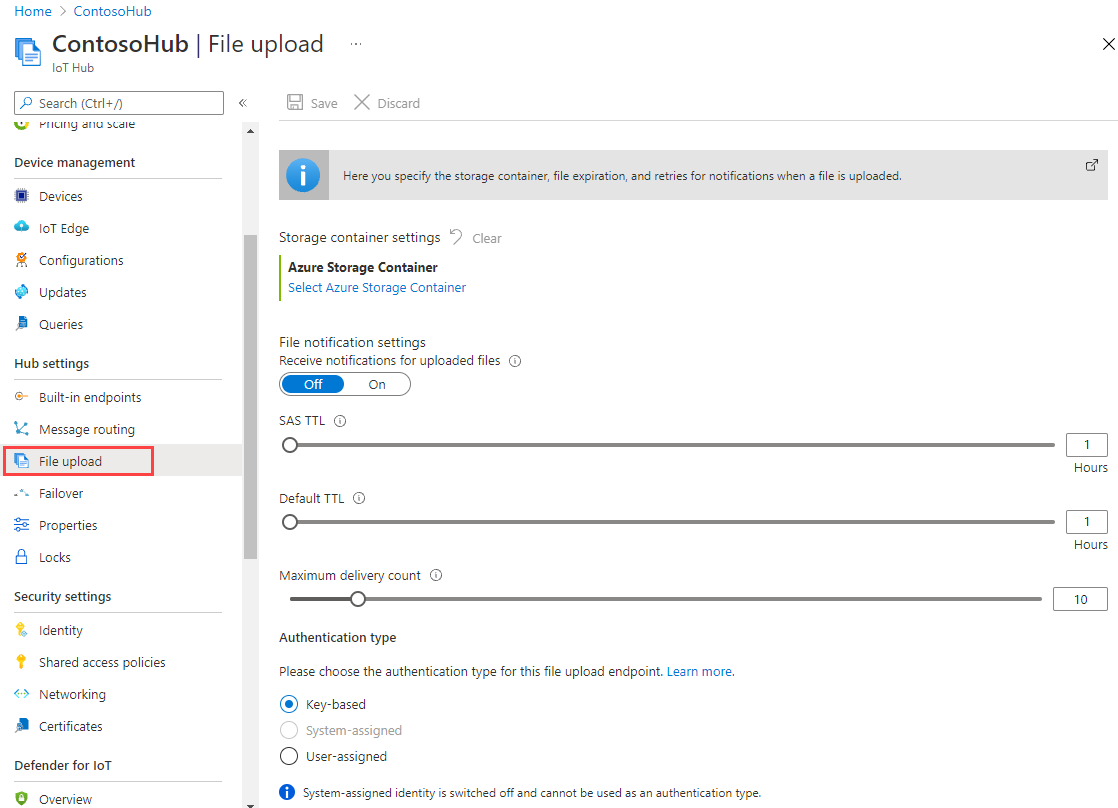
在“ 文件上传 ”窗格中,选择 “Azure 存储容器”。 在本文中,建议将存储帐户和 IoT 中心置于同一区域。
如果已有要使用的存储帐户,请从列表中选择它。
若要创建新的存储帐户,请选择 “+存储帐户”。 提供存储帐户的名称,并确保 位置 设置为与 IoT 中心相同的区域,然后选择“ 确定”。 新帐户在 IoT 中心所在的同一资源组中创建。 部署完成后,从列表中选择存储帐户。
选择存储帐户后,将打开 “容器 ”窗格。
在“ 容器 ”窗格中,选择 Blob 容器。
如果已有要使用的 Blob 容器,请从列表中选择它,然后单击 “选择”。
若要创建新的 Blob 容器,请选择“ + 容器”。 提供新容器的名称。 出于本文的目的,可以将所有其他字段保留为默认值。 选择 创建。 部署完成后,从列表中选择容器,然后单击 “选择”。
返回 “文件上传 ”窗格,确保文件通知设置为 “打开”。 可以将所有其他设置保留为默认设置。 选择“ 保存 ”并等待设置完成,然后再转到下一部分。


有关如何创建 Azure 存储帐户的更详细说明,请参阅 “创建存储帐户”。 有关如何将存储帐户和 Blob 容器与 IoT 中心相关联的详细信息,请参阅 使用 Azure 门户配置文件上传。
使用 Maven 创建项目
为项目创建目录,并在该目录中启动 shell。 在命令行上,执行以下作
mvn archetype:generate -DgroupId=com.mycompany.app -DartifactId=my-app -DarchetypeArtifactId=maven-archetype-quickstart -DarchetypeVersion=1.4 -DinteractiveMode=false
这会生成与 artifactId 和标准项目结构相同的名称的目录:
  my-app
  |-- pom.xml
   -- src
      -- main
         -- java
            -- com
               -- mycompany
                  -- app
                     --App.Java
使用文本编辑器,将 pom.xml 文件替换为以下内容:
<?xml version="1.0" encoding="UTF-8"?>

<project xmlns="http://maven.apache.org/POM/4.0.0" xmlns:xsi="http://www.w3.org/2001/XMLSchema-instance"
  xsi:schemaLocation="http://maven.apache.org/POM/4.0.0 http://maven.apache.org/xsd/maven-4.0.0.xsd">
  <modelVersion>4.0.0</modelVersion>

  <groupId>com.mycompany.app</groupId>
  <artifactId>my-app</artifactId>
  <version>1.0-SNAPSHOT</version>

  <name>my-app</name>
  <!-- FIXME change it to the project's website -->
  <url>http://www.example.com</url>

  <properties>
    <project.build.sourceEncoding>UTF-8</project.build.sourceEncoding>
    <maven.compiler.source>1.7</maven.compiler.source>
    <maven.compiler.target>1.7</maven.compiler.target>
  </properties>

  <dependencies>
      <dependency>
      <groupId>com.microsoft.azure.sdk.iot</groupId>
      <artifactId>iot-device-client</artifactId>
      <version>1.30.1</version>
    </dependency>
    <dependency>
      <groupId>org.slf4j</groupId>
      <artifactId>slf4j-log4j12</artifactId>
      <version>1.7.29</version>
    </dependency>
    <dependency>
      <groupId>junit</groupId>
      <artifactId>junit</artifactId>
      <version>4.11</version>
      <scope>test</scope>
    </dependency>
  </dependencies>

  <build>
    <pluginManagement><!-- lock down plugins versions to avoid using Maven defaults (may be moved to parent pom) -->
      <plugins>
        <plugin>
          <groupId>org.apache.maven.plugins</groupId>
            <artifactId>maven-compiler-plugin</artifactId>
            <version>3.3</version>
            <configuration>
              <source>1.7</source>
              <target>1.7</target>
            </configuration>
        </plugin>
        <plugin>
          <artifactId>maven-shade-plugin</artifactId>
          <version>2.4</version>
          <executions>
              <execution>
                  <phase>package</phase>
                  <goals>
                    <goal>shade</goal>
                  </goals>
                  <configuration>
                      <filters>
                          <filter>
                              <artifact>*:*</artifact>
                              <excludes>
                                  <exclude>META-INF/*.SF</exclude>
                                  <exclude>META-INF/*.RSA</exclude>
                              </excludes>
                          </filter>
                      </filters>
                      <shadedArtifactAttached>true</shadedArtifactAttached>
                      <shadedClassifierName>with-deps</shadedClassifierName>
                  </configuration>
              </execution>
          </executions>
        </plugin>
      </plugins>
    </pluginManagement>
  </build>
</project>
从设备应用上传文件
复制要上传到 my-app 项目树中的文件夹的文件。 使用文本编辑器,将App.java替换为以下代码。 请填写在指定位置的设备连接字符串和文件名。 注册设备时复制了设备连接字符串。
package com.mycompany.app;

import com.azure.storage.blob.BlobClient;
import com.azure.storage.blob.BlobClientBuilder;
import com.microsoft.azure.sdk.iot.deps.serializer.FileUploadCompletionNotification;
import com.microsoft.azure.sdk.iot.deps.serializer.FileUploadSasUriRequest;
import com.microsoft.azure.sdk.iot.deps.serializer.FileUploadSasUriResponse;
import com.microsoft.azure.sdk.iot.device.DeviceClient;
import com.microsoft.azure.sdk.iot.device.IotHubClientProtocol;

import java.io.BufferedInputStream;
import java.io.File;
import java.io.FileInputStream;
import java.io.IOException;
import java.net.URISyntaxException;
import java.util.Scanner;

public class App
{
    /**
     * Upload a single file to blobs using IoT Hub.
     *
     */
    public static void main(String[] args)throws IOException, URISyntaxException
    {
        String connString = "Your device connection string here";
        String fullFileName = "Path of the file to upload";

        System.out.println("Starting...");
        System.out.println("Beginning setup.");

        // File upload will always use HTTPS, DeviceClient will use this protocol only
        //   for the other services like Telemetry, Device Method and Device Twin.
        IotHubClientProtocol protocol = IotHubClientProtocol.MQTT;

        System.out.println("Successfully read input parameters.");

        DeviceClient client = new DeviceClient(connString, protocol);

        System.out.println("Successfully created an IoT Hub client.");

        try
        {
            File file = new File(fullFileName);
            if (file.isDirectory())
            {
                throw new IllegalArgumentException(fullFileName + " is a directory, please provide a single file name, or use the FileUploadSample to upload directories.");
            }

            System.out.println("Retrieving SAS URI from IoT Hub...");
            FileUploadSasUriResponse sasUriResponse = client.getFileUploadSasUri(new FileUploadSasUriRequest(file.getName()));

            System.out.println("Successfully got SAS URI from IoT Hub");
            System.out.println("Correlation Id: " + sasUriResponse.getCorrelationId());
            System.out.println("Container name: " + sasUriResponse.getContainerName());
            System.out.println("Blob name: " + sasUriResponse.getBlobName());
            System.out.println("Blob Uri: " + sasUriResponse.getBlobUri());

            System.out.println("Using the Azure Storage SDK to upload file to Azure Storage...");

            try
            {
                BlobClient blobClient =
                    new BlobClientBuilder()
                        .endpoint(sasUriResponse.getBlobUri().toString())
                        .buildClient();

                blobClient.uploadFromFile(fullFileName);
            }
            catch (Exception e)
            {
                System.out.println("Exception encountered while uploading file to blob: " + e.getMessage());

                System.out.println("Failed to upload file to Azure Storage.");

                System.out.println("Notifying IoT Hub that the SAS URI can be freed and that the file upload failed.");

                // Note that this is done even when the file upload fails. IoT Hub has a fixed number of SAS URIs allowed active
                // at any given time. Once you are done with the file upload, you should free your SAS URI so that other
                // SAS URIs can be generated. If a SAS URI is not freed through this API, then it will free itself eventually
                // based on how long SAS URIs are configured to live on your IoT Hub.
                FileUploadCompletionNotification completionNotification = new FileUploadCompletionNotification(sasUriResponse.getCorrelationId(), false);
                client.completeFileUpload(completionNotification);

                System.out.println("Notified IoT Hub that the SAS URI can be freed and that the file upload was a failure.");

                client.closeNow();
                return;
            }

            System.out.println("Successfully uploaded file to Azure Storage.");

            System.out.println("Notifying IoT Hub that the SAS URI can be freed and that the file upload was a success.");
            FileUploadCompletionNotification completionNotification = new FileUploadCompletionNotification(sasUriResponse.getCorrelationId(), true);
            client.completeFileUpload(completionNotification);
            System.out.println("Successfully notified IoT Hub that the SAS URI can be freed, and that the file upload was a success");
        }
        catch (Exception e)
        {
            System.out.println("On exception, shutting down \n" + " Cause: " + e.getCause() + " \nERROR: " +  e.getMessage());
            System.out.println("Shutting down...");
            client.closeNow();
        }

        System.out.println("Press any key to exit...");

        Scanner scanner = new Scanner(System.in);
        scanner.nextLine();
        System.out.println("Shutting down...");
        client.closeNow();
    }
}
生成并运行应用程序
在文件夹中的 my-app 命令提示符处运行以下命令:
mvn clean package -DskipTests
生成完成后,运行以下命令来运行应用程序:
mvn exec:java -Dexec.mainClass="com.mycompany.app.App"
可以使用门户在配置的存储容器中查看上传的文件:

接收文件上传通知
在本部分中,将创建一个 Java 控制台应用,用于从 IoT 中心接收文件上传通知消息。
为项目创建目录,并在该目录中启动 shell。 在命令行上,执行以下作
mvn archetype:generate -DgroupId=com.mycompany.app -DartifactId=my-app -DarchetypeArtifactId=maven-archetype-quickstart -DarchetypeVersion=1.4 -DinteractiveMode=false在命令提示符下,导航到新
my-app文件夹。使用文本编辑器,将
pom.xml文件夹中的文件my-app替换为以下内容。 通过添加服务客户端依赖项,可以使用应用程序中的 iothub-java-service-client 包与 IoT 中心服务进行通信:<?xml version="1.0" encoding="UTF-8"?> <project xmlns="http://maven.apache.org/POM/4.0.0" xmlns:xsi="http://www.w3.org/2001/XMLSchema-instance" xsi:schemaLocation="http://maven.apache.org/POM/4.0.0 http://maven.apache.org/xsd/maven-4.0.0.xsd"> <modelVersion>4.0.0</modelVersion> <groupId>com.mycompany.app</groupId> <artifactId>my-app</artifactId> <version>1.0-SNAPSHOT</version> <name>my-app</name> <!-- FIXME change it to the project's website --> <url>http://www.example.com</url> <properties> <project.build.sourceEncoding>UTF-8</project.build.sourceEncoding> <maven.compiler.source>1.7</maven.compiler.source> <maven.compiler.target>1.7</maven.compiler.target> </properties> <dependencies> <dependency> <groupId>com.microsoft.azure.sdk.iot</groupId> <artifactId>iot-device-client</artifactId> <version>1.30.1</version> </dependency> <dependency> <groupId>com.microsoft.azure.sdk.iot</groupId> <artifactId>iot-service-client</artifactId> <version>1.7.23</version> </dependency> <dependency> <groupId>org.slf4j</groupId> <artifactId>slf4j-log4j12</artifactId> <version>1.7.29</version> </dependency> <dependency> <groupId>junit</groupId> <artifactId>junit</artifactId> <version>4.11</version> <scope>test</scope> </dependency> </dependencies> <build> <pluginManagement><!-- lock down plugins versions to avoid using Maven defaults (may be moved to parent pom) --> <plugins> <plugin> <groupId>org.apache.maven.plugins</groupId> <artifactId>maven-compiler-plugin</artifactId> <version>3.3</version> <configuration> <source>1.7</source> <target>1.7</target> </configuration> </plugin> <plugin> <artifactId>maven-shade-plugin</artifactId> <version>2.4</version> <executions> <execution> <phase>package</phase> <goals> <goal>shade</goal> </goals> <configuration> <filters> <filter> <artifact>*:*</artifact> <excludes> <exclude>META-INF/*.SF</exclude> <exclude>META-INF/*.RSA</exclude> </excludes> </filter> </filters> <shadedArtifactAttached>true</shadedArtifactAttached> <shadedClassifierName>with-deps</shadedClassifierName> </configuration> </execution> </executions> </plugin> </plugins> </pluginManagement> </build> </project>注释
可以使用 Maven 搜索检查最新版本的 iot-service-client。
保存并关闭
pom.xml文件。获取 IoT 中心服务连接字符串。
若要获取 service策略的 IoT 中心连接字符串,请执行以下步骤:
在 Azure 门户中,选择 资源组。 选择中心所在的资源组,然后从资源列表中选择中心。
在 IoT 中心的左侧窗格中,选择 “共享访问策略”。
在策略列表中,选择“service”策略。
复制“主连接字符串”并保存该值。
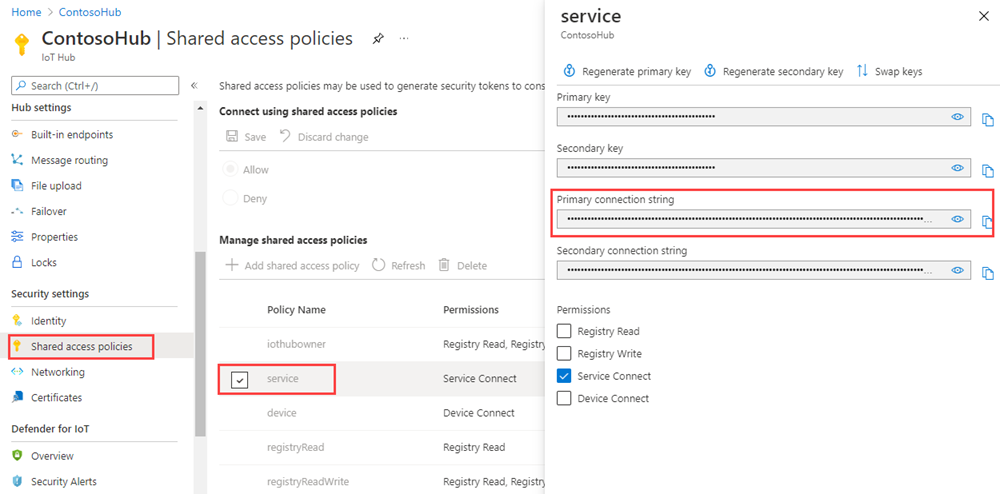
有关 IoT 中心共享访问策略和权限的详细信息,请参阅 访问控制和权限。
使用文本编辑器打开
my-app\src\main\java\com\mycompany\app\App.java文件,并将代码替换为以下内容。package com.mycompany.app; import com.microsoft.azure.sdk.iot.service.*; import java.io.IOException; import java.net.URISyntaxException; import java.util.concurrent.ExecutorService; import java.util.concurrent.Executors; public class App { private static final String connectionString = "{Your service connection string here}"; private static final IotHubServiceClientProtocol protocol = IotHubServiceClientProtocol.AMQPS; public static void main(String[] args) throws Exception { ServiceClient sc = ServiceClient.createFromConnectionString(connectionString, protocol); FileUploadNotificationReceiver receiver = sc.getFileUploadNotificationReceiver(); receiver.open(); FileUploadNotification fileUploadNotification = receiver.receive(2000); if (fileUploadNotification != null) { System.out.println("File Upload notification received"); System.out.println("Device Id : " + fileUploadNotification.getDeviceId()); System.out.println("Blob Uri: " + fileUploadNotification.getBlobUri()); System.out.println("Blob Name: " + fileUploadNotification.getBlobName()); System.out.println("Last Updated : " + fileUploadNotification.getLastUpdatedTimeDate()); System.out.println("Blob Size (Bytes): " + fileUploadNotification.getBlobSizeInBytes()); System.out.println("Enqueued Time: " + fileUploadNotification.getEnqueuedTimeUtcDate()); } else { System.out.println("No file upload notification"); } receiver.close(); } }保存并关闭
my-app\src\main\java\com\mycompany\app\App.java文件。使用以下命令生成应用并检查错误:
mvn clean package -DskipTests

运行应用程序
现在,你已准备好运行应用程序。
在文件夹中的 my-app 命令提示符处运行以下命令:
mvn exec:java -Dexec.mainClass="com.mycompany.app.App"
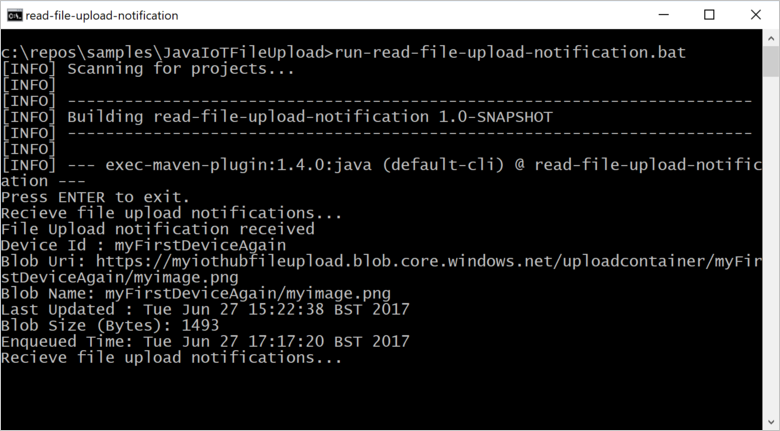
以下屏幕截图显示了 read-file-upload-notification 应用的输出:
后续步骤
本文介绍了如何使用 IoT 中心的文件上传功能来简化设备中的文件上传。 可以使用以下文章继续浏览此功能:
若要进一步探索 IoT 中心的功能,请参阅: