可以使用 X.509 证书向 IoT 中心对设备进行身份验证。 对于生产环境,我们建议从专业的证书服务供应商处购买 X.509 CA 证书。 然后,作为全面公钥基础结构 (PKI) 战略的一部分,可以在组织内从与购买的 CA 证书链接的内部自管理证书颁发机构 (CA) 颁发证书。 有关从专业证书服务供应商处获取 X.509 CA 证书的详细信息,请参阅使用 X.509 CA 证书验证设备的获取 X.509 CA 证书部分。
但是,创建使用内部根 CA 作为信任定位点的自管理专用 CA 足以测试环境。 利用至少有一个从属 CA 链接到内部根 CA 的自管理专用 CA,以及由从属 CA 签名的设备客户端证书,可以模拟建议的生产环境。
重要
不建议在生产环境中使用自签名证书。 此教程仅用于演示目的。
以下教程使用 OpenSSL 和 OpenSSL 指南来描述如何完成以下任务:
- 创建内部根证书颁发机构 (CA) 和根 CA 证书
- 创建由内部根 CA 证书签名的内部从属 CA 和从属 CA 证书
- 将从属 CA 证书上传到 IoT 中心进行测试
- 使用从属 CA 为要在 IoT 中心测试的 IoT 设备创建客户端证书
注意
Azure 提供了 PowerShell 和 Bash 脚本来帮助你了解如何创建你自己的 x.509 证书,并将其向 IoT 中心进行身份验证。 这些脚本包含在适用于 C 的 Azure IoT 中心设备 SDK 中。这些脚本仅用于演示目的。 所创建的证书不得用于生产。 证书包含硬编码密码(“1234”)并在 30 天后过期。 必须使用自己的最佳做法在生产环境中创建证书并管理生存期。 有关详细信息,请参阅适用于 C 的 Azure IoT 中心设备 SDK 的 GitHub 存储库中的管理测试 CA 证书示例和教程。
先决条件
Azure 订阅。 如果没有 Azure 订阅,可在开始前创建一个试用帐户。
Azure 订阅中的 IoT 中心。 如果还没有中心,则可以按照创建 IoT 中心中的步骤进行操作。
最新版本的 Git。 确保将 Git 添加到可供命令窗口访问的环境变量。 请参阅软件自由保护组织提供的 Git 客户端工具,了解要安装的最新版
git工具,其中包括 Git Bash,这是一个命令行应用,可以用来与本地 Git 存储库交互。OpenSSL 安装。 在 Windows 上, Git 安装包含 OpenSSL 安装。 可以从 Git Bash 提示符访问 OpenSSL。 若要验证是否安装了 OpenSSL,请打开 Git Bash 提示符并输入
openssl version。注意
除非你熟悉 OpenSSL 并且已将其安装在 Windows 计算机上,否则我们建议从 Git Bash 提示符使用 OpenSSL。 或者,可以选择下载源代码并生成 OpenSSL。 若要了解详细信息,请参阅 OpenSSL 下载页。 或者,可以从第三方下载预生成的 OpenSSL。 若要了解详细信息,请参阅 OpenSSL wiki。 Azure 不保证从第三方下载的包的有效性。 如果你确实选择生成或下载 OpenSSL,请确保可在你的路径中访问 OpenSSL 二进制文件,并且
OPENSSL_CNF环境变量设置为 openssl.cnf 文件的路径。
创建根 CA
必须先创建内部根证书颁发机构 (CA) 和自签名根 CA 证书来充当信任定位点,以便从中创建其他证书进行测试。 用于创建和维护内部根 CA 的文件存储在文件夹结构中,并作为此过程的一部分进行初始化。 执行以下步骤:
- 创建和初始化根 CA 使用的文件夹和文件
- 创建 OpenSSL 使用的配置文件来配置根 CA 以及使用根 CA 创建的证书
- 请求并创建用作根 CA 证书的自签名 CA 证书
启动 Git Bash 窗口并运行以下命令,将
{base_dir}替换为本教程中要在其中创建证书的所需目录。cd {base_dir}在 Git Bash 窗口中,运行以下命令,一次一个。 此步骤为根 CA 创建以下目录结构和支持文件。
目录或文件 说明 rootca 根 CA 的根目录。 rootca/certs 在其中创建和存储根 CA 的 CA 证书的目录。 rootca/db 存储根 CA 的证书数据库和支持文件的目录。 rootca/db/index 根 CA 的证书数据库。 命令 touch创建不带任何内容的文件,供以后使用。 证书数据库是由 OpenSSL 管理的纯文本文件,其中包含有关颁发的证书的信息。 有关证书数据库的详细信息,请参阅 openssl-ca 手册页。rootca/db/serial 用于存储要为根 CA 创建的下一个证书的序列号的文件。 命令 openssl以十六进制格式创建一个 16 字节随机数,然后将其存储在此文件中,以初始化用于创建根 CA 证书的文件。rootca/db/crlnumber 用于存储根 CA 颁发的已吊销证书的序列号的文件。 命令 echo通过管道将示例序列号 1001 传递到文件中。rootca/private 存储根 CA 的私有文件(包括私钥)的目录。
必须保护此目录中的文件。mkdir rootca cd rootca mkdir certs db private chmod 700 private touch db/index openssl rand -hex 16 > db/serial echo 1001 > db/crlnumber在上一步中创建的
rootca目录中创建名为rootca.conf的文本文件。 在文本编辑器中打开该文件,然后将以下 OpenSSL 配置设置复制并保存到该文件中。文件为 OpenSSL 提供配置测试根 CA 所需的值。 对于此示例,文件使用在前面的步骤中创建的目录和文件来配置名为 rootca 的根 CA。 该文件还提供以下各项的配置设置:
- 根 CA 用于证书可分辨名称 (DN) 字段的 CA 策略
- 根 CA 创建的证书请求
- 应用于根 CA 证书、从属 CA 证书和根 CA 颁发的客户端证书的 X.509 扩展
注意
ca_default部分中的home属性设置为../rootca,因为在为从属 CA 创建证书时也使用此配置文件。 指定的相对路径允许 OpenSSL 在此过程中从从属 CA 文件夹导航到根 CA 文件夹。有关 OpenSSL 配置文件的语法的详细信息,请参阅 OpenSSL 文档中的 config 手册页。
[default]
name                     = rootca
domain_suffix            = exampledomain.com
aia_url                  = http://$name.$domain_suffix/$name.crt
crl_url                  = http://$name.$domain_suffix/$name.crl
default_ca               = ca_default
name_opt                 = utf8,esc_ctrl,multiline,lname,align

[ca_dn]
commonName               = "rootca_common_name"

[ca_default]
home                     = ../rootca
database                 = $home/db/index
serial                   = $home/db/serial
crlnumber                = $home/db/crlnumber
certificate              = $home/$name.crt
private_key              = $home/private/$name.key
RANDFILE                 = $home/private/random
new_certs_dir            = $home/certs
unique_subject           = no
copy_extensions          = none
default_days             = 3650
default_crl_days         = 365
default_md               = sha256
policy                   = policy_c_o_match

[policy_c_o_match]
countryName              = optional
stateOrProvinceName      = optional
organizationName         = optional
organizationalUnitName   = optional
commonName               = supplied
emailAddress             = optional

[req]
default_bits             = 2048
encrypt_key              = yes
default_md               = sha256
utf8                     = yes
string_mask              = utf8only
prompt                   = no
distinguished_name       = ca_dn
req_extensions           = ca_ext

[ca_ext]
basicConstraints         = critical,CA:true
keyUsage                 = critical,keyCertSign,cRLSign
subjectKeyIdentifier     = hash

[sub_ca_ext]
authorityKeyIdentifier   = keyid:always
basicConstraints         = critical,CA:true,pathlen:0
extendedKeyUsage         = clientAuth,serverAuth
keyUsage                 = critical,keyCertSign,cRLSign
subjectKeyIdentifier     = hash

[client_ext]
authorityKeyIdentifier   = keyid:always
basicConstraints         = critical,CA:false
extendedKeyUsage         = clientAuth
keyUsage                 = critical,digitalSignature
subjectKeyIdentifier     = hash
在 Git Bash 窗口中,运行以下命令在
rootca目录中生成证书签名请求 (CSR),并在rootca/private目录中生成私钥。 有关 OpenSSLreq命令的详细信息,请参阅 OpenSSL 文档中的 openssl-req 手册页。注意
即使此根 CA 用于测试目的,并且不会作为公钥基础结构 (PKI) 的一部分公开,但我们建议不要复制或共享私钥。
winpty openssl req -new -config rootca.conf -out rootca.csr -keyout private/rootca.key系统会提示你为私钥文件输入 PEM 密码,如以下示例所示。 输入并确认密码以生成私钥和 CSR。
Enter PEM pass phrase:
Verifying - Enter PEM pass phrase:
-----
在继续操作之前,请确认 CSR 文件
rootca.csr存在于rootca目录中,并且私钥文件rootca.key存在于private子目录中。在 Git Bash 窗口中,运行以下命令以创建自签名根 CA 证书。 命令将
ca_ext配置文件扩展应用于证书。 这些扩展名表示证书适用于根 CA,可用于签署证书和证书吊销列表 (CRL)。 有关 OpenSSLca命令的详细信息,请参阅 OpenSSL 文档中的 openssl-ca 手册页。winpty openssl ca -selfsign -config rootca.conf -in rootca.csr -out rootca.crt -extensions ca_ext系统会提示你为私钥文件提供 PEM 密码,如以下示例所示。 提供密码后,OpenSSL 会生成一个证书,然后提示你为根 CA 签名并提交证书。 为两个提示指定 y,以便为根 CA 生成自签名证书。
Using configuration from rootca.conf
Enter pass phrase for ../rootca/private/rootca.key:
Check that the request matches the signature
Signature ok
Certificate Details:
    {Details omitted from output for clarity}
Certificate is to be certified until Mar 24 18:51:41 2033 GMT (3650 days)
Sign the certificate? [y/n]:


1 out of 1 certificate requests certified, commit? [y/n]
Write out database with 1 new entries
Data Base Updated
在 OpenSSL 更新证书数据库后,确认证书文件
rootca.crt存在于rootca目录中,并且证书的 PEM 证书 (.pem) 文件存在于rootca/certs目录中。 .pem 文件的文件名与根 CA 证书的序列号匹配。
创建从属 CA
创建内部根 CA 后,应创建一个从属 CA,其用作中间 CA 对设备的客户端证书进行签名。 从理论上讲,不需要创建从属 CA;可以将根 CA 证书上传到 IoT 中心,并直接从根 CA 对客户端证书进行签名。 但是,使用从属 CA 作为中间 CA 对客户端证书进行签名可以更密切地模拟建议的生产环境,其中根 CA 保持脱机状态。 还可以使用从属 CA 对另一个从属 CA 进行签名,进而为其他从属 CA 签名,依此类推。 使用从属 CA 对其他从属 CA 进行签名会创建中间 CA 的层次结构,其属于证书信任链的一部分。在生产环境中,证书信任链允许对签名设备进行信任委派。 有关将设备登录到证书信任链的详细信息,请参阅使用 X.509 CA 证书对设备进行身份验证。
与根 CA 类似,用于创建和维护从属 CA 的文件存储在文件夹结构中,并在此过程中进行初始化。 执行以下步骤:
- 创建和初始化从属 CA 使用的文件夹和文件
- 创建 OpenSSL 使用的配置文件来配置从属 CA 和使用从属 CA 创建的证书
- 请求并创建由根 CA 签名的 CA 证书,其用作从属 CA 证书
返回到包含
rootca目录的基目录。 对于此示例,根 CA 和从属 CA 都位于同一基目录中。cd ..在 Git Bash 窗口中,运行以下命令,一次一个。
此步骤为从属 CA 创建目录结构和支持文件,类似于在前一节中为根 CA 创建的文件夹结构和文件。
mkdir subca
cd subca
mkdir certs db private
chmod 700 private
touch db/index
openssl rand -hex 16 > db/serial
echo 1001 > db/crlnumber
在上一步中创建的
subca目录中创建名为subca.conf的文本文件。 在文本编辑器中打开该文件,然后将以下 OpenSSL 配置设置复制并保存到该文件中。与测试根 CA 的配置文件一样,此文件为 OpenSSL 提供配置测试从属 CA 所需的值。 你可以创建多个从属 CA,用于管理测试方案或环境。
有关 OpenSSL 配置文件的语法的详细信息,请参阅 OpenSSL 文档中的 config 主手册页。
[default]
name                     = subca
domain_suffix            = exampledomain.com
aia_url                  = http://$name.$domain_suffix/$name.crt
crl_url                  = http://$name.$domain_suffix/$name.crl
default_ca               = ca_default
name_opt                 = utf8,esc_ctrl,multiline,lname,align

[ca_dn]
commonName               = "subca_common_name"

[ca_default]
home                     = ../subca
database                 = $home/db/index
serial                   = $home/db/serial
crlnumber                = $home/db/crlnumber
certificate              = $home/$name.crt
private_key              = $home/private/$name.key
RANDFILE                 = $home/private/random
new_certs_dir            = $home/certs
unique_subject           = no
copy_extensions          = copy
default_days             = 365
default_crl_days         = 90
default_md               = sha256
policy                   = policy_c_o_match

[policy_c_o_match]
countryName              = optional
stateOrProvinceName      = optional
organizationName         = optional
organizationalUnitName   = optional
commonName               = supplied
emailAddress             = optional

[req]
default_bits             = 2048
encrypt_key              = yes
default_md               = sha256
utf8                     = yes
string_mask              = utf8only
prompt                   = no
distinguished_name       = ca_dn
req_extensions           = ca_ext

[ca_ext]
basicConstraints         = critical,CA:true
keyUsage                 = critical,keyCertSign,cRLSign
subjectKeyIdentifier     = hash

[sub_ca_ext]
authorityKeyIdentifier   = keyid:always
basicConstraints         = critical,CA:true,pathlen:0
extendedKeyUsage         = clientAuth,serverAuth
keyUsage                 = critical,keyCertSign,cRLSign
subjectKeyIdentifier     = hash

[client_ext]
authorityKeyIdentifier   = keyid:always
basicConstraints         = critical,CA:false
extendedKeyUsage         = clientAuth
keyUsage                 = critical,digitalSignature
subjectKeyIdentifier     = hash
在 Git Bash 窗口中运行以下命令,在从属 CA 目录中生成私钥和证书签名请求 (CSR)。
系统会提示你为私钥文件输入 PEM 密码,如以下示例所示。 输入并验证密码以生成私钥和 CSR。
Enter PEM pass phrase:
Verifying - Enter PEM pass phrase:
-----
在继续操作之前,请确认 CSR 文件
subca.csr存在于从属 CA 目录中,并且私钥文件subca.key存在于private子目录中。在 Git Bash 窗口中运行以下命令,在从属 CA 目录中创建从属 CA 证书。 命令将
sub_ca_ext配置文件扩展应用于证书。 这些扩展表示证书适用于从属 CA,还可用于签署证书和证书吊销列表 (CRL)。 与根 CA 证书不同,此证书不是自签名证书。 相反,从属 CA 证书使用根 CA 证书进行签名,从而建立一个与用于公钥基础结构 (PKI) 的证书链类似的证书链。 然后,使用从属 CA 证书对客户端证书进行签名,以测试设备。winpty openssl ca -config ../rootca/rootca.conf -in subca.csr -out subca.crt -extensions sub_ca_ext系统会提示输入根 CA 的私钥文件的密码,如以下示例所示。 输入密码后,OpenSSL 会生成并显示证书的详细信息,然后提示你为从属 CA 签名并提交证书。 为两个提示指定
y,以便为从属 CA 生成证书。Using configuration from rootca.conf Enter pass phrase for ../rootca/private/rootca.key: Check that the request matches the signature Signature ok Certificate Details: {Details omitted from output for clarity} Certificate is to be certified until Mar 24 18:55:00 2024 GMT (365 days) Sign the certificate? [y/n]: 1 out of 1 certificate requests certified, commit? [y/n] Write out database with 1 new entries Data Base UpdatedOpenSSL 更新证书数据库后,确认证书文件
subca.crt存在于从属 CA 目录中,并且证书的 PEM 证书 (.pem) 文件存在于rootca/certs目录中。 .pem 文件的文件名与从属 CA 证书的序列号匹配。
将从属 CA 证书注册到 IoT 中心
将从属 CA 证书注册到 IoT 中心,在注册和连接期间,IoT 中心将使用此证书对设备进行身份验证。 以下步骤介绍如何将从属 CA 证书上传到 IoT 中心并自动验证。
在 Azure 门户中,导航到 IoT 中心并从资源菜单中的“安全设置”下选择“证书”。
从命令栏中选择“添加”,以添加新的 CA 证书。
在“证书名称”字段中输入从属 CA 证书的显示名称。
从
rootca/certs目录中选择从属 CA 证书的 PEM 证书 (.pem) 文件,以添加到“证书 .pem 或 .cer 文件”字段中。选中“在上传时将证书状态设置为已验证”旁边的复选框。
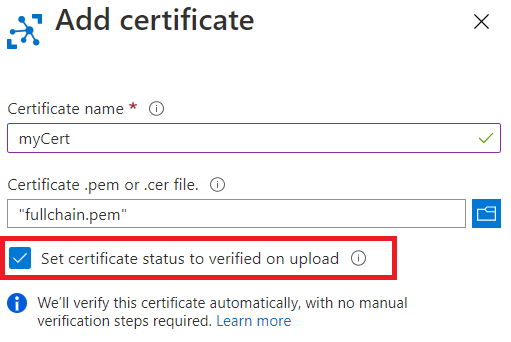
选择“保存”。
你上传的从属 CA 证书在工作窗格的“证书”选项卡上显示,其状态设置为“已验证”。
为设备创建客户端证书
创建从属 CA 后,可以为设备创建客户端证书。 你为从属 CA 创建的文件和文件夹用于存储客户端证书的 CSR、私钥和证书文件。
客户端证书的使用者公用名 (CN) 字段的值必须设置为在 Azure IoT 中心注册相应设备时使用的设备 ID 值。
执行以下步骤:
- 为客户端证书创建私钥和证书签名请求 (CSR)
- 创建由从属 CA 证书签名的客户端证书
在 Git Bash 窗口中,确保你仍处于
subca目录中。在 Git Bash 窗口中,运行以下命令,一次一个。 将占位符替换为 IoT 设备的名称,例如
testdevice。 此步骤为客户端证书创建私钥和 CSR。此步骤为客户端证书创建 2048 位 RSA 私钥,然后使用该私钥生成证书签名请求 (CSR)。
出现提示时,提供证书详细信息,如以下示例所示。
必须为其提供特定值的唯一提示是“公用名”,它必须是上一步中提供的相同设备名称。 对于其余的提示,可跳过或提供任意值。
提供证书详细信息后,OpenSSL 会生成并显示证书的详细信息,然后提示你为从属 CA 签名并提交证书。 为两个提示指定 y,以便为从属 CA 生成证书。
-----
Country Name (2 letter code) [XX]:.
State or Province Name (full name) []:.
Locality Name (eg, city) [Default City]:.
Organization Name (eg, company) [Default Company Ltd]:.
Organizational Unit Name (eg, section) []:
Common Name (eg, your name or your server hostname) []:'<DEVICE_NAME>'
Email Address []:

Please enter the following 'extra' attributes
to be sent with your certificate request
A challenge password []:
An optional company name []:
在继续操作之前,请确认 CSR 文件存在于从属 CA 目录中,并且私钥文件存在于
private子目录中。 有关 CSR 和私钥文件的格式的详细信息,请参阅 X.509 证书。在 Git Bash 窗口中,运行以下命令,将设备名称占位符替换为在前面的步骤中使用的相同名称。
此步骤在从属 CA 目录中创建客户端证书。 命令将
client_ext配置文件扩展应用于证书。 这些扩展指示证书适用于客户端证书,不能将其用作 CA 证书。 客户端证书使用从属 CA 证书进行签名。winpty openssl ca -config subca.conf -in <DEVICE_NAME>.csr -out <DEVICE_NAME>.crt -extensions client_ext系统会提示输入从属 CA 的私钥文件的密码,如以下示例所示。 输入密码后,OpenSSL 会生成并显示证书的详细信息,然后提示你为设备签名并提交客户端证书。 为两个提示指定 y 以生成客户端证书。
Using configuration from subca.conf
Enter pass phrase for ../subca/private/subca.key:
Check that the request matches the signature
Signature ok
Certificate Details:
    {Details omitted from output for clarity}
Certificate is to be certified until Mar 24 18:51:41 2024 GMT (365 days)
Sign the certificate? [y/n]:


1 out of 1 certificate requests certified, commit? [y/n]
Write out database with 1 new entries
Data Base Updated
OpenSSL 更新证书数据库后,确认客户端证书的证书文件存在于从属 CA 目录中,并且客户端证书的 PEM 证书 (.pem) 文件存在于从属 CA 目录的 certs 子目录中。 .pem 文件的文件名与客户端证书的序列号匹配。
后续步骤
你可以向 IoT 中心注册设备,以测试为该设备创建的客户端证书。 有关注册设备的详细信息,请参阅使用 Azure 门户创建 IoT 中心中的在 IoT 中心注册新设备部分。