Note
Access to this page requires authorization. You can try signing in or changing directories.
Access to this page requires authorization. You can try changing directories.
This article shows you how to use Visual Studio Code to create Bicep files.
Install Visual Studio Code
To set up your environment for Bicep development, see Install Bicep tools. After completing those steps, you have Visual Studio Code and the Bicep extension installed. You also have either the latest Azure CLI or the latest Azure PowerShell module.
Bicep commands
Visual Studio Code comes with several Bicep commands.
Open or create a Bicep file in Visual Studio Code, and select the View menu and then Command Palette. You can also press F1 or the Ctrl+Shift+P key combination to bring up the command palette. Enter Bicep to list the Bicep commands.
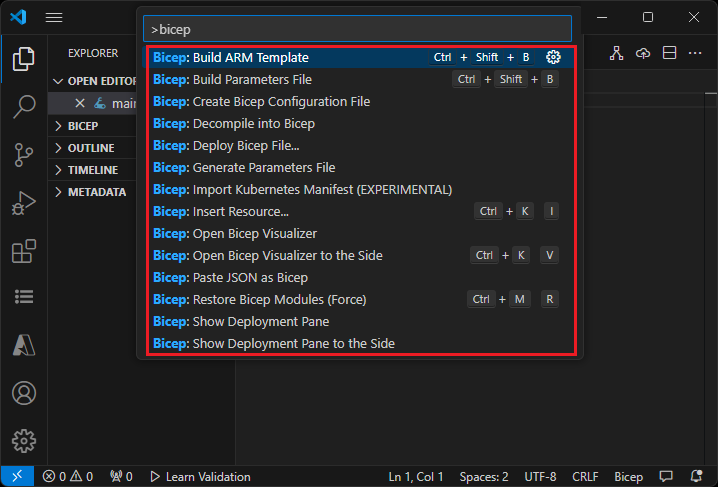
These commands include:
- Build Azure Resource Manager (ARM) template
- Build Parameters File
- Create Bicep Configuration File
- Decompile into Bicep
- Deploy Bicep File
- Generate Parameters File
- Import Azure Kubernetes Manifest (EXPERIMENTAL)
- Insert Resource
- Open Bicep Visualizer
- Open Bicep Visualizer to the Side
- Paste JSON as Bicep
- Restore Bicep Modules (Force)
- Show Deployment Pane
- Show Deployment Pane to the Side
These commands are also shown in the context menu when you right-click a Bicep file:
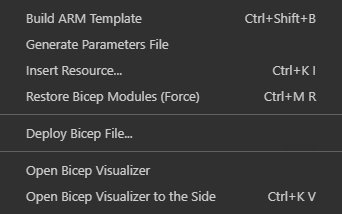
And when you right-click a JSON file:

To learn more about the commands in this article, see Bicep CLI commands.
In addition to the Bicep commands, you can also use the built-in VS Code commands, such as Format Documents, or Shift+Alt+F.
Build ARM Template command
The build command converts a Bicep file to a JSON ARM template. The new template is stored in the same folder with the same file name. If a file with the same file name exists, it overwrites the old file. See build for an example and more information.
Build Parameters File command
The build-params command also converts a Bicep parameters file to a JSON parameters file. The new parameters file is stored in the same folder with the same file name. If a file with the same file name exists, it overwrites the old file. See build-params for an example.
Create Bicep Configuration File command
The bicepconfig.json file is a Bicep configuration file that can customize your Bicep development experience. You can add bicepconfig.json to multiple directories; the configuration file closest to the Bicep file in the directory hierarchy is used. When you select Create Bicep Configuration File in Visual Studio Code, the extension opens a dialog for you to select a folder. The default folder is where you store the Bicep file. If a bicepconfig.json file already exists in the folder, you can overwrite the existing file.
To create a Bicep configuration file:
- Open Visual Studio Code.
- From the View menu, select Command Palette (or press Ctrl/Cmd+Shift+P) and then Bicep: Create Bicep Configuration File.
- Select the file directory where you want to place the file.
- Save the configuration file when you're done.
Decompile into Bicep command
The decompile command decompiles a JSON ARM template into a Bicep file and places it in the same directory as the original JSON ARM template. The new file has the same file name with the .bicep extension. If a Bicep file with the same file name already exists in the same folder, Visual Studio Code prompts you to overwrite the existing file or create a copy. See decompile for an example.
Deploy Bicep File command
You can deploy Bicep files directly from Visual Studio Code. Select Deploy Bicep File from the command palette or from the context menu. The extension prompts you to sign into the Azure portal, select your subscription, create or select a resource group, and enter values for parameters.
Note
The Bicep deploy command in Visual Studio Code uses the new built-in authentication API for managing authentication. It doesn't use cloud profiles from bicepconfig.json. To sign in to a custom cloud, select Manage > Settings > Extension > Microsoft accounts > Microsoft Sovereign Cloud. At this time, multiple signed-in accounts aren't supported.
Generate Parameters File command
The generate-params command creates a parameters file in the same folder as the Bicep file. You can choose to create a Bicep parameters file or a JSON parameters file. The new Bicep parameters file name is <bicep-file-name>.bicepparam, while the new JSON parameters file name is <bicep-file-name>.parameters.json. See generate-params for an example and more information.
Import AKS Manifest (Preview) command
This command imports an AKS manifest file and creates a Bicep module. For more information, see Bicep Kubernetes extension (preview) and Quickstart: Deploy an Azure Kubernetes Service (AKS) cluster using the Bicep Kubernetes extension (preview).
Insert Resource command
This command declares a resource in the Bicep file by providing the resource ID of an existing resource. Select Insert Resource in Visual Studio Code, and enter the resource ID in the command palette. It takes a few moments to insert the resource.
You can use one of these methods to find the resource ID:
Use the Azure Resources extension for Visual Studio Code.
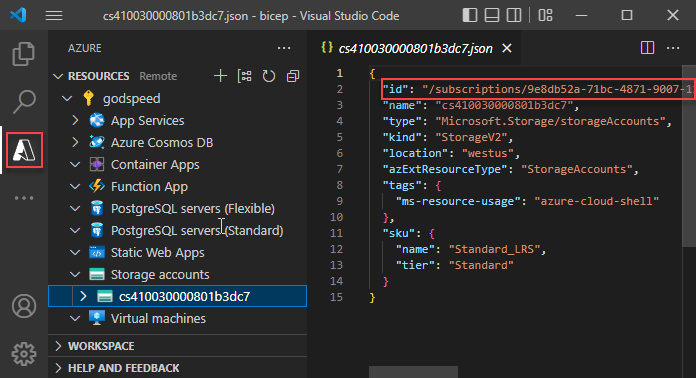
Check the Azure portal.
Use the Azure CLI or Azure PowerShell:
az resource list
Similar to the process of exporting templates, this process tries to create a usable resource. However, most of the inserted resources need to be changed in some way before they can be used to deploy Azure resources. For more information, see Decompile ARM template JSON to Bicep.
Open Bicep Visualizer command
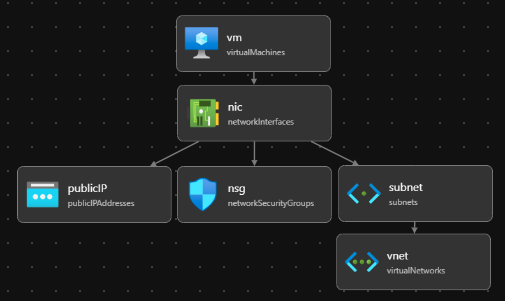
Bicep Visualizer shows the resources defined in the Bicep file and the dependencies between them. Following diagram is a visual representation of a Bicep file for a Linux Virtual Machine.
You can open Bicep Visualizer side by side with the Bicep file.
Paste JSON as Bicep command
You can paste a JSON snippet from an ARM template to a Bicep file. Visual Studio Code automatically decompiles the JSON to Bicep. This feature is only available with the Bicep extension version 0.14.0 or newer, and it's enabled by default. To disable the feature, see Visual Studio Code and Bicep extension.
This feature allows you to paste:
- Full JSON ARM templates.
- Single or multiple resources.
- JSON values such as objects, arrays, or strings. A string with double quotation marks converts to one with single quotation marks.
For example, you can start with the following Bicep file:
@description('Storage Account type')
@allowed([
  'Standard_LRS'
  'Standard_GRS'
  'Standard_ZRS'
  'Premium_LRS'
])
param storageAccountsku string = 'Standard_LRS'

@description('Location for all resources.')
param location string = resourceGroup().location

var storageAccountName = '${uniqueString(resourceGroup().id)}storage'

resource storageAccount 'Microsoft.Storage/storageAccounts@2025-06-01' = {
  name: storageAccountName
  location: location
  sku: {
    name: storageAccountsku
  }
  kind: 'StorageV2'
  tags: {
    ObjectName: storageAccountName
  }
  properties: {}
}

output storageAccountName string = storageAccountName
And paste the following JSON:
{
  "type": "Microsoft.Batch/batchAccounts",
  "apiVersion": "2024-02-01",
  "name": "[parameters('batchAccountName')]",
  "location": "[parameters('location')]",
  "tags": {
    "ObjectName": "[parameters('batchAccountName')]"
  },
  "properties": {
    "autoStorage": {
      "storageAccountId": "[resourceId('Microsoft.Storage/storageAccounts', variables('storageAccountName'))]"
    }
  }
}
Visual Studio Code automatically converts JSON to Bicep. Notice that you also need to add a batchAccountName parameter.
You can undo the decompilation by pressing Ctrl+Z. The original JSON appears in the file.
Restore Bicep Modules command
When your Bicep file uses modules that are published to a registry, the restore command gets copies of all the required modules from the registry. It stores those copies in a local cache. For more information and an example, see restore.
Show Deployment Pane command
The deployment pane provides an interactive UI in VS Code that can access your Azure account to perform validate, deploy, and what-if operations, providing instant feedback without leaving the editor.
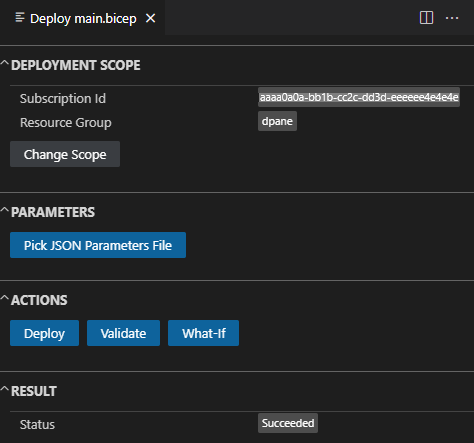
See Deployment Pane for more information.
Use quick fix suggestions
The light bulb in VS Code represents a quick fix suggestion. It appears when the editor detects an issue or an improvement opportunity in your code. Clicking on the light bulb displays a menu of actions that can address the issue or enhance the code.
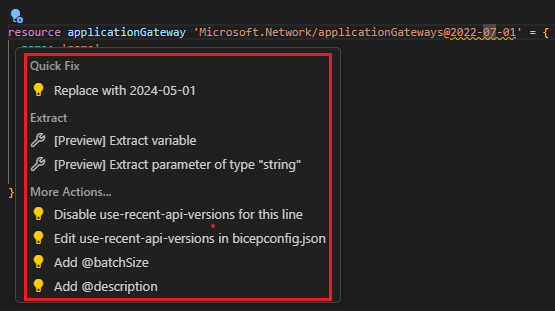
For the extract commands, see Extract parameters, variables, and types. In More Actions, it suggests adding decorators.
Extract parameters, variables, and types
Extracting variables, parameters, and user-defined data types involves isolating and defining these components from existing code to improve code structure, maintainability, and clarity.
The following screenshot shows a definition of an AKS cluster resource. You can extract a parameter or a variable, or a user-defined data type based of a property, such as identity. Select the identity line from the code, and then select the yellow light bulb icon. The context windows shows the available extract options.
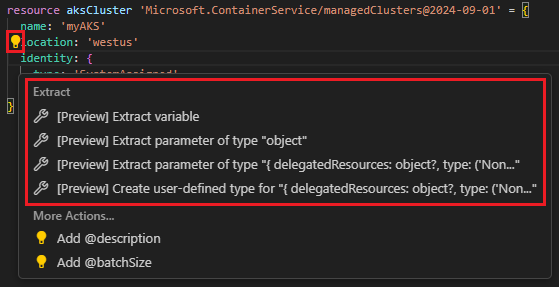
Extract variable: Create a new variable, plus the option to update the variable name:

Extract parameter of a simple data type: Create a new parameter with a simple data type such as string, int, etc., plus the option to update the parameter name:

Extract parameter of a user-defined data type: Create a new parameter with a user-defined data type, plus the option to update the parameter name:
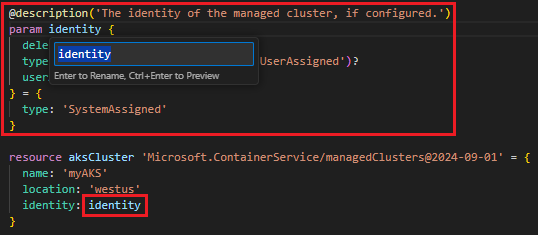
This requires some customization after the extraction.
Create user-defined type: Create a new user-defined type, plus the option to update the type name.
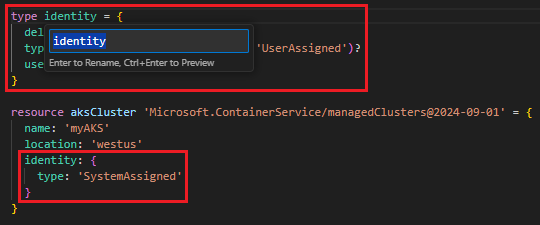
Unlike the other options, it doesn't replace the selected code with a reference to the new type. In the preceding example, the value of
identityremains as it is. To use the new type, you must incorporate it into your code.
View Documentation option
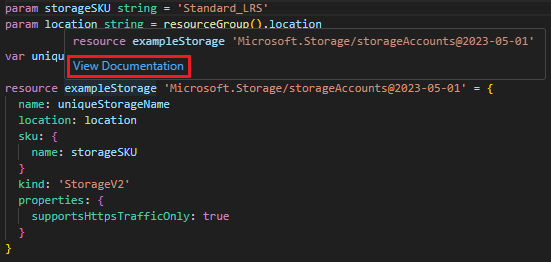
From Visual Studio Code, you can open the template reference for the resource type in which you're working. To do so, hover your cursor over a resource's symbolic name, and select View Documentation.
Go to file
When defining a module and regardless of the type of file that's being referenced - a local file, module registry file, or a template spec - you can open the file by selecting or highlighting the module path and pressing [F12]. If the referenced file is an Azure Verified Module, an AVM, then you can toggle between the compiled JSON or Bicep file. To open the Bicep file of a private registry module, ensure that the module is published to the registry with the WithSource switch enabled. For more information, see Publish files to registry. Visual Studio Code Bicep extension version 0.27.1 or newer is required for opening Bicep files from a private module registry.
Troubleshoot
The Problems pane summarizes the errors and warning in your Bicep file:
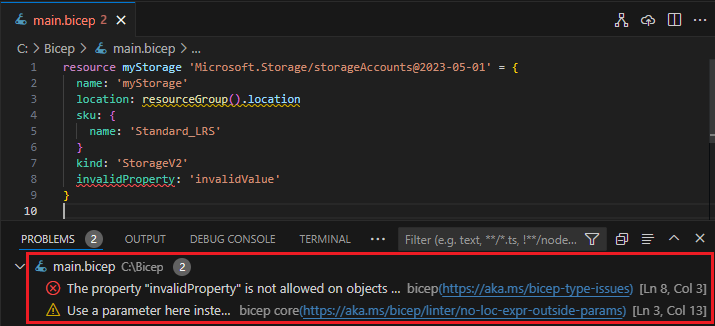
Bicep core diagnostics provides a list of error and warning codes.
Next steps
Continue to Quickstart: Create Bicep files with Visual Studio Code for a tutorial of how to apply the information in this article.
