设备孪生是存储设备状态信息的 JSON 文档,包括元数据、配置和条件。 IoT 中心为连接到它的每台设备保留设备孪生。
注释
本文中所述的功能仅在 IoT 中心的标准层中可用。 有关基本层和标准/免费 IoT 中心层的详细信息,请参阅 为解决方案选择正确的 IoT 中心层和大小。
使用设备孪生可以:
从解决方案后端存储设备元数据。
报告当前状态信息,例如可用功能和条件,例如设备应用中使用的连接方法。
在设备应用和后端应用之间同步长时间运行的工作流的状态,例如固件和配置更新。
查询设备元数据、配置或状态。
设备孪生专为同步和查询设备配置和条件而设计。 有关设备孪生的详细信息,包括何时使用设备孪生,请参阅 了解设备孪生。
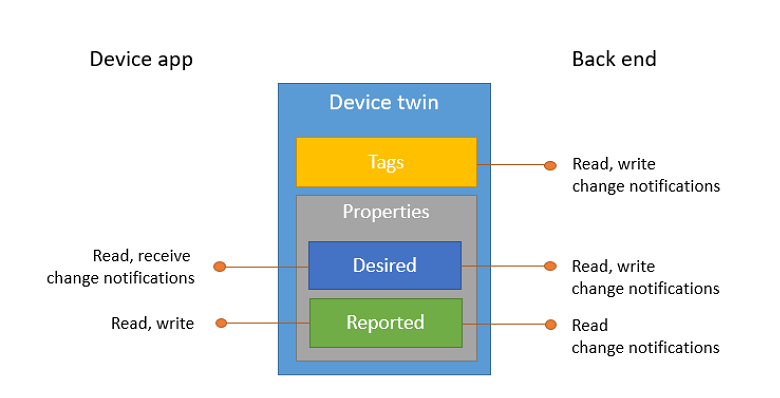
IoT 中心存储设备孪生体,其中包含以下元素:
标记。 设备元数据只能由解决方案后端访问。
所需属性。 解决方案后端可修改的 JSON 对象,并且设备应用程序可对其进行观察。
报告的属性。 设备应用可修改的 JSON 对象,解决方案后端可读。
标记和属性不能包含数组,但可以包含嵌套对象。
下图显示了设备孪生结构:
此外,解决方案后端可以根据上述所有数据查询设备孪生。 有关设备孪生的详细信息,请参阅 了解设备孪生。 有关查询的详细信息,请参阅 IoT 中心查询语言。
在本文中,将创建两个 Java 控制台应用:
- add-tags-query:一个后端应用,用于添加标记和查询设备孪生。
- simulated-device:一个连接到 IoT 中心的模拟设备应用,并报告其连接条件。
注释
有关可用于生成设备和后端应用的 SDK 工具的详细信息,请参阅 Azure IoT SDK 。
先决条件
已注册的设备。 在 Azure 门户中注册一个。
Java SE 开发工具包 8。 请确保在长期支持下选择 Java 8,以获取 JDK 8 的下载。
确保已在防火墙中打开端口 8883。 本文中的设备示例使用通过端口 8883 进行通信的 MQTT 协议。 某些企业和教育网络环境中可能会阻止此端口。 有关解决此问题的详细信息和方法,请参阅“连接到 IoT 中心”(MQTT)。
获取 IoT 中心连接字符串
在本文中,你将创建一个后端服务,该服务将所需属性添加到设备孪生,然后查询标识注册表以查找报告的属性已相应地更新的所有设备。 服务需要 服务连接 权限来修改设备孪生的所需属性,并且需要 注册表读取 权限才能查询标识注册表。 没有仅包含这两个权限的默认共享访问策略,因此需要创建一个。
若要创建一个共享访问策略,用于授予 服务连接 和 注册表读取 权限并获取此策略的连接字符串,请执行以下步骤:
在 Azure 门户中,选择 资源组。 选择中心所在的资源组,然后从资源列表中选择中心。
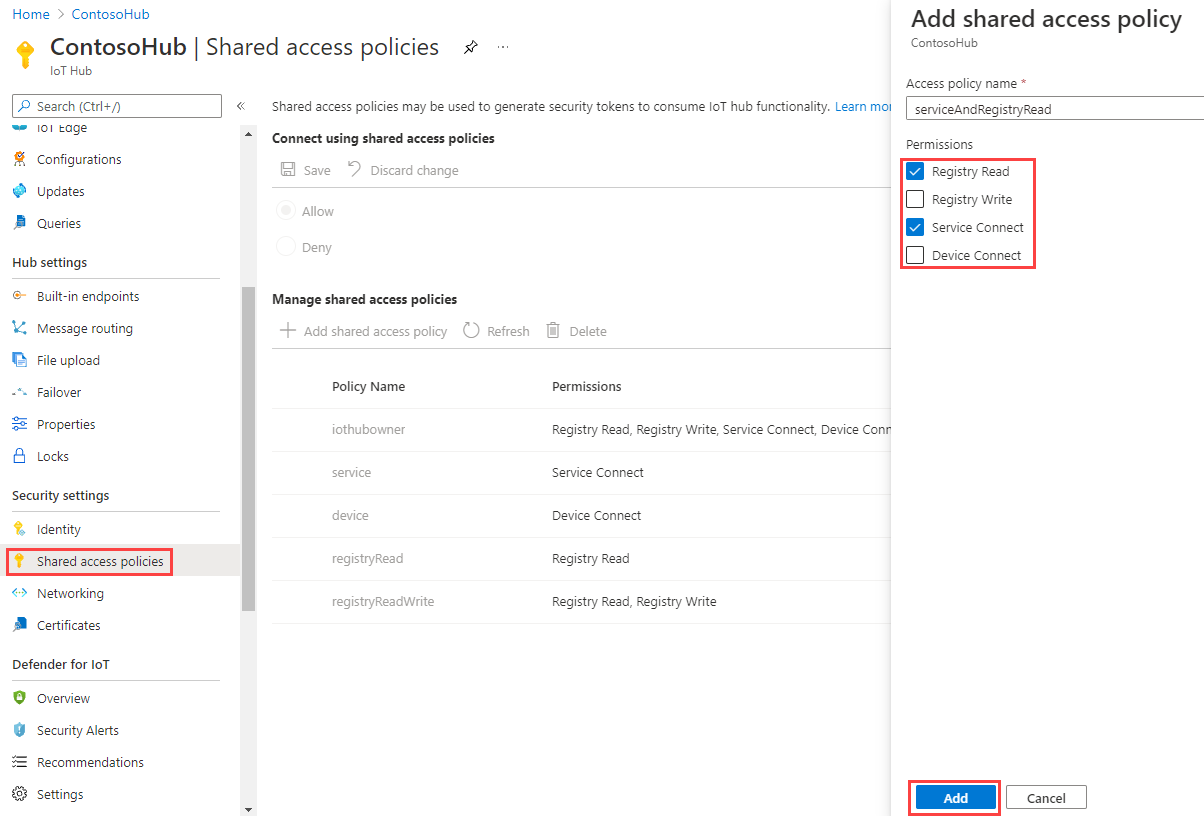
在中心的左侧窗格中,选择 “共享访问策略”。
从策略列表上方的顶部菜单中,选择 “添加共享策略访问策略”。
在右侧的 “添加共享访问策略 ”窗格中,输入策略的描述性名称,例如 serviceAndRegistryRead。 在“权限”下,选择“注册表读取”和服务连接,然后选择“添加”。
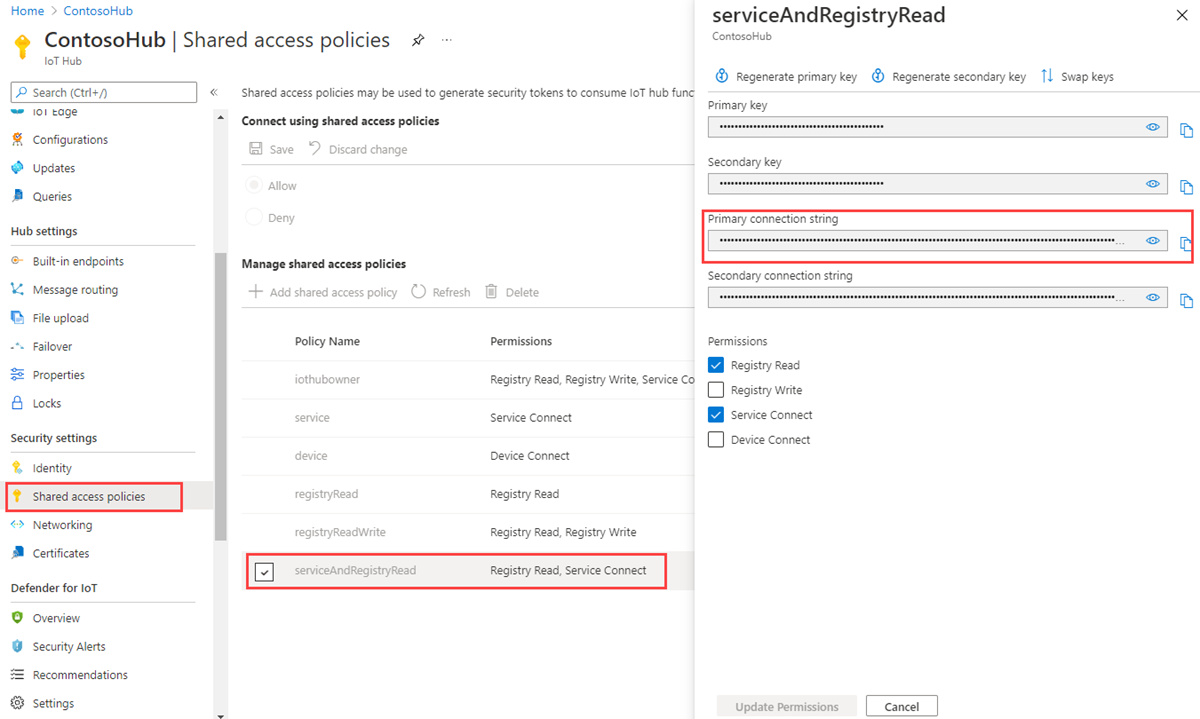
从策略列表中选择新策略。
选择 主连接字符串 的复制图标并保存值。


有关 IoT 中心共享访问策略和权限的详细信息,请参阅 访问控制和权限。
创建更新报告属性的设备应用
在本部分中,将创建一个 Java 控制台应用,该应用以 myDeviceId 的形式连接到中心,然后更新其设备孪生的报告属性,以确认它已使用手机网络进行连接。
在 iot-java-twin-getstarted 文件夹中,使用命令提示符处的以下命令创建名为 simulated-device 的 Maven 项目:
mvn archetype:generate -DgroupId=com.mycompany.app -DartifactId=simulated-device -DarchetypeArtifactId=maven-archetype-quickstart -DinteractiveMode=false在命令提示符下,导航到 simulated-device 文件夹。
使用文本编辑器打开 simulated-device 文件夹中的pom.xml 文件,并将以下依赖项添加到依赖项节点。 通过此依赖项,可以使用应用中的 iot-device-client 包与 IoT 中心通信。
<dependency>
  <groupId>com.microsoft.azure.sdk.iot</groupId>
  <artifactId>iot-device-client</artifactId>
  <version>1.17.5</version>
</dependency>
注释
可以使用 Maven 搜索检查最新版本的 iot-device-client。
将以下依赖项添加到 依赖项 节点。 此依赖项将 Apache SLF4J 日志记录外观配置为 NOP,设备客户端 SDK 使用它来进行日志记录。 此配置是可选的,但如果省略该配置,则运行应用时可能会在控制台中看到警告。 有关设备客户端 SDK 中的日志记录的详细信息,请参阅适用于 Java 的 Azure IoT 设备 SDK 示例自述文件中的日志记录。
<dependency> <groupId>org.slf4j</groupId> <artifactId>slf4j-nop</artifactId> <version>1.7.28</version> </dependency>在依赖项节点之后添加以下构建节点。 此配置指示 Maven 使用 Java 1.8 生成应用:
<build>
  <plugins>
    <plugin>
      <groupId>org.apache.maven.plugins</groupId>
      <artifactId>maven-compiler-plugin</artifactId>
      <version>3.3</version>
      <configuration>
        <source>1.8</source>
        <target>1.8</target>
      </configuration>
    </plugin>
  </plugins>
</build>
保存并关闭 pom.xml 文件。
使用文本编辑器打开 simulated-device\src\main\java\com\mycompany\app\App.java 文件。
将以下 import 语句添加到该文件:
import com.microsoft.azure.sdk.iot.device.*;
import com.microsoft.azure.sdk.iot.device.DeviceTwin.*;

import java.io.IOException;
import java.net.URISyntaxException;
import java.util.Scanner;
将以下类级变量添加到 App 类。 替换为
{yourdeviceconnectionstring}在 IoT 中心注册设备时看到的设备连接字符串:private static String connString = "{yourdeviceconnectionstring}"; private static IotHubClientProtocol protocol = IotHubClientProtocol.MQTT; private static String deviceId = "myDeviceId";此示例应用在实例化 DeviceClient 对象时使用协议变量。
将以下方法添加到 App 类以打印有关孪生更新的信息:
protected static class DeviceTwinStatusCallBack implements IotHubEventCallback {
    @Override
    public void execute(IotHubStatusCode status, Object context) {
      System.out.println("IoT Hub responded to device twin operation with status " + status.name());
    }
  }
将 main 方法中的代码替换为以下代码:
创建设备客户端以与 IoT 中心通信。
创建 Device 对象以存储设备孪生属性。
DeviceClient client = new DeviceClient(connString, protocol);

// Create a Device object to store the device twin properties
Device dataCollector = new Device() {
  // Print details when a property value changes
  @Override
  public void PropertyCall(String propertyKey, Object propertyValue, Object context) {
    System.out.println(propertyKey + " changed to " + propertyValue);
  }
};
将以下代码添加到 main 方法,以创建 connectivityType 报告属性并将其发送到 IoT 中心:
try {
  // Open the DeviceClient and start the device twin services.
  client.open();
  client.startDeviceTwin(new DeviceTwinStatusCallBack(), null, dataCollector, null);

  // Create a reported property and send it to your IoT hub.
  dataCollector.setReportedProp(new Property("connectivityType", "cellular"));
  client.sendReportedProperties(dataCollector.getReportedProp());
}
catch (Exception e) {
  System.out.println("On exception, shutting down \n" + " Cause: " + e.getCause() + " \n" + e.getMessage());
  dataCollector.clean();
  client.closeNow();
  System.out.println("Shutting down...");
}
将以下代码添加到 main 方法的末尾。 等待按下 Enter 键,以便 IoT 中心有时间报告设备孪生操作的状态。
System.out.println("Press any key to exit...");

Scanner scanner = new Scanner(System.in);
scanner.nextLine();

dataCollector.clean();
client.close();
修改 main 方法的签名,以包括异常,如下所示:
public static void main(String[] args) throws URISyntaxException, IOException保存并关闭 simulated-device\src\main\java\com\mycompany\app\App.java 文件。
生成 模拟设备 应用并更正任何错误。 在命令提示符下,导航到 simulated-device 文件夹并运行以下命令:
mvn clean package -DskipTests
创建用于更新所需属性和查询孪生的服务应用
在本部分中,将创建一个 Java 应用,该应用将位置元数据作为标记添加到与 myDeviceId 关联的 IoT 中心的设备孪生。 该应用查询 IoT 中心以查找位于美国的设备,然后查询报告手机网络连接的设备。
在开发计算机上,创建名为 iot-java-twin-getstarted 的空文件夹。
在 iot-java-twin-getstarted 文件夹中,使用命令提示符处的以下命令创建名为 add-tags-query 的 Maven 项目:
mvn archetype:generate -DgroupId=com.mycompany.app -DartifactId=add-tags-query -DarchetypeArtifactId=maven-archetype-quickstart -DinteractiveMode=false在命令提示符下,导航到 add-tags-query 文件夹。
使用文本编辑器,在 add-tags-query 文件夹中打开 pom.xml 文件,并将以下依赖项添加到依赖项节点。 通过此依赖项,可以使用应用中的 iot-service-client 包与 IoT 中心通信:
<dependency>
  <groupId>com.microsoft.azure.sdk.iot</groupId>
  <artifactId>iot-service-client</artifactId>
  <version>1.17.1</version>
  <type>jar</type>
</dependency>
注释
可以使用 Maven 搜索检查最新版本的 iot-service-client。
在依赖项节点之后添加以下构建节点。 此配置指示 Maven 使用 Java 1.8 生成应用。
<build>
  <plugins>
    <plugin>
      <groupId>org.apache.maven.plugins</groupId>
      <artifactId>maven-compiler-plugin</artifactId>
      <version>3.3</version>
      <configuration>
        <source>1.8</source>
        <target>1.8</target>
      </configuration>
    </plugin>
  </plugins>
</build>
保存并关闭 pom.xml 文件。
使用文本编辑器打开 add-tags-query\src\main\java\com\mycompany\app\App.java 文件。
将以下 import 语句添加到该文件:
import com.microsoft.azure.sdk.iot.service.devicetwin.*;
import com.microsoft.azure.sdk.iot.service.exceptions.IotHubException;

import java.io.IOException;
import java.util.HashSet;
import java.util.Set;
将以下类级变量添加到 App 类。 将
{youriothubconnectionstring}替换为你在 获取 IoT 中心连接字符串 中复制的 IoT 中心连接字符串。public static final String iotHubConnectionString = "{youriothubconnectionstring}"; public static final String deviceId = "myDeviceId"; public static final String region = "US"; public static final String plant = "Redmond43";更新 main 方法签名以包括以下
throws子句:public static void main( String[] args ) throws IOException将 main 方法中的代码替换为以下代码,以创建 DeviceTwin 和 DeviceTwinDevice 对象。 DeviceTwin 对象处理与 IoT 中心的通信。 DeviceTwinDevice 对象表示具有其属性和标记的设备孪生:
// Get the DeviceTwin and DeviceTwinDevice objects
DeviceTwin twinClient = DeviceTwin.createFromConnectionString(iotHubConnectionString);
DeviceTwinDevice device = new DeviceTwinDevice(deviceId);
将以下
try/catch块添加到 main 方法:try { // Code goes here } catch (IotHubException e) { System.out.println(e.getMessage()); } catch (IOException e) { System.out.println(e.getMessage()); }若要更新设备孪生中的区域和工厂设备孪生标记,请在
try块中添加以下代码:// Get the device twin from IoT Hub System.out.println("Device twin before update:"); twinClient.getTwin(device); System.out.println(device); // Update device twin tags if they are different // from the existing values String currentTags = device.tagsToString(); if ((!currentTags.contains("region=" + region) && !currentTags.contains("plant=" + plant))) { // Create the tags and attach them to the DeviceTwinDevice object Set<Pair> tags = new HashSet<Pair>(); tags.add(new Pair("region", region)); tags.add(new Pair("plant", plant)); device.setTags(tags); // Update the device twin in IoT Hub System.out.println("Updating device twin"); twinClient.updateTwin(device); } // Retrieve the device twin with the tag values from IoT Hub System.out.println("Device twin after update:"); twinClient.getTwin(device); System.out.println(device);若要在 IoT 中心查询设备孪生,请在上一步骤中添加的代码后,将以下代码添加到
try块中。 代码运行两个查询。 每个查询最多返回 100 台设备。// Query the device twins in IoT Hub System.out.println("Devices in Redmond:"); // Construct the query SqlQuery sqlQuery = SqlQuery.createSqlQuery("*", SqlQuery.FromType.DEVICES, "tags.plant='Redmond43'", null); // Run the query, returning a maximum of 100 devices Query twinQuery = twinClient.queryTwin(sqlQuery.getQuery(), 100); while (twinClient.hasNextDeviceTwin(twinQuery)) { DeviceTwinDevice d = twinClient.getNextDeviceTwin(twinQuery); System.out.println(d.getDeviceId()); } System.out.println("Devices in Redmond using a cellular network:"); // Construct the query sqlQuery = SqlQuery.createSqlQuery("*", SqlQuery.FromType.DEVICES, "tags.plant='Redmond43' AND properties.reported.connectivityType = 'cellular'", null); // Run the query, returning a maximum of 100 devices twinQuery = twinClient.queryTwin(sqlQuery.getQuery(), 3); while (twinClient.hasNextDeviceTwin(twinQuery)) { DeviceTwinDevice d = twinClient.getNextDeviceTwin(twinQuery); System.out.println(d.getDeviceId()); }保存并关闭 add-tags-query\src\main\java\com\mycompany\app\App.java 文件
生成 add-tags-query 应用并更正任何错误。 在命令提示符下,导航到 add-tags-query 文件夹并运行以下命令:
mvn clean package -DskipTests
运行应用
现在可以运行控制台应用了。
在 add-tags-query 文件夹中的命令提示符处,运行以下命令以运行 add-tags-query 服务应用:
mvn exec:java -Dexec.mainClass="com.mycompany.app.App"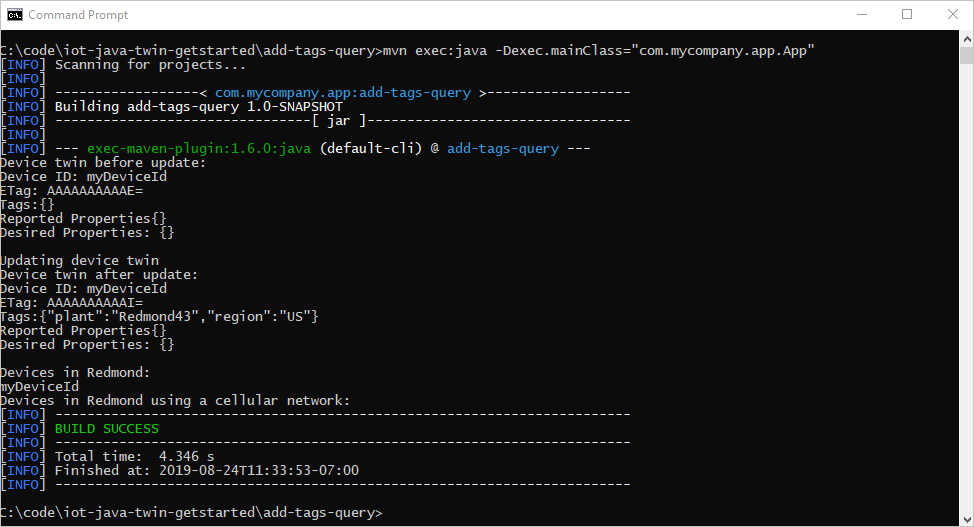
可以看到添加到设备孪生的 工厂 和 区域 标记。 第一个查询返回你的设备,但第二个不会。
在 simulated-device 文件夹中的命令提示符处运行以下命令,将 connectivityType 报告属性添加到设备孪生:
mvn exec:java -Dexec.mainClass="com.mycompany.app.App"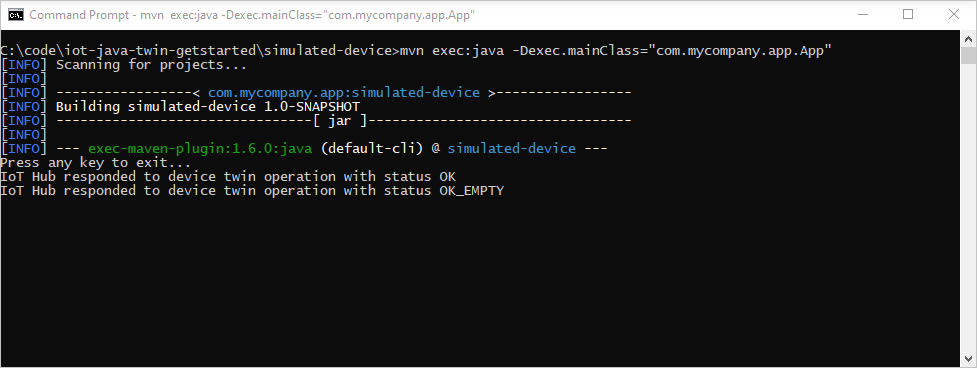
在 add-tags-query 文件夹中的命令提示符处,运行以下命令,再次运行 add-tags-query 服务应用:
mvn exec:java -Dexec.mainClass="com.mycompany.app.App"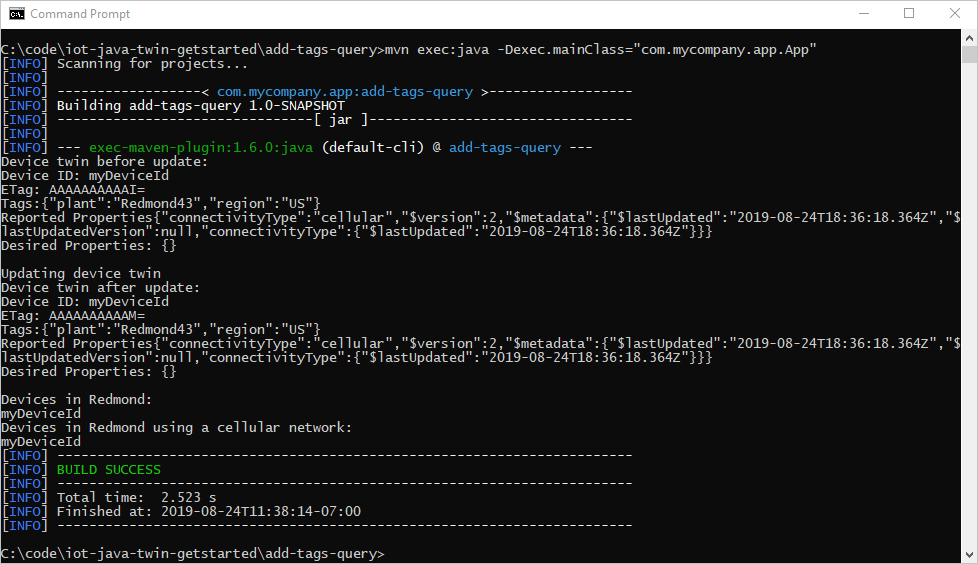
设备已将 connectivityType 属性发送到 IoT 中心后,第二个查询将返回设备。
本文内容:
- 从后端应用添加设备元数据作为标记
- 设备孪生中报告的设备连接信息
- 使用类似于 SQL 的 IoT 中心查询语言查询设备孪生信息
后续步骤
若要了解如何操作:
从设备发送遥测数据,请参阅 快速入门:将遥测数据从 IoT 即插即用设备发送到 Azure IoT 中心
使用设备孪生的所需属性配置设备。请参阅教程:从后端服务配置设备。
以交互方式控制设备,例如从用户控制的应用中打开风扇,请参阅 快速入门:控制连接到 IoT 中心的设备