概述
利用 Azure 中的推送通知支持,可以访问易于使用且向外扩展的多平台推送基础结构,这大大简化了为移动平台的使用者应用程序和企业应用程序实现推送通知的过程。
由于法规或安全约束,有时应用程序可能想要在通知中包含某些无法通过标准推送通知基础结构传输的内容。 本教程介绍如何通过客户端设备和应用后端之间安全且经过验证的连接发送敏感信息,以便获得相同的体验。
在高级别中,此流程如下所示:
- 应用后端:
- 在后端数据库中存储安全有效负载。
- 将此通知的 ID 发送到此设备(不发送任何安全信息)。
- 此设备上的应用在接收通知时:
- 此设备将联系请求安全有效负载的后端。
- 此应用可以将有效负载显示为设备上的通知。
请务必注意,在之前的流程(以及本教程中)中,我们假设此设备会在用户登录后在本地存储中存储身份验证令牌。 这可以保证完全无缝的体验,因为该设备可以使用此令牌检索通知的安全有效负载。 如果应用程序未在设备上存储身份验证令牌,或者如果这些令牌可能已过期,此设备应用在收到通知时应显示提示用户启动应用的通用通知。 然后,应用对用户进行身份验证并显示通知有效负载。
本教程演示如何安全地发送推送通知。 本教程以通知用户教程为基础,因此应先完成该教程中的步骤。
注意
本教程假设你已根据将通知发送到通用 Windows 平台应用中所述创建并配置了通知中心。 此外,请注意 Windows Phone 8.1 需要 Windows(而不是 Windows Phone)凭据,且后台任务无法在 Windows Phone 8.0 或 Silverlight 8.1 上正常运行。 对于 Windows 应用商店应用程序,只能在应用锁屏界面启用(单击 Appmanifest 中的复选框)的情况下,通过运行后台任务来接收通知。
WebAPI 项目
在 Visual Studio 中,打开在通知用户教程中创建的 AppBackend 项目。
在 Notifications.cs 中,将整个 Notifications 类替换为以下代码。 请确保将占位符替换为通知中心的连接字符串(具有完全访问权限)和中心名称。 可以从 Azure 门户获取这些值。 现在,该模块将表示要发送的其他安全通知。 在完整的实现中,通知将存储在数据库中;为简单起见,在此示例中我们将它们存储在内存中。
 public class Notification
 {
     public int Id { get; set; }
     public string Payload { get; set; }
     public bool Read { get; set; }
 }

 public class Notifications
 {
     public static Notifications Instance = new Notifications();

     private List<Notification> notifications = new List<Notification>();

     public NotificationHubClient Hub { get; set; }

     private Notifications() {
         Hub = NotificationHubClient.CreateClientFromConnectionString("{conn string with full access}",     "{hub name}");
     }

     public Notification CreateNotification(string payload)
     {
         var notification = new Notification() {
         Id = notifications.Count,
         Payload = payload,
         Read = false
         };

         notifications.Add(notification);

         return notification;
     }

     public Notification ReadNotification(int id)
     {
         return notifications.ElementAt(id);
     }
 }
在 NotificationsController.cs 中,将 NotificationsController 类定义中的代码替换为以下代码。 该组件为设备实现了一种安全检索通知的方法,还提供了一种方法来触发到设备的安全推送(用于本教程的教学目的)。 请注意,在向通知中心发送通知时,我们将只发送一个包含通知 ID(且没有实际的消息内容)的原始通知:
 public NotificationsController()
 {
     Notifications.Instance.CreateNotification("This is a secure notification!");
 }

 // GET api/notifications/id
 public Notification Get(int id)
 {
     return Notifications.Instance.ReadNotification(id);
 }

 public async Task<HttpResponseMessage> Post()
 {
     var secureNotificationInTheBackend = Notifications.Instance.CreateNotification("Secure confirmation.");
     var usernameTag = "username:" + HttpContext.Current.User.Identity.Name;

     // windows
     var rawNotificationToBeSent = new Microsoft.Azure.NotificationHubs.WindowsNotification(secureNotificationInTheBackend.Id.ToString(),
                     new Dictionary<string, string> {
                         {"X-WNS-Type", "wns/raw"}
                     });
     await Notifications.Instance.Hub.SendNotificationAsync(rawNotificationToBeSent, usernameTag);

     // apns
     await Notifications.Instance.Hub.SendAppleNativeNotificationAsync("{\"aps\": {\"content-available\": 1}, \"secureId\": \"" + secureNotificationInTheBackend.Id.ToString() + "\"}", usernameTag);

     // gcm
     await Notifications.Instance.Hub.SendGcmNativeNotificationAsync("{\"data\": {\"secureId\": \"" + secureNotificationInTheBackend.Id.ToString() + "\"}}", usernameTag);

     return Request.CreateResponse(HttpStatusCode.OK);
 }
请注意,Post 方法现在不发送 toast 通知。 它将发送只包含通知 ID 且没有任何敏感内容的原始通知。 另外,请确保注释在通知中心上未配置其凭据的平台的发送操作,因为它们会导致错误。
- 现在,我们将此应用重新部署到 Azure 网站,以便可以从所有设备对其进行访问。 右键单击 AppBackend 项目,并选择“发布”。
- 选择 Azure 网站作为发布目标。 使用 Azure 帐户登录,选择现有或新的网站,并记下“连接”选项卡中的“目标 URL”属性。在本教程后面的部分中,我们将此 URL 称为“后端终结点” 。 单击“发布” 。
修改 Windows Phone 项目
在 NotifyUserWindowsPhone 项目中,将以下代码添加到 App.xaml.cs 注册推送后台任务。 在
OnLaunched()方法的末尾添加以下代码行:RegisterBackgroundTask();仍在 App.xaml.cs 中,紧跟
OnLaunched()方法添加以下代码:private async void RegisterBackgroundTask() { if (!Windows.ApplicationModel.Background.BackgroundTaskRegistration.AllTasks.Any(i => i.Value.Name == "PushBackgroundTask")) { var result = await BackgroundExecutionManager.RequestAccessAsync(); var builder = new BackgroundTaskBuilder(); builder.Name = "PushBackgroundTask"; builder.TaskEntryPoint = typeof(PushBackgroundComponent.PushBackgroundTask).FullName; builder.SetTrigger(new Windows.ApplicationModel.Background.PushNotificationTrigger()); BackgroundTaskRegistration task = builder.Register(); } }在 App.xaml.cs 文件的顶部添加以下
using语句:using Windows.Networking.PushNotifications; using Windows.ApplicationModel.Background;从 Visual Studio 的“文件”菜单中,单击“全部保存”。
创建推送后台组件
下一步是创建推送背景组件。
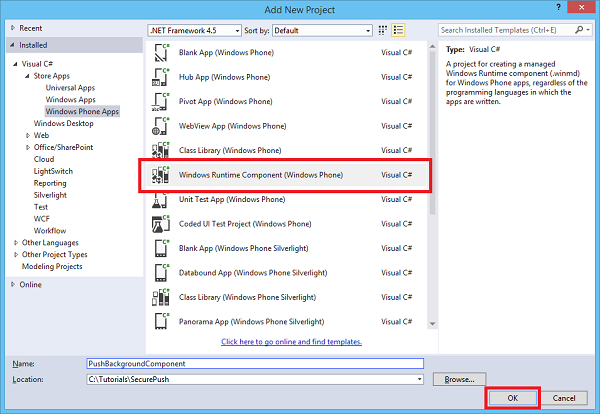
在“解决方案资源管理器”中,右键单击解决方案的顶层节点(在本例中为 Solution SecurePush),并依次单击“添加”和“新建项目”。
展开“应用商店应用,并依次单击“Windows Phone 应用”和“Windows 运行时组件 (Windows Phone)”。 将该项目命名为 PushBackgroundComponent,然后单击“确定”创建项目。
在“解决方案资源管理器”中,右键单击“PushBackgroundComponent (Windows Phone 8.1)”项目,并依次单击“添加”和“类”。 将新类命名为
PushBackgroundTask.cs。 单击“添加”生成类。将
PushBackgroundComponent命名空间定义的整个内容替换为以下代码,将占位符{back-end endpoint}替换为部署后端时获取的后端终结点:public sealed class Notification { public int Id { get; set; } public string Payload { get; set; } public bool Read { get; set; } } public sealed class PushBackgroundTask : IBackgroundTask { private string GET_URL = "{back-end endpoint}/api/notifications/"; async void IBackgroundTask.Run(IBackgroundTaskInstance taskInstance) { // Store the content received from the notification so it can be retrieved from the UI. RawNotification raw = (RawNotification)taskInstance.TriggerDetails; var notificationId = raw.Content; // retrieve content BackgroundTaskDeferral deferral = taskInstance.GetDeferral(); var httpClient = new HttpClient(); var settings = ApplicationData.Current.LocalSettings.Values; httpClient.DefaultRequestHeaders.Authorization = new AuthenticationHeaderValue("Basic", (string)settings["AuthenticationToken"]); var notificationString = await httpClient.GetStringAsync(GET_URL + notificationId); var notification = JsonConvert.DeserializeObject<Notification>(notificationString); ShowToast(notification); deferral.Complete(); } private void ShowToast(Notification notification) { ToastTemplateType toastTemplate = ToastTemplateType.ToastText01; XmlDocument toastXml = ToastNotificationManager.GetTemplateContent(toastTemplate); XmlNodeList toastTextElements = toastXml.GetElementsByTagName("text"); toastTextElements[0].AppendChild(toastXml.CreateTextNode(notification.Payload)); ToastNotification toast = new ToastNotification(toastXml); ToastNotificationManager.CreateToastNotifier().Show(toast); } }在“解决方案资源管理器”中,右键单击“PushBackgroundComponent (Windows Phone 8.1)”项目,并单击“管理 NuGet 包”。
在左侧单击“联机”。
在“搜索”框中键入 Http 客户端。
在结果列表中,单击“Microsoft HTTP 客户端库”,并单击“安装”。 完成安装。
返回到 NuGet“搜索”框,键入 Json.net。 安装 Json.NET 包,并关闭“NuGet 包管理器”窗口。
在
PushBackgroundTask.cs文件的顶部,添加以下using语句:using Windows.ApplicationModel.Background; using Windows.Networking.PushNotifications; using System.Net.Http; using Windows.Storage; using System.Net.Http.Headers; using Newtonsoft.Json; using Windows.UI.Notifications; using Windows.Data.Xml.Dom;在“解决方案资源管理器”的 NotifyUserWindowsPhone (Windows Phone 8.1) 项目中,右键单击“引用”,然后单击“添加引用...” 。在“引用管理器”对话框中,选中 PushBackgroundComponent 旁边的复选框,然后单击“确定” 。
在“解决方案资源管理器”中,双击 NotifyUserWindowsPhone (Windows Phone 8.1) 项目中的“Package.appxmanifest”。 在“通知”下,将“”设置为“”。

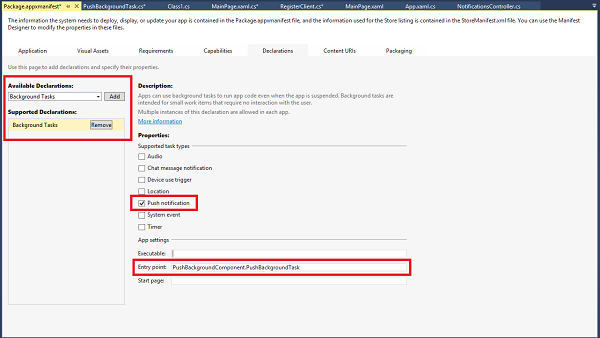
仍在 Package.appxmanifest 中,单击顶部附近的“声明”菜单。 在“可用声明”下拉列表中,单击“后台任务”,并单击“添加”。
在“属性”下的 Package.appxmanifest 中选中“推送通知”。
在“应用设置”下的 Package.appxmanifest 中,在“入口点”字段中键入 PushBackgroundComponent.PushBackgroundTask。
在“文件”菜单中,单击“全部保存” 。
运行此应用程序
若要运行应用程序,请执行以下操作:
- 在 Visual Studio 中运行此 AppBackend Web API 应用程序。 将显示 ASP.NET 网页。
- 在 Visual Studio 中运行此 NotifyUserWindowsPhone (Windows Phone 8.1) Windows Phone 应用。 Windows Phone 模拟器会自动运行并加载应用程序。
- 在 NotifyUserWindowsPhone 应用 UI 中,输入用户名和密码。 这些信息可以是任意字符串,但必须是相同的值。
- 在 NotifyUserWindowsPhone 应用 UI 中,单击“登录并注册”。 然后单击“发送推送” 。