使用 Azure Batch 在 Azure 中高效运行大规模并行和高性能计算 (HPC) 批处理作业。 本教程通过一个 C# 示例演示了如何使用 Batch 运行并行工作负荷。 你可以学习常用的 Batch 应用程序工作流,以及如何以编程方式与 Batch 和存储资源交互。
- 将应用程序包添加到 Batch 帐户。
- 通过 Batch 和存储帐户进行身份验证。
- 将输入文件上传到存储。
- 创建运行应用程序所需的计算节点池。
- 创建用于处理输入文件的作业和任务。
- 监视任务执行情况。
- 检索输出文件。
在本教程中,你会使用 ffmpeg 开放源代码工具将 MP4 媒体文件并行转换为 MP3 格式。
如果没有 Azure 帐户,请在开始前创建一个试用帐户。
先决条件
适用于 Linux、macOS 或 Windows 的 Visual Studio 2017 或更高版本 或 .NET Core SDK。
Batch 帐户和关联的 Azure 存储帐户。 要创建这些帐户,请参阅 Azure 门户 或 Azure CLI 的 Batch 快速入门指南。
将适合你的用例的相应 ffmpeg 版本下载到本地计算机。 本教程和相关示例应用使用 Windows 64 位完全构建版本的 ffmpeg 4.3.1。 本教程只需 zip 文件。 不需将文件解压缩或安装在本地。
登录 Azure
登录 Azure 门户。
添加应用程序包
使用 Azure 门户,将 ffmpeg 作为应用程序包添加到 Batch 帐户。 应用程序包有助于管理任务应用程序及其到池中计算节点的部署。
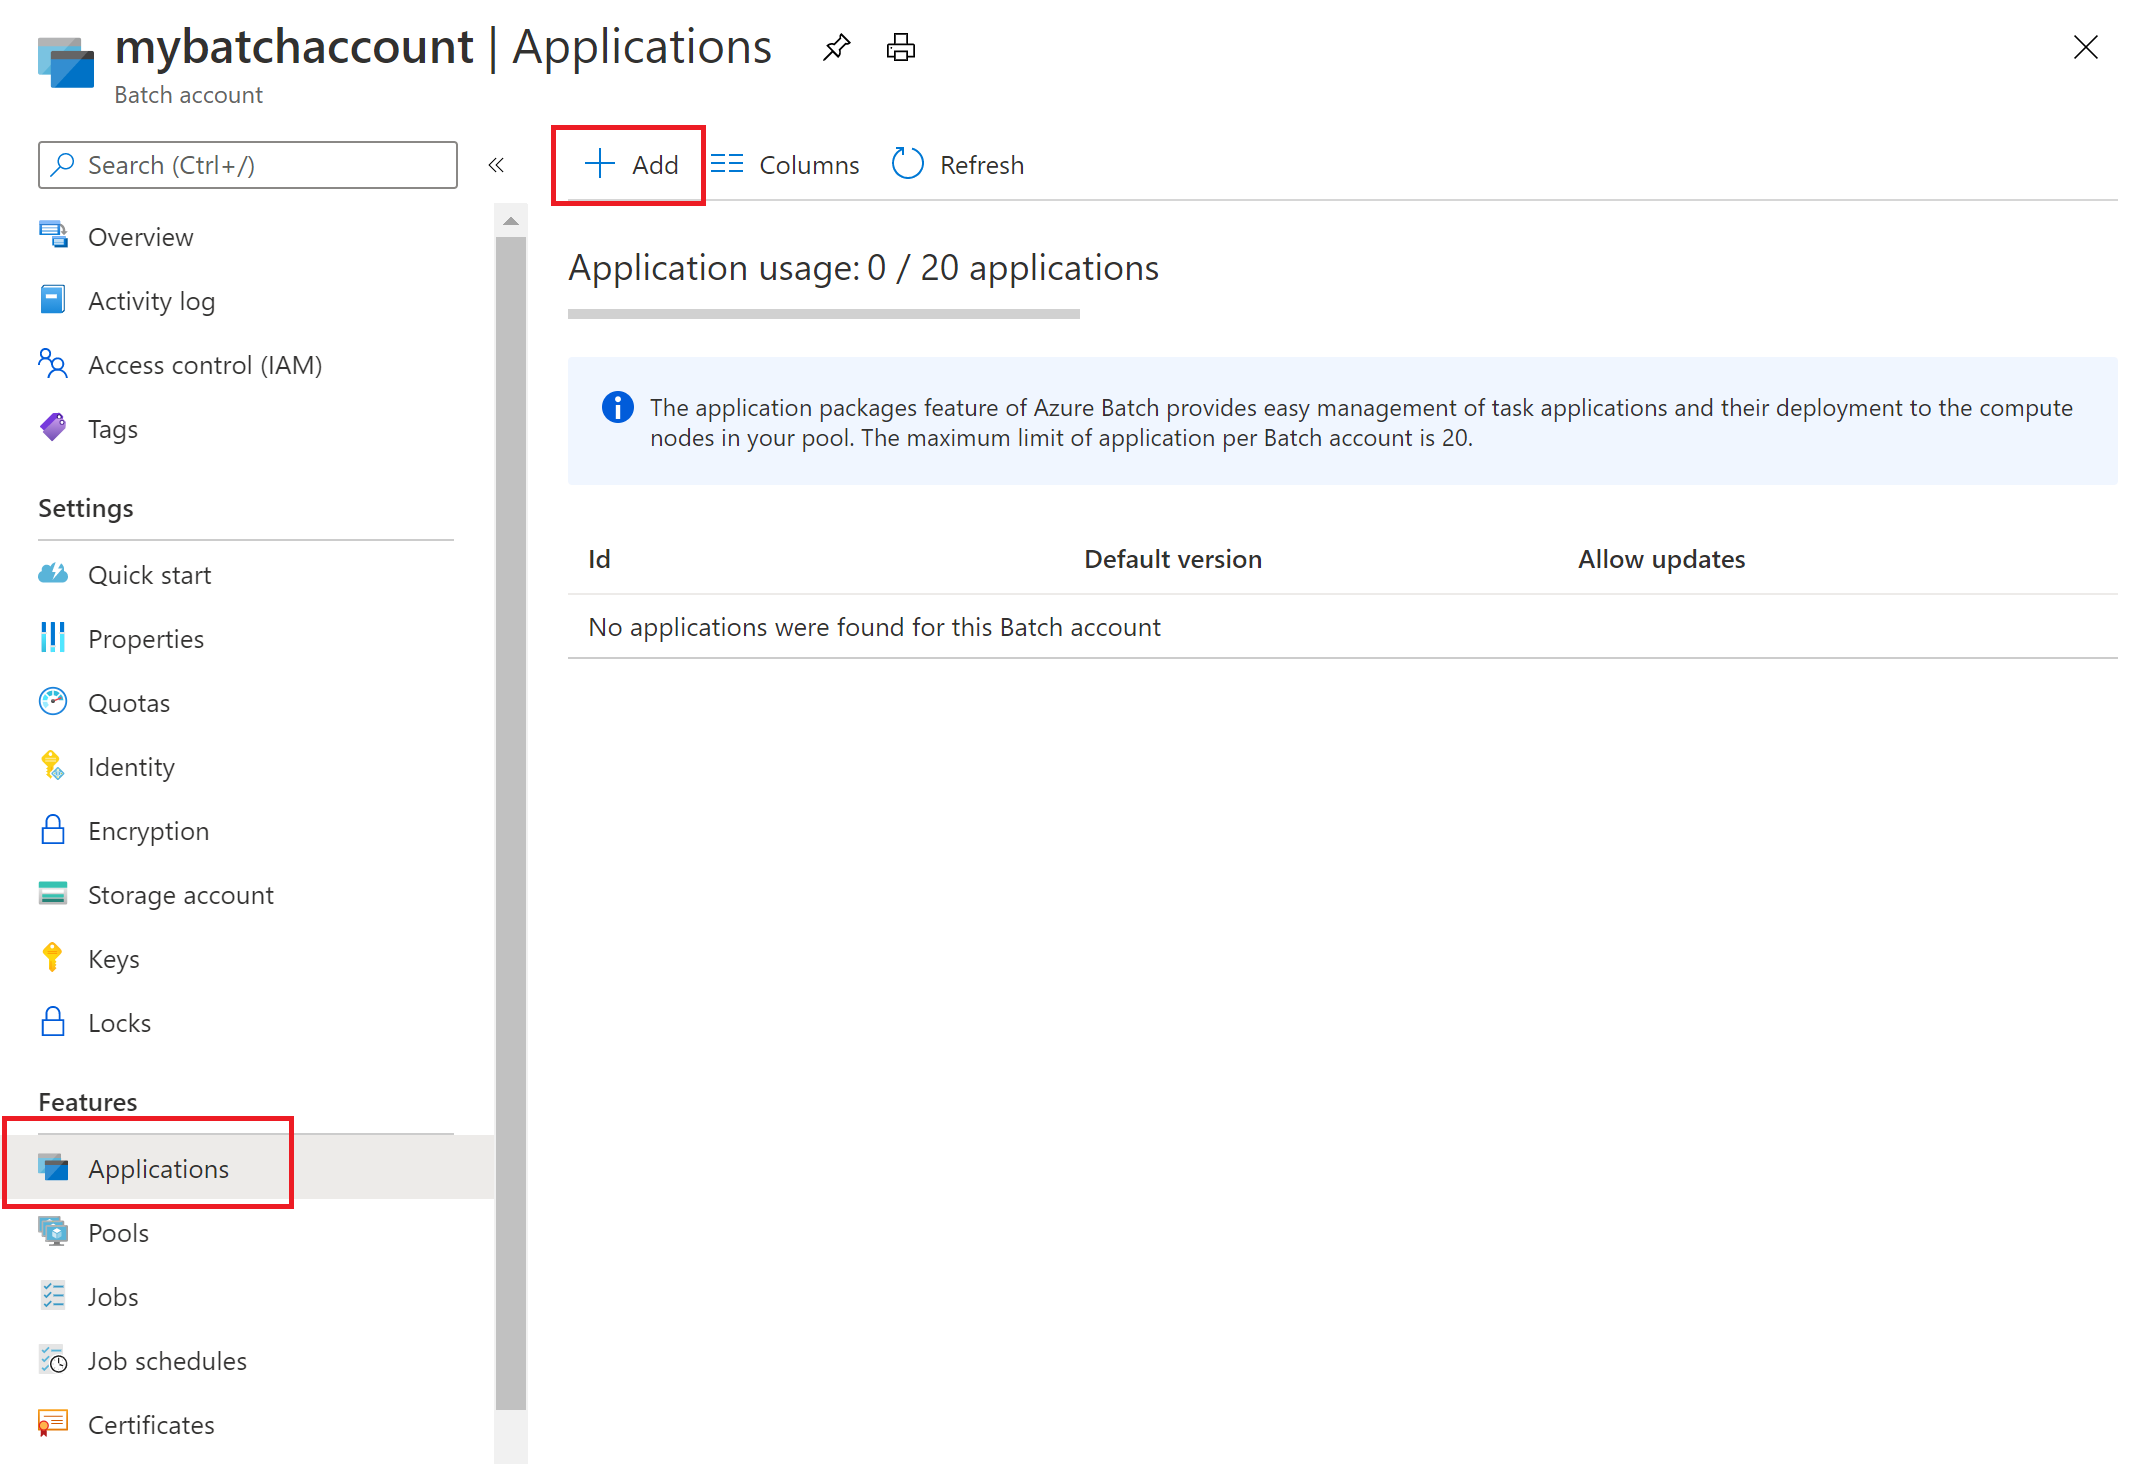
在 Azure 门户中,点击“更多服务”>“Batch 帐户”,然后选择 Batch 帐户的名称。
单击 “应用程序”>“添加”。
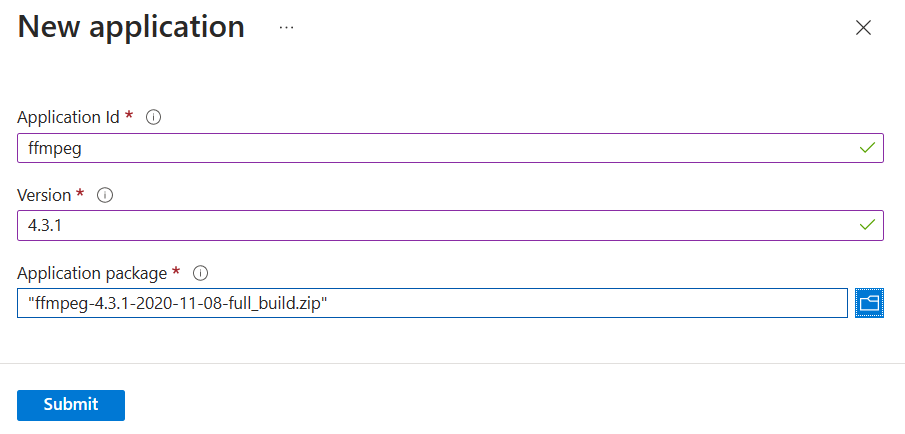
在“应用程序 ID”字段中输入 ffmpeg,在“版本”字段中输入包版本 4.3.1。 选择之前下载的 ffmpeg zip 文件,然后选择“提交”。 ffmpeg 应用程序包已添加到您的 Batch 帐户中。
获取帐户凭据
在此示例中,你需要提供 Batch 帐户和存储帐户的凭据。 若要获取所需凭据,一种直接的方法是使用 Azure 门户。 (也可使用 Azure API 或命令行工具来获取这些凭据。)
选择所有服务>Batch 帐户,然后选择 Batch 帐户的名称。
若要查看 Batch 凭据,请选择“密钥”。 将“Batch 帐户”、“URL”和“主访问密钥”的值复制到文本编辑器。
若要查看存储帐户名称和密钥,请选择“存储帐户”。 将“存储帐户名称”和“Key1”的值复制到文本编辑器。
下载并运行示例应用
下载示例应用
从 GitHub 下载或克隆示例应用。 若要使用 Git 客户端克隆示例应用存储库,请使用以下命令:
git clone https://github.com/Azure-Samples/batch-dotnet-ffmpeg-tutorial.git
导航到包含 Visual Studio 解决方案文件 BatchDotNetFfmpegTutorial.sln 的目录。
另外,请确保解决方案中引用的 ffmpeg 应用程序包与你上传到 Batch 帐户的 ffmpeg 包的标识符和版本相匹配。 例如,ffmpeg 和 4.3.1。
const string appPackageId = "ffmpeg";
const string appPackageVersion = "4.3.1";
生成并运行示例项目
在 Visual Studio 中构建并运行应用程序,或在命令行中使用 dotnet build 和 dotnet run 命令。 运行应用程序后,请查看代码,了解应用程序的每个部分的作用。 例如,在 Visual Studio 中:
在解决方案资源管理器中右键单击解决方案,然后选择“生成解决方案”。
出现提示时,请确认还原任何 NuGet 包。 如果需要下载缺少的包,请确保 NuGet 包管理器已安装。
运行解决方案。 运行示例应用程序时,控制台输出如下所示。 在执行过程中,当池中的计算节点启动时,会在
Monitoring all tasks for 'Completed' state, timeout in 00:30:00...处暂停一下。
Sample start: 11/19/2018 3:20:21 PM

Container [input] created.
Container [output] created.
Uploading file LowPriVMs-1.mp4 to container [input]...
Uploading file LowPriVMs-2.mp4 to container [input]...
Uploading file LowPriVMs-3.mp4 to container [input]...
Uploading file LowPriVMs-4.mp4 to container [input]...
Uploading file LowPriVMs-5.mp4 to container [input]...
Creating pool [WinFFmpegPool]...
Creating job [WinFFmpegJob]...
Adding 5 tasks to job [WinFFmpegJob]...
Monitoring all tasks for 'Completed' state, timeout in 00:30:00...
Success! All tasks completed successfully within the specified timeout period.
Deleting container [input]...

Sample end: 11/19/2018 3:29:36 PM
Elapsed time: 00:09:14.3418742
转到 Azure 门户中的 Batch 帐户,监视池、计算节点、作业和任务。 例如,若要查看池中的计算节点的热力图,请单击 池>WinFFmpegPool。
任务正在运行时,热度地图如下所示:
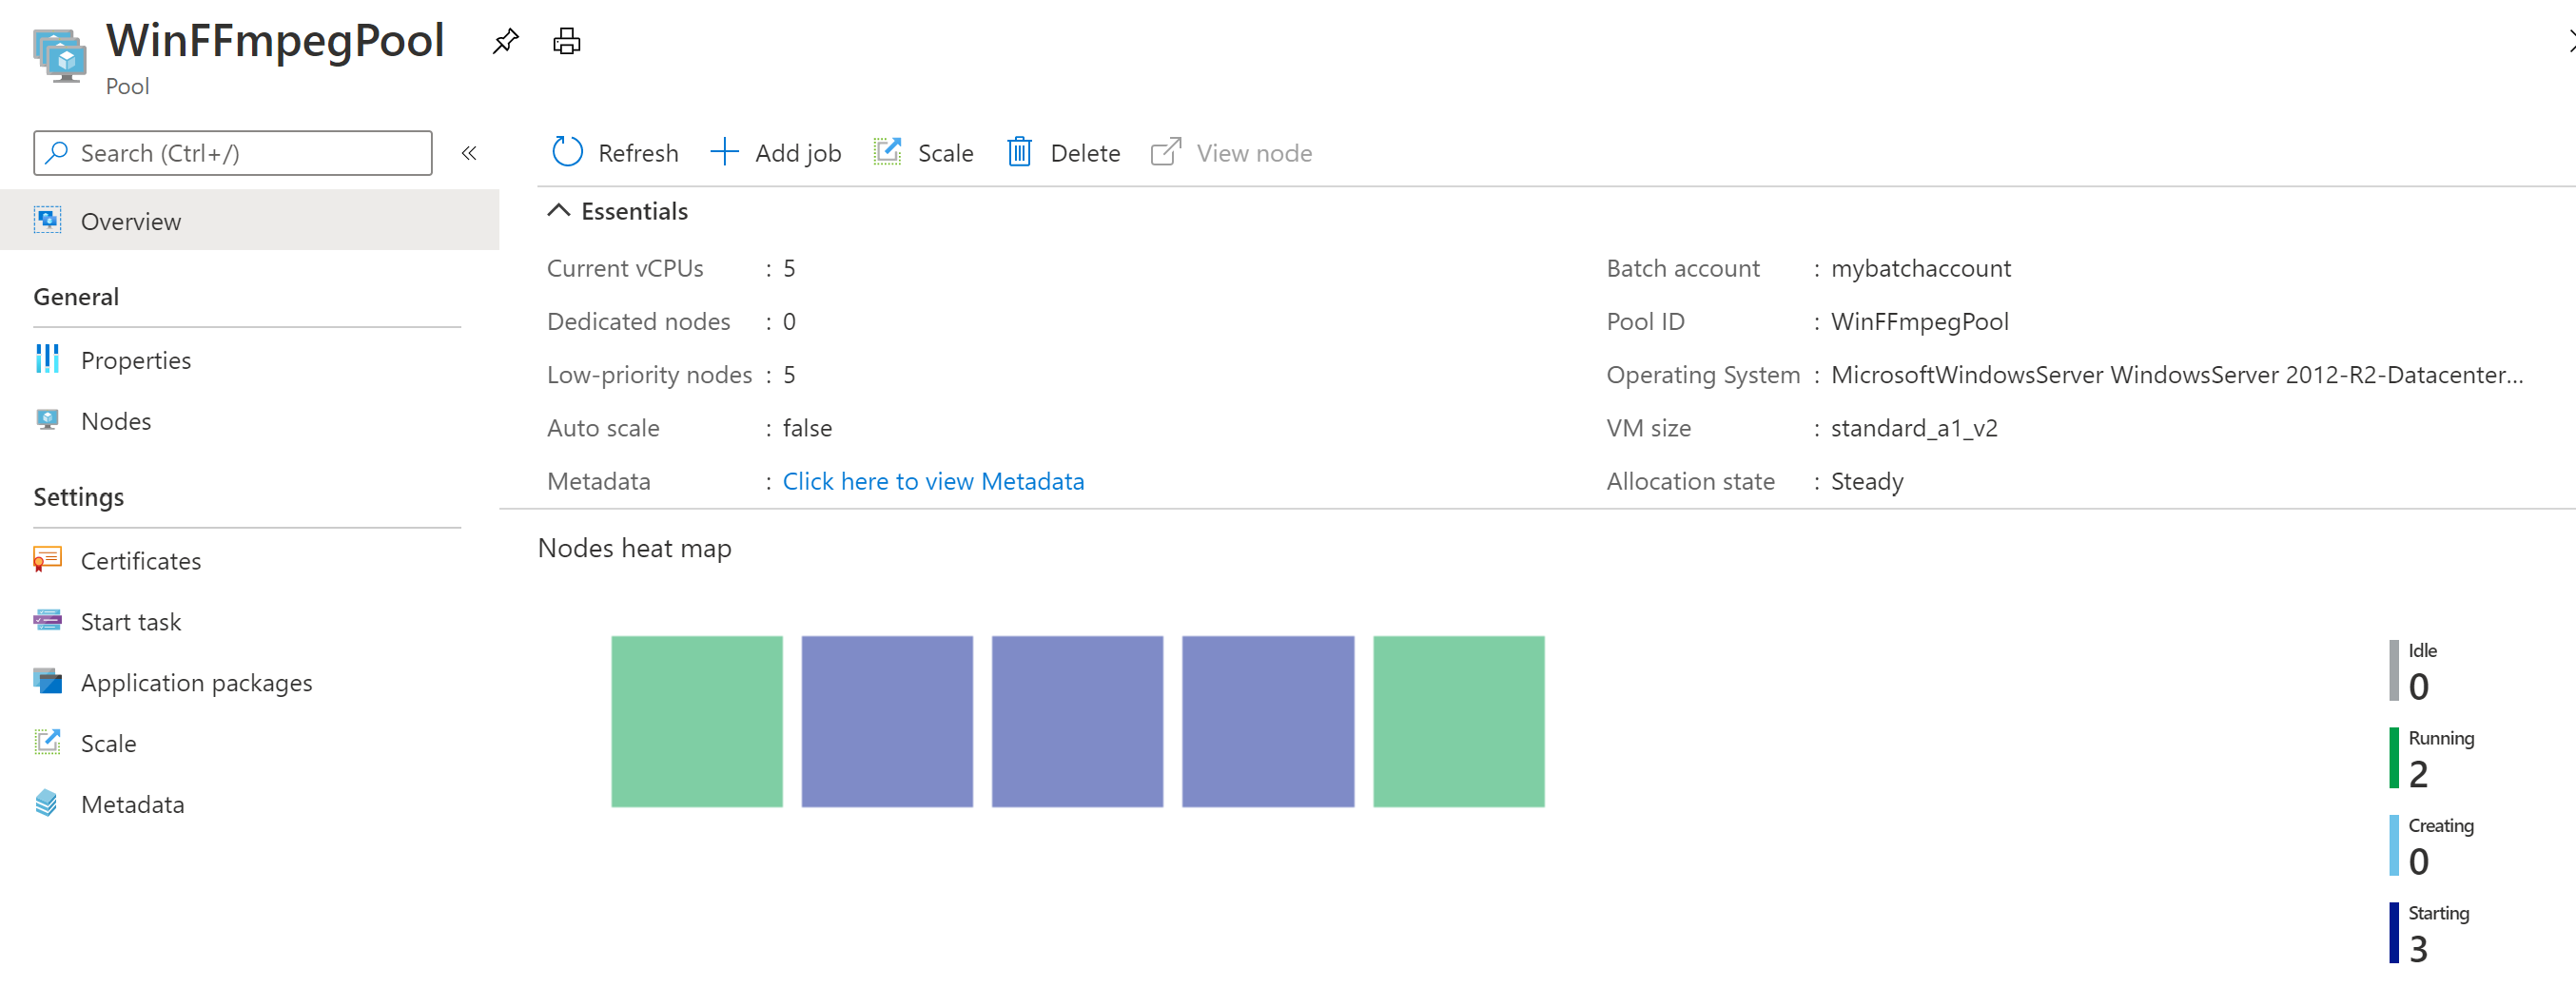
以默认配置运行应用程序时,典型的执行时间大约为 10 分钟。 池创建过程需要最多时间。
检索输出文件
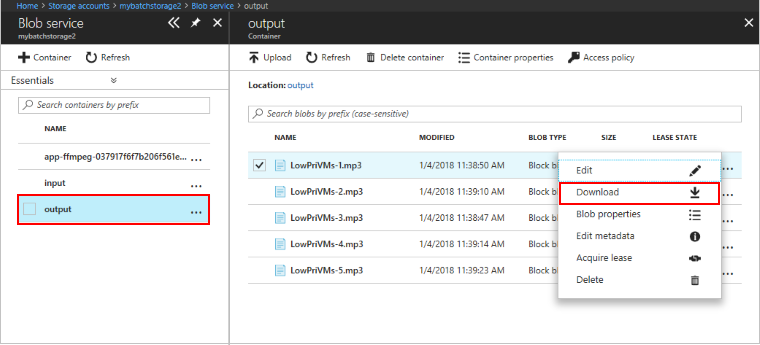
可以使用 Azure 门户下载 ffmpeg 任务生成的输出 MP3 文件。
- 单击“所有服务”>“存储帐户”,然后单击存储帐户的名称。
- 单击“Blobs”>“output”。
- 右键单击一个输出 MP3 文件,然后单击“下载”。 在浏览器中按提示打开或保存该文件。
也可以编程方式从计算节点或存储容器下载这些文件(但在本示例中未演示)。
查看代码
以下部分将示例应用程序细分为多个执行步骤,用于处理 Batch 服务中的工作负荷。 由于我们并未讨论示例中的每个代码行,因此阅读本文的其余内容时,请参考解决方案中的文件 Program.cs。
对 Blob 和 Batch 客户端进行身份验证
为了与关联的存储帐户交互,应用使用适用于 .NET 的 Azure.Storage.Blobs 库。 使用 BlobServiceClient 类来引用帐户 URI 并验证令牌(例如 DefaultAzureCredential)。
// TODO: Replace <storage-account-name> with your actual storage account name
Uri accountUri = new Uri("https://<storage-account-name>.blob.core.chinacloudapi.cn/");
BlobServiceClient blobClient = new BlobServiceClient(accountUri, new DefaultAzureCredential());
应用通过 资源管理器 的
ArmClient _armClient = new ArmClient(new DefaultAzureCredential());
var batchAccountIdentifier = ResourceIdentifier.Parse(BatchAccountResourceID);
BatchAccountResource batchAccount = await _armClient.GetBatchAccountResource(batchAccountIdentifier).GetAsync();
应用创建的 BatchClient 对象用于创建 Batch 服务中的作业和任务。 示例中的 Batch 客户端使用 DefaultAzureCredential 身份验证。
// TODO: Replace <batch-account-name> with your actual storage account name
Uri batchUri = new Uri("https://<batch-account-name>t.chinaeast2.batch.chinacloudapi.cn");
BatchClient _batchClient = new BatchClient(batchUri, new DefaultAzureCredential());
上传输入文件
应用将 blobServerClient 对象传递至 CreateContainerIfNotExist 方法,以便为输入文件(MP4 格式)创建一个存储容器,并为任务输出创建一个容器。
CreateContainerIfNotExist(blobClient, inputContainerName);
CreateContainerIfNotExist(blobClient, outputContainerName);
然后,文件从本地 InputFiles 文件夹上传到输入容器。 存储中的文件定义为 Batch ResourceFile 对象,Batch 随后可以将这些对象下载到计算节点。
上传文件时,涉及到 Program.cs 中的两个方法:
-
UploadFilesToContainerAsync:返回ResourceFile对象的集合,并在内部调用UploadResourceFileToContainerAsync,从而上传在inputFilePaths参数中传递的每个文件。 -
UploadResourceFileToContainerAsync:将每个文件作为 Blob 上传到输入容器。 上传文件后,它会获取该 Blob 的共享访问签名(SAS)并返回代表它的ResourceFile对象。
string inputPath = Path.Combine(Environment.CurrentDirectory, "InputFiles");

List<string> inputFilePaths = new List<string>(Directory.GetFileSystemEntries(inputPath, "*.mp4",
    SearchOption.TopDirectoryOnly));

List<ResourceFile> inputFiles = await UploadFilesToContainerAsync(
  blobClient,
  inputContainerName,
  inputFilePaths);
若要详细了解如何使用 .NET 将文件作为 Blob 上传到存储帐户,请参阅使用 .NET 上传、下载和列出 blob。
创建计算节点池
然后,该示例会调用 CreatePoolIfNotExistAsync 以在 Batch 帐户中创建计算节点池。 这个定义的方法使用 BatchAccountResource.GetBatchAccountPools().CreateOrUpdateAsync 方法设置节点数、VM 大小和池配置。 这里,BatchVmConfiguration 对象指定了一个BatchImageReference,该引用指向 Azure 市场中发布的 Windows Server 映像。 Batch 支持 Azure 市场中的各种 VM 映像以及自定义 VM 映像。
节点数和 VM 大小使用定义的常数进行设置。 Batch 支持专用节点,你可以在池中单独使用其中一种,也可以同时使用两种。 专用节点为您的池预留。 现成节点在 Azure 有剩余 VM 容量时以优惠价提供。 如果 Azure 没有足够的容量,现成节点会变得不可用。 默认情况下,此示例会创建一个仅包含 5 个大小为 Standard_A1_v2 的 Spot 节点的池。
注意
请务必检查节点配额。 有关如何创建配额请求的说明,请参阅 Batch 服务配额和限制。
通过将 BatchApplicationPackageReference 添加到池配置,将 ffmpeg 应用程序部署到计算节点。
var credential = new DefaultAzureCredential();
ArmClient _armClient = new ArmClient(credential);

var batchAccountIdentifier = ResourceIdentifier.Parse(BatchAccountResourceID);
BatchAccountResource batchAccount = await _armClient.GetBatchAccountResource(batchAccountIdentifier).GetAsync();

BatchAccountPoolCollection collection = batchAccount.GetBatchAccountPools();
if (collection.Exists(poolId) == false)
{
    var poolName = poolId;
    var imageReference = new BatchImageReference()
    {
        Publisher = "MicrosoftWindowsServer",
        Offer = "WindowsServer",
        Sku = "2019-datacenter-smalldisk",
        Version = "latest"
    };
    string nodeAgentSku = "batch.node.windows amd64";

    ArmOperation<BatchAccountPoolResource> armOperation = await batchAccount.GetBatchAccountPools().CreateOrUpdateAsync(
        WaitUntil.Completed, poolName, new BatchAccountPoolData()
        {
            VmSize = "Standard_DS1_v2",
            DeploymentConfiguration = new BatchDeploymentConfiguration()
            {
                VmConfiguration = new BatchVmConfiguration(imageReference, nodeAgentSku)
            },
            ScaleSettings = new BatchAccountPoolScaleSettings()
            {
                FixedScale = new BatchAccountFixedScaleSettings()
                {
                    TargetDedicatedNodes = DedicatedNodeCount,
                    TargetLowPriorityNodes = LowPriorityNodeCount
                }
            },
            Identity = new ManagedServiceIdentity(ManagedServiceIdentityType.UserAssigned)
            {
                UserAssignedIdentities =
                {
                        [new ResourceIdentifier(ManagedIdentityId)] = new Azure.ResourceManager.Models.UserAssignedIdentity(),
                },
            },
            ApplicationPackages =
            {
                    new Azure.ResourceManager.Batch.Models.BatchApplicationPackageReference(new ResourceIdentifier(appPackageResourceID))
                    {
                        Version = appPackageVersion,
                    }
            },

        });
    BatchAccountPoolResource pool = armOperation.Value;
创建作业
Batch 作业可指定在其中运行任务的池以及可选设置,例如工作的优先级和计划。 此示例通过调用 CreateJobAsync 创建一个作业。 此处定义的方法使用 BatchClient.CreateJobAsync 方法在你的池上创建作业。
 BatchJobCreateOptions batchJobCreateOptions = new BatchJobCreateOptions(jobId, new BatchPoolInfo { PoolId = poolId });
 await batchClient.CreateJobAsync(batchJobCreateOptions);
创建任务
此示例通过调用 AddTasksAsync 方法来创建 BatchTask 对象的列表,从而在作业中创建任务。 每个 BatchTask 都运行 ffmpeg,使用 ResourceFile 属性处理输入 对象。 ffmpeg 此前已在创建池时安装在每个节点上。 在这里,命令行运行 ffmpeg 将每个输入 MP4(视频)文件转换为 MP3(音频)文件。
此示例在运行命令行后为 MP3 文件创建 OutputFile 对象。 每个任务的输出文件(在此示例中为一个)都会使用任务的 OutputFiles 属性上传到关联的存储帐户中的一个容器。 请注意 outputFile 对象上设置的条件。 只有在任务成功完成后 (OutputFileUploadCondition.TaskSuccess),任务中的输出文件才会上传到容器。 在 GitHub 上查看完整的代码示例,进一步了解实现的详细信息。
然后,示例使用 CreateTaskAsync 方法将任务添加到作业,使任务按顺序在计算节点上运行。
将可执行文件路径替换为你下载的版本名称。 此示例代码使用了示例 ffmpeg-4.3.1-2020-11-08-full_build。
// Create a collection to hold the tasks added to the job:
List<BatchTaskCreateOptions> tasks = new List<BatchTaskCreateOptions>();

for (int i = 0; i < inputFiles.Count; i++)
{
    // Assign a task ID for each iteration
    string taskId = String.Format("Task{0}", i);

    // Define task command line to convert the video format from MP4 to MP3 using ffmpeg.
    // Note that ffmpeg syntax specifies the format as the file extension of the input file
    // and the output file respectively. In this case inputs are MP4.
    string appPath = String.Format("%AZ_BATCH_APP_PACKAGE_{0}#{1}%", appPackageId, appPackageVersion);
    string inputMediaFile = inputFiles[i].StorageContainerUri.ToString();
    string outputMediaFile = String.Format("{0}{1}",
        System.IO.Path.GetFileNameWithoutExtension(inputMediaFile),
        ".mp3");
    string taskCommandLine = String.Format("cmd /c {0}\\ffmpeg-4.3.1-2020-11-08-full_build\\bin\\ffmpeg.exe -i {1} {2}", appPath, inputMediaFile, outputMediaFile);

    // Create a batch task (with the task ID and command line) and add it to the task list

    BatchTaskCreateOptions batchTaskCreateOptions = new BatchTaskCreateOptions(taskId, taskCommandLine);
    batchTaskCreateOptions.ResourceFiles.Add(inputFiles[i]);

    // Task output file will be uploaded to the output container in Storage.
    // TODO: Replace <storage-account-name> with your actual storage account name
    OutputFileBlobContainerDestination outputContainer = new OutputFileBlobContainerDestination(new Uri("https://<storage-account-name>.blob.core.chinacloudapi.cn/output/" + outputMediaFile))
    {
        IdentityReference = inputFiles[i].IdentityReference,
    };

    OutputFile outputFile = new OutputFile(outputMediaFile,
                                           new OutputFileDestination() { Container = outputContainer },
                                           new OutputFileUploadConfig(OutputFileUploadCondition.TaskSuccess));
    batchTaskCreateOptions.OutputFiles.Add(outputFile);

    tasks.Add(batchTaskCreateOptions);
}

// Call BatchClient.CreateTaskCollectionAsync() to add the tasks as a collection rather than making a
// separate call for each. Bulk task submission helps to ensure efficient underlying API
// calls to the Batch service.

await batchClient.CreateTaskCollectionAsync(jobId, new BatchTaskGroup(tasks));
清理资源
运行任务之后,应用自动删除所创建的输入存储容器,并允许你选择是否删除 Batch 池和作业。 BatchClient 有用于删除作业的方法 DeleteJobAsync 和用于删除池的方法 DeletePoolAsync,系统会在你确认进行删除时调用这些方法。 虽然不会就作业和任务本身向您收费,但会就计算节点向您收费。 因此,建议仅在需要时分配池。 删除池时会删除节点上的所有任务输出。 但是,输出文件保留在存储帐户中。
若不再需要资源组、Batch 帐户和存储帐户,请将其删除。 为此,请在 Azure 门户中选择 Batch 帐户所在的资源组,然后单击“删除资源组”。
后续步骤
在本教程中,你了解了如何执行以下操作:
- 将应用程序包添加到 Batch 帐户。
- 通过 Batch 和存储帐户进行身份验证。
- 将输入文件上传到存储。
- 创建运行应用程序所需的计算节点池。
- 创建用于处理输入文件的作业和任务。
- 监视任务执行情况。
- 检索输出文件。
更多使用 .NET API 计划和处理 Batch 工作负载的示例,请参阅 GitHub 上的 Batch C# 示例。