本教程将引导你如何创建和运行可运行 Azure Batch 工作负载的 Azure 数据工厂管道。 Python 脚本在 Azure Batch 节点上运行,从 Azure Blob 存储容器中获取逗号分隔值 (CSV) 输入、操作数据并将输出写入到其他存储容器。 你使用 Azure Batch Explorer 创建 Azure Batch 池和节点,而 Azure 存储资源管理器则处理存储容器和文件。
在本教程中,你将了解:
- 使用 Batch Explorer 创建 Batch 池和节点。
- 使用 Azure 存储资源管理器创建存储容器并上传输入文件。
- 开发一个 Python 脚本操作输入数据并生成输出。
- 创建一个用于运行 Azure Batch 工作负载的 Azure 数据工厂管道。
- 使用 Azure Batch Explorer 查看输出日志文件。
先决条件
- 具有活动订阅的 Azure 帐户。 如果没有,请创建一个试用版订阅。
- Batch 帐户及其关联的 Azure 存储帐户。 可以使用以下任一方法创建这些帐户:Azure 门户 | Azure CLI | Bicep | ARM 模板 | Terraform。
- 一个数据工厂实例。 请按照创建数据工厂中的说明进行操作,创建数据工厂。
- 已下载并安装 Azure Batch Explorer。
- 已下载并安装 Azure 存储资源管理器。
-
Python 3.8 或更高版本,并使用
pip安装 azure-storage-blob 包。 - 从 GitHub 下载的 iris.csv 输入数据集。
使用 Batch Explorer 创建批处理池和节点
使用 Azure Batch Explorer 创建用于运行工作负载的计算节点池。
使用 Azure 凭据登录到 Azure Batch Explorer。
选择您的 Batch 帐户。
选择左侧边栏上的“池”,然后选择 + 图标添加一个池。
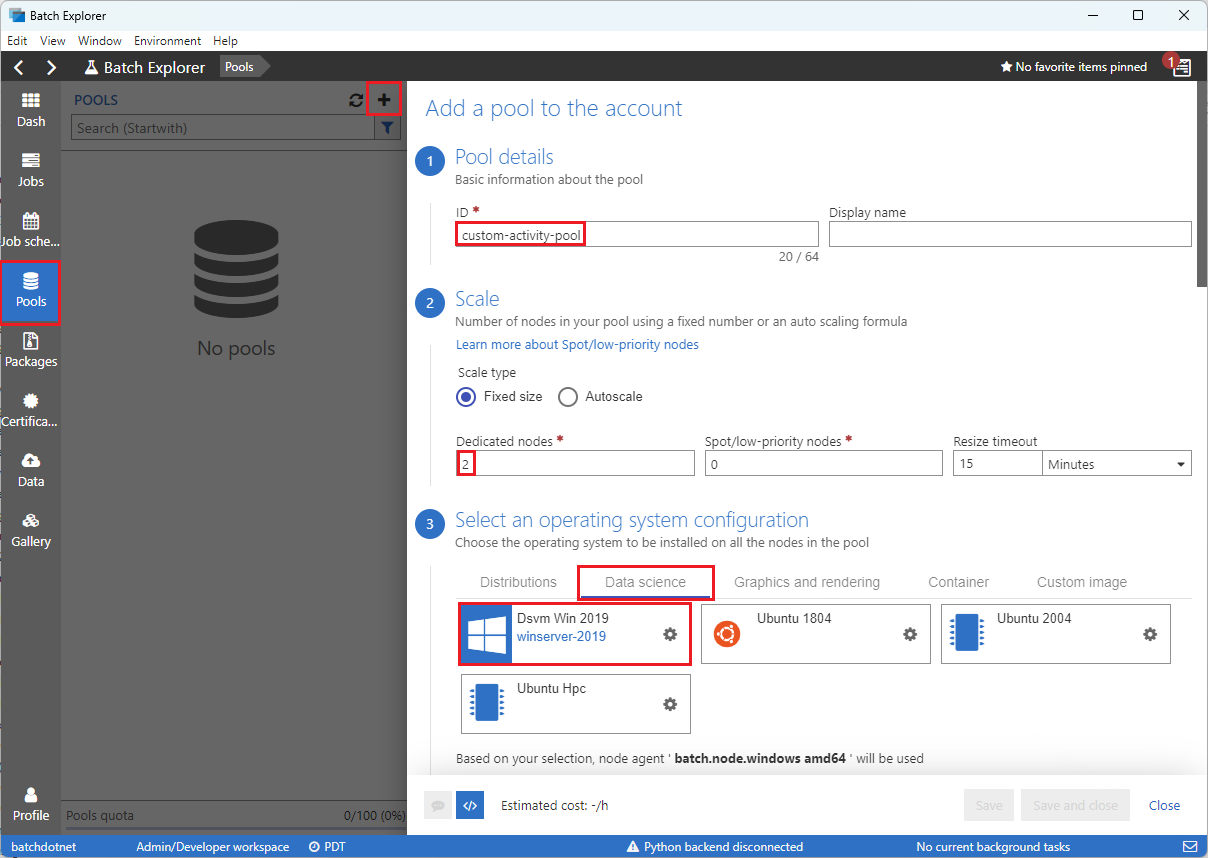
按如下方式填写向账户添加池表单:
- 在“ID”字段中,输入“custom-activity-pool”。
- 在“专用节点”下,输入“2”。
- 在“选择操作系统配置”处,选择“数据科学”选项卡,然后选择“Dsvm Win 2019”。
- 在“选择虚拟机大小”处,选择“Standard_F2s_v2”。
- 在“开始任务”处,选择“添加开始任务”。
在开始任务屏幕的“命令行”下,输入
cmd /c "pip install azure-storage-blob pandas",然后选择“选择”。 此命令在启动时在每个节点上安装azure-storage-blob包。
选择“保存并关闭”。

使用 Azure 存储资源管理器创建 Blob 容器
使用 Azure 存储资源管理器创建 blob 容器来存储输入和输出文件,然后上传输入文件。
- 使用 Azure 凭据登录到 Azure 存储资源管理器。
- 在左侧边栏中,找到与你的 Batch 帐户关联的存储帐户,并将其展开。
- 右键单击“Blob 容器”,然后选择“创建 Blob 容器”,或者从边栏底部的“操作”中选择“创建 Blob 容器”。
- 在输入字段中输入“输入”。
- 创建另一个名为“输出”的 blob 容器。
- 选择“输入”容器,然后在右侧窗格中依次选择“上传”>“上传文件”。
- 在“上传文件”屏幕的“所选文件”下,选择输入字段旁边的省略号“...”。
- 浏览到你下载 iris.csv 文件的位置,选择“打开”,然后选择“上传”。

开发 Python 脚本
下面这个 Python 脚本会加载 Azure 存储资源管理器“输入”容器中的“iris.csv”数据集文件、操作数据,并将结果保存到“输出”容器。
该脚本需要使用与你的 Batch 帐户关联的 Azure 存储帐户的连接字符串。 请执行以下操作获取连接字符串:
- 在“Azure 门户”中,搜索并选择链接到 Azure Batch 帐户的存储帐户的名称。
- 在存储帐户页面上,从“安全 + 网络”下的左侧导航栏中选择“访问密钥”。
- 在“key1”下,选择“连接字符串”旁边的“显示”,然后选择“复制”图标复制连接字符串。
将连接字符串粘贴到以下脚本中,替换 <storage-account-connection-string> 占位符。 将脚本保存为名为“main.py”的文件。
重要
在实际使用时,不建议在应用源代码中公开帐户密钥。 正确的做法是限制对这些凭据的访问权限,通过使用变量或配置文件来在代码中引用它们。 最好是将 Batch 和存储帐户密钥存储在 Azure 密钥保管库中。
# Load libraries
# from azure.storage.blob import BlobClient
from azure.storage.blob import BlobServiceClient
import pandas as pd
import io

# Define parameters
connectionString = "<storage-account-connection-string>"
containerName = "output"
outputBlobName	= "iris_setosa.csv"

# Establish connection with the blob storage account
blob = BlobClient.from_connection_string(conn_str=connectionString, container_name=containerName, blob_name=outputBlobName)

# Initialize the BlobServiceClient (This initializes a connection to the Azure Blob Storage, downloads the content of the 'iris.csv' file, and then loads it into a Pandas DataFrame for further processing.)
blob_service_client = BlobServiceClient.from_connection_string(conn_str=connectionString)
blob_client = blob_service_client.get_blob_client(container_name=containerName, blob_name=outputBlobName)

# Download the blob content
blob_data = blob_client.download_blob().readall()

# Load iris dataset from the task node
# df = pd.read_csv("iris.csv")
df = pd.read_csv(io.BytesIO(blob_data))

# Take a subset of the records
df = df[df['Species'] == "setosa"]

# Save the subset of the iris dataframe locally in the task node
df.to_csv(outputBlobName, index = False)

with open(outputBlobName, "rb") as data:
    blob.upload_blob(data, overwrite=True)
有关使用 Azure Blob 存储的详细信息,请参阅 Azure Blob 存储文档。
在本地运行该脚本以测试和验证功能。
python main.py
该脚本应生成一个名为“iris_setosa.csv”的输出文件,其中仅包含 Species = setosa 的数据记录。 验证脚本正确工作后,将 main.py 脚本文件上传到 Azure 存储资源管理器的“输入”容器。
设置数据工厂管道
创建并验证使用 Python 脚本的数据工厂管道。
获取帐户信息
数据工厂管道使用你的 Azure Batch 帐户名称、存储帐户名称、帐户密钥值以及 Azure Batch 帐户终结点。 可以从 Azure 门户获取此信息:
在 Azure 搜索栏中,搜索并选择你的 Batch 帐户名称。
在 Batch 帐户页面上,从左侧导航栏中选择“密钥”。
在“密钥”页面上,复制以下值:
- 批处理帐户
- 帐户终结点
- 主访问密钥
- 存储帐户名称
- 密钥 1
创建并运行管道
如果 Azure 数据工厂工作室尚未运行,则在 Azure 门户中的数据工厂页面上选择“启动工作室”。
在数据工厂工作室中,选择左侧导航栏中的“作者”铅笔图标。
在“工厂资源”下,选择 + 图标,然后选择“管道”。
在右侧的“属性”窗格中,将管道的名称更改为“运行 Python”。
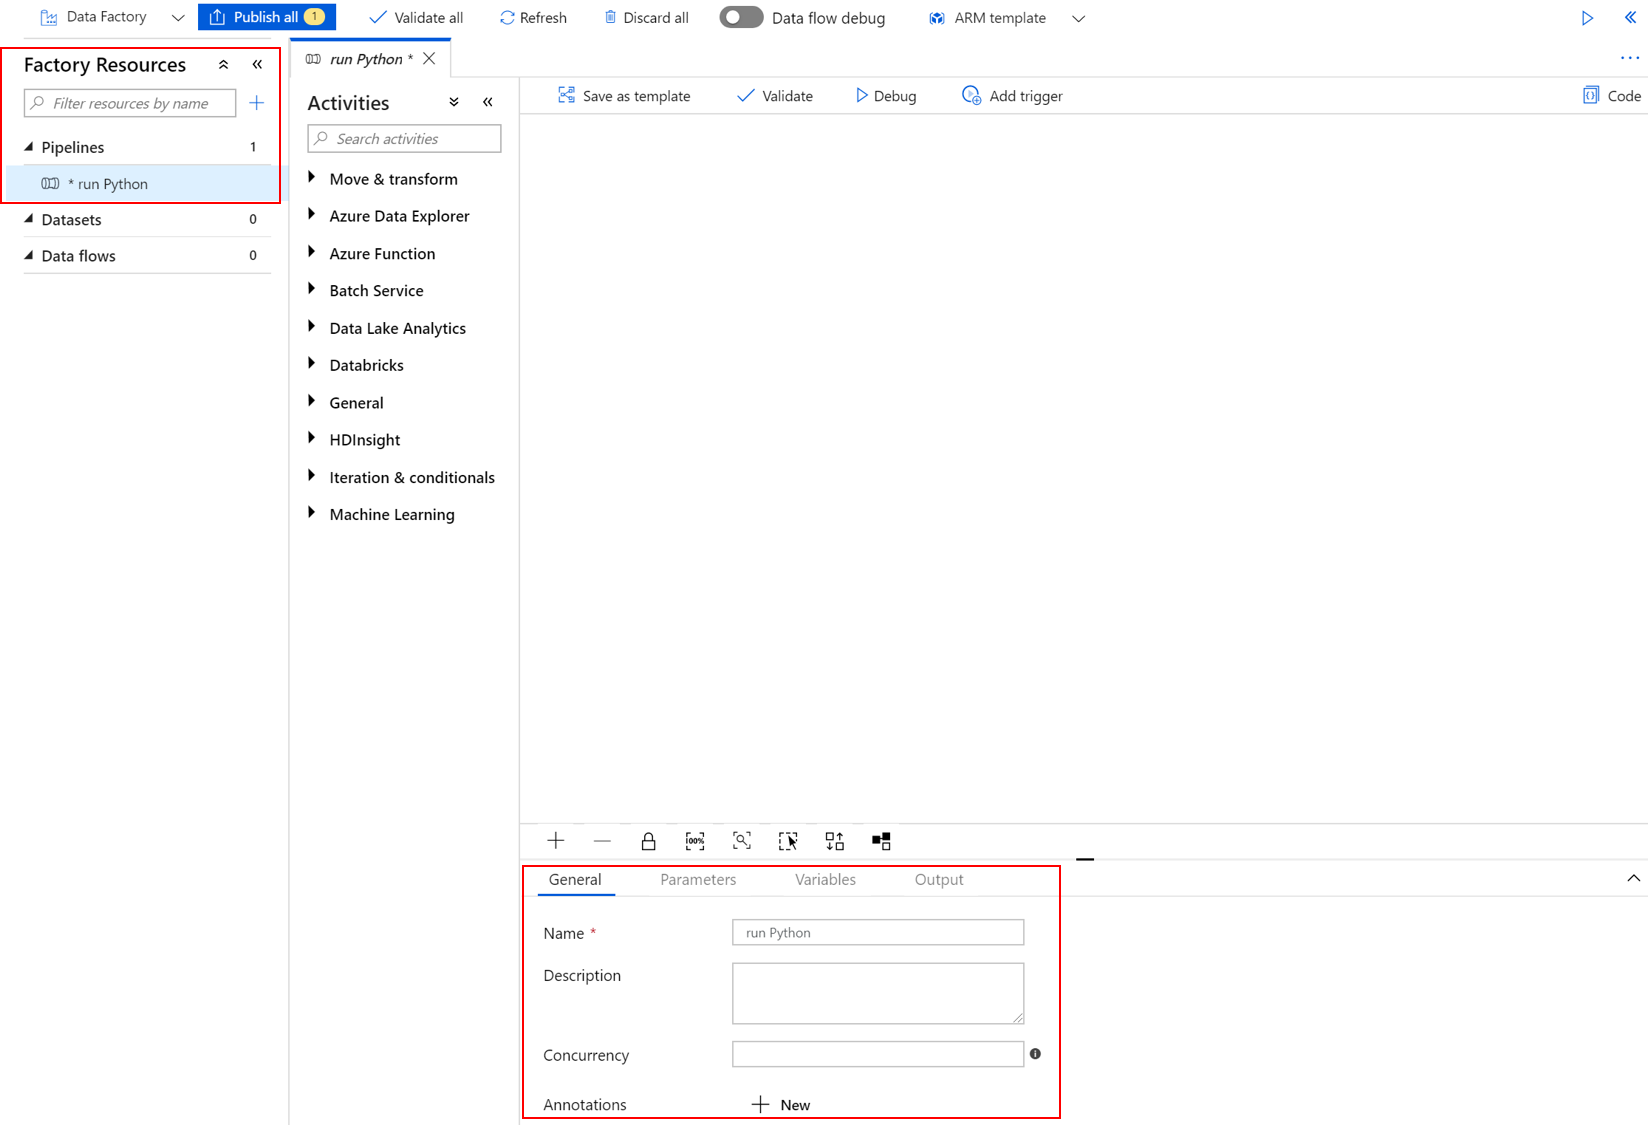
在“活动”窗格中,展开“Batch 服务”,然后将“自定义”活动拖到管道设计器画布上。
在设计器画布下的“常规”选项卡上,在“名称”下输入“testPipeline”。
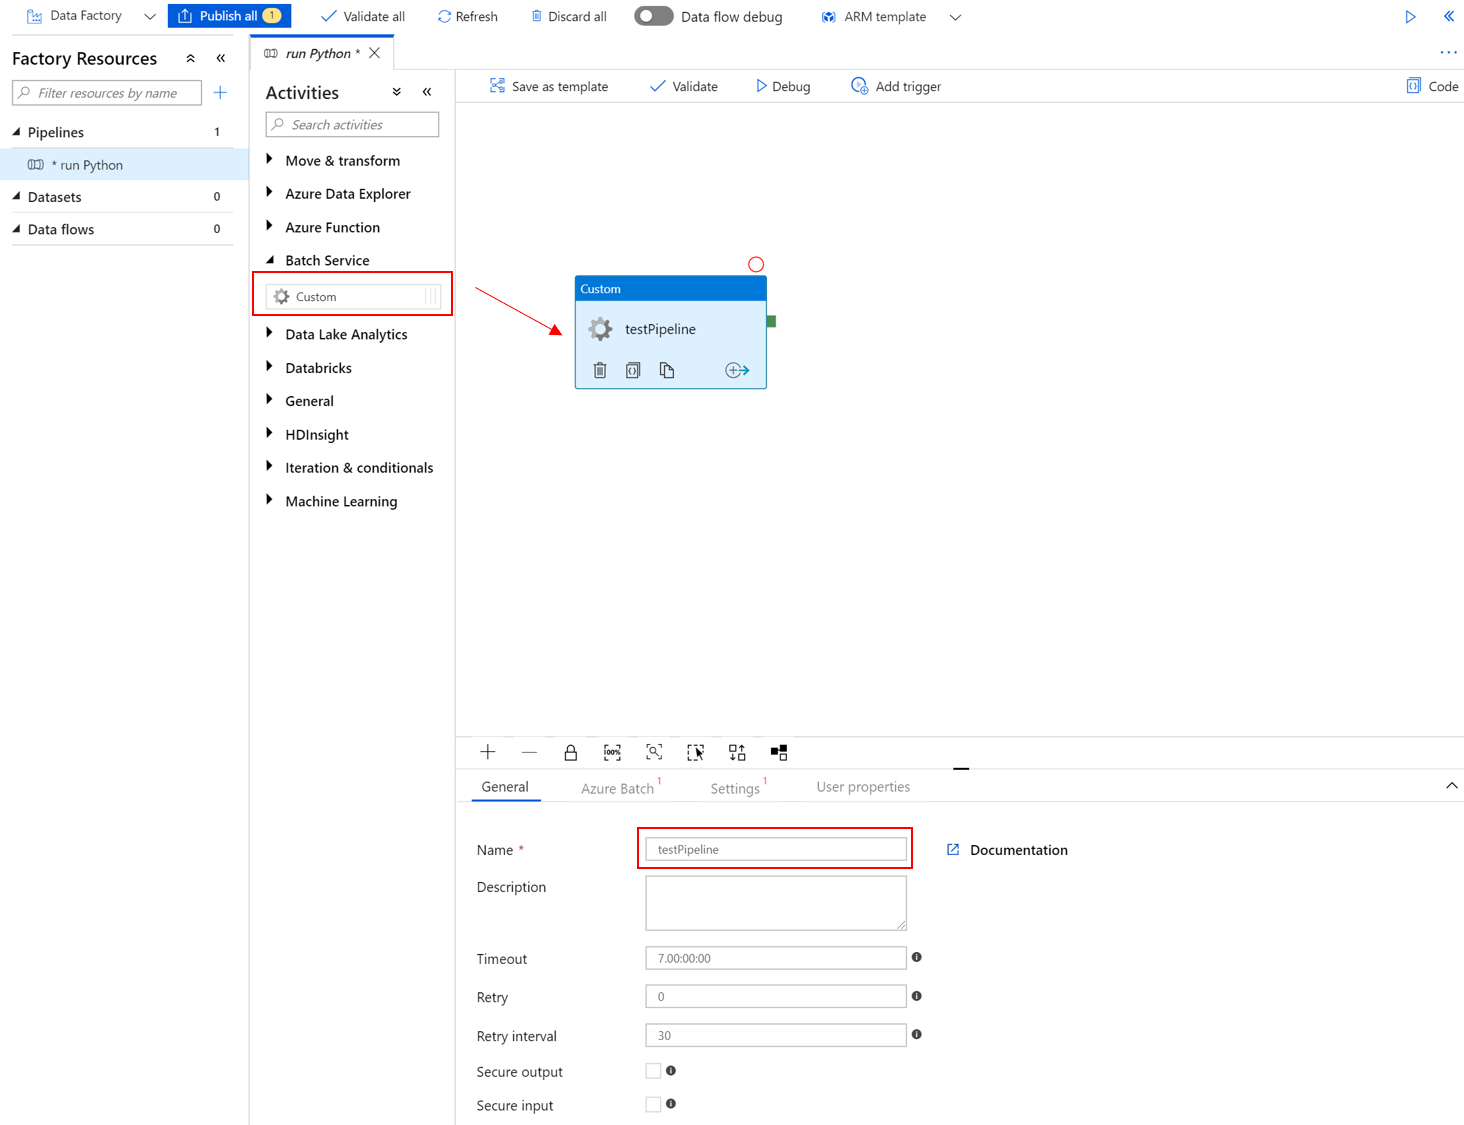
选择“Azure Batch”选项卡,然后选择“新建”。
如下所示,填写“新建链接服务”表单:
- 名称:输入链接服务的名称,例如“AzureBatch1”。
- 访问密钥:输入从 Azure Batch 帐户复制的主访问密钥。
- 帐户名称:输入您的 Batch 帐户名称。
-
Azure Batch URL:输入从 Azure Batch 帐户复制的帐户终结点,例如
https://batchdotnet.chinaeast2.batch.chinacloudapi.cn。 - 池名称:输入 custom-activity-pool,即你在 Batch Explorer 中创建的池。
- 存储帐户链接服务名称:选择“新建”。 在下一个屏幕上,输入链接的存储服务的“名称”,例如“AzureBlobStorage1”,选择你的 Azure 订阅和链接的存储帐户,然后选择“创建”。
在 Batch“新建链接服务”页面底部,选择“测试连接”。 连接成功后,选择“创建”。

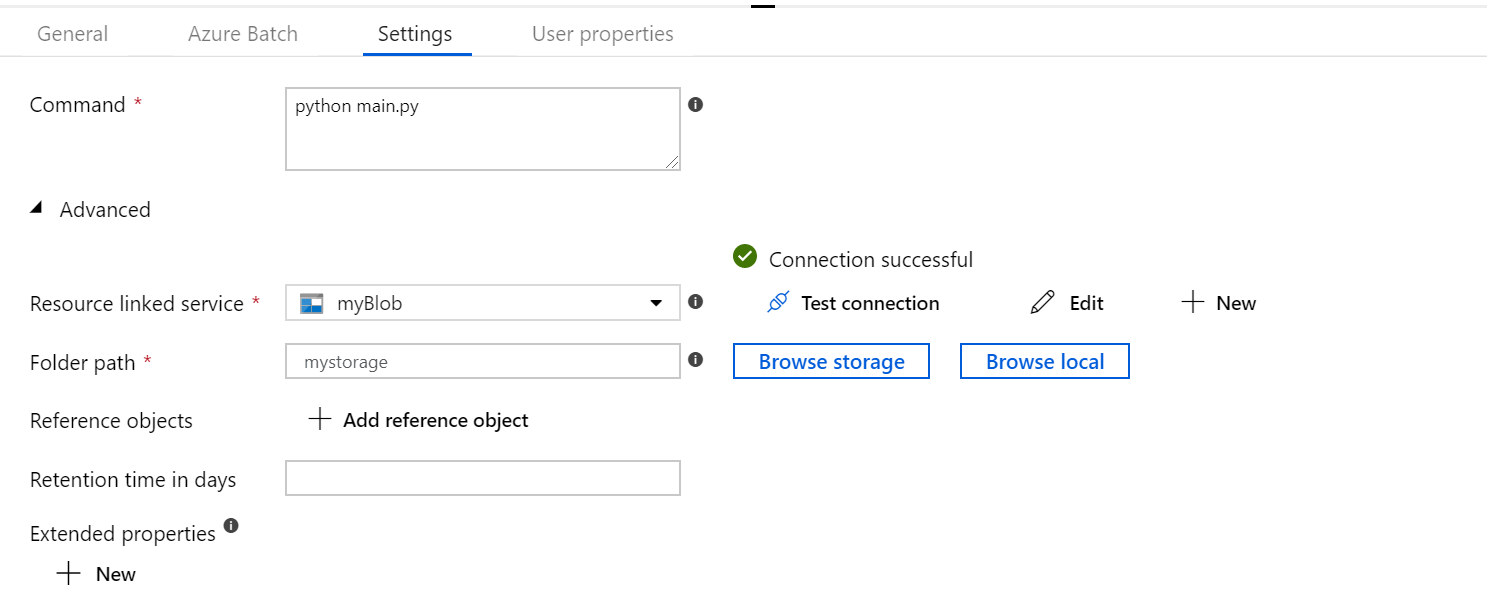
选择“设置”选项卡并输入或选择以下设置:
-
命令:输入
cmd /C python main.py。 - 资源链接服务:选择创建的链接存储服务(例如“AzureBlobStorage1”)并测试连接,确保已成功连接。
- 文件夹路径:选择文件夹图标,然后选择输入容器,选择“确定”。 运行 Python 脚本之前,此文件夹中的文件从容器下载到池节点。
-
命令:输入
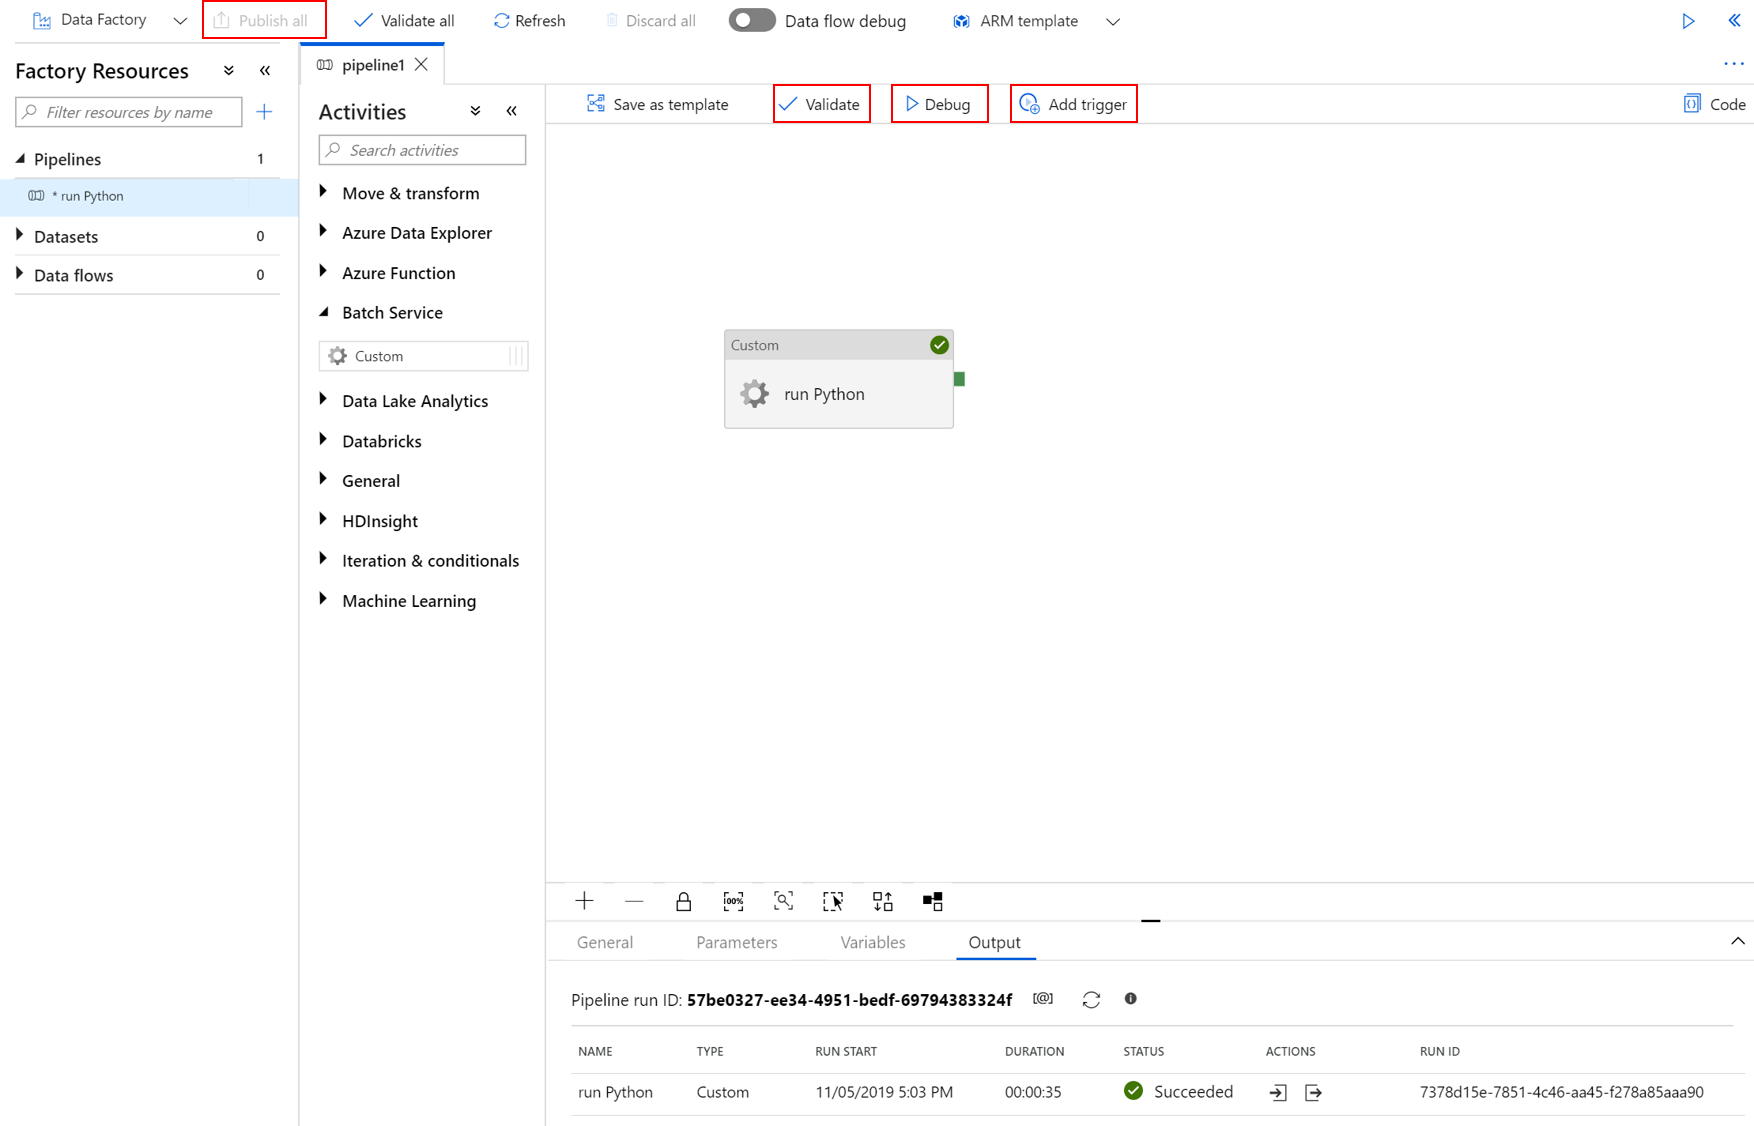
选择管道工具栏中的“验证”,验证管道。
选择“调试”测试管道,确保管道正常工作。
选择“全部发布”以发布管道。
选择“添加触发器”,然后选择“立即触发”以运行管道,或“新建/编辑”以设定触发时间。

使用 Azure Batch Explorer 查看日志文件
如果运行管道后产生警告或错误,可以使用 Azure Batch Explorer 查看 stdout.txt 和 stderr.txt 输出文件获取详细信息。
- 在 Batch Explorer 的左侧边栏中,选择“作业”。
- 选择名为 adfv2-custom-activity-pool 的作业。
- 选择具有失败退出代码的任务。
- 查看 stdout.txt 和 stderr.txt 文件调查和诊断问题。
清理资源
Batch 帐户、作业和任务是免费的,但计算节点即使在未运行作业时也会产生费用。 最好仅在需要时才分配节点池,并在用完后将其删除。 删除池会删除节点上的所有任务输出以及节点本身。
输入和输出文件保留在存储帐户中,会产生费用。 不再需要这些文件时,可以删除文件或容器。 不再需要 Azure Batch 帐户或链接存储帐户时,可以将其删除。
后续步骤
本教程介绍了如何将 Python 脚本与 Azure Batch Explorer、Azure 存储资源管理器和 Azure 数据工厂配合使用来运行 Azure Batch 工作负载。 有关 Azure 数据工厂的详细信息,请参阅什么是 Azure 数据工厂?