适用于:SDK v4
创建任何机器人的主要目标都是让用户参与富有意义的聊天。 实现此目标的最佳方法之一是确保从用户首次连接的那一刻起,他们就了解你的机器人的主要用途和功能,以及创建机器人的原因。 本文提供了帮助你欢迎用户使用机器人的代码示例。
重要
Bot Framework SDK 和 Bot Framework Emulator 已在 GitHub 上存档。 项目不再更新或维护。 自 2025 年 12 月 31 日起,Bot Framework SDK 的支持票证将不再提供服务。
若要使用所选的 AI 服务、业务流程和知识生成代理,请考虑使用 Microsoft 365 代理 SDK。 代理 SDK 对 C#、JavaScript 或 Python 具有语言支持。 可以在 aka.ms/agents 了解有关代理 SDK 的详细信息。
如果现有的机器人是使用 Bot Framework SDK 生成的,则可以将机器人更新到代理 SDK。 查看 Bot Framework SDK 到代理 SDK 迁移指南的核心更改和更新。
如果要构建设计为在 Microsoft Teams 中工作的协作代理,请考虑使用 Teams SDK。 它为在 Teams 环境中运行的代理提供 Teams 特定的 API、自适应卡支持和内置 AI 协同调度功能。 可以在 Teams SDK(Teams AI 库)中了解详细信息。
如果要查找基于 SaaS 的代理平台,请考虑 Microsoft Copilot Studio。
先决条件
关于此示例代码
此示例代码演示如何在新用户开始连接到机器人时检测到他们并发送欢迎消息。 下图显示了此机器人的逻辑流。
机器人遇到的两个主要事件为:
-
OnMembersAddedAsync,当有新用户连接到您的机器人时调用。
-
OnMessageActivityAsync,在机器人收到新用户输入时调用。

只要有新用户进行连接,机器人就会向其提供 WelcomeMessage、InfoMessage 和 PatternMessage。
收到新用户输入以后,系统会检查 WelcomeUserState,看是否已将 DidBotWelcomeUser 设置为 true。 如果否,则会将初始的欢迎用户消息返回给用户。
机器人遇到的两个主要事件为:
-
onMembersAdded,当有新用户连接到你的机器人时调用。
-
onMessage,在机器人收到新用户输入时调用。
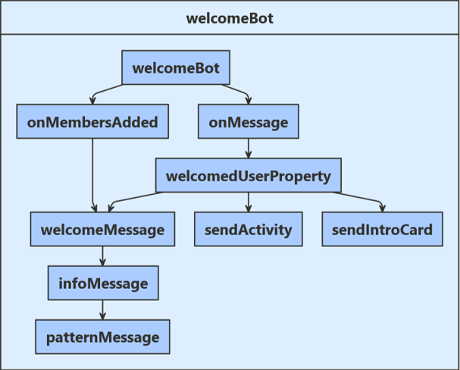
只要有新用户进行连接,机器人就会向其提供 welcomeMessage、infoMessage 和 patternMessage。
收到新用户输入以后,系统会检查 welcomedUserProperty,看是否已将 didBotWelcomeUser 设置为 true。 如果否,则会将初始的欢迎用户消息返回给用户。
如果 DidBotWelcomeUser 为 true,则会评估用户的输入。 此机器人会根据用户的输入内容执行下述操作之一:
- 回显用户发来的问候语。
- 显示一张英雄卡,其中包含有关机器人的其他信息。
- 重新发送
WelcomeMessage,其中说明该机器人需要哪些输入。
机器人遇到的两个主要事件为:
-
onMembersAdded,当新用户连接到你的机器人时调用。
-
onMessageActivity,在机器人收到新用户输入时调用。
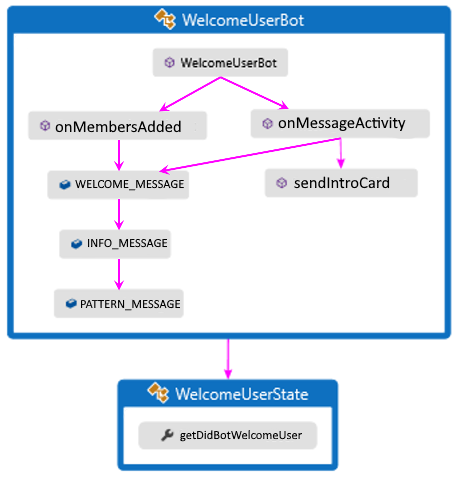
只要有新用户进行连接,机器人就会向其提供 WELCOME_MESSAGE、INFO_MESSAGE 和 PATTERN_MESSAGE。
收到新用户输入以后,系统会检查 WelcomeUserState,看是否已将 getDidBotWelcomeUser() 设置为 true。 如果否,则会将初始的欢迎用户消息返回给用户。
机器人遇到的两个主要事件为:
-
on_members_added_activity,在新用户连接到你的机器人时会被调用。
-
on_message_activity,在机器人收到新用户输入时调用。
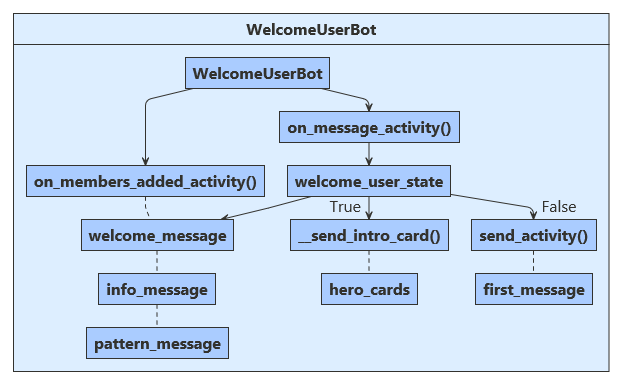
只要有新用户连接,他们就会收到机器人发送的“欢迎消息”、“信息消息”和“模式消息”。
收到新的用户输入以后,系统会检查 welcome_user_state.did_welcome_user 属性。 如果没有设置为 true,则会将初始的欢迎用户消息返回给用户。 如果设置为 true,则此机器人会根据用户的输入内容执行下述操作之一:
- 回显用户发来的问候语。
- 显示一张英雄卡,其中包含有关机器人的其他信息。
创建用户状态
用户状态对象在启动时创建,依赖项会注入机器人构造函数中。
Startup.cs
// Create the Bot Framework Authentication to be used with the Bot Adapter.
services.AddSingleton<BotFrameworkAuthentication, ConfigurationBotFrameworkAuthentication>();

// Create the Bot Adapter with error handling enabled.
Bots\WelcomeUserBot.cs
// Initializes a new instance of the "WelcomeUserBot" class.
public WelcomeUserBot(UserState userState)
{
    _userState = userState;
}
在启动时,用户状态在 index.js 中定义,由机器人构造函数使用。
index.js
// Create the main dialog.
const bot = new WelcomeBot(userState);

// Create HTTP server
const server = restify.createServer();
server.use(restify.plugins.bodyParser());

server.listen(process.env.port || process.env.PORT || 3978, function() {
    console.log(`\n${ server.name } listening to ${ server.url }`);
    console.log('\nGet Bot Framework Emulator: https://aka.ms/botframework-emulator');
使用 Spring 容器,在启动时创建用户状态对象,并将依赖项注入机器人构造函数中。
Application.java
@Bean
public Bot getBot(UserState userState) {
    return new WelcomeUserBot(userState);
}
WelcomeUserBot.java
private final UserState userState;

// Initializes a new instance of the "WelcomeUserBot" class.
@Autowired
public WelcomeUserBot(UserState withUserState) {
    userState = withUserState;
}
在启动时,用户状态在 app.py 中定义,由机器人构造函数使用。
app.py
# Create the Bot
BOT = WelcomeUserBot(USER_STATE)

# Listen for incoming requests on /api/messages.
创建属性访问器
现在,我们创建一个属性访问器,使我们能够在 OnMessageActivityAsync 方法中获取 WelcomeUserState 的句柄。
接下来,调用 GetAsync 方法,获取已正确设置了范围的密钥。 然后,使用 SaveChangesAsync 方法在每次用户输入迭代以后保存用户状态数据。
Bots\WelcomeUserState.cs
// Gets or sets whether the user has been welcomed in the conversation.
public bool DidBotWelcomeUser { get; set; } = false;
Bots\WelcomeUserBot.cs
var didBotWelcomeUser = await welcomeUserStateAccessor.GetAsync(turnContext, () => new WelcomeUserState(), cancellationToken);
await _userState.SaveChangesAsync(turnContext, cancellationToken: cancellationToken);
}
我们现在创建一个属性访问器,用于获取持久保存在 userState 中的 welcomedUserProperty 的句柄。
bots/welcomeBot.js
this.welcomedUserProperty = userState.createProperty(WELCOMED_USER);
this.onMessage(async (context, next) => {
    // Read UserState. If the 'DidBotWelcomedUser' does not exist (first time ever for a user)
    // set the default to false.
    const didBotWelcomedUser = await this.welcomedUserProperty.get(context, false);
/**
 * Override the ActivityHandler.run() method to save state changes after the bot logic completes.
 */
async run(context) {
    await super.run(context);

    // Save state changes
    await this.userState.saveChanges(context);
}
现在,我们来创建一个属性访问器,使我们能够在 onMessageActivity 方法内部获得对 WelcomeUserState 的访问句柄。
接下来,调用 get 方法,获取已正确设置了范围的密钥。 然后,使用 saveChanges 方法在每次用户输入迭代以后保存用户状态数据。
WelcomeUserBot.java
// Get state data from UserState.
StatePropertyAccessor<WelcomeUserState> stateAccessor =
    userState.createProperty("WelcomeUserState");
CompletableFuture<WelcomeUserState> stateFuture =
    stateAccessor.get(turnContext, WelcomeUserState::new);
return super.onTurn(turnContext)
    .thenCompose(saveResult -> userState.saveChanges(turnContext));
此示例在机器人构造函数中创建聊天状态属性访问器 user_state_accessor。
bots/welcome-user-bot.py
self.user_state_accessor = self._user_state.create_property("WelcomeUserState")
它在 on_message_activity 处理程序中使用属性访问器,并重写了 on_turn 处理程序,以便在本轮交互结束前保存状态。
# Get the state properties from the turn context.
welcome_user_state = await self.user_state_accessor.get(
    turn_context, WelcomeUserState
)
async def on_turn(self, turn_context: TurnContext):
    await super().on_turn(turn_context)

    # save changes to WelcomeUserState after each turn
    await self._user_state.save_changes(turn_context)
检测并问候新连接的用户
在 WelcomeUserBot 中使用 OnMembersAddedAsync() 检查活动更新即可了解是否已将新用户添加到聊天中,然后向该用户发送一组(共三条)初始的欢迎消息:WelcomeMessage、InfoMessage、PatternMessage。 此交互的完整代码显示在下面。
Bots\WelcomeUserBot.cs
public class WelcomeUserBot : ActivityHandler
{
    // Messages sent to the user.
    private const string WelcomeMessage = "This is a simple Welcome Bot sample. This bot will introduce you " +
                                            "to welcoming and greeting users. You can say 'intro' to see the " +
                                            "introduction card. If you are running this bot in the Bot Framework " +
                                            "Emulator, press the 'Start Over' button to simulate user joining " +
                                            "a bot or a channel";

    private const string InfoMessage = "You are seeing this message because the bot received at least one " +
                                        "'ConversationUpdate' event, indicating you (and possibly others) " +
                                        "joined the conversation. If you are using the emulator, pressing " +
                                        "the 'Start Over' button to trigger this event again. The specifics " +
                                        "of the 'ConversationUpdate' event depends on the channel. You can " +
                                        "read more information at: " +
                                        "https://aka.ms/about-botframework-welcome-user";

    private const string LocaleMessage = "You can use the activity's 'GetLocale()' method to welcome the user " +
                                         "using the locale received from the channel. " +
                                         "If you are using the Emulator, you can set this value in Settings.";
{
    foreach (var member in membersAdded)
    {
        if (member.Id != turnContext.Activity.Recipient.Id)
        {
            await turnContext.SendActivityAsync($"Hi there - {member.Name}. {WelcomeMessage}", cancellationToken: cancellationToken);
            await turnContext.SendActivityAsync(InfoMessage, cancellationToken: cancellationToken);
            await turnContext.SendActivityAsync($"{LocaleMessage} Current locale is '{turnContext.Activity.GetLocale()}'.", cancellationToken: cancellationToken);
            await turnContext.SendActivityAsync(PatternMessage, cancellationToken: cancellationToken);
        }
    }
}
添加用户时,此 JavaScript 代码会发送初始的欢迎消息。 这是通过检查聊天活动并验证是否已将新成员添加到聊天中来完成的。
bots/welcomeBot.js
    // By calling next() you ensure that the next BotHandler is run.
    await next();
});

// Sends welcome messages to conversation members when they join the conversation.
// Messages are only sent to conversation members who aren't the bot.
this.onMembersAdded(async (context, next) => {
    // Iterate over all new members added to the conversation
    for (const idx in context.activity.membersAdded) {
        // Greet anyone that was not the target (recipient) of this message.
        // Since the bot is the recipient for events from the channel,
        // context.activity.membersAdded === context.activity.recipient.Id indicates the
        // bot was added to the conversation, and the opposite indicates this is a user.
        if (context.activity.membersAdded[idx].id !== context.activity.recipient.id) {
            await context.sendActivity(`Welcome to the 'Welcome User' Bot. This bot will introduce you to welcoming and greeting users.`);
            await context.sendActivity(`You are seeing this message because the bot received at least one 'ConversationUpdate' ` +
                `event, indicating you (and possibly others) joined the conversation. If you are using the emulator, ` +
                `pressing the 'Start Over' button to trigger this event again. The specifics of the 'ConversationUpdate' ` +
                `event depends on the channel. You can read more information at https://aka.ms/about-botframework-welcome-user`);
            await context.sendActivity(`You can use the activity's 'locale' property to welcome the user ` +
                `using the locale received from the channel. ` +
                `If you are using the Emulator, you can set this value in Settings. ` +
                `Current locale is '${ context.activity.locale }'`);
            await context.sendActivity(`It is a good pattern to use this event to send general greeting to user, explaining what your bot can do. ` +
                `In this example, the bot handles 'hello', 'hi', 'help' and 'intro'. ` +
                `Try it now, type 'hi'`);
        }
    }

    // By calling next() you ensure that the next BotHandler is run.
    await next();
});
在 WelcomeUserBot 中使用 onMembersAdded() 检查活动更新即可了解是否已将新用户添加到聊天中,然后向该用户发送一组(共三条)初始的欢迎消息:WELCOME_MESSAGE、INFO_MESSAGE、PATTERN_MESSAGE。 此交互的完整代码显示在下面。
WelcomeUserBot.java
public class WelcomeUserBot extends ActivityHandler {
    // Messages sent to the user.
    private static final String WELCOME_MESSAGE =
        "This is a simple Welcome Bot sample. This bot will introduce you "
            + "to welcoming and greeting users. You can say 'intro' to see the "
            + "introduction card. If you are running this bot in the Bot Framework "
            + "Emulator, press the 'Start Over' button to simulate user joining "
            + "a bot or a channel";

    private static final String INFO_MESSAGE =
        "You are seeing this message because the bot received at least one "
            + "'ConversationUpdate' event, indicating you (and possibly others) "
            + "joined the conversation. If you are using the emulator, pressing "
            + "the 'Start Over' button to trigger this event again. The specifics "
            + "of the 'ConversationUpdate' event depends on the channel. You can "
            + "read more information at: " + "https://aka.ms/about-botframework-welcome-user";

    private String localeMessage =
        "You can use the activity's GetLocale() method to welcome the user "
            + "using the locale received from the channel. "
            + "If you are using the Emulator, you can set this value in Settings.";

    private static final String PATTERN_MESSAGE =
        "It is a good pattern to use this event to send general greeting"
            + "to user, explaining what your bot can do. In this example, the bot "
            + "handles 'hello', 'hi', 'help' and 'intro'. Try it now, type 'hi'";
@Override
protected CompletableFuture<Void> onMembersAdded(
    List<ChannelAccount> membersAdded,
    TurnContext turnContext
) {
    return membersAdded.stream()
        .filter(
            member -> !StringUtils
                .equals(member.getId(), turnContext.getActivity().getRecipient().getId())
        )
        .map(
            channel -> turnContext
                .sendActivities(
                    MessageFactory.text(
                        "Hi there - " + channel.getName() + ". " + WELCOME_MESSAGE
                    ),
                    MessageFactory.text(INFO_MESSAGE),
                    MessageFactory.text(
                        localeMessage
                        + " Current locale is " + turnContext.getActivity().getLocale() + "."),
                    MessageFactory.text(PATTERN_MESSAGE)
                )
        )
        .collect(CompletableFutures.toFutureList())
        .thenApply(resourceResponses -> null);
}
on_members_added_activity 将检查是否已添加新用户,然后发送三条初始欢迎消息:“欢迎消息”、“信息消息”、“模式消息” 。
bots/welcome-user-bot.py
"""
Greet when users are added to the conversation.
Note that all channels do not send the conversation update activity.
If you find that this bot works in the emulator, but does not in
another channel the reason is most likely that the channel does not
send this activity.
"""
for member in members_added:
    if member.id != turn_context.activity.recipient.id:
        await turn_context.send_activity(
            f"Hi there { member.name }. " + self.WELCOME_MESSAGE
        )

        await turn_context.send_activity(self.INFO_MESSAGE)

        await turn_context.send_activity(
            f"{ self.LOCALE_MESSAGE } Current locale is { turn_context.activity.locale }."
        )

        await turn_context.send_activity(self.PATTERN_MESSAGE)
此外还必须考虑在实际情况下用户的输入何时可能包含有用信息,这可能因通道而异。 为确保用户在所有可能的通道上获得良好的体验,我们将检查状态标志 didBotWelcomeUser。如果其值为“false”,我们将不处理初始用户输入。 而是向用户提供初始欢迎消息。 然后,布尔型 welcomedUserProperty 会被设置为“true”并存储在 UserState 中。现在,代码将处理此用户在所有其他消息活动中的输入。
Bots\WelcomeUserBot.cs
{
    var welcomeUserStateAccessor = _userState.CreateProperty<WelcomeUserState>(nameof(WelcomeUserState));
    var didBotWelcomeUser = await welcomeUserStateAccessor.GetAsync(turnContext, () => new WelcomeUserState(), cancellationToken);

    if (didBotWelcomeUser.DidBotWelcomeUser == false)
    {
        didBotWelcomeUser.DidBotWelcomeUser = true;

        // the channel should sends the user name in the 'From' object
        var userName = turnContext.Activity.From.Name;

        await turnContext.SendActivityAsync("You are seeing this message because this was your first message ever to this bot.", cancellationToken: cancellationToken);
        await turnContext.SendActivityAsync($"It is a good practice to welcome the user and provide personal greeting. For example, welcome {userName}.", cancellationToken: cancellationToken);
    }
    else
await _userState.SaveChangesAsync(turnContext, cancellationToken: cancellationToken);
}
此外还必须考虑在实际情况下用户的输入何时可能包含有用信息,这可能因通道而异。 为确保用户在所有可能的通道上获得良好的体验,我们将检查 didBotWelcomedUser 属性。如果该属性不存在,我们会将其设置为“false”,并且不处理初始用户输入。 而是向用户提供初始欢迎消息。 随后,布尔变量 didBotWelcomeUser 被设置为“true”,我们的代码会处理所有其他消息活动中的用户输入。
bots/welcomeBot.js
this.welcomedUserProperty = userState.createProperty(WELCOMED_USER);

this.userState = userState;

this.onMessage(async (context, next) => {
    // Read UserState. If the 'DidBotWelcomedUser' does not exist (first time ever for a user)
    // set the default to false.
    const didBotWelcomedUser = await this.welcomedUserProperty.get(context, false);

    // Your bot should proactively send a welcome message to a personal chat the first time
    // (and only the first time) a user initiates a personal chat with your bot.
    if (didBotWelcomedUser === false) {
        // The channel should send the user name in the 'From' object
        const userName = context.activity.from.name;
        await context.sendActivity('You are seeing this message because this was your first message ever sent to this bot.');
        await context.sendActivity(`It is a good practice to welcome the user and provide personal greeting. For example, welcome ${ userName }.`);

        // Set the flag indicating the bot handled the user's first message.
        await this.welcomedUserProperty.set(context, true);
    } else {
}

    // By calling next() you ensure that the next BotHandler is run.
    await next();
});
必须考虑用户的输入何时可能包含有用信息,这可能因通道而异。 为确保用户在所有可能的通道上获得良好的体验,我们将检查状态标志 getDidBotWelcomeUser。如果其值为“false”,我们将不处理初始用户输入。 而是向用户提供初始欢迎消息。 然后,布尔型 setDidBotWelcomeUser 会被设置为“true”并存储在 UserState 中。现在,代码将处理此用户在所有其他消息活动中的输入。
WelcomeUserBot.java
@Override
protected CompletableFuture<Void> onMessageActivity(TurnContext turnContext) {
    // Get state data from UserState.
    StatePropertyAccessor<WelcomeUserState> stateAccessor =
        userState.createProperty("WelcomeUserState");
    CompletableFuture<WelcomeUserState> stateFuture =
        stateAccessor.get(turnContext, WelcomeUserState::new);

    return stateFuture.thenApply(thisUserState -> {
        if (!thisUserState.getDidBotWelcomeUser()) {
            thisUserState.setDidBotWelcomeUser(true);

            // the channel should send the user name in the 'from' object
            String userName = turnContext.getActivity().getFrom().getName();
            return turnContext
                .sendActivities(
                    MessageFactory.text(FIRST_WELCOME_ONE),
                    MessageFactory.text(String.format(FIRST_WELCOME_TWO, userName))
                );
// Save any state changes.
.thenApply(response -> userState.saveChanges(turnContext))
此外还必须考虑在实际情况下用户的输入何时可能包含有用信息,这可能因通道而异。 为了确保用户在所有可能的通道上有一个良好的体验,on_message_activity 会检查 did_welcome_user 属性。 第一次它会将其设置为 false,不处理用户输入。 而是向用户提供初始欢迎消息。 然后它会将 did_welcome_user 设置为 true,并处理所有其他消息活动中的用户输入。
bots/welcome-user-bot.py
if not welcome_user_state.did_welcome_user:
    welcome_user_state.did_welcome_user = True

    await turn_context.send_activity(
        "You are seeing this message because this was your first message ever to this bot."
    )

    name = turn_context.activity.from_property.name
    await turn_context.send_activity(
        f"It is a good practice to welcome the user and provide personal greeting. For example: Welcome {name}"
    )
欢迎新用户以后,机器人将针对每个消息轮次评估用户输入信息,并根据该用户输入的上下文提供响应。 以下代码显示用于生成该响应的决策逻辑。
输入为“简介”或“帮助”时,会调用函数 SendIntroCardAsync,为用户呈现一张说明性的英雄卡。 我们会在本文下一部分详细分析该代码。
Bots\WelcomeUserBot.cs
    switch (text)
    {
        case "hello":
        case "hi":
            await turnContext.SendActivityAsync($"You said {text}.", cancellationToken: cancellationToken);
            break;
        case "intro":
        case "help":
            await SendIntroCardAsync(turnContext, cancellationToken);
            break;
        default:
            await turnContext.SendActivityAsync(WelcomeMessage, cancellationToken: cancellationToken);
            break;
    }
}
当输入为“intro”或“help”时,会使用 CardFactory 向用户显示一张“Intro”自适应卡片。 我们会在本文下一部分详细分析该代码。
bots/welcomeBot.js
    // Set the flag indicating the bot handled the user's first message.
    await this.welcomedUserProperty.set(context, true);
} else {
    // This example uses an exact match on user's input utterance.
    // Consider using LUIS or QnA for Natural Language Processing.
    const text = context.activity.text.toLowerCase();
    switch (text) {
    case 'hello':
    case 'hi':
        await context.sendActivity(`You said "${ context.activity.text }"`);
        break;
    case 'intro':
    case 'help':
        await this.sendIntroCard(context);
        break;
    default:
输入为“简介”或“帮助”时,会调用函数 sendIntroCard,为用户呈现一张说明性的英雄卡。 我们会在本文下一部分详细分析该代码。
WelcomeUserBot.java
// This example hardcodes specific utterances.
// You should use LUIS or QnA for more advance language understanding.
String text = turnContext.getActivity().getText().toLowerCase();
switch (text) {
    case "hello":
    case "hi":
        return turnContext.sendActivities(MessageFactory.text("You said " + text));

    case "intro":
    case "help":
        return sendIntroCard(turnContext);

    default:
        return turnContext.sendActivity(WELCOME_MESSAGE);
}
当用户输入 intro 或 help 时,机器人会调用 __send_intro_card,向用户显示一张介绍性自适应卡片。
bots/welcome-user-bot.py
if text in ("hello", "hi"):
    await turn_context.send_activity(f"You said { text }")
elif text in ("intro", "help"):
    await self.__send_intro_card(turn_context)
else:
    await turn_context.send_activity(self.WELCOME_MESSAGE)
使用英雄卡问候语
如上所述,某些用户输入会导致系统生成一张英雄卡来响应用户请求。 可以在此处详细了解英雄卡问候语:发送简介卡。 下面是创建此机器人的英雄卡响应所需的代码。
Bots\WelcomeUserBot.cs
    {
        var card = new HeroCard
        {
            Title = "Welcome to Bot Framework!",
            Text = @"Welcome to Welcome Users bot sample! This Introduction card
                     is a great way to introduce your Bot to the user and suggest
                     some things to get them started. We use this opportunity to
                     recommend a few next steps for learning more creating and deploying bots.",
            Images = new List<CardImage>() { new CardImage("https://aka.ms/bf-welcome-card-image") },
            Buttons = new List<CardAction>()
            {
                new CardAction(ActionTypes.OpenUrl, "Get an overview", null, "Get an overview", "Get an overview", "https://docs.azure.cn/bot-service/?view=azure-bot-service-4.0"),
                new CardAction(ActionTypes.OpenUrl, "Ask a question", null, "Ask a question", "Ask a question", "https://stackoverflow.com/questions/tagged/botframework"),
                new CardAction(ActionTypes.OpenUrl, "Learn how to deploy", null, "Learn how to deploy", "Learn how to deploy", "https://docs.azure.cn/bot-service/bot-builder-howto-deploy-azure?view=azure-bot-service-4.0"),
            }
        };

        var response = MessageFactory.Attachment(card.ToAttachment());
        await turnContext.SendActivityAsync(response, cancellationToken);
    }
}
bots/welcomeBot.js
    // Save state changes
    await this.userState.saveChanges(context);
}

async sendIntroCard(context) {
    const card = CardFactory.heroCard(
        'Welcome to Bot Framework!',
        'Welcome to Welcome Users bot sample! This Introduction card is a great way to introduce your Bot to the user and suggest some things to get them started. We use this opportunity to recommend a few next steps for learning more creating and deploying bots.',
        ['https://aka.ms/bf-welcome-card-image'],
        [
            {
                type: ActionTypes.OpenUrl,
                title: 'Get an overview',
                value: 'https://docs.azure.cn/bot-service/?view=azure-bot-service-4.0'
            },
            {
                type: ActionTypes.OpenUrl,
                title: 'Ask a question',
                value: 'https://stackoverflow.com/questions/tagged/botframework'
            },
            {
                type: ActionTypes.OpenUrl,
                title: 'Learn how to deploy',
                value: 'https://docs.azure.cn/bot-service/bot-builder-howto-deploy-azure?view=azure-bot-service-4.0'
            }
        ]
    );

    await context.sendActivity({ attachments: [card] });
}
WelcomeUserBot.java
private CompletableFuture<ResourceResponse> sendIntroCard(TurnContext turnContext) {
    HeroCard card = new HeroCard();
    card.setTitle("Welcome to Bot Framework!");
    card.setText(
        "Welcome to Welcome Users bot sample! This Introduction card "
            + "is a great way to introduce your Bot to the user and suggest "
            + "some things to get them started. We use this opportunity to "
            + "recommend a few next steps for learning more creating and deploying bots."
    );

    CardImage image = new CardImage();
    image.setUrl("https://aka.ms/bf-welcome-card-image");

    card.setImages(Collections.singletonList(image));

    CardAction overviewAction = new CardAction();
    overviewAction.setType(ActionTypes.OPEN_URL);
    overviewAction.setTitle("Get an overview");
    overviewAction.setText("Get an overview");
    overviewAction.setDisplayText("Get an overview");
    overviewAction.setValue(
        "https://docs.azure.cn/bot-service/?view=azure-bot-service-4.0"
    );

    CardAction questionAction = new CardAction();
    questionAction.setType(ActionTypes.OPEN_URL);
    questionAction.setTitle("Ask a question");
    questionAction.setText("Ask a question");
    questionAction.setDisplayText("Ask a question");
    questionAction.setValue("https://stackoverflow.com/questions/tagged/botframework");

    CardAction deployAction = new CardAction();
    deployAction.setType(ActionTypes.OPEN_URL);
    deployAction.setTitle("Learn how to deploy");
    deployAction.setText("Learn how to deploy");
    deployAction.setDisplayText("Learn how to deploy");
    deployAction.setValue(
        "https://docs.azure.cn/bot-service/bot-builder-howto-deploy-azure?view=azure-bot-service-4.0"
    );
    card.setButtons(Arrays.asList(overviewAction, questionAction, deployAction));

    Activity response = MessageFactory.attachment(card.toAttachment());
    return turnContext.sendActivity(response);
}
bots/welcome-user-bot.py
async def __send_intro_card(self, turn_context: TurnContext):
    card = HeroCard(
        title="Welcome to Bot Framework!",
        text="Welcome to Welcome Users bot sample! This Introduction card "
        "is a great way to introduce your Bot to the user and suggest "
        "some things to get them started. We use this opportunity to "
        "recommend a few next steps for learning more creating and deploying bots.",
        images=[CardImage(url="https://aka.ms/bf-welcome-card-image")],
        buttons=[
            CardAction(
                type=ActionTypes.open_url,
                title="Get an overview",
                text="Get an overview",
                display_text="Get an overview",
                value="https://docs.azure.cn/bot-service/?view=azure-bot-service-4.0",
            ),
            CardAction(
                type=ActionTypes.open_url,
                title="Ask a question",
                text="Ask a question",
                display_text="Ask a question",
                value="https://stackoverflow.com/questions/tagged/botframework",
            ),
            CardAction(
                type=ActionTypes.open_url,
                title="Learn how to deploy",
                text="Learn how to deploy",
                display_text="Learn how to deploy",
                value="https://docs.azure.cn/bot-service/bot-builder-howto-deploy-azure?view=azure-bot-service-4.0",
            ),
        ],
    )

    return await turn_context.send_activity(
        MessageFactory.attachment(CardFactory.hero_card(card))
    )
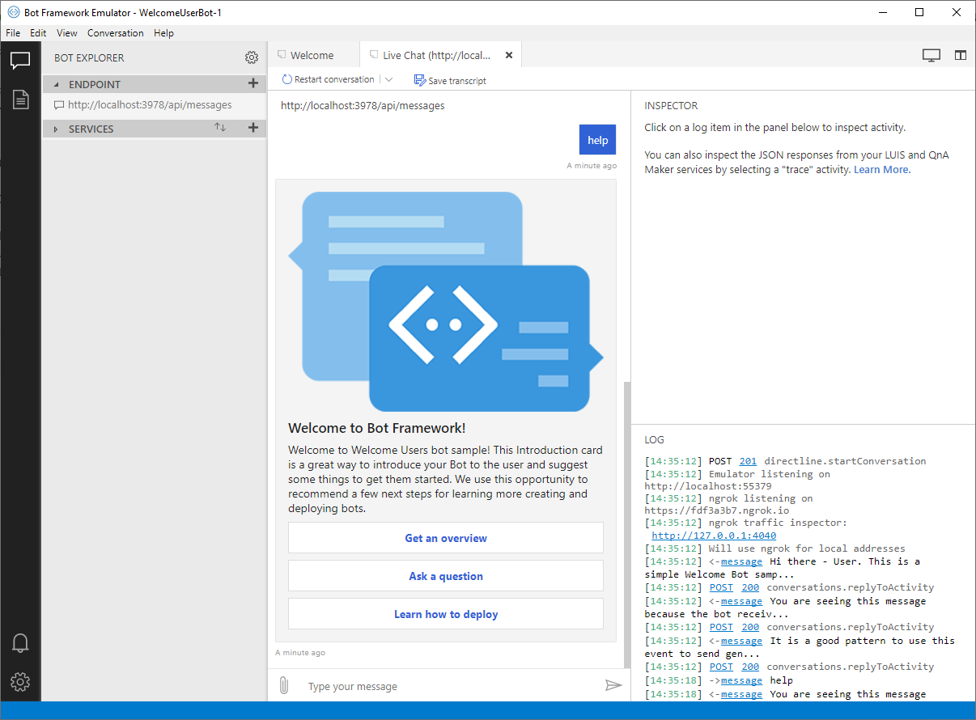
测试机器人
下载并安装最新的 Bot Framework Emulator
在计算机本地运行示例。 如需说明,请参阅 C# 示例或JavaScript 示例的 README 文件。
打开 Emulator 测试机器人。
当你开始与机器人对话时,它会向你发送一系列欢迎消息。
首次发送“hello”消息时,机器人会回复一些建议。
发送后续的“hello”消息时,机器人会回答“You said hello”。
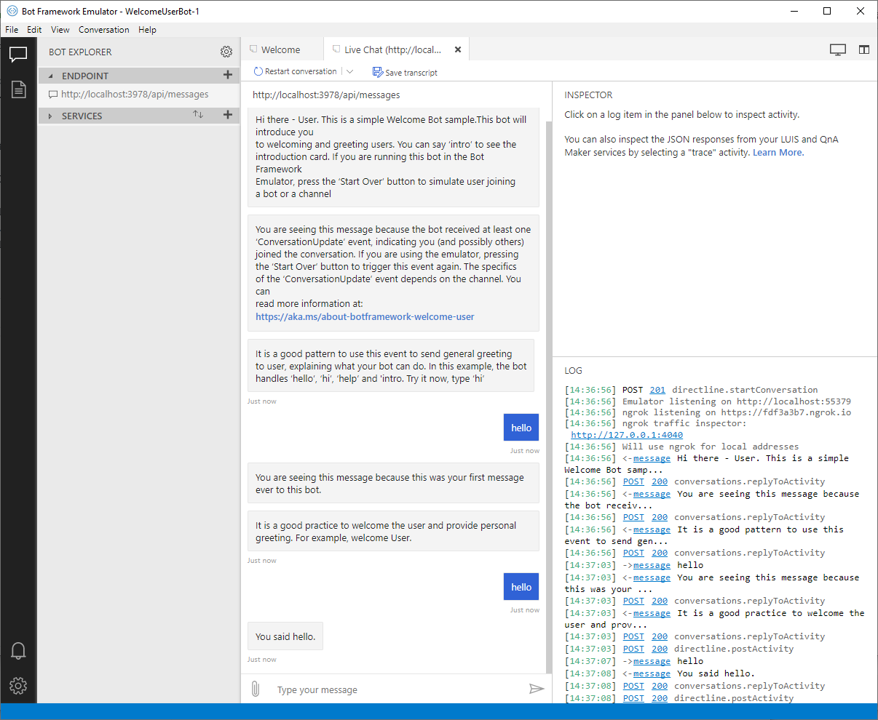
向你的机器人发送一条“help”消息。 它会发送一张英雄卡片作为响应。
其他资源
在向消息添加媒体一文中详细了解各种媒体响应。
后续步骤