适用于:Azure Logic Apps(消耗 + 标准)
“转换 XML”和“Liquid”等工作流操作需要映射才能执行其任务。 例如,“转换 XML”操作需要映射才能在格式之间转换 XML。 映射是一个 XML 文档,描述如何将数据从 XML 转换为另一种格式。 映射内容包含源 XML 架构作为输入,目标 XML 架构作为输出。 你可以定义一个基本转换,例如,将名称和地址从一个文档复制到另一个文档。 或者,可以使用现成可用的映射操作创建更复杂的转换。 可以使用不同的内置函数来操作或控制数据,如字符串操作、条件分配、算术表达式、日期时间格式化程序甚至是循环构造。
例如,假设你从使用 YearMonthDay 日期格式 (YYYYMMDD) 的客户定期接收 B2B 订单或发票。 但是,你的组织使用 MonthDayYear 日期格式 (MMDDYYYY)。 在将订单或发票详细信息存储在客户活动数据库中之前,可以定义并使用一个映射,以便将 YYYYMMDD 格式转换为 MMDDYYYY 格式。
本指南演示如何为您的工作流添加地图以供使用。 可以将映射添加到链接集成帐户,或者如果你有标准逻辑应用,则可以直接将映射添加到逻辑应用资源。
先决条件
Azure 帐户和订阅。 如果还没有订阅,请注册 Azure 帐户。
要上传的地图。
消耗工作流支持以下映射类型: Liquid、 XSLT、 XSLT 2.0、 XSLT 3.0 或 HIDX。
标准工作流支持以下映射类型: XSLT、 XSLT 2.0 和 XSLT 3.0。
要创建映射,可以使用以下任何工具:
Visual Studio Code 和数据映射器扩展。 若要从工作流调用使用数据映射器创建的映射,必须使用名为“使用数据映射器 XSLT 进行转换”的“数据映射器操作”操作,而不是名为“转换 XML”的“XML 操作”操作。 有关详细信息,请参阅使用 Visual Studio Code 为数据转换创建映射。
Visual Studio 2019 和 Azure 逻辑应用企业集成工具扩展。
注意
不要将 Azure 逻辑应用企业集成工具扩展与 BizTalk Server 扩展一起安装。 同时安装这两个扩展可能会导致意外行为。 请确保只安装其中一个扩展。
在高分辨率监视器上,可能会在 Visual Studio 中遇到地图设计器显示问题。 若要解决此显示问题,请在 DPI 无感知模式下重启 Visual Studio 或添加 DPIUNAWARE 注册表值。
有关详细信息,请查看本文中的创建映射部分。
你需要集成帐户资源,具体取决于你使用的是消耗型还是标准型逻辑应用工作流。 通常,当你想要定义和存储项目以将其用于企业集成和 B2B 工作流时,你需要此资源。
重要
若要协同工作,集成帐户和逻辑应用资源必须存在于同一 Azure 订阅和 Azure 区域中。
对于消耗逻辑应用工作流,需有一个链接到逻辑应用资源的集成帐户。
对于标准逻辑应用工作流,可以根据以下情况将集成帐户与逻辑应用资源相连,直接上传映射到逻辑应用资源,或者同时进行:
如果你已经有一个包含所需工件或要使用的工件的集成帐户,可以将该集成帐户链接到要在其中使用工件的多个标准逻辑应用资源。 这样,就不必将映射上传到每个单独的逻辑应用。 有关详细信息,请查看将逻辑应用资源链接到集成帐户。
通过 Liquid 内置连接器,可选择一个以前上传到逻辑应用资源或链接集成帐户的映射,但不能同时选择这两个选项。
因此,如果你没有集成帐户,或者你不需要集成帐户,可以使用上传选项。 否则,可以使用链接选项。 采用上述任一方式,都可以在同一逻辑应用程序的所有子工作流中使用这些工件。
消费和标准工作流支持引用外部程序集的映射,使得可以直接从映射调用自定义的 .NET 代码。 为了支持此功能,消耗工作流还具有以下要求:
需要一个 64 位程序集。 转换服务运行 64 位进程,因此不支持 32 位程序集。 如果有 32 位程序集的源代码,请将此代码重新编译为 64 位程序集。 如果没有源代码,但从另一个提供程序获取了二进制文件,请从该提供程序获取 64 位版本。 例如,某些供应商在包中提供有 32 位和 64 位版本的程序集。 如果可以选择,请改用 64 位版本。
必须按特定的顺序将程序集和映射上传到集成帐户。 请确保先上传您的程序集,然后上传引用该程序集的地图。
如果程序集或映射为 2 MB 或更小,你可以直接从 Azure 门户将程序集和映射添加到集成帐户。
如果程序集大于 2 MB 但不超过程序集大小限制,则需要可上传程序集的 Azure 存储帐户和 Blob 容器。 稍后,在将程序集添加到集成帐户时,可以提供该容器的位置。 对于此任务,下表描述了所需的项:
项目 说明 Azure 存储帐户 在此帐户中创建程序集的 Azure Blob 容器。 了解如何创建存储帐户。 Blob 容器 可在此容器中上传程序集。 将程序集添加到集成帐户时,也需要此容器的内容 URI 位置。 了解如何创建 Blob 容器。 Azure 存储资源管理器 借助此工具可以更轻松地管理存储帐户和 Blob 容器。 若要使用存储资源管理器, 请下载并本地安装 Azure 存储资源管理器。 然后,遵循存储资源管理器入门中的步骤将存储资源管理器连接到存储帐户。 有关详细信息,请参阅 快速入门:使用 Azure 存储资源管理器在对象存储中创建 Blob。 若要添加较大的映射,可以使用 Azure 逻辑应用 REST API - 映射。 对于标准型工作流,Azure 逻辑应用 REST API 目前不可用。
限制
限制适用于每个集成帐户的工件数量,例如地图。 有关详细信息,请查看 Azure 逻辑应用的限制和配置信息。
根据你使用的是消耗型还是标准型逻辑应用工作流,适用以下限制:
创建地图
可以使用具有数据映射器扩展的 Visual Studio Code 或具有 Azure 逻辑应用企业集成工具扩展的 Visual Studio 来创建映射。
Visual Studio Code
使用 Visual Studio Code 和数据映射器扩展创建映射时,可以从工作流调用这些映射,但只能使用名为“使用数据映射器 XSLT 进行转换”的“数据映射器操作”操作,而不是名为“转换 XML”的“XML 操作”操作。 有关详细信息,请参阅使用 Visual Studio Code 为数据转换创建映射。
Visual Studio
如果使用 Visual Studio 创建地图,则需要使用 Visual Studio 2019 和 Azure 逻辑应用企业集成工具扩展创建集成项目。
在集成项目中,可以生成用于直观地在两个 XML 架构文件之间映射项的集成映射文件。 这些工具提供以下映射功能:
您正在使用地图的图形表示形式,它显示您创建的所有关系和链接。
你可以在用于创建映射的 XML 架构之间直接进行数据复制。 Visual Studio 的企业集成 SDK 包含一个映射器,它能够使此任务变得非常简单,就如同绘制一条线将源 XML 架构中的元素与目标 XML 架构中的对应元素连接到一起一样。
针对多个映射的操作或函数已提供,包括字符串函数、日期时间函数等。
若要添加示例 XML 消息,可以使用映射测试功能。 只需一个手势,就能测试创建的映射并查看生成的输出。
生成你的项目后,你会获得一个 XSLT 文档。
您的图必须具备以下属性,并且包含一个调用程序集代码的 CDATA 部分。
name是自定义程序集名称。namespace是程序集中的包含自定义代码的命名空间。
此示例演示了一个映射,该映射引用名为“XslUtilitiesLib”的程序集并从该程序集调用 circumference 方法。
<?xml version="1.0" encoding="UTF-8"?>
<xsl:stylesheet version="1.0" xmlns:xsl="http://www.w3.org/1999/XSL/Transform" xmlns:msxsl="urn:schemas-microsoft-com:xslt" xmlns:user="urn:my-scripts">
<msxsl:script language="C#" implements-prefix="user">
    <msxsl:assembly name="XsltHelperLib"/>
    <msxsl:using namespace="XsltHelpers"/>
    <![CDATA[public double circumference(int radius){ XsltHelper helper = new XsltHelper(); return helper.circumference(radius); }]]>
</msxsl:script>
<xsl:template match="data">
<circles>
    <xsl:for-each select="circle">
        <circle>
            <xsl:copy-of select="node()"/>
                <circumference>
                    <xsl:value-of select="user:circumference(radius)"/>
                </circumference>
        </circle>
    </xsl:for-each>
</circles>
</xsl:template>
</xsl:stylesheet>
添加引用的程序集
消耗逻辑应用资源支持从映射引用外部程序集,这些程序集支持直接从映射调用自定义 .NET 代码。
在 Azure 门户搜索框中,输入集成帐户,然后选择集成帐户。
选择要将程序集添加到的集成帐户。
在集成帐户菜单上,选择“ 概述”。 在“设置”下选择“程序集” 。
在“程序集”页面工具栏上,选择“添加”。
根据程序集文件的大小,遵循相应的步骤来上传不超过 2 MB 或大于 2 MB 但不超过 8 MB 的程序集。 有关集成帐户中程序集数量的限制,请查看 Azure 逻辑应用的限制和配置。
注意
如果更改了程序集,无论映射是否发生变化,都必须更新映射。
添加不超过 2 MB 的程序集
在“添加程序集”下,输入程序集的名称。 将“小文件”保持选定状态。 点击“程序集”框旁边的文件夹图标。 找到并选择要上传的程序集。
选择程序集后,“程序集名称”属性会自动显示该程序集的文件名。
完成后,请选择“确定”。
完成程序集文件上传后,该程序集将显示在“程序集”列表中。 在集成帐户 “概述 ”页上的 “项目”下,也会显示上传的程序集。
添加 2 MB 以上的程序集
若要添加更大的程序集,可将程序集上传到 Azure 存储帐户中的 Azure Blob 容器。 添加程序集的步骤因 Blob 容器是否具有公共读取访问权限而异。 因此,首先请执行以下步骤检查 Blob 容器是否具有公共读取访问权限:为 Blob 容器设置公共访问级别
检查容器访问级别
打开 Azure 存储资源管理器。 在“资源管理器”窗口中,展开你的 Azure 订阅。
展开 存储帐户><存储帐户名称>>Blob 容器。 选择你的 Blob 容器。
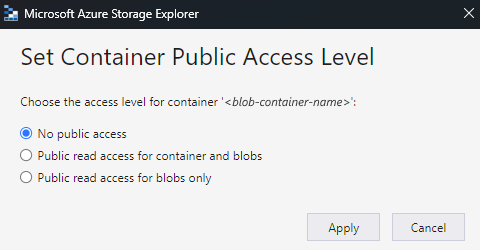
在 Blob 容器的快捷菜单中,选择“设置公共访问级别”。
如果 Blob 容器至少具有公共访问权限,请选择“取消”,并执行本页稍后所述的步骤:上传到具有公共访问权限的容器
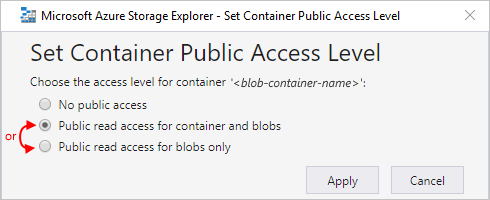
如果 Blob 容器没有公共访问权限,请选择“取消”,并执行本页稍后所述的步骤:上传到没有公共访问权限的容器
上传到具有公共访问权限的容器
若要将程序集上传到 Blob 容器,请执行以下步骤:
打开 Azure 存储资源管理器(如果尚未打开)。 在“资源管理器”窗口中,展开你的 Azure 订阅。
展开 存储帐户><存储帐户名称>>Blob 容器。 选择要添加程序集的 Blob 容器。
在 Blob 容器工具栏上,选择“ 上传>上传文件”。 在“上传文件”框中,浏览到并选择程序集文件。 准备就绪后,选择“ 上传”。
上传完成后,打开已上传程序集的快捷菜单,然后选择“ 复制 URL”。
返回 Azure 门户,其中已打开“添加程序集”窗格。 输入程序集的名称。 选择“大文件(大于 2 MB)”。
此时会显示“内容 URI”框而不是“程序集”框。
在“内容 URI”框中,粘贴程序集的 URL。 完成添加程序集。
完成程序集上传后,该程序集将显示在“程序集”列表中。 在集成帐户 “概述 ”页上的 “项目”下,也会显示上传的程序集。
上传到没有公共访问权限的容器
若要将程序集上传到 Blob 容器,请执行以下步骤:
打开 Azure 存储资源管理器(如果尚未打开)。 在“资源管理器”窗口中,展开你的 Azure 订阅。
展开 存储帐户><存储帐户名称>>Blob 容器。 选择要添加程序集的 Blob 容器。
在 Blob 容器工具栏上,选择“ 上传>上传文件”。 在“ 上传文件 ”框中,浏览到并选择程序集文件。 准备就绪后,选择“ 上传”。
上传完成后,为程序集生成共享访问签名 (SAS)。 在程序集的快捷菜单中,选择“获取共享访问签名”。
在 “共享访问签名 ”框中,查看可用选项。 准备就绪后,选择“创建”。 存储资源管理器生成 SAS URL 后,在 URL 框下,选择“ 复制”。
返回 Azure 门户,其中已打开“添加程序集”窗格。 输入程序集的名称。 选择“大文件(大于 2 MB)”。
现在会出现“内容 URI”框,而不是“程序集”框。
在 “内容 URI ”框中,粘贴之前创建的 SAS URI。 完成程序集的添加。
完成程序集上传后,该程序集将显示在“程序集”列表中。 在您的集成帐户的概述页下的工件部分,您上传的程序集也会显示。
添加地图
如果使用的是消费型工作流,则必须将映射添加到关联的集成帐户。
如果使用的是标准型工作流,则有以下选项:
将地图添加到链接集成帐户。 可以在多个标准型逻辑应用资源及其子工作流之间共享映射和集成帐户。
将映射直接添加到逻辑应用资源。 但是,只能在同一逻辑应用资源中的子工作流之间共享该映射。
将映射添加到集成帐户
在 Azure 门户中,使用 Azure 帐户凭据登录。
在 Azure 门户搜索框中,输入“集成帐户”,然后选择“集成帐户”。
找到并选择你的集成帐户。
在集成帐户菜单的设置下,选择映射。
在 “地图 ”页面工具栏上,选择“ 添加”。
对于消耗型工作流,根据映射的文件大小,现在按照相应的步骤上传不超过 2 MB 或大于 2 MB 的映射。
添加不超过 2 MB 的地图
在“添加映射”窗格中,输入映射的唯一名称。
在 “映射类型”下,选择类型,例如: Liquid、 XSLT、 XSLT 2.0、 XSLT 3.0 或 HIDX。
在“地图”框旁边,选择文件夹图标。 选择要上传的映射,然后选择“ 打开”。
如果将“名称”属性留空,则选择映射文件后,映射的文件名将自动显示在该属性中。
完成后,请选择“确定”。
完成映射文件上传后,该映射将显示在“映射”列表中。 如果未显示地图,请在 “地图” 工具栏上选择“ 刷新”。 在你的集成帐户概述页面的项目下,你上传的映射也会显示。
添加大于 2 MB 的地图
若要为消耗型工作流添加更大的映射,请使用 Azure 逻辑应用 REST API - 映射。
将映射添加到标准型逻辑应用资源
仅当想要将地图直接添加到标准逻辑应用资源时,以下步骤才适用。 否则,请将地图添加到集成帐户。
Azure 门户
在逻辑应用菜单上的工件下,选择映射。
在 “地图 ”页面工具栏上,选择“ 添加”。
在 “添加映射 ”窗格中,输入地图的唯一名称,并包括文件扩展名,例如 .xslt、 .hidx 或 .liquid。
选择Map框旁边的文件夹图标。 选择要上传的地图。
完成后,请选择“确定”。
完成映射文件上传后,该映射将显示在“映射”列表中。 在您的集成帐户“概览页面”的“制品”下,也会显示您上传的地图。
Visual Studio Code
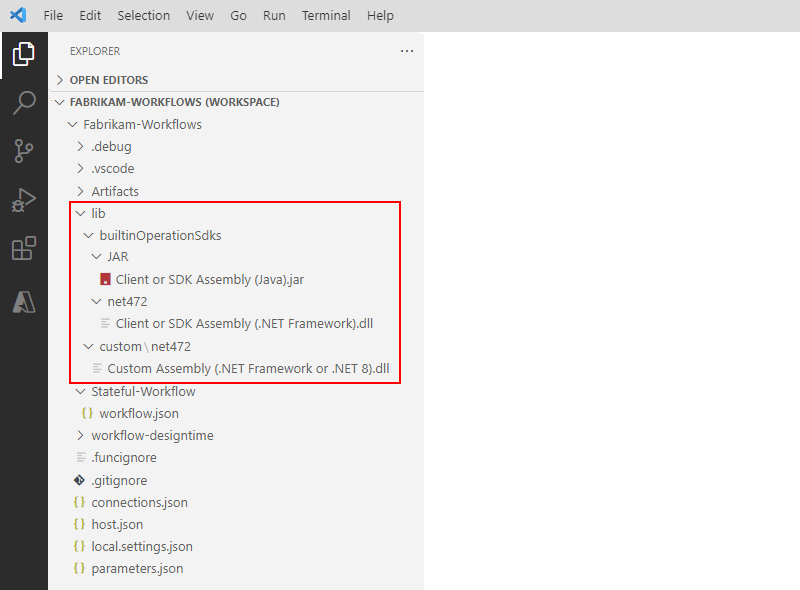
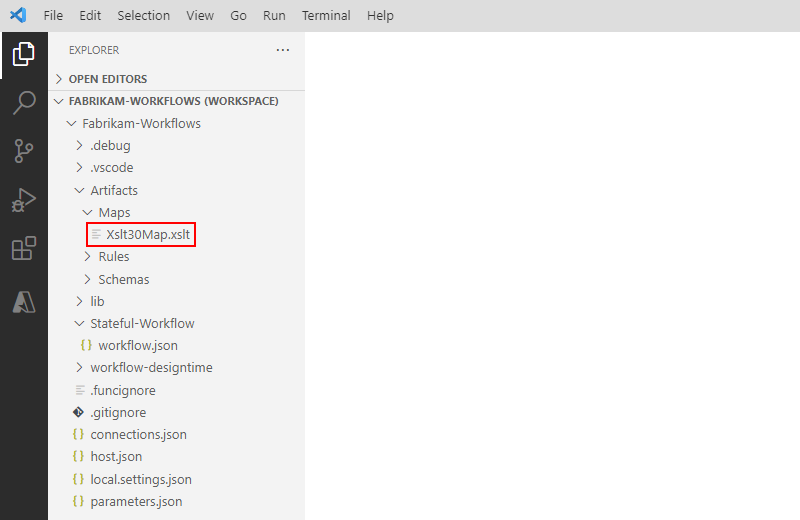
在计算机上,转到项目的 本地 文件夹,然后展开以下文件夹: Artifacts>Maps。
在 “地图” 文件夹中,添加地图文件。
返回到 Visual Studio Code。
地图文件现在显示在项目中,例如:
编辑地图
若要更新现有的映射,必须上传一个新的映射文件,其中包含所要做出的更改。 不过,您可以先下载现有地图进行编辑。
在 Azure 门户中,打开你的集成帐户(如果尚未打开)。
在集成帐户菜单的设置下,选择映射。
“ 地图” 页打开后,选择地图。 若要首先下载和编辑地图,请在 “地图 ”页面工具栏上选择“ 下载”,然后保存地图。
准备好上传更新的地图后,在 “地图” 页上,选择要更新的地图。 在 “地图 ”页面工具栏上,选择“ 更新”。
找到并选择要上传的更新地图。
完成映射文件上传后,更新的映射将显示在“映射”列表中。