Note
Access to this page requires authorization. You can try signing in or changing directories.
Access to this page requires authorization. You can try changing directories.
Applies to: Azure Logic Apps (Consumption + Standard)
From a workflow in Azure Logic Apps, you can connect to Azure Cosmos DB and work with documents by using the Azure Cosmos DB connector. For example, you can use connector operations to create, update, read, query, or delete documents.
You can connect to Azure Cosmos DB from both Consumption and Standard logic app workflows by using the managed connector operations, which are hosted, managed, and run in global, multitenant Azure. For Standard workflows, Azure Cosmos DB also provides built-in operations that run alongside the runtime for single-tenant Azure Logic Apps. Built-in operations offer better performance, higher throughput, and sometimes different functionality. For example, in a Standard workflow, you can use the built-in trigger to monitor an Azure Cosmos DB container for new or updated items. You can combine Azure Cosmos DB operations with others in a workflow to support scenarios like event sourcing and general data processing.
Limitations
Currently, only stateful workflows in a Standard workflow can use both the managed connector operations and built-in operations. Stateless workflows can use only the built-in operations.
The Azure Cosmos DB connector supports only Azure Cosmos DB accounts created with Azure Cosmos DB for NoSQL.
Prerequisites
An Azure account and subscription. Get a trial Azure account.
A logic app workflow from where you want to access an Azure Cosmos DB account. To use the Azure Cosmos DB built-in trigger, you need to start with a blank workflow.
Connector technical reference
For reference information about the Azure Cosmos DB managed connector operations, such as triggers, actions, and limits, see the managed connector's reference page.
For reference information about the Azure Cosmos DB built-in operations, such as triggers, actions, and limits, see the built-in operations reference page.
Add Azure Cosmos DB trigger
In Azure Logic Apps, every workflow must start with a trigger, which fires when a specific event happens or when a specific condition is met.
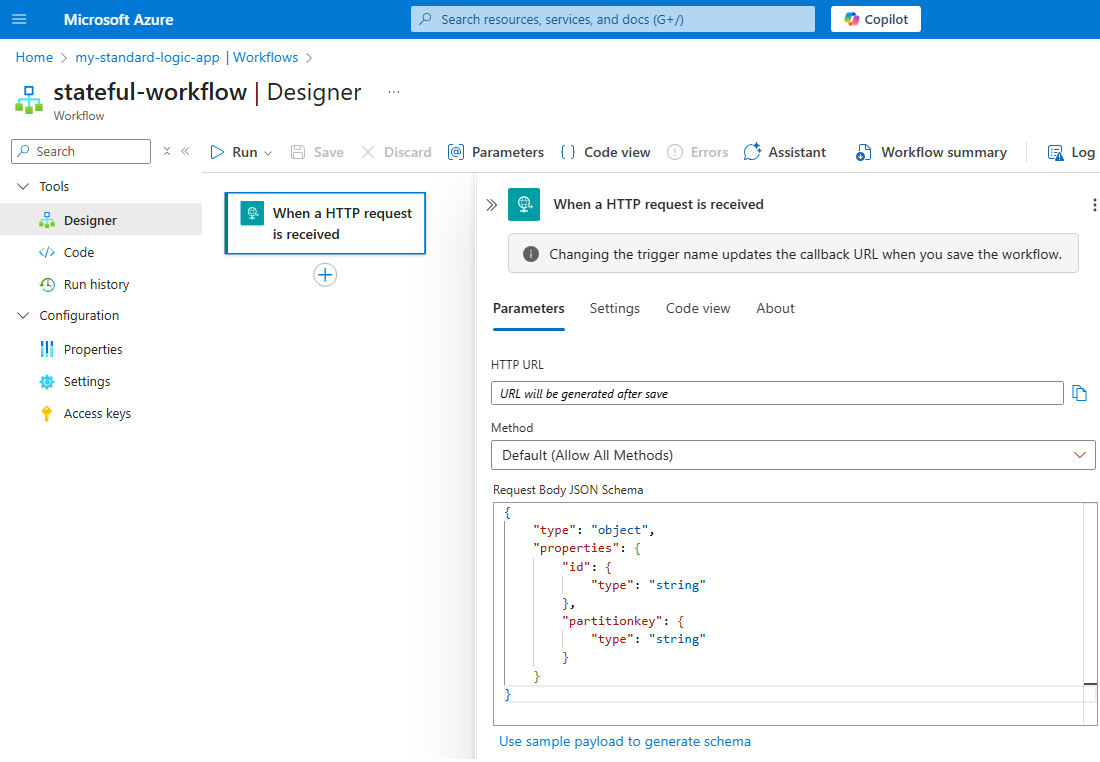
If you're working with a Standard workflow, the built-in trigger named When an item is created or modified is available and is based on the Azure Cosmos DB change feed design pattern. This trigger is unavailable for Consumption workflows.
No Azure Cosmos DB triggers are available for Consumption workflows. Instead, add a trigger that works for your scenario.

Add Azure Cosmos DB action
In Azure Logic Apps, an action is a step in a workflow that follows a trigger or another action. The Azure Cosmos DB connector offers actions for both Consumption and Standard workflows. The following examples show how to use an action that creates or updates a document.
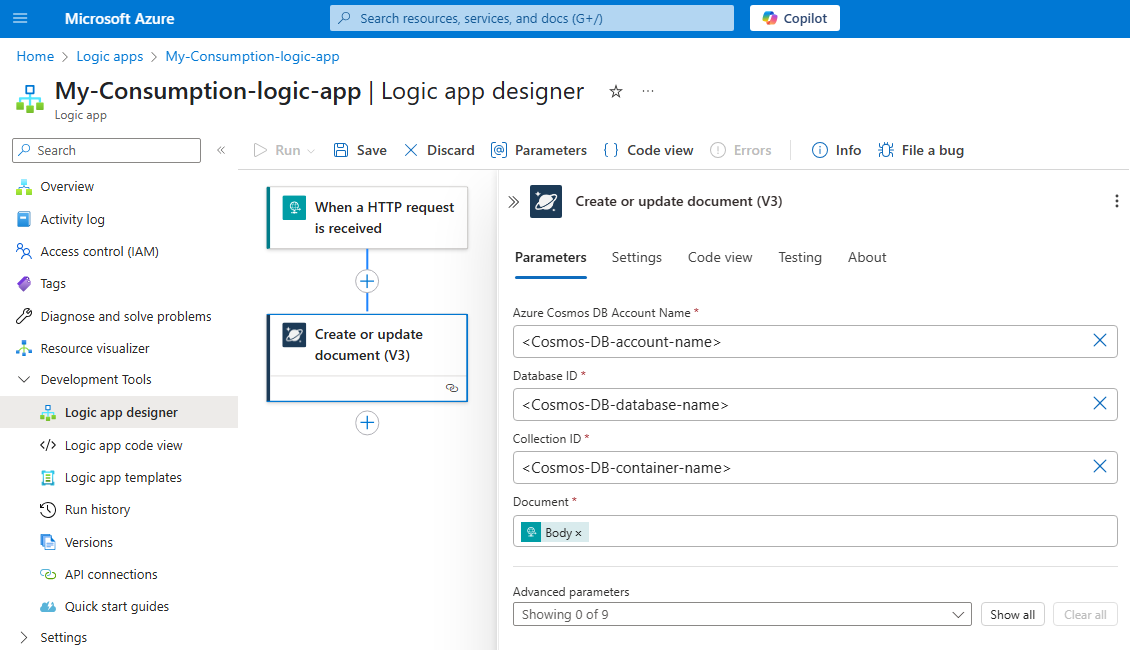
To add an Azure Cosmos DB action to a Consumption workflow, follow these steps:
In the Azure portal, open your Consumption workflow in the designer.
If the workflow is blank, add any trigger that you want.
This example starts with the When an HTTP request is received trigger.
Under the trigger or action where you want to add the Azure Cosmos DB action, follow these general steps to add the Azure Cosmos DB action that you want.
This example uses the action named Create or update document (V3).
If you're prompted for connection details, create a connection to your Azure Cosmos DB account now.
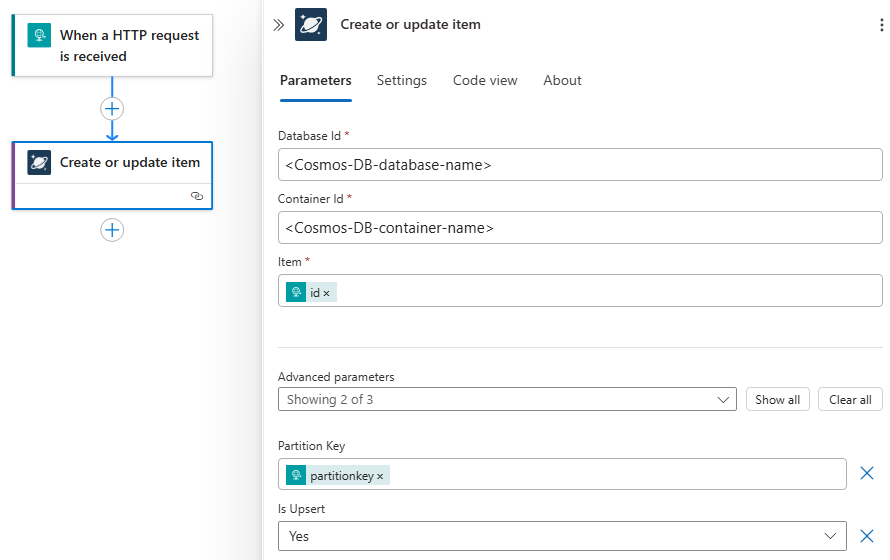
In the action information pane, on the Parameters tab, provide the following necessary information:
Parameter Required Value Description Azure Cosmos DB account name Yes <Cosmos-DB-account-name> The account name for the Azure Cosmos DB account. Database ID Yes <Cosmos-DB-database-name> The database to connect. Collection ID Yes <Cosmost-DB-container-name> The container to query. Document Yes <JSON-document> The JSON document to create. This example uses the request body from the trigger output.
Tip: If the HTTP trigger's Body token doesn't appear in the dynamic content list for you to add, next to the trigger name, select See more.
Note: Make sure that the body is well-formed JSON, and at a minimum, contains theidproperty and the partition key property for your document. If a document with the specifiedidand partition key exists, the document is updated. Otherwise, a new document is created.For example:
To add any other available parameters, open the Advanced parameters list.
Configure any other parameters or settings as needed.
On the designer toolbar, select Save.
Test the workflow to confirm that the action creates a document in the specified container.
Connect to Azure Cosmos DB
When you add a trigger or action that connects to a service or system, and you don't have an existing or active connection, Azure Logic Apps prompts you to provide the connection information, which varies based on the connection type, for example:
- A name to use for the connection
- Your account credentials
- The server or system name
- A connection string
- The authentication type to use
Before you can configure an Azure Cosmos DB trigger or Azure Cosmos DB action, you need to connect to a database account.
For a Consumption workflow, an Azure Cosmos DB connection requires the following information:
| Parameter | Required | Value | Description |
|---|---|---|---|
| Connection Name | Yes | <connection-name> | The name to use for the connection. |
| Authentication Type | Yes | <connection-type> | The authentication type to use. This example uses Access key. - If you select Access Key, provide the remaining required property values to create the connection. - If you select Microsoft Entra ID Integrated, no other property values are required, but you have to configure the connection by following the steps for Microsoft Entra authentication and Azure Cosmos DB connector. - To set up a managed identity, see Authenticate access and connections to Azure resources with managed identities in Azure Logic Apps. |
| Account ID | Yes | <account-ID> | The name for the Azure Cosmos DB account to use for this connection. |
| Access Key To Your Azure Cosmos DB Account | Yes | <access-key> | The access key for the Azure Cosmos DB account to use for this connection. This value is either a read-write key or a read-only key. Note: To find the key, go to the Azure Cosmos DB account page. In the account menu, under Settings, select Keys. Copy one of the available key values. |
Note
After you create the connection, if you have a different Azure Cosmos DB connection that you want to use instead, or if you want to create a new connection, select Change connection in the Parameters tab on the trigger or action information pane.
Configure managed identity authentication
To use a managed identity with the Azure Cosmos DB connector, you must first assign the appropriate Azure Cosmos DB data plane role to your managed identity. Azure Cosmos DB uses its own role-based access control (RBAC) system for data plane operations separately from Azure RBAC.
The built-in role named Cosmos DB Built-in Data Contributor (role definition ID: 00000000-0000-0000-0000-000000000002) grants read and write access to Azure Cosmos DB data. For more information, see Use data plane role-based access control with Azure Cosmos DB for NoSQL.
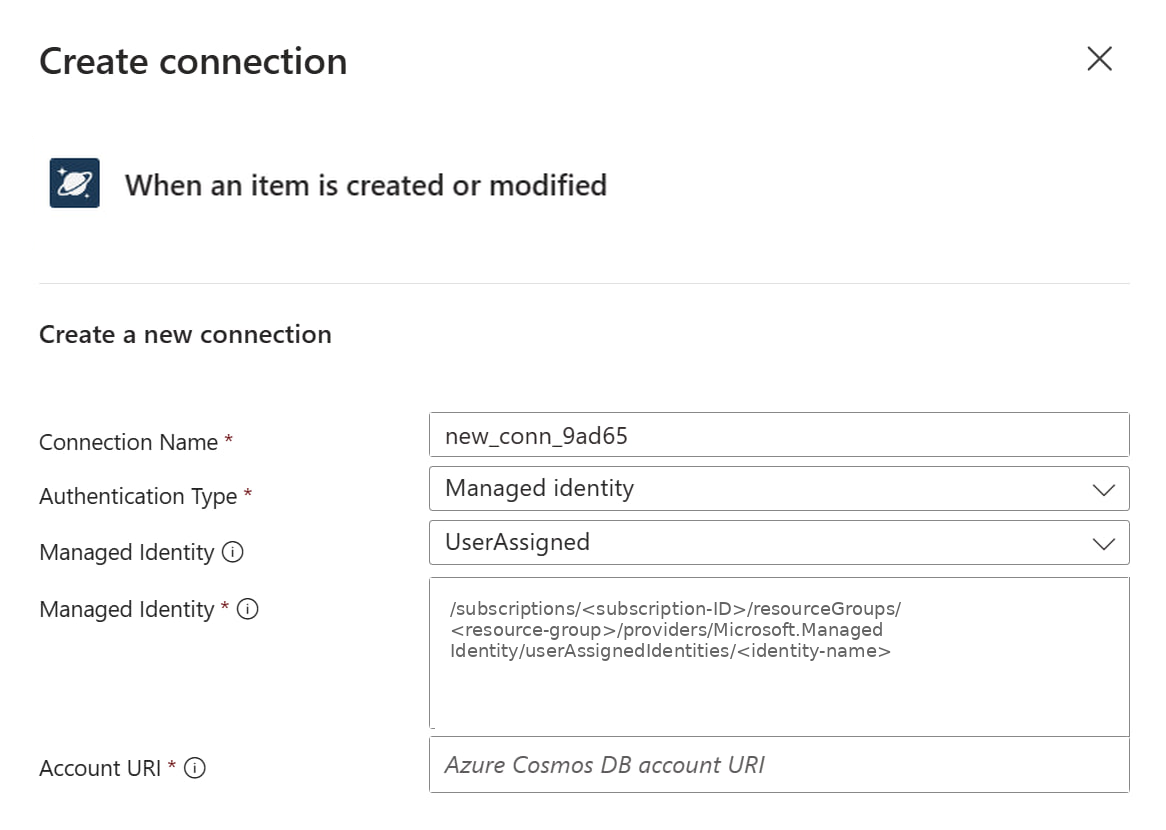
For Consumption workflows, when you create the Azure Cosmos DB connection, select Logic Apps Managed Identity as the authentication type. You don't need to provide any other property values, but make sure that you assign the Cosmos DB data plane role to your logic app's managed identity as described in the following sections.
For more information about Consumption managed identities, see Authenticate access and connections to Azure resources with managed identities in Azure Logic Apps.
Assign Cosmos DB data plane role to a system-assigned managed identity
To use a system-assigned managed identity, first make sure that the identity is enabled on your logic app resource. Then, get the principal ID for the identity and assign the Azure Cosmos DB data plane role.
In the Azure portal, go to your logic app resource. On the resource sidebar, under Settings, select Identity.
Confirm that the System assigned identity is set to On. Copy the Object (principal) ID value.
In Azure CLI, assign the Cosmos DB Built-in Data Contributor role to the system-assigned managed identity:
az cosmosdb sql role assignment create \
  --resource-group "<cosmos-db-resource-group>" \
  --account-name "<cosmos-db-account-name>" \
  --role-definition-id "00000000-0000-0000-0000-000000000002" \
  --principal-id "<system-assigned-identity-principal-id>" \
  --scope "/subscriptions/<subscription-id>/resourceGroups/<cosmos-db-resource-group>/providers/Microsoft.DocumentDB/databaseAccounts/<cosmos-db-account-name>"
Note
The
--scopeparameter defines the access level. You can scope the role assignment to the account level, a specific database, or a specific container. For more information, see Use data plane role-based access control with Azure Cosmos DB for NoSQL.
Assign Cosmos DB data plane role to a user-assigned managed identity
Before you can use a user-assigned managed identity, first create the identity, add it to your logic app, and then assign the Azure Cosmos DB data plane role.
Get the principal ID for your user-assigned managed identity. In Azure CLI, run the following command:
az identity show \
  --resource-group "<identity-resource-group>" \
  --name "<identity-name>" \
  --query principalId \
  --output tsv
Assign the Cosmos DB Built-in Data Contributor role to the user-assigned managed identity:
az cosmosdb sql role assignment create \
  --resource-group "<cosmos-db-resource-group>" \
  --account-name "<cosmos-db-account-name>" \
  --role-definition-id "00000000-0000-0000-0000-000000000002" \
  --principal-id "<user-assigned-identity-principal-id>" \
  --scope "/subscriptions/<subscription-id>/resourceGroups/<cosmos-db-resource-group>/providers/Microsoft.DocumentDB/databaseAccounts/<cosmos-db-account-name>"
When you create the Azure Cosmos DB connection in the workflow designer, provide the full resource ID of the user-assigned managed identity as the Managed identity value, for example:
/subscriptions/{subscription-id}/resourceGroups/{resource-group}/providers/Microsoft.ManagedIdentity/userAssignedIdentities/{identity-name}Tip
To find the full resource ID, follow these steps:
- In the Azure portal, go to the user-assigned managed identity resource.
- On the resource sidebar, select Overview.
- On the Overview page, find the Properties section, and then copy the Id value.
Best practices for Azure Cosmos DB built-in operations
Get iterable results from the Query items action
In a Standard workflow, the Query items built-in action produces many dynamic content output items for use in subsequent actions. To get the query result items or item metadata as an iterable object, follow these steps:
In the Azure portal, open your Standard workflow in the designer.
If the workflow is blank, add any trigger that you want.
This example starts with the Recurrence trigger.
Under the trigger or action where you want to add the Azure Cosmos DB action, follow these general steps to add the Azure Cosmos DB action named Query items.
If you're prompted for connection details, create a connection to your Azure Cosmos DB account.
In the action information pane, on the Parameters tab, provide the following necessary information:
Parameters Required Value Description Database Id Yes <database-ID> The database to connect. Container Id Yes <container-ID> The container to query. SQL Query Yes <sql-query> The SQL query for the request. The following example shows the Query items action:
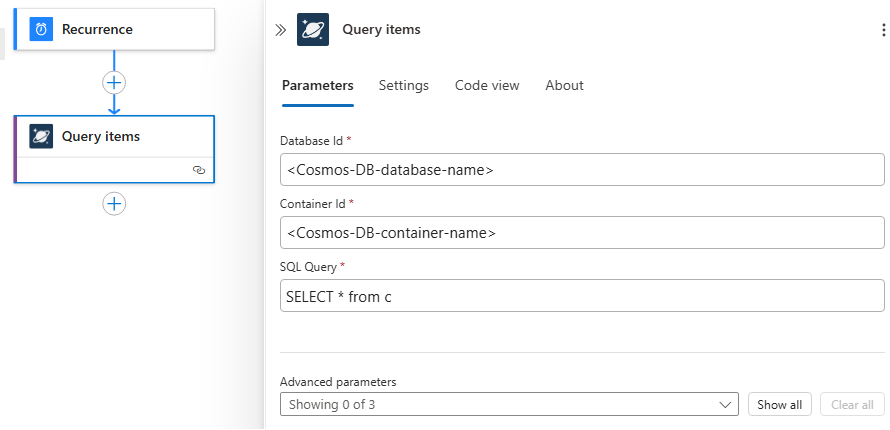
Configure any other parameters or settings as needed.
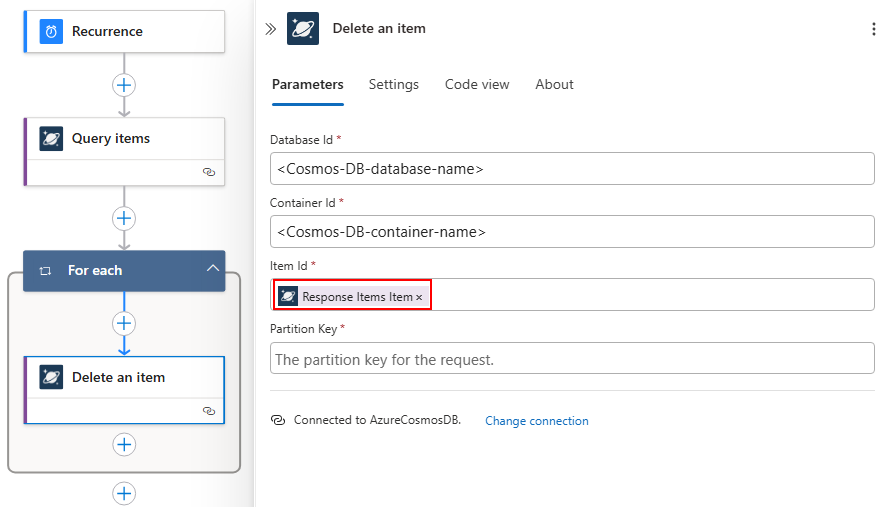
Under the Query items action, follow these general steps to add an action that you want to run on all the returned query items.
This example uses the Azure Cosmos DB built-in action named Delete an item.
In the Delete an item action, you can access outputs from the Query items action by following these steps:
Select inside any input field to show the available options.
Select the lightning icon to open the dynamic content list.
From the Query items section in the list, select the output you want, or select See more for more outputs.
For example, you can select Response Items Item to populate the Item Id field with IDs from the query results.
After you select the Response Items Item, the For each action is automatically added to iterate through all the query results. The For each loop contains the Delete an item action.
Add any other actions that you want to the loop.
On the designer toolbar, select Save.
Test the workflow to confirm that the actions return the output that you expect.